Deep Dive Recap: All About Appointments

Register for upcoming Monthly Deep Dives here.
From consultations to court dates to signing meetings, you undoubtedly schedule a plethora of appointments with potential clients. Lawmatics has all the tools you need to facilitate a smooth process, from the initial booking to confirmation, reminders, and post-meeting correspondences.
While you may know that all of these tools exist in Lawmatics, you may not yet be using them all to their full potential. We are thrilled to share this deep dive into every aspect of appointment in Lawmatics.
Calendar Sync
Before you even begin booking appointments, we first recommend that you sync your external calendar to Lawmatics. Note that this is an individual user setting, so each of your firm’s users can connect their own calendar account.
By initiating this sync, you permit that any of your appointments booked via Lawmatics to seamlessly sync onto your external calendar. The sync eliminates any need for you to be hopping back and forth between multiple calendars, such as your Google Calendar or Outlook and Lawmatics, when booking an appointment.
To sync your Calendar to Lawmatics:
- Navigate to the Settings page in Lawmatics by clicking the gear icon near the top right of your screen.
- Select Calendar from the left sidebar. If you have not yet synced your calendar, you will see options to sync for each calendar provider.
Once you have walked through the necessary steps, your page will look similar to the one shown below.
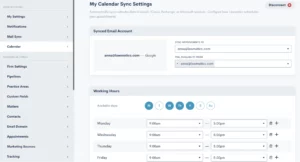
From here, you can easily select your availability hours as well as Buffer Time, Lunch Hour, and other availability settings. These options will come into play for our automatic scheduling, which we’ll discuss more later.
Appointment Settings
In addition to syncing your calendar, there are a few other settings relating to appointments that you’ll want to get squared away. Select Appointments from the main settings menu to get started.
First, make sure you create your firm’s various Appointment Types. This is an essential step before you begin booking appointments in Lawmatics. Appointment Types are used to distinguish between the different emails, reminders, follow-ups, etc that are used for each different type of appointment your firm may hold.
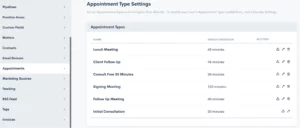
Note that these are completely customizable and can be edited or updated at any time.
Scheduling Appointments
Now that you have synced your calendar and set up your appointment types, you are ready to start booking appointments in Lawmatics.
Within the platform you will find many different ways to go about scheduling your appointments. Throughout your intake process you may wind up using some combination of these methods. Let’s walk through each of them.
Calendar
The first and perhaps the most obvious way to book an appointment is from the Calendar, found under the CRM tab. Simply select Calendar from the drop down menu, and you will then see a summary of your Lawmatics appointments, as well as your Tasks.
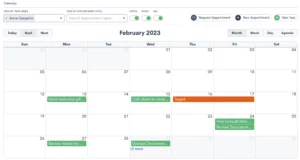
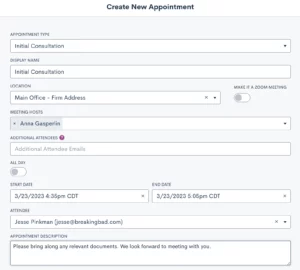
Click on the New Appointment button at the top of the page to book a new appointment. You will then be prompted to fill in details on the appointment and make selections such as the location, attendees, etc. No matter which method you choose to book an appointment from the options outlined here, you will see a similar window when scheduling.
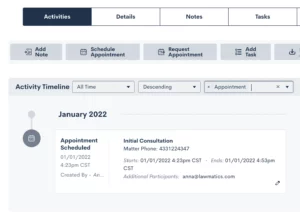
Matter Profile
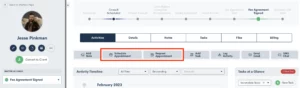
You can also book appointments directly from a matter’s profile. Simply navigate to the matter using either the search tool or clicking on their name from the pipeline, then click the Schedule Appointment button.
Note that there are two options for appointments, highlighted above. Schedule Appointment allows you to simply choose the date and time and book the appointment. Request Appointment on the other hand sends out a booking link for the recipient to choose their own appointment time based on the host’s availability. Read on to learn more about that feature.
Custom Form
Forms are another common method for booking appointments. If using an internal Form, you have the option to select either an Appointment field, or the Booking Request field, both highlighted below.
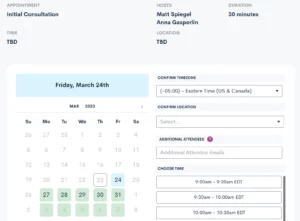
The Appointment can only be used on internal Forms, since it allows the internal firm user to select the exact date and time for scheduling the appointment. The Booking Request option gives the client the chance to schedule for themselves based on the host availability.
Booking Form
A Booking Form is similar to a Custom Form but with one exception, it will always contain a booking request whereas this is merely an option on a Custom Form. This scheduling method is great for embedding on your website, since it can simultaneously capture a new lead and prompt them to schedule their own appointment.
Bonus: Use a booking form with our new Payment Gateway feature to easily collect a consultation fee
Booking Link
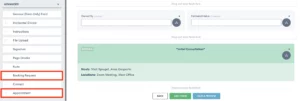
Last but not least, you can also use a simple Booking Link to allow leads or clients to book their own appointment. Booking links are generated from the Appointments page in settings, click the arrow icon (visible on the far right for each appointment type) and then make your selections as shown below.
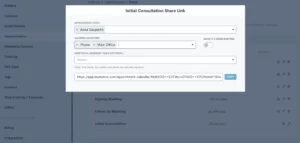
This link could be used in an email template, connected to a button on your website, or even used internally.
Confirming Appointments
Now that you know the ins and outs of booking appointments, it’s time to dive into the client experience side of things. Your leads and clients will absolutely love the experience of receiving an instant email or text message after they schedule letting them know that everything is confirmed and sharing any other pertinent details.
While you may be accustomed to using an Appointment Automation to confirm appointments, we’ve made this even easier with our new default confirmation option — no need to build a dedicated Automation any more.
When you navigate to the Appointments section of the Settings menu, you now have the option to create a Custom Email and/or SMS template for confirming each of your various appointment types. This confirmation will be sent automatically at the time the appointment is scheduled.
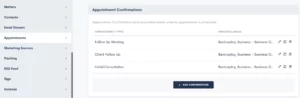
When setting up your Appointment Confirmations, you can create your own custom email template (along with any merge fields) and/or create a text message template as well.
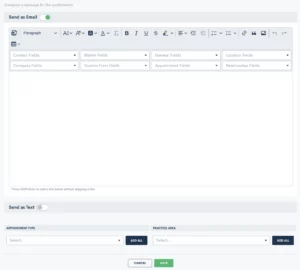
Make sure to select which appointment type(s) your confirmation applies to, as well as any practice area limitations that should apply for this confirmation. This setting allows you to easily set up various confirmation messages for different appointment types, without needing to create a bunch of separate automations.
Appointment Reminders
Similar to Appointment Confirmations, Appointment Reminders are also now set up on the Appointments page within settings. While you still have the option to use appointment Automations for sending out your reminders, we have made it much easier with this new built-in setting.
Much like with appointment confirmations, set up your appointment reminders for each appointment type.

Additionally, you may also set up multiple reminders for a single appointment type if you wish to have reminders go out on multiple time frames, such as 1 week before, 1 day before, etc.
Once again, you no longer need to build any Automations for confirming or reminding of your appointments. These simple settings will handle everything!
Rescheduling
In a perfect world, all clients would show for all of their appointments as scheduled. But unexpected conflicts do arise and thus rescheduling is often unavoidable. Thankfully, Lawmatics has simplified this as well.
When you use Booking Forms or Appointment Requests, you will always have the option to include a Reschedule option right within the scheduling module. So let’s say someone is booking their appointment. Immediately after they have chosen a date and time, they can simply return to the initial request and select an alternate time slot, as opposed to booking a new appointment all together.
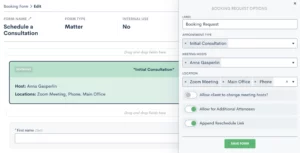
Above you see an example of the Reschedule Setting option within a Booking Form. Simply toggle that on to include the Reschedule Link.
In addition to using the Reschedule Link on automated Appointments, you can also manually reschedule any appointment by simply editing that Appointment either from the Calendar or from the Matter Profile, shown below.
Note that when an Appointment is rescheduled in Lawmatics it will also automatically be rescheduled to the new time on your external synced calendar.
Additionally, any Appointment Reminders that you have set up in your Settings as described above will also run as per the new time. Even if they had already been sent relative to the original appointment time, the reminders will resend based on the new date and time.
Conclusion
Lawmatics can tackle anything you throw at it when it comes to your appointments. A consultation with a new lead is often the first impression they have of your firm, so it is essential to make the scheduling process a smooth one.
From automated booking links to customized confirmations and reminders to easy rescheduling, appointments are sure to be a breeze with the help of Lawmatics.