
Monthly Deep Dive


Will AI replace lawyers? Artificial intelligence (AI) will not replace lawyers, but it is fundamentally changing how they get legal work done. As AI becomes more embedded in research, document review, and client intake, firms are increasingly automating many traditional legal tasks. This article examines whether AI can truly replace lawyers, which legal functions are most affected, how law firms are using AI today, and what these trends mean for associate attorneys navigating an AI-driven legal industry.
AI is already reshaping how your firm gets work done. It’s changing how you handle research, drafting, intake, billing pressure, and the future of associate work.
For many firms, the real question is how to use AI without disrupting the way they already work. Firms are figuring out where AI adds value and where attorneys still need to stay hands-on, while navigating how these tools change the work without changing who’s ultimately responsible.
In this guide, we’ll examine where AI affects legal tasks, why associate attorneys feel the most pressure, how firms are using AI today, and what the next 12-24 months are likely to bring.
Will AI Replace Lawyers or Just Change the Job?
The short answer is no: AI will not replace lawyers. What it can do is automate or accelerate certain tasks lawyers have traditionally handled manually, and that distinction matters.
When people ask, "Will lawyers be replaced by AI?" or "Can AI replace lawyers?" they are usually reacting to how quickly these tools have improved at summarizing information, reviewing documents, and generating draft language.
But those capabilities are not the same as practicing law. Lawyers are still responsible for legal judgment, ethical obligations, advocacy, and client outcomes. And courts, clients, and regulators continue to hold licensed attorneys accountable.
A better question is: “Which parts of your work is AI already automating, and what does that mean for you?”
Why Associate Attorneys Feel Most at Risk
If any group in the profession feels exposed by AI, it is associate attorneys. Associates often spend a large share of their time on high-volume, repeatable work:
- Document review
- Contract comparison
- Drafting from templates
- Follow-up tied to matters in progress
Those are also the kinds of tasks AI is taking on.
It’s no surprise that many associates feel pressure as these tasks shift. Many associates are already under pressure to be faster, more accurate, and easier to justify to cost-conscious clients.
But "most exposed" does not mean associates are the most likely to be replaced. It means the tasks that make up their role are among the first to be reshaped by AI, while expectations for more substantive work rise earlier.
Legal Tasks AI Can Replace or Automate
AI is most effective at handling structured, repetitive, text-heavy, and rules-based work that slows your team down.
Legal research and case summarization
AI is already changing the first layer of legal research. Attorneys can use it for a faster first pass to:
- Scan cases, statutes, and regulations quickly
- Summarize large volumes of text
- Highlight recurring themes
- Spot potential issues faster
That means less time gathering information and more time testing whether the output is accurate, relevant, and persuasive. These are the kinds of outputs that actually move cases forward.
Contract review and document analysis
Contract review is another area where AI can help. AI can be useful in due diligence, compliance review, procurement workflows, and any matter involving large volumes of contracts or standard language, including:
- Identifying clauses
- Comparing language across document sets
- Flagging deviations from standard terms
- Surfacing inconsistencies that manual review might otherwise miss
Many firms are also exploring legal document automation software to streamline repetitive drafting and review tasks while keeping attorneys in control of the final output.
Intake, qualification, and administrative work
Some of the fastest wins come from automating intake and follow-up with predefined criteria, so no potential client gets lost. These are areas where automation and AI can reduce a major administrative burden:
- Client intake
- Lead qualification and routing
- Follow-up
- Automated scheduling and reminders
Legal Tasks AI Cannot Replace
For all the attention on automation, there are still core parts of legal practice that AI cannot replace.
AI cannot replace certain legal tasks
Legal work often involves high-stakes decisions where the details matter, and the right call isn’t always obvious. Many matters require attorneys to navigate uncertainty, emotional dynamics, and practical risk in ways that go beyond pattern recognition.
Lawyers do more than surface information. They interpret ambiguity, weigh tradeoffs, and make recommendations when the answer is not obvious. AI can help organize information and support analysis, but legal judgment still depends on attorneys.
Advocacy and negotiation
Legal advocacy is deeply human. Whether in court, at a mediation table, or in a negotiation, persuasion depends on judgment, timing, credibility, listening, and adaptation.
Strong advocates read tone, pressure, resistance, leverage, and opportunity. AI can assist with preparation, but it cannot respond to the human dynamics that shape negotiation and advocacy in the moment.
Ethical responsibility and accountability
The biggest boundary in legal practice around AI use is accountability. Lawyers have ethical duties to clients, courts, and the profession, including competence, confidentiality, candor, supervision, and professional judgment.
Those duties still rest with attorneys. They must verify the work, protect client information, exercise judgment, and stand behind the advice they give.
How Law Firms Are Using AI Today
Law firms are using AI in several practical ways today. It supports legal work by improving intake and connecting workflows inside a legal client relationship management (CRM) system.
AI as an assistant, not a replacement
In many firms, AI is being used to accelerate research, support drafting, improve consistency, and reduce time spent on routine tasks. It helps attorneys work more efficiently, but they still have to review outputs, make decisions, and stand behind the final work product.
AI in client intake, lead qualification, and routing
One of the clearest applications of AI for law firms is in client intake. AI can help firms improve the quality of information they collect, apply qualification criteria more consistently, and move leads through the right next steps with less manual effort.
For example, AI can:
- Evaluate urgency: Identify inquiries that may need faster attention based on timing, case type, or stated circumstances.
- Screen for practice fit: Help determine whether a matter aligns with the firm’s services before teams spend time reviewing it.
- Assess lead quality: Apply defined qualification standards consistently to help teams focus on stronger opportunities. Tools like QualifyAI support this process by helping firms automate intake screening and matter qualification without crossing into the realm of legal advice.
- Collect intake information: Use custom forms and structured workflows to gather client details and create more complete records from the start.
- Route inquiries intelligently: Sort leads by priority, stage, or next step and direct them to the right person or process.
- Automate follow-up: Trigger responses, reminders, and outreach to ensure promising leads do not stall due to delayed communication.
- Support scheduling: Move qualified leads into consultations with less back-and-forth and fewer manual touchpoints.
- Reduce administrative drag: Improve upstream intake so attorneys spend less time on triage and more time on billable work.
AI paired with legal CRM workflows
AI becomes more useful when it works inside a broader system. That works best when legal CRM software and legal software integrations connect intake, follow-up, and client information into a single centralized system.
When intake data flows directly into a centralized CRM, follow-up can happen automatically, and attorneys can work from more complete, organized information.
What Will Actually Change for Associate Attorneys in the Next 12-24 Months
The table below illustrates which legal tasks firms are already automating, which are likely to change in the next 12-24 months, and which still depend on human judgment.
| Legal task category | Examples of tasks | Level of AI impact | Timeline |
|---|---|---|---|
| Intake and administrative work | Intake data collection, lead qualification, follow-up, and scheduling | High | Already happening |
| Legal research and summarization | First-pass case law research, statute summaries, issue spotting | High | Already happening |
| Contract review and analysis | Clause identification, risk flagging, document comparison | High | Already happening |
| Drafting standard legal documents | Routine motions, template-based agreements with attorney review | Medium | 12-24 months |
| Litigation prep and discovery support | Document organization, evidence tagging, timeline creation | Medium | 12-24 months |
| Intake decision support | Applying firm-defined qualification rules without legal advice | Medium | Already happening |
| Legal judgment and strategy | Case strategy, risk assessment, application of law to facts | Low | Unlikely to be replaced |
| Client counseling and advocacy | Client advice, negotiation, courtroom advocacy | Low | Unlikely to be replaced |
| Ethical and professional accountability | Malpractice liability, ethical judgment, licensing responsibility | None | Not replaceable |
Fewer low-value tasks, higher expectations
Associates will likely spend less time on intake administration, document work, and other repetitive tasks that can be standardized. As a result, firms may expect associates to handle more substantive work earlier.
As routine work takes up less of the role, firms may place greater value on analytical skills, precision, and the ability to take on client-facing responsibility.
Faster feedback loops
AI-assisted systems can make performance more visible. When workflows are digitized and standardized, firms can see turnaround times, follow-up completion, response rates, matter progression, and other indicators sooner.
Faster feedback loops help strong associates stand out while also making expectations around consistency and execution clearer across the board.
Increased leverage for AI-literate associates
The associates who benefit most from AI will be the ones who adopt it quickly and use it responsibly. That starts with understanding how to prompt, review, verify, and refine outputs. It also involves knowing where automation adds value and where it introduces risk.
The real advantage comes from turning saved time into stronger work, not just faster work.
The real risks of AI in legal practice
AI can create leverage, but only if you understand the risks that come with it. Key concerns include:
- Hallucinations and inaccurate outputs: AI can produce confident-sounding errors, including fabricated citations, misread authority, or oversimplified legal distinctions. In legal work, every output requires attorney verification.
- Confidentiality and data privacy: Firms must handle client information carefully, and not every AI tool is appropriate for legal workflows. Tools can create risk when firms do not understand how data is processed, stored, or reused. That is why firms need clear policies, controlled workflows, and tools built for legal use cases.
- Unauthorized practice of law: AI cannot independently provide legal advice. Firms can use AI to support intake, qualification, and internal workflows, but if implementation crosses into unsupervised legal advice, the risk becomes regulatory exposure.
- Over-reliance and skill atrophy: Attorneys still need to build judgment, pattern recognition, and analytical strength. If AI is responsible for too much thinking, it can result in weaker legal reasoning over time.
How Associate Attorneys Can Future-Proof Their Careers
The strongest position is knowing where AI supports your legal work and where your judgment still matters most.
Focus on high-judgment legal work
The more your value depends on strategy, counseling, nuanced analysis, negotiation, and client communication, the harder you are to replace. Look for opportunities to build skills in asking better questions, improving communication, and taking ownership of recommendations.
Become AI-literate, not AI-dependent
Lawyers do not need to become AI experts. They need to understand how AI fits into their day-to-day workflows.
Learning how to evaluate outputs, identify weak reasoning, spot missing context, and supervise automated processes will better equip you to leverage AI without becoming dependent on it.
Use AI to protect billable work
AI should protect time for more meaningful work. When firms automate low-value administrative steps, intake bottlenecks, or repetitive drafting processes, you can focus your time where it adds the most value: analysis, advocacy, and client service.
The Future of Law in an AI-Driven Legal Profession
AI isn’t changing who’s responsible for legal work. It’s changing how efficiently you can get that work done.
For attorneys, AI is most useful when it automates administrative tasks and streamlines intake, follow-up, and qualification, allowing them to spend more time on substantive legal work.
As a legal CRM, Lawmatics helps firms automate intake, follow-up, and qualification through custom automations. You receive better information and fewer administrative bottlenecks, so you can spend more time practicing law.
To see how AI-supported intake fits into a modern Legal CRM, request a demo.
FAQ
Will AI replace lawyers entirely?
No. AI can automate parts of legal work, but it cannot replace legal judgment, ethical accountability, or advocacy. Lawyers are still responsible for advising clients, applying the law to specific facts, and standing behind the decisions and filings.
Are associate attorneys more vulnerable to AI?
Associate attorneys are more affected by AI-driven task automation because early-career roles often include more routine, document-heavy, and process-driven work. With AI, the structure of their work is changing, with more emphasis on analysis, judgment, and client-facing readiness.
Can AI practice law on its own?
No. AI cannot practice law independently or provide legal advice without attorney oversight. It can support research, intake, and administrative workflows, but licensed attorneys are still responsible for verifying outputs, protecting client information, and exercising professional judgment.
What legal work is safest from AI?
Legal work that depends on strategy, advocacy, negotiation, and client counseling is the least likely to be automated. These responsibilities require judgment, persuasion, relationship management, and the ability to respond to nuanced facts and human dynamics.
Should lawyers be worried about AI?
Lawyers should prepare for change, but not assume AI is replacing the profession. Firms and attorneys who learn how to use AI responsibly will be in a stronger position than those who ignore it.

This month, we’re pulling back the curtain on the workflows and go-to tools that help three attorneys — and Lawmatics power users — run their firms with efficiency. These experts share their secrets to mastering three critical stages of the client journey: attracting qualified leads, nurturing them into clients, and onboarding new clients seamlessly.In this exclusive roundtable, our panelists dive deep into what’s driving results for their firms, offering practical insights and actionable tips that any attorney can use to streamline operations and accelerate growth.
Panelists

Clare Struzzi
Account Management Team Lead,Lawmatics

Conti Moore Smith
Owner & Managing Partner,Conti Moore Law Divorce Lawyers

Shawnna Riggers
Owner & Attorney,Arizona Family Law Attorneys

Patrick Patino
Owner & Attorney,High Five Legal
Time Stamps of Key Takeaways
3:55 — Attracting quality leads with precision
When it comes to client intake, precision is the name of the game. The self-styled ‘MacGuyver of Law Firms’ Patrick Patino shares how High Five Legal leverages the Lawbrokr integration with Lawmatics, in conjunction with Lawmatics custom forms, to ensure only the most qualified leads make their way to his desk. Think of it as a finely-tuned filter, separating the gold from the gravel.
14:30 — Nurturing leads and sealing the deal
Once the custom forms have filtered through qualified leads, it's time for automation to take over. Patrick showcases how Lawmatics automations keep leads engaged through timely follow-ups, personalized communication, and relevant content. This nurturing process ensures that leads stay warm and continue to move seamlessly through your pipeline, ultimately leading to that important final step — hiring your firm.
20:00 — Automatic engagement and data population
Shawnna presents the custom form her team uses to capture comprehensive client data and personalize the intake process. Once submitted, Lawmatics automatically generates and sends engagement agreements, streamlining the initial client onboarding. For clients still deciding, the system enrolls them into an email nurture campaign featuring informative videos and resources to guide their next steps.
28:26 — Phone intake and booking calendars
Shawnna hands things over to Jordan Douglas, the firm’s new client coordinator. She sheds light on features used by the intake team, beginning with an internal intake form used during phone consultations. One of Jordan's favorite features is the self-serve booking option on these forms, which helps set client expectations in real-time during the intake call regarding attorney availability. This form also includes fields essential for operations, such as referral source tracking and space for additional notes.
37:28 — Onboarding made excellent and efficient
Conti Moore dives into her process for onboarding clients after they’ve decided to hire the firm. It all starts with an automated fee agreement and extends to paying retainers, sending final onboarding forms, and generating invoices. This considered approach ensures a smooth onboarding experience for new clients who are still learning to trust their new attorneys.
48:56 — Adapting automations for client journeys
Conti is joined by Marko Skarica, a digital marketer and developer who helped set up the firm’s automations, who demonstrates how the firm can adapt and build new automations to accommodate every step toward retaining the firm — regardless of the client journey. For example, Conti Moore Law offers DIY courses for prospective clients who may not currently afford an attorney. These leads are supported with their own automated drip campaigns designed to transition them into paying clients should they later decide to hire an attorney.

Let's face it: A disorganized practice can feel like herding cats while juggling flaming torches. Missed appointments, paper trails that go nowhere, and potential clients slipping through the cracks are common stress points that keep you up at night. Our recent Deep Dive webinar was all about how we can tackle these challenges together.Whether you're new to Lawmatics or just looking to sharpen your skills, this webinar showed how mastering the basics of our CRM can make a monumental impact on your practice. Imagine slashing intake times in half, reducing no-show rates, and converting leads twice as fast. That's the kind of game-changing efficiency we’re talking about!
Time Stamps of Key Takeaways
0:00 — Getting started
Meet your host, Clare Struzzi! Clare is our account management team lead, and an expert at getting law firms up and running on Lawmatics. Here, she outlines the agenda for the session, which is to recreate a typical first onboarding session for new Lawmatics customers.
5:47 — General settings
The general settings page is always the place to start with a new account. Clare starts with user settings like creating your email signature and connecting your calendar. Then, she moves into firm settings, where your firm’s chief Lawmatics user can fill in practice-specific information, like office locations and branded document headers.
18:55 — Organizing the pipeline
The pipeline is what keeps a prospect moving through the intake process, from marketing all the way to signing their engagement agreement and beyond — so it’s important to spend time making sure it’s built for your firm’s needs. Clare shows how to create each stage of your pipeline, and even create different pipelines for each of your firm’s practice areas.
29:39 — Appointments and events
Next, Clare walks through how to create appointment types, from setting the duration of each meeting type to the default rate the firm will charge for each. Then, she uses the email builder to write reminder and confirmation messages for these appointments, incorporating custom fields that tailor each message to each client.
44:00 — Phone intake form
Forms are an invaluable tool for collecting information about your clients and matters. In this final section, Clare builds an example of a form an intake specialist would use for intake by phone. She explains the differences between standard and custom fields, as well as how to make forms dynamic by incorporating options like a self-service booking calendar at the end of the form.

You wouldn’t set sail without a course—so why run a law firm without any clear KPIs? Custom dashboards are your navigational charts, guiding you through the sea of data toward smarter, more strategic decisions.In the latest Deep Dive Webinar, Product Manager Devon Roth delves into how these custom dashboard data visualizations can revolutionize your law firm's efficiency. This session covers everything from building new custom dashboards for immediate data access to tailoring them for showcasing the metrics that matter most, all aimed at enabling better operational decisions with actionable data insights.
Time Stamps of Key Takeaways
0:00 — Getting started
The webinar kicks off with an explanation of how custom dashboards differ from our legacy dashboard, and how you can alternate between the two. Devon also outlines some of the key (and surprising!) benefits of customizing your dashboard layout, from boosting client engagement to tailoring your marketing strategy.
6:17 — Choose your panel types
Devon first surveys all of the different panels firms can use to organize their information. Firms use these panel types to review things like notes, tasks, upcoming appointments, outstanding e-signatures, and more. She then offers a demonstration of how to format the page, resize panels, and even divide your dashboard layout by practice area.
18:55 — Understanding panel visualizations
Next, Devon focuses specifically on the data panel. From conversion rates to the value of cases in your pipeline, these analytical indicators are the cornerstone of guiding your firm toward increased profitability. She demonstrates a few panel setups that enable you to keep an eye on the intake pipeline, ensuring no potential client gets stuck between stages.
24:08 — How to use reports on dashboards
While some of the other panel types only show standard fields, data panels can pull insights from any of your custom matter reports. In this section, Devon walks through how to set up data visualizations that show the specific granular criteria you need to keep front and center for your firm.
42:31 — Organizing group panels
Finally, Devon quickly shows the click-and-drag customization options with the group panel type. You can select any panels already on your custom dashboards and bunch them together, grouping insights by practice area, matter type, or time period.

Marketing and reporting are the key drivers of a law firm's profitability. But how do you ensure your marketing efforts hit the mark and your reports provide actionable insights? Join Lawmatics Product Manager Devon as she guides you through the essentials of optimizing your marketing efforts using Lawmatics. From creating stunning HTML emails that captivate clients to precisely segmenting your audience for targeted campaigns, Devon provides a step-by-step guide to revolutionize your approach.
Webinar Timestamps
0:00 — Why use Lawmatics for marketing and reporting?
Devon kicks off the webinar with an overview of why Lawmatics stands out as a game-changer for law firms when it comes to marketing and data insights.
4:54 — How to build and edit an email using HTML templates
Devon’s first product demonstration focuses on the HTML email builder and editor. She shows how users can start with a blank canvas or customize pre-built templates to meet the specific design and branding needs of any firm.
10:00 — Create audiences based on types of marketing emails
Next, Devon discusses how creating specific audiences enables better-targeted marketing campaigns. This segmentation ensures your content reaches the most relevant audience, boosting engagement and conversion rates.
15:34 — Schedule campaigns to be sent out
Effective marketing is often about timing. In this segment, Devon walks through the step-by-step process of scheduling emails to be sent at optimal times, ensuring your message hits your audience when they’re most likely to engage.
21:05 — Create custom reports
Understanding your marketing performance is crucial, and Lawmatics custom reports let you dive into the metrics that matter most. Devon shows how to generate these reports based on different fields, offering insights that help you track success and pinpoint areas for improvement.
41:45 — Add custom reports to your custom dashboards
To wrap up this month’s Deep Dive, Devon incorporates the custom reports into a personalized dashboard. This fully customizable data hub gives you a comprehensive view of your firm’s performance, from marketing ROI to task management efficiency.

In the high-stakes world of criminal defense, where every move can change a client's future, streamlining your workflows is more than essential—it's critical. Imagine being able to respond promptly to every client's needs without pulling focus from their matters or that of your other clients. Our latest Deep Dive Webinar showcases the power of criminal defense workflows in Lawmatics, making it easy to disengage unqualified leads and win more clients with impactful marketing campaigns. Host and Lawmatics Product Manager Devon Roth demonstrates how to build and implement this workflow in your own practice, ensuring you take timely action and accurate insights.
Webinar Timestamps
0:00 - Introduction and overview
Devon opens the webinar by outlining the focus on mastering criminal defense workflows in Lawmatics, covering housekeeping items, and briefly introducing herself and Erika from the customer success team.
5:36 — Criminal defense Automations
Devon gives an overview of the Automations typically used in a criminal defense practice. Her example workflow includes drip campaigns for leads who haven’t scheduled a consultation, appointment reminders and follow ups, and exit conditions to end follow up campaigns.
15:16 — How to automatically disengage unqualified leads
Not every lead is going to fit your firm’s client profile. In this section, Devon demonstrates how to use Automations to swiftly disengage those disqualified leads after a consultation. She also previews how to build Automations for clients who are undecided, may wish to retain your services at a later date, or are referred out to a law firm better suited to handle their matter.
27:38 — Tailor marketing campaigns for maximum impact
Targeted campaigns for segmented audiences are an effective way to engage prospects and both old and new clients. Here, Devon shows how to create branded HTML emails and incorporate them into drip campaigns to keep your firm top of mind no matter the stage of the client journey.
33:23 — Analyze and report on firm metrics
Understanding your data is critical to running an efficient and profitable criminal defense practice. This section exhibits how to build custom reports based on any field in your Lawmatics CRM and how to incorporate these helpful reports into custom dashboards for actionable visualizations.
35:50 — Create follow ups based on court dates
Automations are key to staying on top of court dates and ensuring no deadlines are missed. Devon wraps up this Deep Dive with a guide to creating date-based Automations, like reminders based on court appearance dates or other key points in your client’s matter.

Personal injury cases are more than legal battles—they're a pivotal chapter in a client’s life, often fraught with physical, emotional, and financial turmoil. With that in mind, the latest installment of our Deep Dive Webinar series showcases a fully automated workflow tailored for personal injury practices. Host and Lawmatics Product Manager, Devon Roth, demonstrates how to build and implement this workflow in your own practice to not only boost efficiency and reduce errors but also ensure that every client receives best-in-class care and support throughout their legal journey.
Webinar Timestamps
0:00 - Introduction and overview
Devon opens the webinar, introduces the focus on mastering personal injury workflows in Lawmatics, covers housekeeping items, and provides brief personal introductions for herself and Erika from the customer success team.
4:50 - Personal injury law automations
Devon gives an overview of the Automations typically used in a personal injury practice. Her example workflow includes intake processes for leads that contact your firm both through the web and phone. She also demonstrates how to use custom forms to collect practice-area-specific fields, like insurance documentation or incident photos.
18:00 — Appointments, emails, and e-signature
Continuing down the intake process, Devon shows the next steps in the personal injury client journey after they’ve been contacted by the firm. She uses Automations to prompt leads to schedule consultations, notify leads that they may not qualify to work with the practice, and share the engagement agreement.
30:48 — Staff review, undecided status, and welcome emails
Next, Devon demonstrates how Lawmatics is adaptable to different client situations. Successfully hired clients can be welcomed with an automated email welcoming them to the firm, and outlining next steps. Lawmatics can also flag matters in need of staff review, and monitor the status of potential clients who have yet to make a decision on representation.
35:30 — How to track referrals in and out
Devon discusses setting up Automation for tracking referrals of potential clients. By updating specific custom fields, users can ensure that referrals are accurately tracked in their records. This system can provide valuable insights for reports and help monitor the success of referral partnerships.
40:15 — Reporting on matters and referrals
In this section, Devon breaks down the analytics page, and demonstrates how to create custom reports for referrals. Filters can be applied to show matters specific to a practice area, such as personal injury, and to track referrals from specific sources. The report can also include additional columns for tracking status, substatus, and grouping referrals by the person making the referral.

In the intricate domain of family law, where emotions run high and the stakes are personal, mastering your workflows is more than a strategy; it’s a commitment to excellence and empathy. Our latest Deep Dive Webinar peeled back the layers of family law workflows in Lawmatics, revealing a wealth of strategies for automation, personalization, and seamless client interaction.This recap offers a distilled view of our comprehensive webinar, guiding you through the pivotal stages of automating client onboarding, executing conflict checks with precision, and nurturing client relationships with automated yet heartfelt communication. Watch as our product manager, Devon, explores the unique benefits for family law practices using Lawmatics, illustrating practical applications that can revolutionize your approach to client intake.
Webinar Timestamps
0:00 - Introduction and Overview
Lawmatics product manager, Devon Roth, welcomes participants and sets the stage for exploring family law workflows with Lawmatics, highlighting the webinar's goal to enhance process efficiency through automation and custom dashboards.
4:30 - Family Law Automations and Conflict Checking
Devon delves into family law automations, emphasizing their role in streamlining communication and conflict checking. She goes on to showcase how automations ensure accurate and timely management of leads and clients.
4:54 Pipeline and Initial Contact Form Automation
Devon details on automating the client journey from initial contact, focusing on moving new leads through the pipeline and initiating templated emails, alongside automated conflict checks based on lead information.
10: 16 Drip Campaigns and Client Engagement
A thorough explanation of drip campaigns in maintaining potential client engagement, with insights on automated communications to prompt consultation scheduling and the use of conditional logic for personalized email and SMS communications.
17:38 Consultation Scheduling, Confirmation, and Follow-up
Devon outlines the automation process for moving leads to the 'consult scheduled' stage and setting up appointment confirmations and reminders. Also addresses handling no-shows and cancellations to ensure rescheduling.
31:01 Post-Consultation Engagement and Retainer Agreement
The presentation wraps with post-consultation steps including sending retainer agreements via automation, utilizing e-signature documents, and the process of converting a potential new client to a hired status, emphasizing continued engagement and relationship formalization.
In the world of estate planning, where every detail is pivotal and time is of the essence, mastering your workflows can be the linchpin to unparalleled success and client satisfaction. In our recent Deep Dive Webinar, we dove into the heart of estate planning workflows within Lawmatics, offering a treasure trove of insights on automation, customization, and client engagement.This recap encapsulates the takeaways of our engaging session, walking you through the intricacies of automating intake processes, crafting sophisticated estate planning forms, and enhancing client communication, all tailored to elevate your law practice to new heights. Watch as we showcase a real-life estate planning workflow and how to implement it into your own practice.
Webinar Timestamps
0:00 - Introduction and Overview of Estate Planning in Lawmatics
Devon opens the webinar, introduces the focus on mastering estate planning workflows in Lawmatics, covers housekeeping items, and provides a brief personal introduction and that of Erika from the customer success team.
02:15 - Utilizing Automations and Custom Dashboards
Devon discusses the power of Automations in Lawmatics for estate planning, highlighting the customizability for different practice areas and the significance of custom dashboards for managing workflows and enhancing client communication.
07:08 - Assets, Automations, and Intake Process
A detailed walkthrough of creating and utilizing assets and automations within Lawmatics to streamline the intake process, including setting up client intake forms, automating communication, and managing new leads.
17:17 - Consultation Scheduling and Follow-Up Automations
Discussion on the automation setup for consultation scheduling, including how to handle rescheduling, undecided clients, and maintaining engagement through email and text communication.
27:39 - Marketing, Campaigns, and Event Management
Overview of using Lawmatics for marketing purposes, creating campaigns for different audiences, managing email communication, and organizing events to engage both leads and existing clients.
In the dynamic landscape of legal practice, where time is a precious resource, the pursuit of efficiency has become paramount. Manual tasks and processes in law firms can be a bottleneck to growth, often leading to delays, errors, and missed opportunities.Enter Lawmatics, a beacon of innovation designed to transform the way legal professionals operate.
Intake
Manual handling of intake processes, including forms, marketing tracking, new lead follow-ups, and pipeline management, can lead to inefficiencies, delays, and potential errors. Recognizing these challenges, Lawmatics provides a solution to eliminate manual work in each of these areas. Let's explore how you can transform and streamline your client onboarding for a more efficient and error-free process.
Forms and Documents
One of the simplest ways to collect leads is via a Contact Us form on your firm’s website. Lawmatics makes it easy to embed a contact form on your site, which seamlessly channels new leads directly into your CRM.

You also have complete control over the fields, styling, colors, and more of your website form.
Once a web form has collected your leads, the completion of said form can be set to trigger further steps in your process such as sending a more robust intake form or document request.
Lawmatics uses sophisticated conditional logic to give your clients the best possible experience when filling out your forms, making sure that they only need to answer questions that are relevant to their matter.

This is also incredibly useful for your staff, since they no longer need to to manually filter through unanswered questions or data that doesn’t apply to the matter at hand.Similarly, Lawmatics documents are also a highly customizable and automateable part of your intake. Build a template once, including options like conditional logic and e-signature, and you’ll never need to manually draft that document ever again.

Forms and documents alike can be built into your automated workflows to ensure that the right template is sent out exactly when it’s needed – without you or your staff needing to take the time to manually send it.
Marketing Sources
Allocating your marketing budget requires pinpointing the most lucrative marketing sources. In the past, manually tracking down lead sources and assigning tags or attributions may have been the norm. With Lawmatics, you can set and forget.Simply configure your marketing sources in your account settings, after which you can create Automations to tag your leads automatically based on the source they enter the CRM from.

Lawmatics will then take charge of assigning all of your incoming leads accordingly, freeing up your time to spend on other tasks. And when it comes time to evaluate marketing campaigns, you’ll have perfect data to consider.
Follow Ups
No matter the stage of the client journey, communication is key for staying top of mind. Lawmatics makes it easy to create automated follow-ups and check-ins, ensuring prompt and consistent communication without manual effort on your end.Create a simple drip campaign using any trigger of your choice to keep in touch with your leads.

These campaigns can be as long or short as you wish, and you can increase the odds of engagement by opting for a variety of communication mediums like text messages or emails.
Pipeline
One of the most beloved features of Lawmatics, the intake pipeline, is your go-to for staying on top of all of your leads as they progress through your sales funnel. While you have the option to use the pipeline feature as a drag-and-drop tool (manually), the flow of clients through your pipeline can be automated to eliminate any human error.For instance, any new lead entering your pipeline can automatically be placed in the New Lead stage using a “change attributes” action in an Automation. Likewise, when they schedule their consultation, they’ll automatically progress to the next stage.

No more manually updating statuses or tracking lead progress in a spreadsheet. The pipeline is your one-stop shop for knowing exactly where a lead is at all times.
Case Management
Automation in case management – taking on tasks like scheduling, task allocation, conflict checking, and payments – significantly reduces manual effort and human error. Implementing automated systems provides convenience and efficiency for both clients and staff.
Scheduling
There are several ways to use Lawmatics to take the manual work out of your scheduling:
- Booking links allow clients to book their own meetings based on your availability. They also allow you to set custom availability for different event types, so that your appointments are booked according to your specifications.

- Booking forms are useful when you need to collect additional information from the client, since it serves as a form and a scheduler all in one automatic step. No more phone tag or rescheduling hassle.
Tasks
Tasks are commonly seen as an inherently manual aspect of law firm operations. With Lawmatics, that’s not necessarily the case. Our automatic task system allows you to create templated tasks as part of an Automation.

Not only can the system assign tasks, but it can also trigger a further step in your process once a particular task has been completed.Have certain tasks that must be assigned and completed on a recurring basis? Lawmatics can handle that too. Build a recurrence schedule just once, and then you’ll be set for those tasks for life.

Conflict Checking
You may be so accustomed to running manual conflict checks that it’s never even occurred to you to automate this process. Lawmatics changes the game.Our sophisticated conflict checking system allows you to template your search terms using merge fields.

The system then examines potential matches closely and verifies or flags the check accordingly. Make informed decisions about your clientele and ethical obligations without having to filter through paper records.
Client Portal
For the client who loves to take their matter into their own hands, Lawmatics offers the Client Portal. This feature grants your client full access to a personalized hub of all case details such as communication logs, documents, etc.Simply use our Automation action to invite them to the Portal upon the appropriate trigger, then automatically share any tasks, appointments, forms, and documents to their Portal.

This gives them the chance to review their items on their own terms, without requiring any response or action from you.
Billing
While all elements of your practice are important, there are arguably none as important as receiving payment for your services.Through the use of our innovative LMPay system or through our LawPay integration, Lawmatics makes invoicing a simple set-and-forget process. Create custom invoice types with an optional default (that always be edited for one-off invoices if needed) and send an invoice automatically when you need to.We even offer a simple solution for collecting in-form payments for consultations or other paid meetings called the Payment Gateway.

If you’re not yet using LMPay, feel free to reach out to support@lawmatics.com to get started.
Networking
Networking and marketing tasks – like event hosting, marketing emails, and referrals – are vital for nurturing client relationships and generating leads. Manually managing these activities can be time-consuming. Automating these efforts enables consistent and personalized communication, fostering stronger relationships and expanding the firm's reach.
Events
Hosting events is a great way to keep in touch with your network and your local community. Use Lawmatics to easily create your events and collect attendees, whether they’re in-person happy hours or virtual webinars.
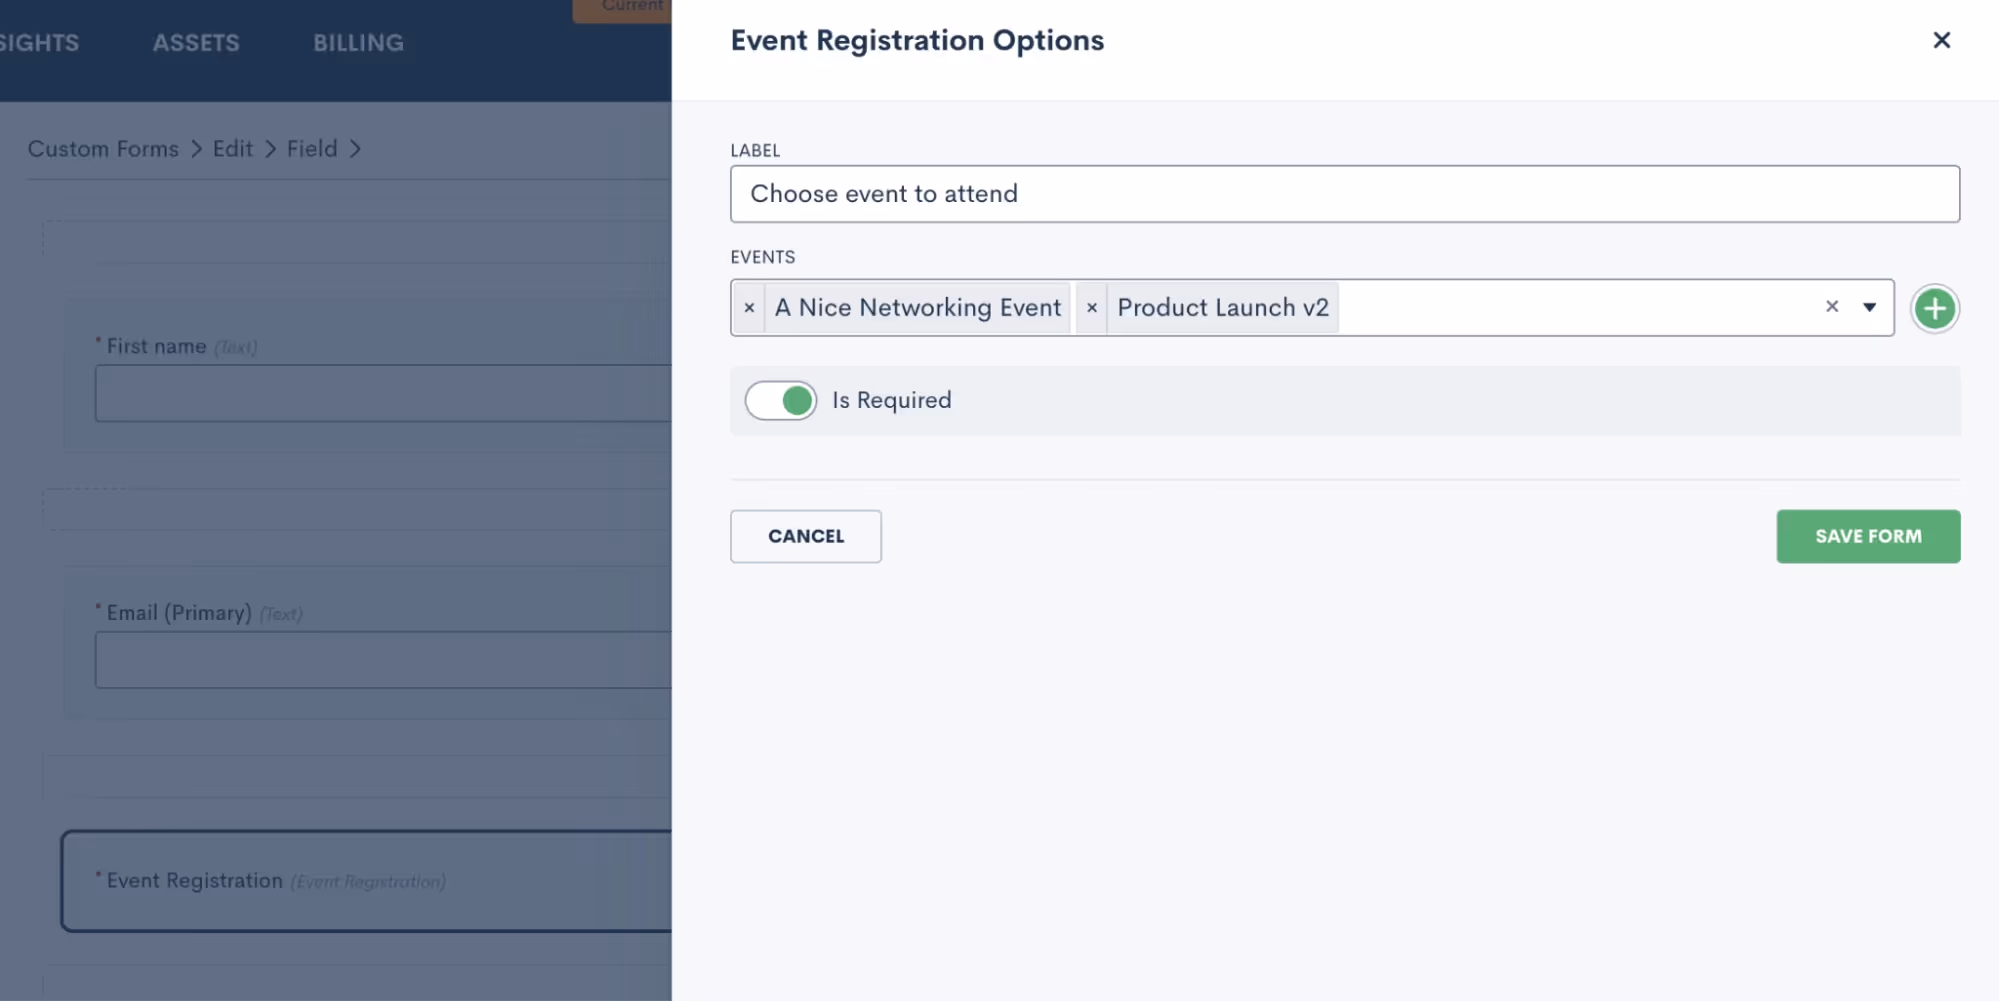
Event registration can be added onto a form, so that registrants are collected automatically, even giving them the opportunity to choose from multiple events that might interest them.Take things a step further and include an automated message (or any other action item) that triggers upon event registration.

Drip Campaigns
While we already mentioned email campaigns for intake automation, they’re also incredibly useful for keeping in touch with your entire book of business. For example, you might have a drip campaign that triggers upon the completion of matter, initiating a sequence of follow-ups and check-ins for that client now that their case is finished.It may seem daunting to write all of those emails. Don’t worry – Lawmatics has an automated solution for that too. Use LM[AI] to draft your emails with our artificial intelligence.
![LM[AI]](https://cdn.prod.website-files.com/688005f0c89682201c6776e9/68d1bde3abf1236abcce48e9_68a8d834c86f5492edc669f6_image1.avif)
You have the option to let LM[AI] write your emails entirely, or simply use it as a jumping off point for creating your email content.
Date-Based Email Campaigns
In addition to drip campaigns, Lawmatics is also your solution for automated email campaigns that must be sent on a particular date. This can be automated for a date unique to a particular client, such as a birthdate or anniversary, as well as for holidays and firm announcements.Lawmatics makes it easy to create your email, and then automate it to send on a particular date and time (or the date and time populated into a variable field).

The campaign will also automatically log your performance statistics such as opens, clicks, and bounces, for you to review at your convenience.
Conclusion
The era of manual work in law firms is now an epoch of the past. The shift towards automation isn't merely a technological trend; it's a strategic imperative. By leveraging the power of Lawmatics to eliminate manual work, law firms can reclaim valuable time, reduce errors, and fortify their foundations for sustainable growth. The journey toward a more efficient, client-centered, and future-ready legal practice begins with embracing the transformative capabilities of Lawmatics. Here's to a future where manual work takes a back seat, allowing law firms to focus on what truly matters – delivering exceptional legal services with precision and ease.
As 2023 comes to a close, let’s take a look back on some of the top game-changing tools and functionalities released in Lawmatics this year.Designed to push your practice towards higher profits and improved efficiency, these favorite features have been sourced directly from legal professionals of thriving firms with a broad spectrum of practice areas.
1An intuitive user experience
Create From Within was a complete reinvention of our UX (user experience). This revolutionary feature gives users the ability to create any asset or object in Lawmatics from the very place that you intend to use it. It’s just one example of this year’s focus on making Lawmatics easier to build AND use in the day-to-day.
Need to send a new email to Contacts? Now you can create the email right from within the email select menu. Have a new Contact that needs to be added as a relationship to a Matter? Now you’re able to create that Contact right from the Add New Relationship section of a Matter. Anything and everything that you build and add to Lawmatics can be created without navigating to another screen!
2Create better emails with LM[AI]
Earlier this year, we made a groundbreaking announcement: the launch of LM[AI], our very own artificial intelligence generative text tool. With LM[AI], drafting client emails has never been easier — you can do it in seconds. Simply click on the AI button, provide a prompt, and watch as LM[AI] composes a full-length email, complete with merge fields.
![Create better emails with LM[AI]](https://cdn.prod.website-files.com/688005f0c89682201c6776e9/68d1d9f2787b622cdf0fcdcc_68a8d836ad8fd8078b63d6e8_LMAI_Newsletter_EML.avif)
You have full control over the generated text, as you can manually edit it to your liking. Additionally, you can instruct LM[AI] to make edits itself, whether it's adjusting the tone to be friendlier or more formal, or rephrasing the content. From nurturing leads to check-ins and promotions, LM[AI] will ensure your email campaigns are engaging and captivating.Click here to learn more about LM[AI] and why it won the LegalTech Breakthrough Award for AI Innovation of the Year.
Tasks
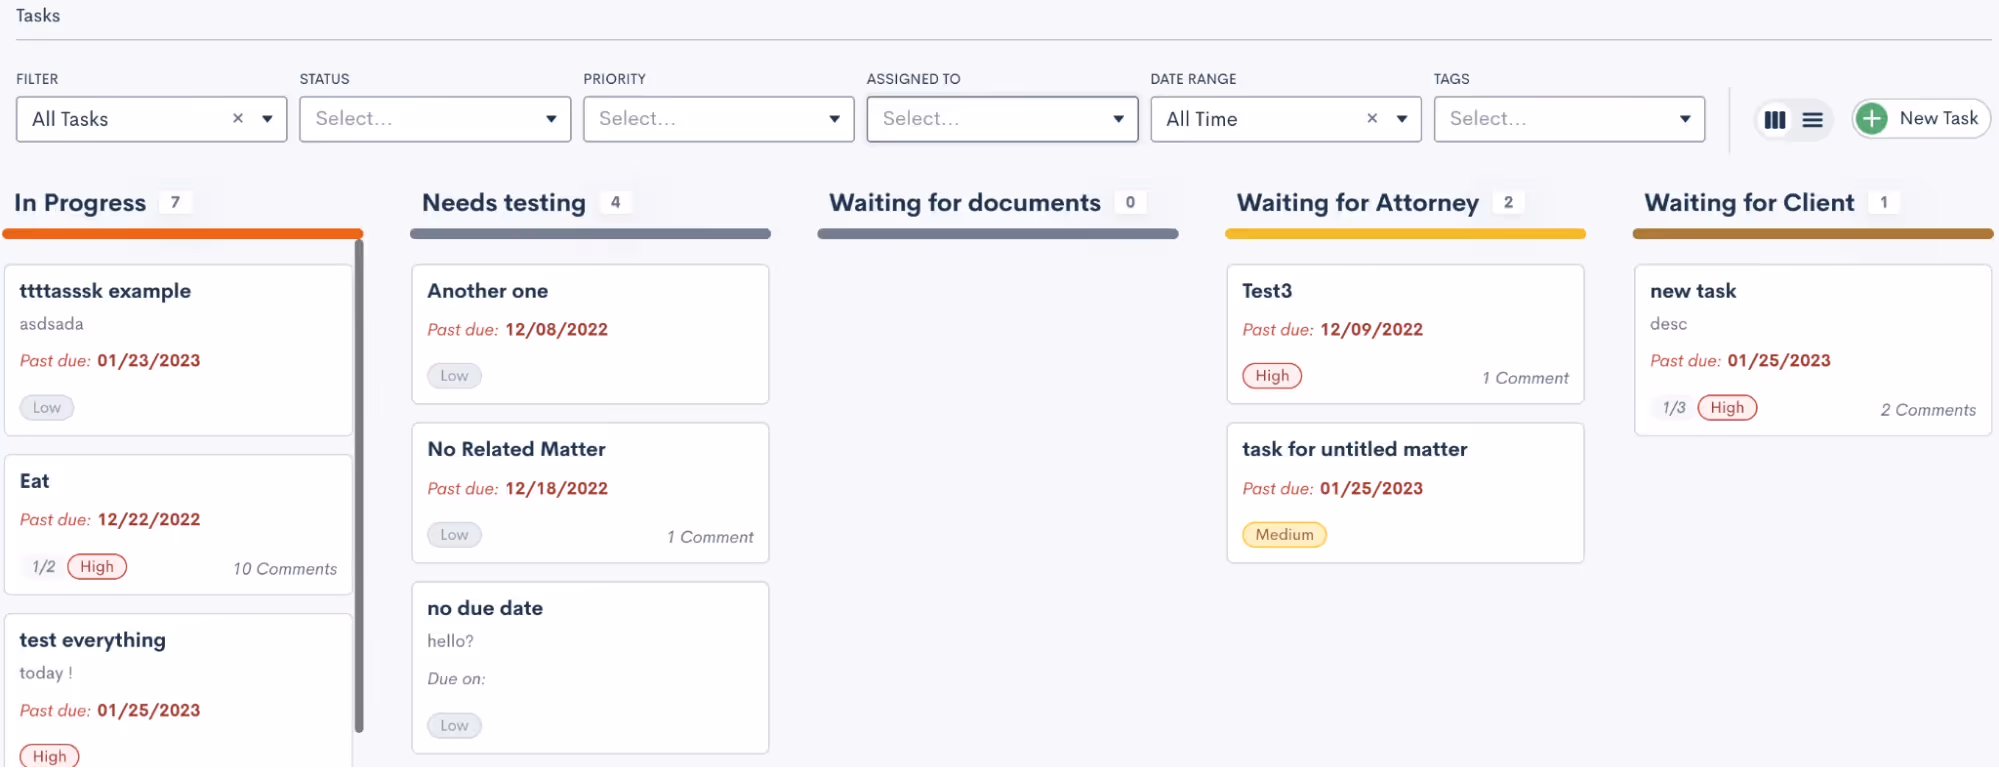
3Manage your Tasks with kanban board
This year we gave the Tasks dashboard the same pipeline visualization you know and love. You can now drag and drop Tasks across your sequence of statuses in the kanban view. With the help of custom Task statuses, this feature helps to keep your Tasks more organized than ever.
Learn more about custom task statuses here.
4Save time with Recurring Tasks
Stay on top of your to-dos with this year’s new Recurring Task capabilities. Create a Task as you normally would – either by itself or within an Automation – then select a custom recurring schedule (monthly, weekly, every 3 days, etc.). When the first iteration of the Task is completed, the next Recurring Task will be created with the same name, description, subtasks, status, priority, and assignee.
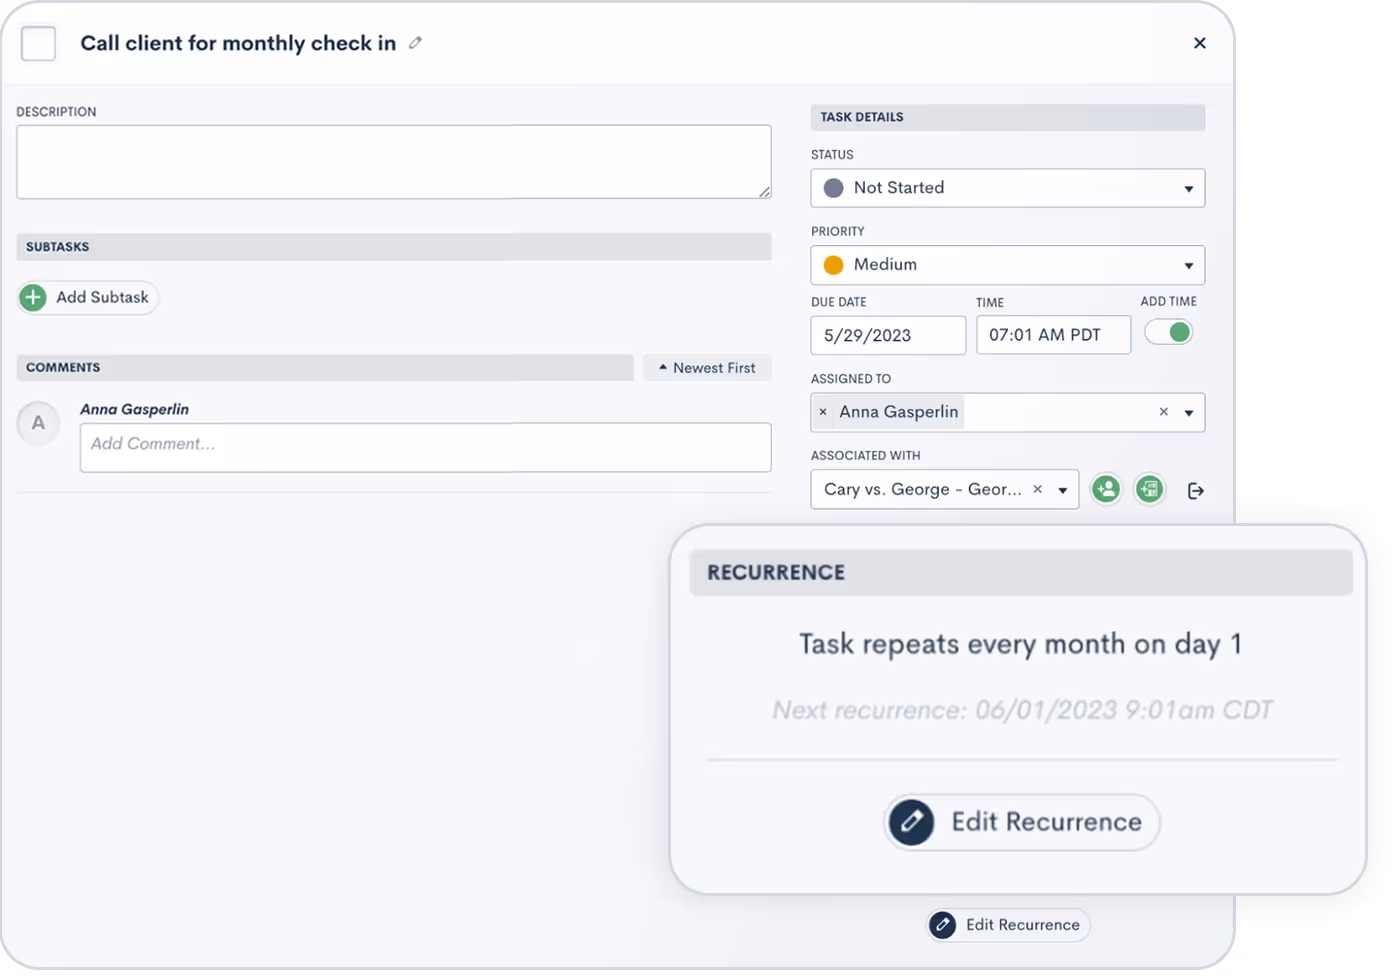
5Stay better informed with Task mentions and comments
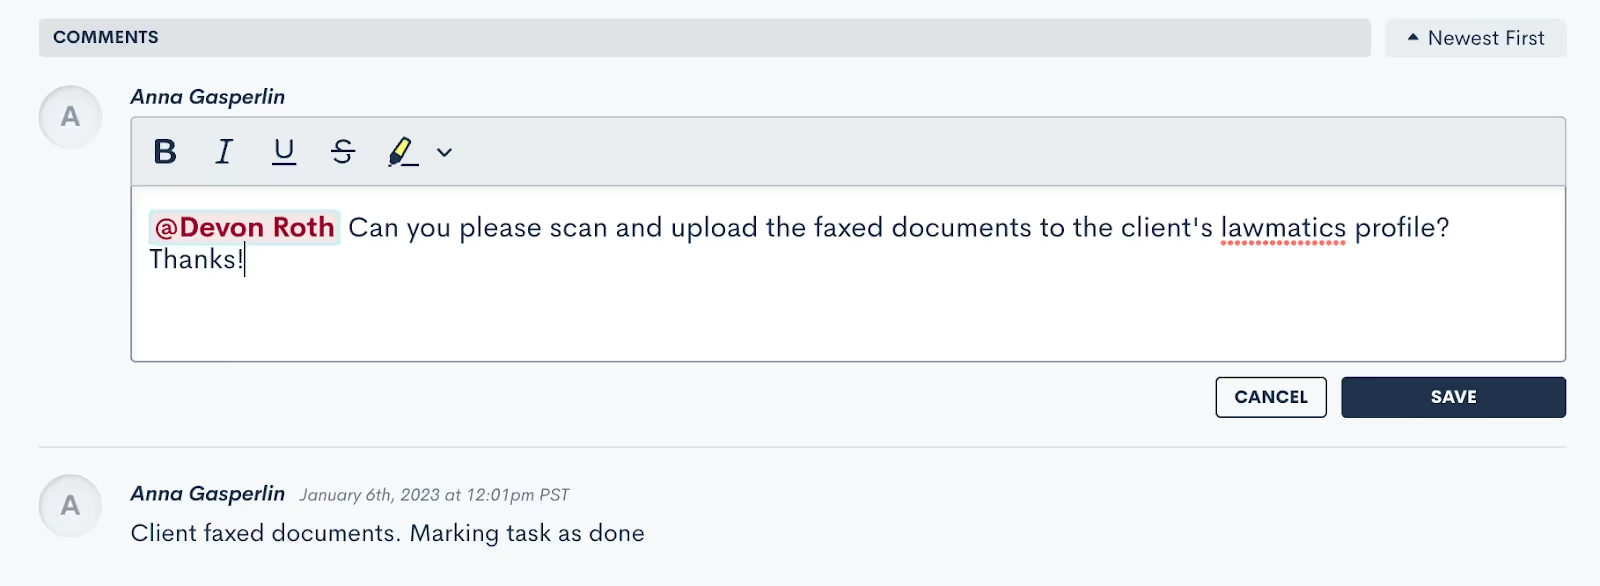
To ask questions, request extra information, or offer insight on a particular action item, you can now add comments to Tasks. Each comment is logged within the Task along with the name of the commenter, the date, and time for future reference. Want to leave a comment that pertains to a specific colleague? Simply use the @ sign to select any of your users to be tagged in the comment.

Read more about Task comments and mentions here.
6Increase specificity with advanced conditional logic
You can now take your data analysis to the next level by using advanced conditional logic to combine multiple criteria. Available in reports, Automations, documents, and more, you can now layer both “and” and “or” conditions to uncover hidden insights, track trends, and make data-informed decisions. Whether you're running campaigns or segmenting clients, this feature gives you unparalleled control.

Click here to learn more about advanced conditional logic.
7Clean up your CRM by merging Matters
This year, Lawmatics made it easier than ever to deal with the inevitable duplicate entries in your CRM. If at any point you end up with a duplicate Matter, Contact, or Company you can simply click the Merge button on the to combine two entries. Any conflicting fields can be reconciled with the option to overwrite a duplicate Matter’s data.
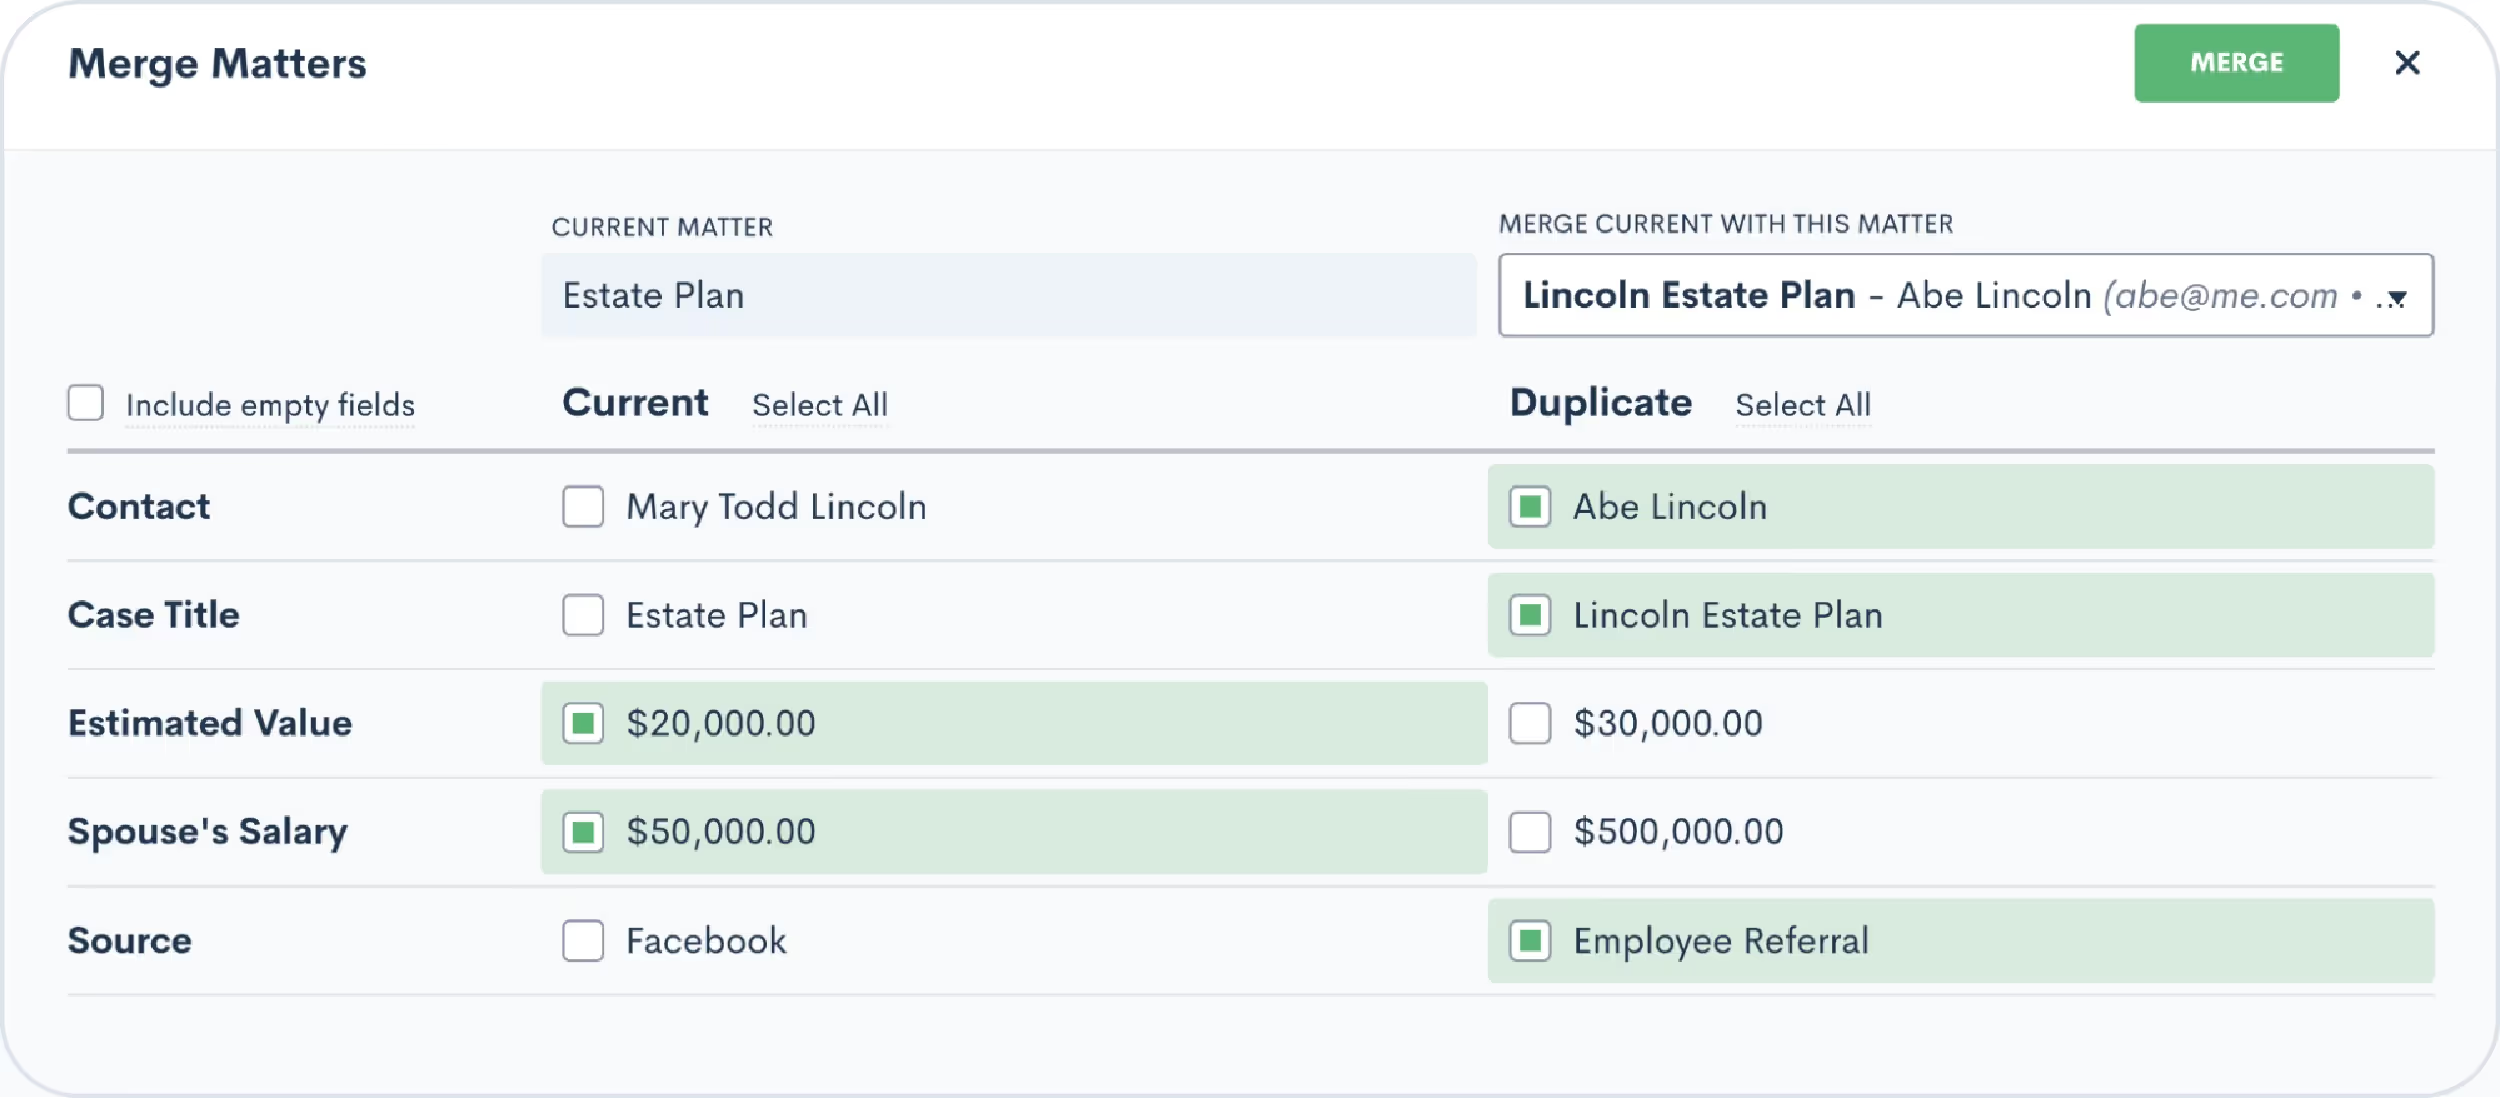
Driven by user requests, this new feature keeps your pipeline accurate and tidy. Click here to learn more.
Appointments
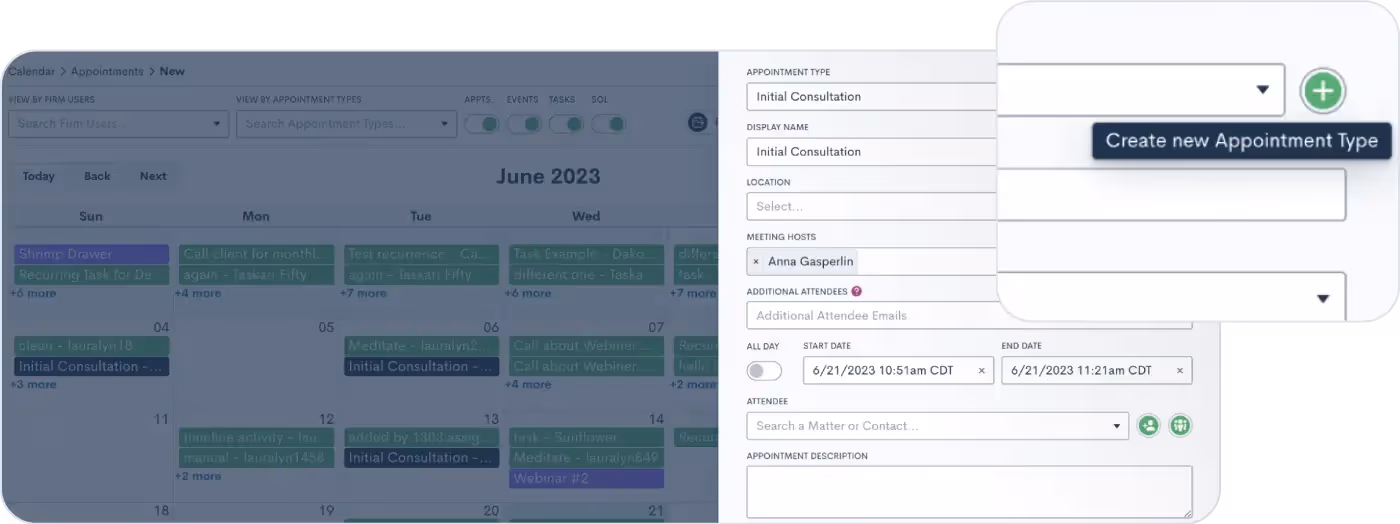
8Automate efficiently with built-in appointment confirmation
Scheduling and confirming consultations is an essential part of your intake process. While you may be accustomed to using an Automation to confirm or remind clients of their appointments, this year we made this process even easier by adding Confirmations messages as a default function — no need to build a dedicated Automation. Navigate to the Appointments section of the Settings menu and you’ll have the option to create a Custom Email and/or SMS template for confirming each of your various appointment types. This confirmation will be sent automatically at the time the appointment is scheduled.

Learn more about appointments in Lawmatics.
9Schedule meetings around your host availability
Automatic scheduling continues to be a fan-favorite feature among Lawmatics users. This latest update gives you availability options when booking for multiple hosts. Use the “All” option when both hosts must be available for the meeting, or use the “Any” option to showcase the soonest individual availability among the multiple hosts. You will find this option on your booking forms as well as custom forms.

Click here to read up on booking forms.
10Bring people together with event management
So many customers have told us they attract new business by hosting webinars, seminars, luncheons, and other events to engage potential clients. We heard you loud and clear – that’s why we’re still so excited for this year’s event management feature.

With event management, users can set up different event types (like webinars or luncheons), easily create and promote an event, and collect registrants. We’ve added a setting for built-in confirmation and reminder emails, and you’ll find a new entry condition to Automations to trigger a custom workflow when someone registers for your event. No matter how your firm brings people together, you can do it all in Lawmatics.Learn more about using this exciting new feature here.
Messaging Updates
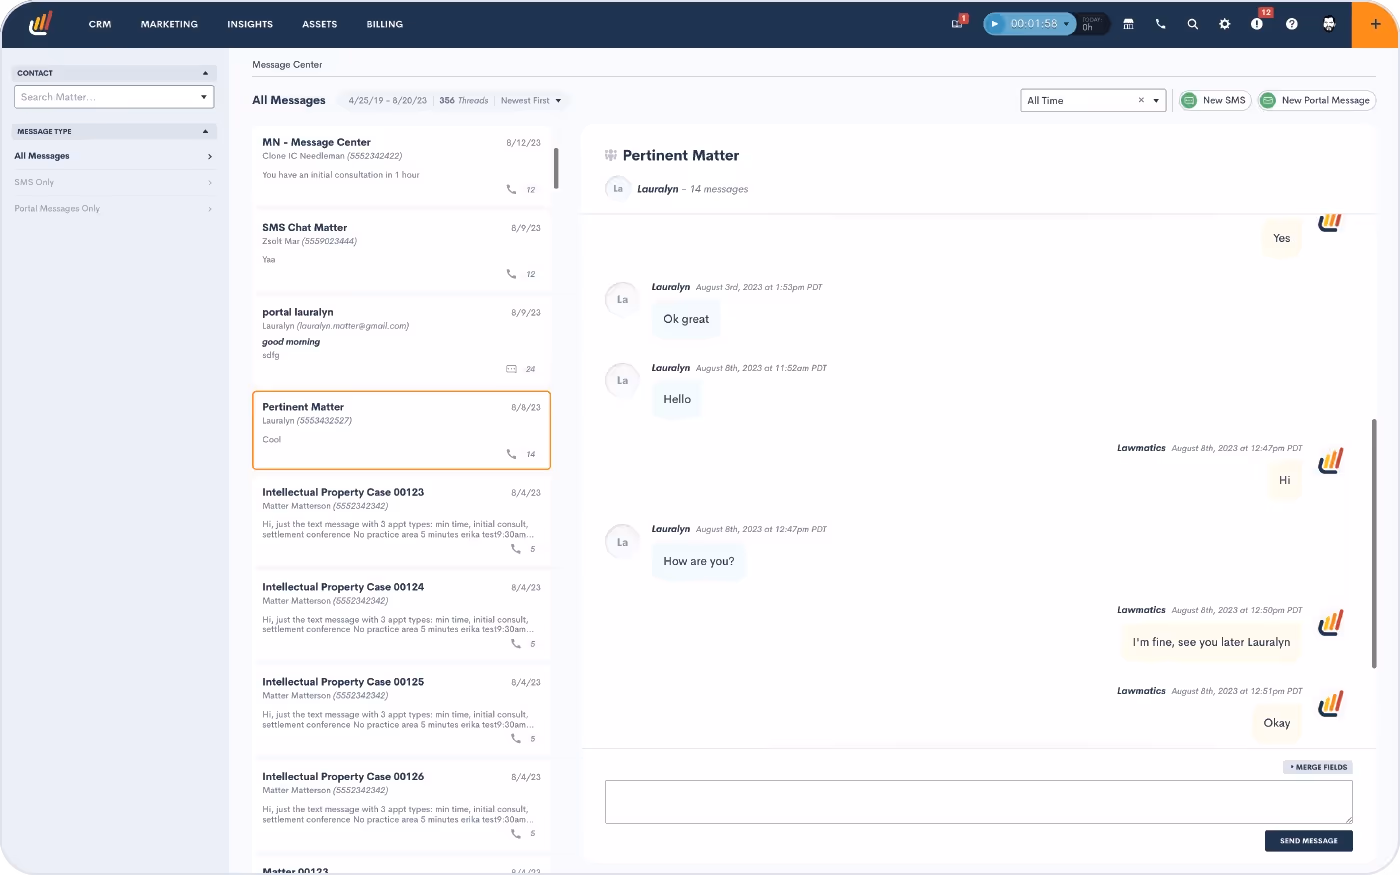
11Simplify client communication with the Message Center
This year we said hello to the Lawmatics Message Center, your all-in-one dashboard for tracking and managing client communication. Stay on top of your inbox with centralized client messages — spanning texts and Client Portal interactions — in a single organized hub. You can filter and sort messages, and even set permission levels for which messages your staff can view. With this powerful feature, staying connected to your clients is hassle-free.
Learn how to get started with the Message Center.
12Tailor your texting with multiple SMS numbers
Your firm can now send text messages using multiple phone numbers via Lawmatics. If your firm has a presence in multiple geographical areas, this feature ensures you can reach out to clients with an area code that feels local, trustworthy, and familiar. To activate this feature, simply email us at support@lawmatics.com and let us know what area code(s) you would like to add.* Once enabled, you can start connecting with each client a bit closer to home.

This release is accompanied by a new Firm SMS Number field, allowing you to manually select which phone number to use for each contact. Learn more here.*Note: Additional fees apply.
13Reply to client emails without disrupting workflow
We live to make your day-to-day tasks easier. This year’s email Quick Reply feature does just that. When viewing emails logged on a Contact or Matter’s activity timeline, this new button allows you to write and send a quick response without disrupting your workflow. Emails generated from this button will go right to your client as part of the existing email thread.**

**Note: In order to use this feature you must have your Mail Sync set up and the Send from Outbox option enabled.
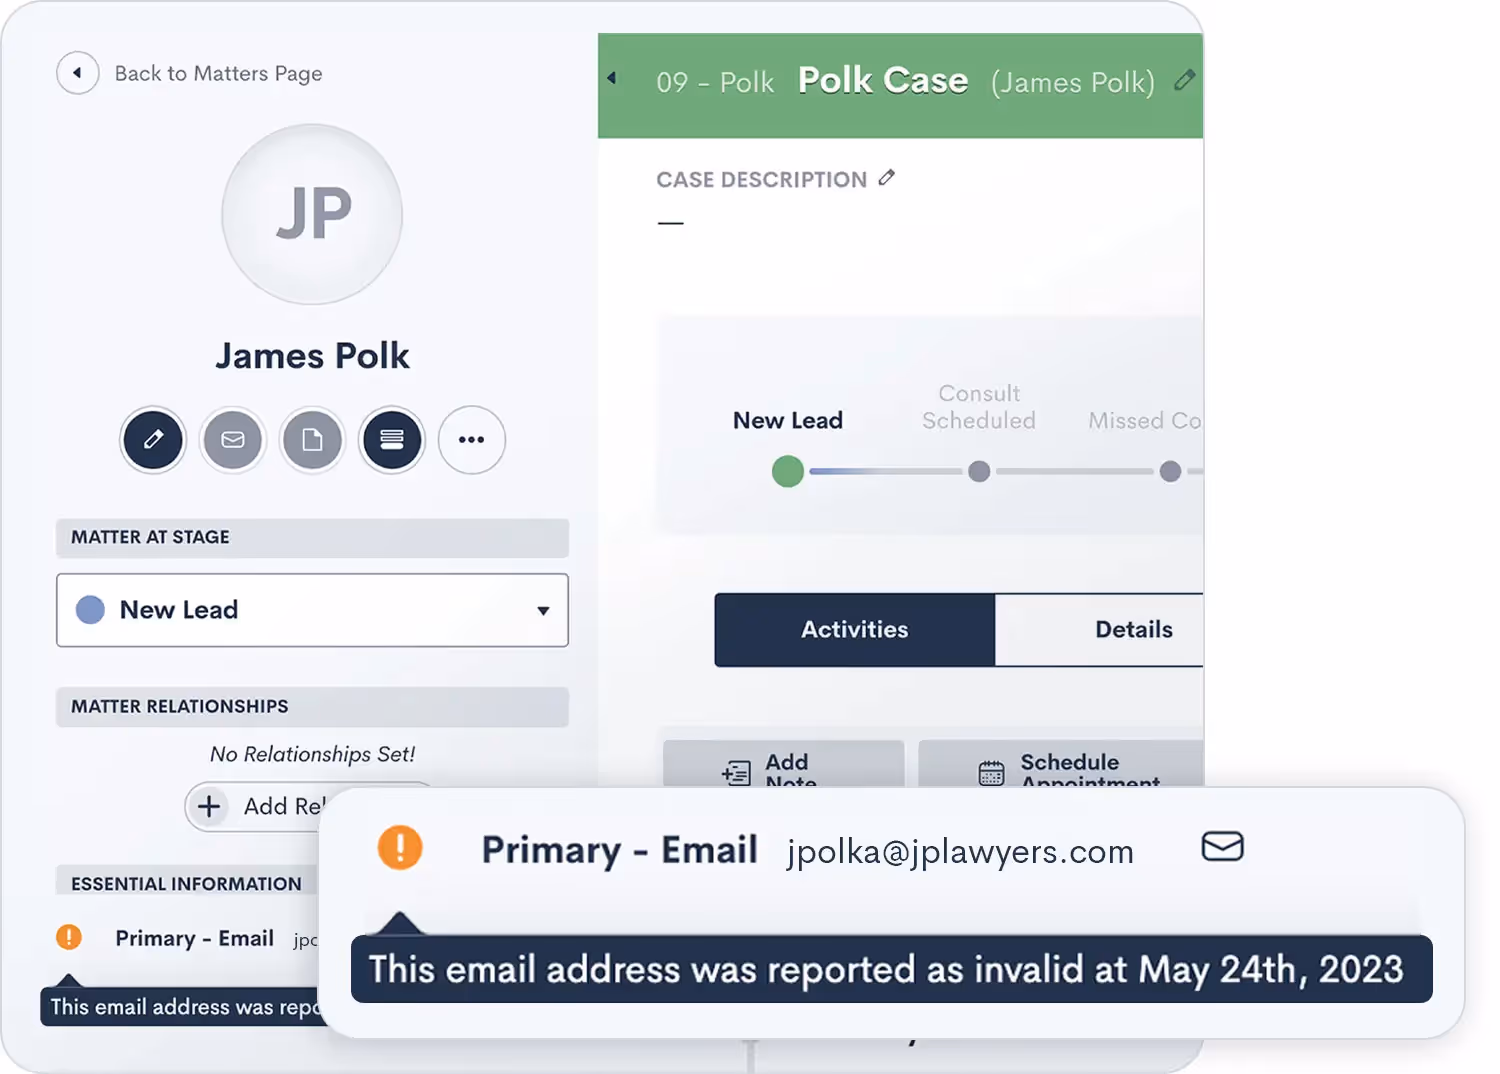
14Improve your outreach strategy with email validation
Earlier this year we released our new email validation feature, allowing you to validate a new contact’s email address prior to sending them anything. This functionality gives you the opportunity to correct any grammatical errors while ensuring contacts don’t miss out on any important emails from your firm. Additionally, we’ve incorporated an option for all email Automation actions, allowing you to decide whether an invalid email address should fail the Automation or be skipped over. Just choose Skip if Target has Invalid Email when building the Automation if you do not wish for an invalid email to fail the Automation.
Learn more about sending emails via Lawmatics here.
Conflict Checking
15Streamline conflict checking with flexible terms
We understand that exact matches are just the tip of the iceberg when it comes to conflict identification. That's why our enhanced system now closely examines flexible search term matches as well as Contact relationships on Matters, ensuring that you have a holistic view of potential conflicts. Seamlessly navigate the complexities of your clients' networks, uncover connections, and make informed decisions that safeguard your firm's reputation and ethics. In 2023 we said goodbye to missed connections and hello to a more comprehensive approach to identify potential conflicts that may have been previously overlooked.
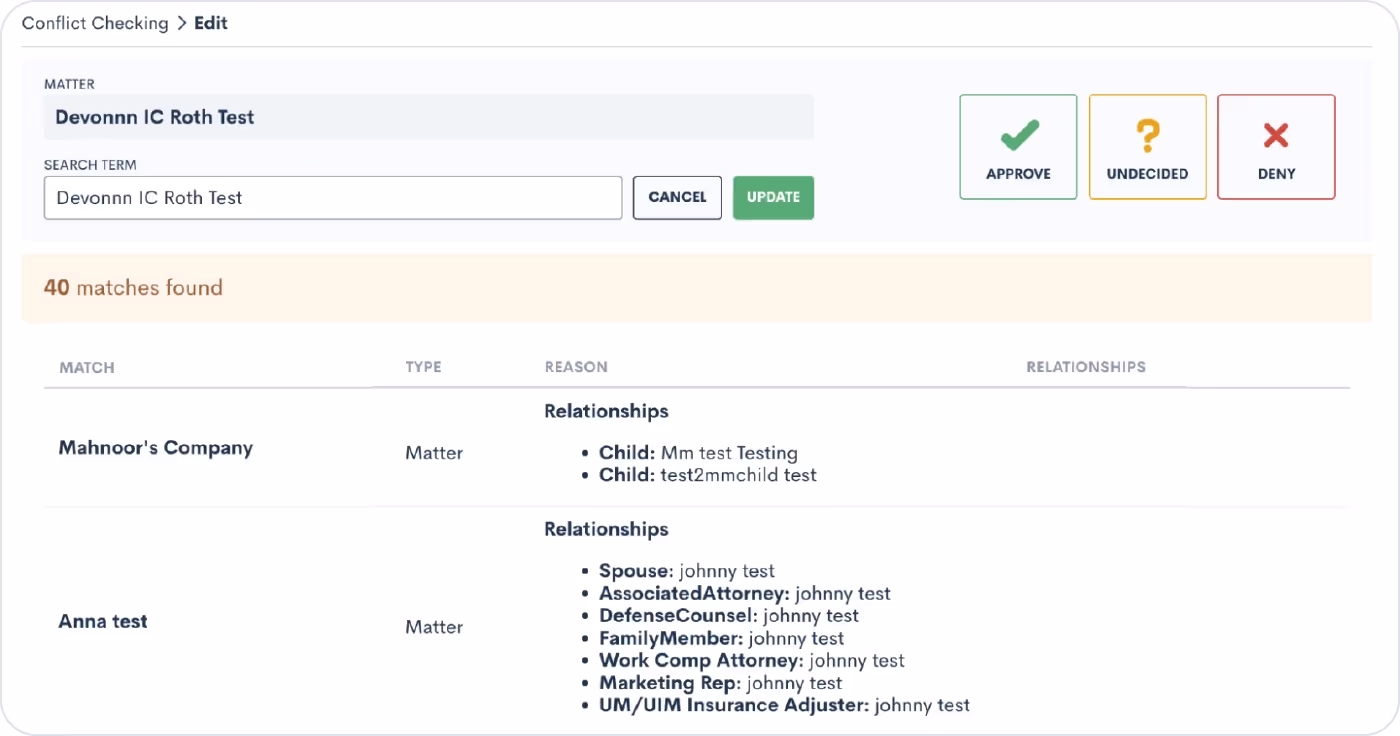
16Refine conflict checks with multiple search terms
After introducing flexible search terms in our August release, we also made your conflict check search even more dynamic and inclusive with multiple search terms. Users can now use this feature to create an ‘And’ or ‘Or’ relationship between multiple terms. This will include more relevant data in your search by significantly broadening your conflict check results.

Learn how to conduct more thorough conflict checks here.
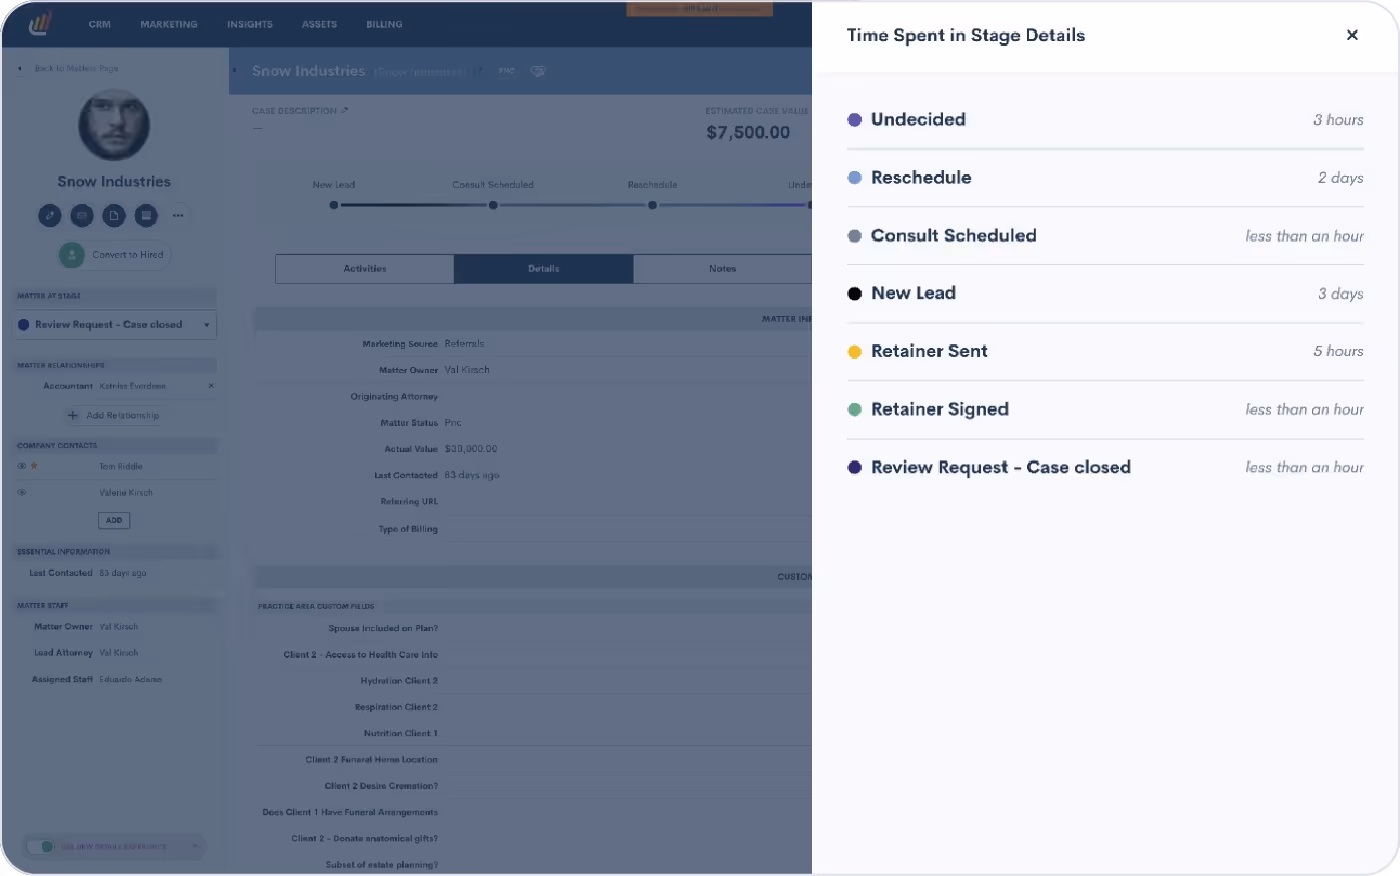
17Fine-tune your sales cycle by tracking time in stage
Tracking time isn’t just for billing — it’s instrumental in unlocking the power of data-informed decision making. This year’s new Time in Stage feature allows you to automatically log the duration of time each of your leads spends in each stage of your firm’s Pipeline(s). With this new capability, you can easily identify bottlenecks or delays in your sales cycle. Armed with these insights, you’ll be able to fine-tune your processes and make informed changes that simplify your client journey, ultimately accelerating conversions.
Click here to learn how to start tracking time in a stage.
18New display options for true/false custom fields
Custom fields have always been a staple of the Lawmatics CRM, so why not introduce further customization options? With this feature you can now select from three different display options for your true/false fields: toggle (previously the only option), a checkbox, or a picklist displaying options of “Yes” and “No”. Select the option that is best suited for each custom field to give your clients the best possible experience when filling out your intake forms.
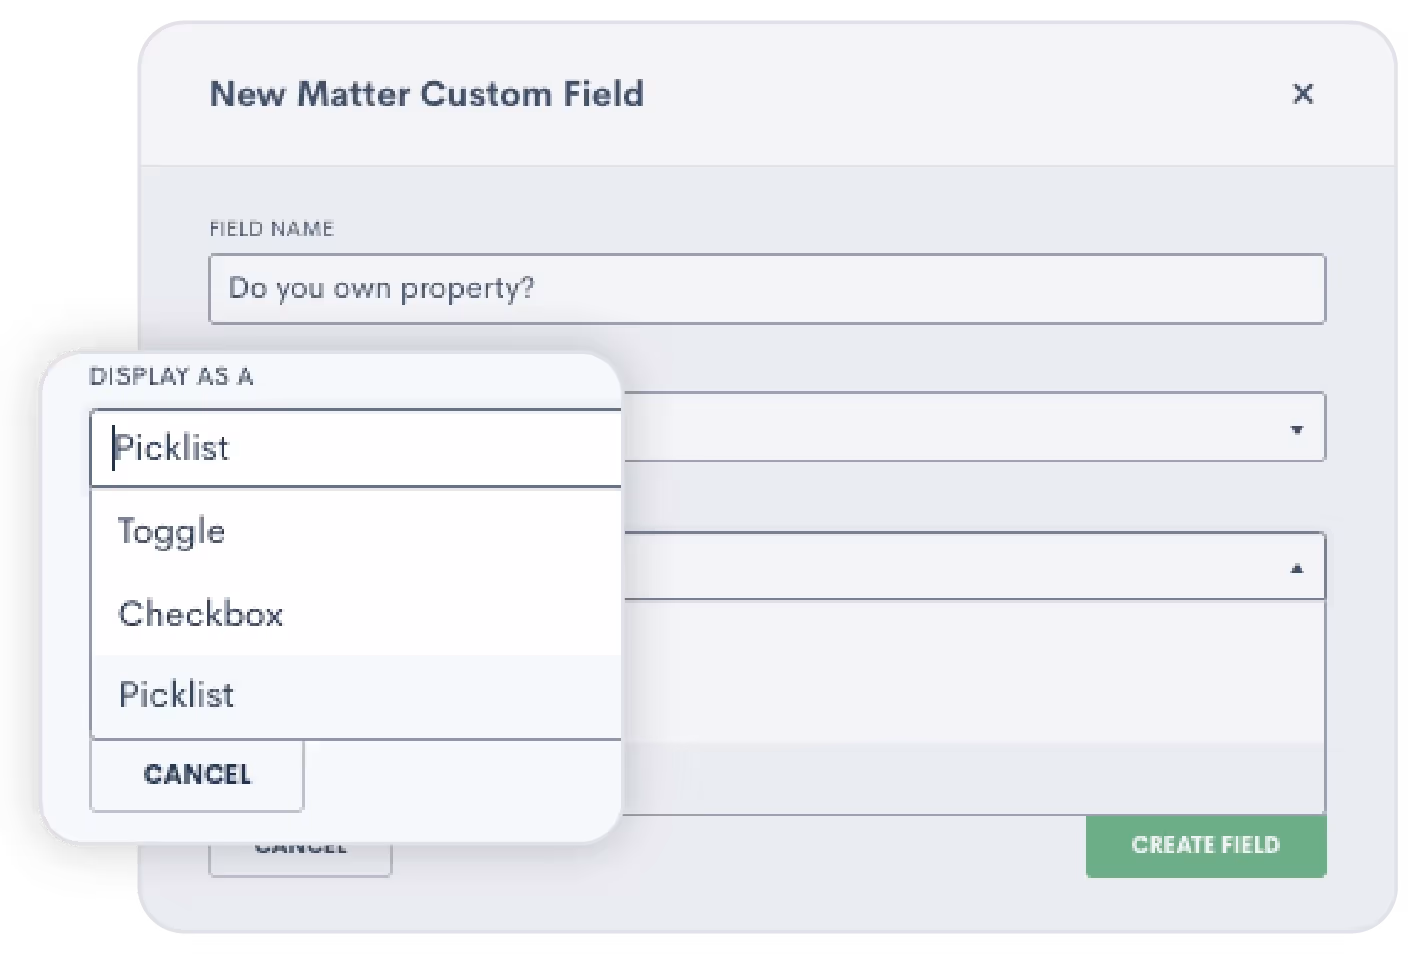
We also introduced the option for true/false fields to be designated as either Required or Required To Be True. This gives you the flexibility to enforce the selection of a ‘true’ or ‘false’ answer - particularly when a ‘false’ response would result in disqualifying a potential lead.

Click here to learn more about custom fields.
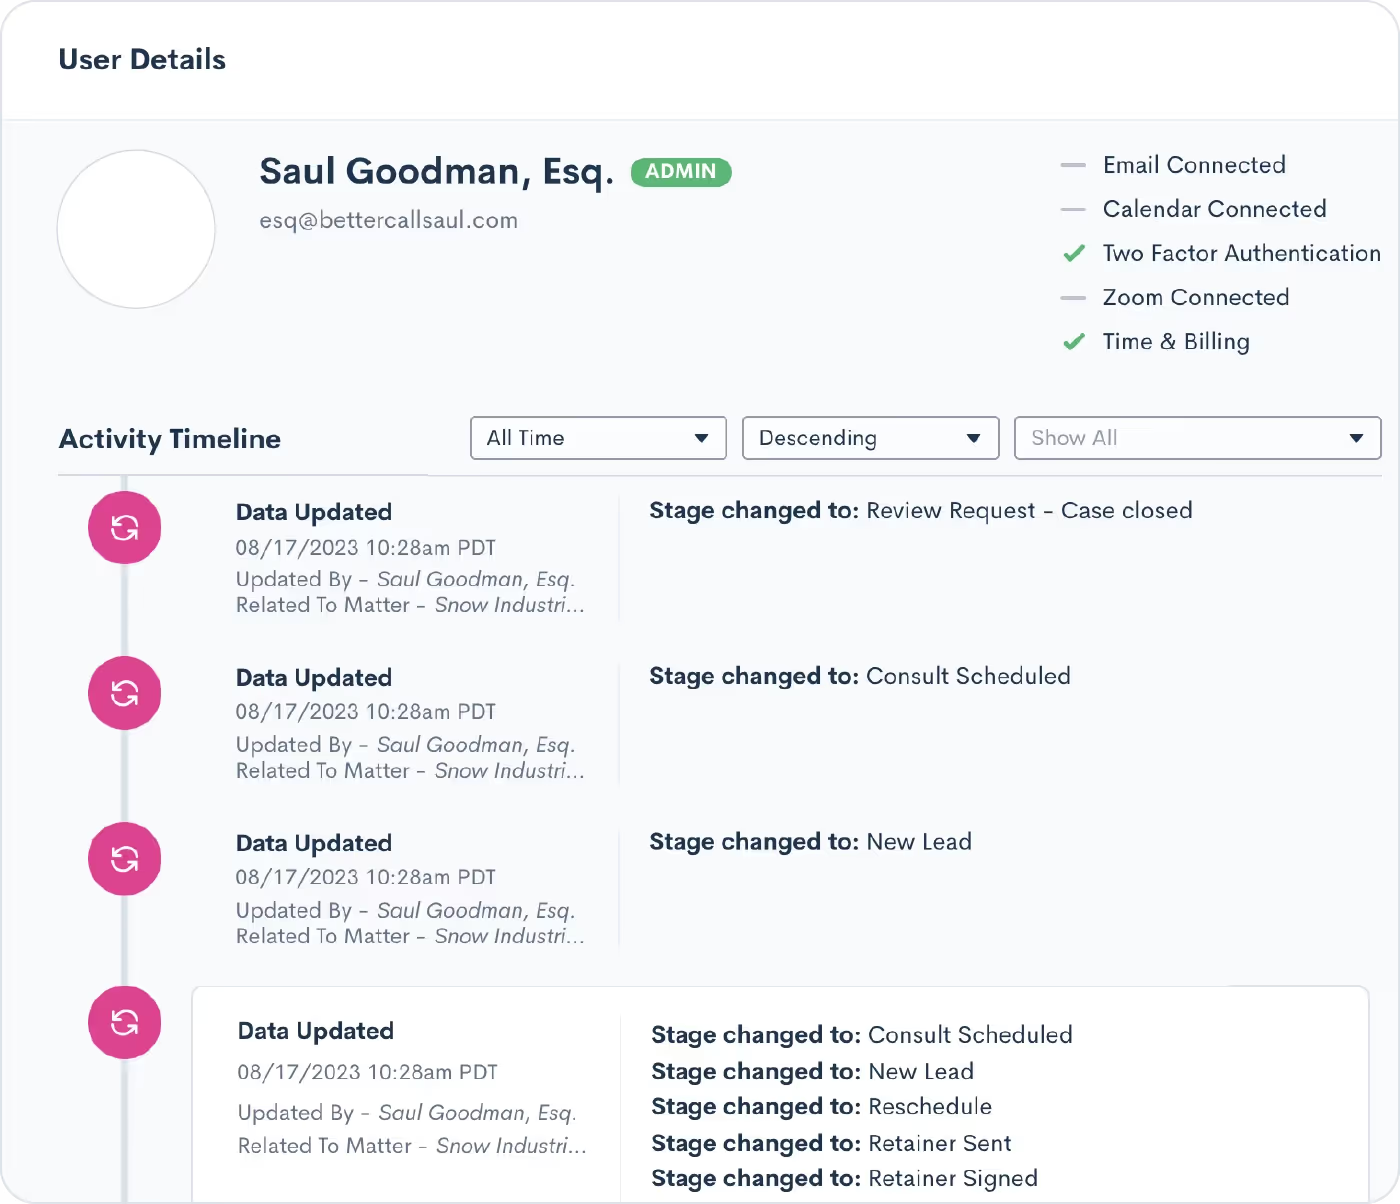
19Unlock internal visibility with User Activity Timelines
Earlier this year we met the User Activity Timeline, a dynamic tool that brings enhanced oversight and collaboration to your law firm. With this exciting addition, administrators can access a comprehensive view of each user’s activities, presented in a timeline format. From Matter updates to Task completions, client interactions to internal collaborations, this feature empowers administrators to stay informed and ensure optimal productivity across the board.
Learn how to use the User Activity Timeline here.
20Build more robust integrations with Zapier
This year we added several new Lawmatics Zapier App enhancements to help you further redefine your workflows. Previously, users were limited to syncing Contacts and Matters through Zapier. Now, we’ve enabled the syncing of Companies across applications. This update simplifies data management, ensuring uniformity and consistency throughout.

Access the Lawmatics Zapier App.
Conclusion
As we bid farewell to 2023, we thank you for reminiscing with us about all that the Lawmaticians have innovated for you throughout this year. We have spent countless hours talking to you, our passionate customer, and listening to your feedback.Each of these new tools and functionalities, meticulously crafted to propel your practice towards increased profitability and streamlined efficiency, has been a joy for us to create – and we hope a joy for your firm to use. As we conclude this year's journey, our team here at Lawmatics looks forward to setting our sights on another year of enriching the evolution of legal technology.
Lawmatics is a treasure trove of tools that transform the way you operate your legal practice and elevate the client experience. In fact, there may even be CRM, marketing, reporting, and asset management functionalities you’ve yet to explore.For this month’s Deep Dive we unveil the 13 most potent yet underutilized features our platform has to offer.Without further ado, let’s get into it!
CRM
The Lawmatics Customer Relationship Management (CRM) system is an indispensable asset for law firms, serving as a centralized hub for organizing and managing client information. The CRM enables streamlined client communications by providing a holistic view of client interactions, case details, key dates, and so much more.With all this potential at your fingertips, here are some elements that can further maximize your client management.
1Pipeline filtering
The pipeline is a favorite feature of many, designed to help you monitor the progress of all leads and clients as they progress through your intake process. You’re probably already familiar with building and using your firm’s various pipelines – but have you explored the possibilities of pipeline filtering?When viewing your pipeline under the CRM tab, click the funnel icon near the top right to create a custom filtered view.
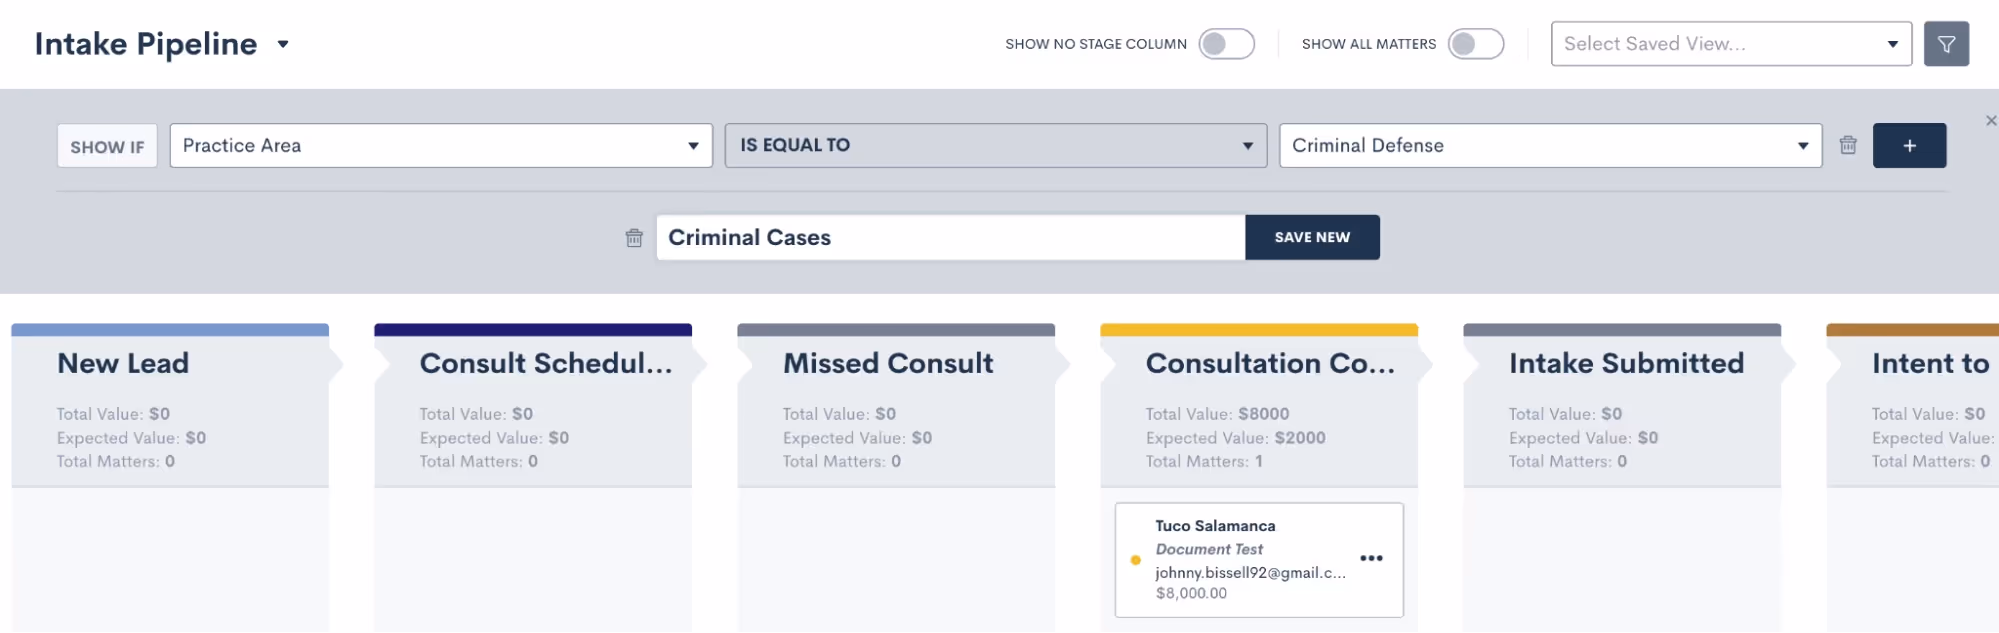
For instance, you might create a filtered view to show all matters of a certain practice area, or matters of which you are the owner. Add on as many filters as you like – the possibilities are endless.Once you’ve added filters, give this View a name and save it so that you can easily select it from your dropdown list of Saved Views next time.
2Relationships
Your Matters will always have one Contact as the primary contact on the Matter, but did you know you can link additional Contacts using Relationships?If your firm often deals with multiple contacts related to one particular matter, Relationships can be a game changer when it comes to organizing your CRM. It’s the most efficient way to capture information about other individuals involved in a particular matter.
- Navigate to the Matters page in Settings
- Create your Relationship Types
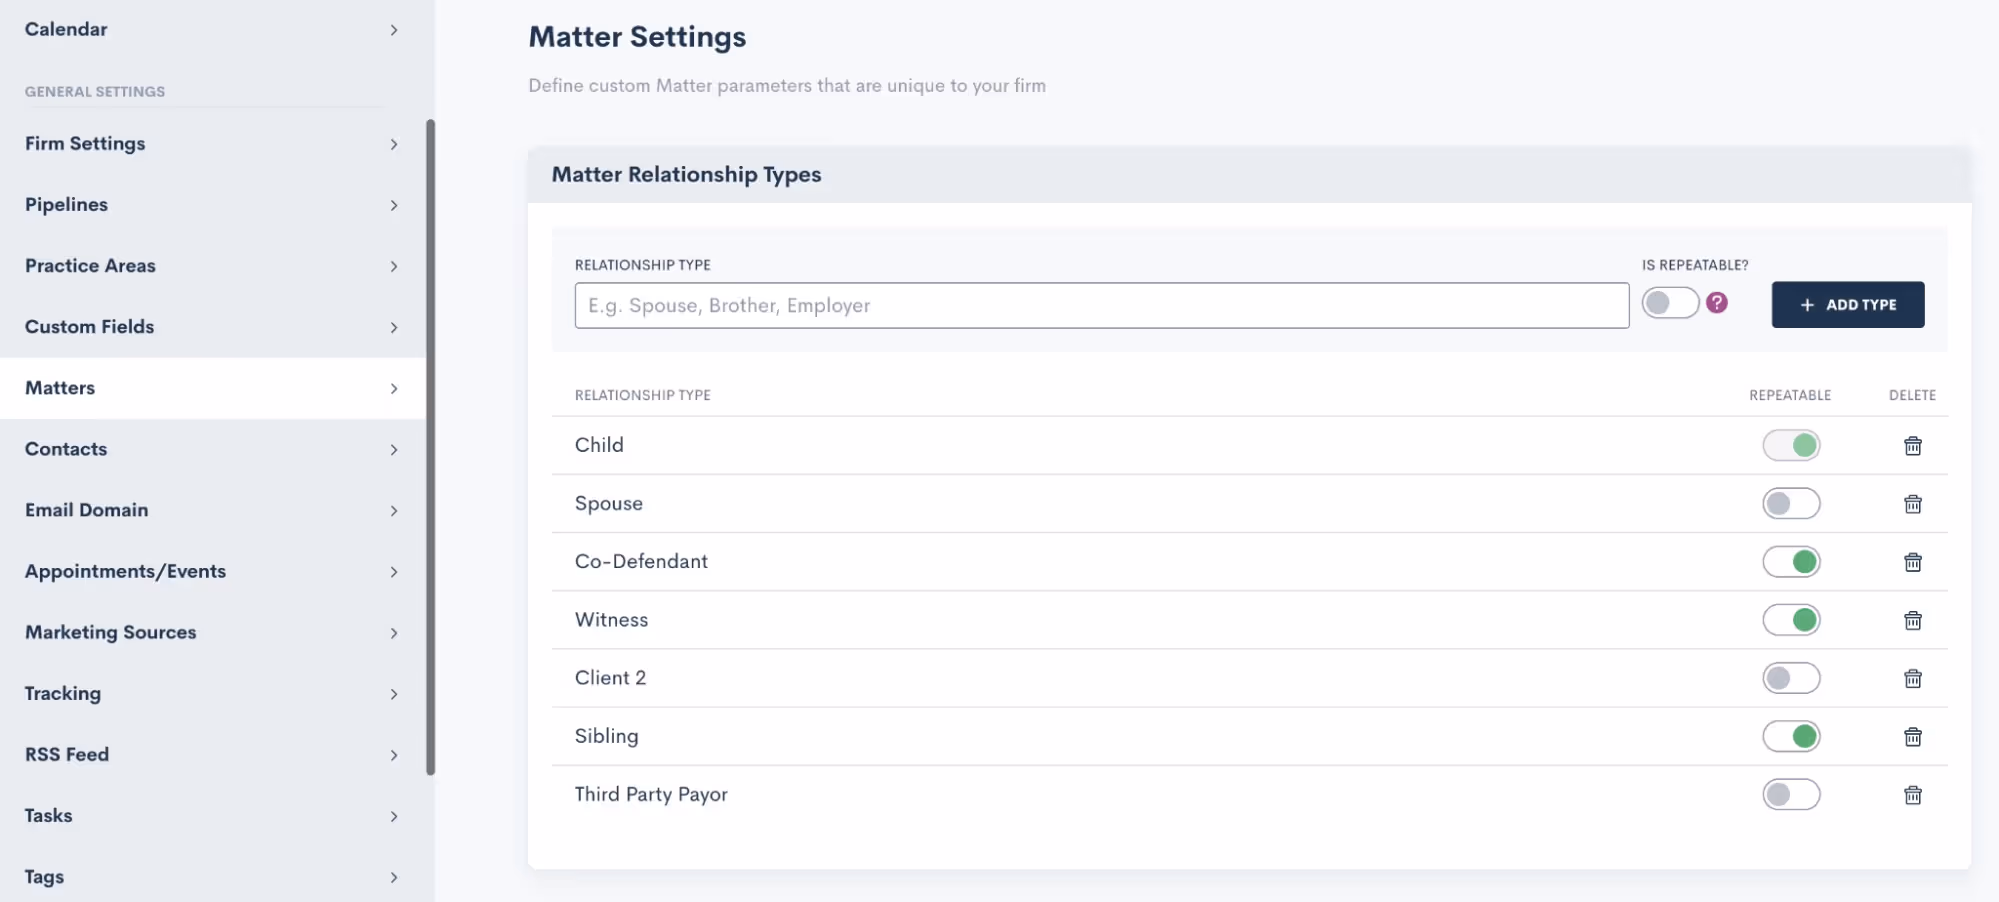
- Link a Contact to a Matter by selecting the Relationship Type and the Contact on a Matter’s profile,

- …from within Custom Forms,

- …or even CC the relationship in an email from an Automation!
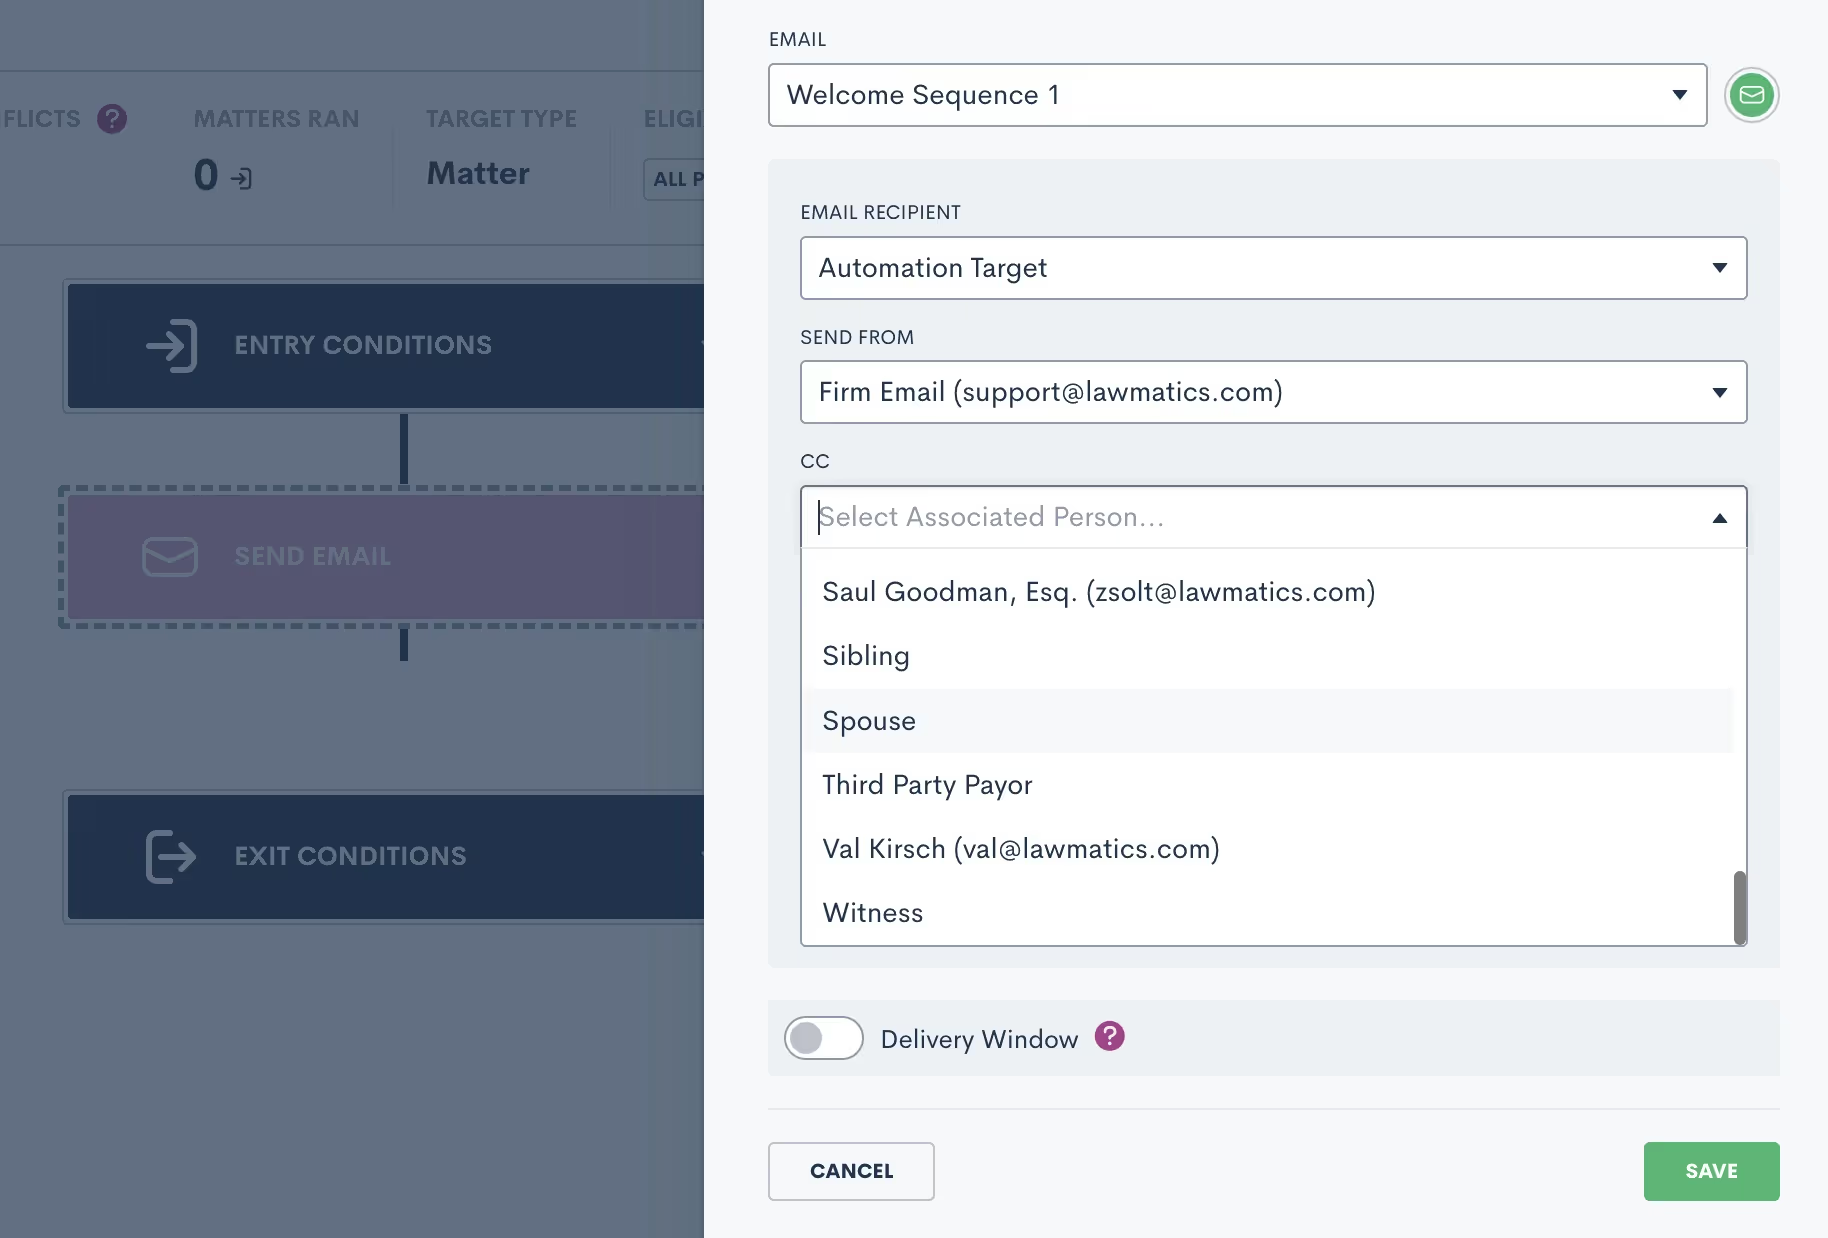
Even if you’re already aware of Relationships, you may find yet another way to utilize them within your Lawmatics CRM.
3Task comments
Communication is key when it comes to collaboration, and Lawmatics Tasks make the process of communicating even easier.While you’re probably already familiar with creating and completing Tasks – both manually and from Automations – have you made the most of Task comments and mentions yet?When viewing a Task – either from the Tasks dashboard or from the Matter’s profile – you’ll see the Comments section, highlighted below.
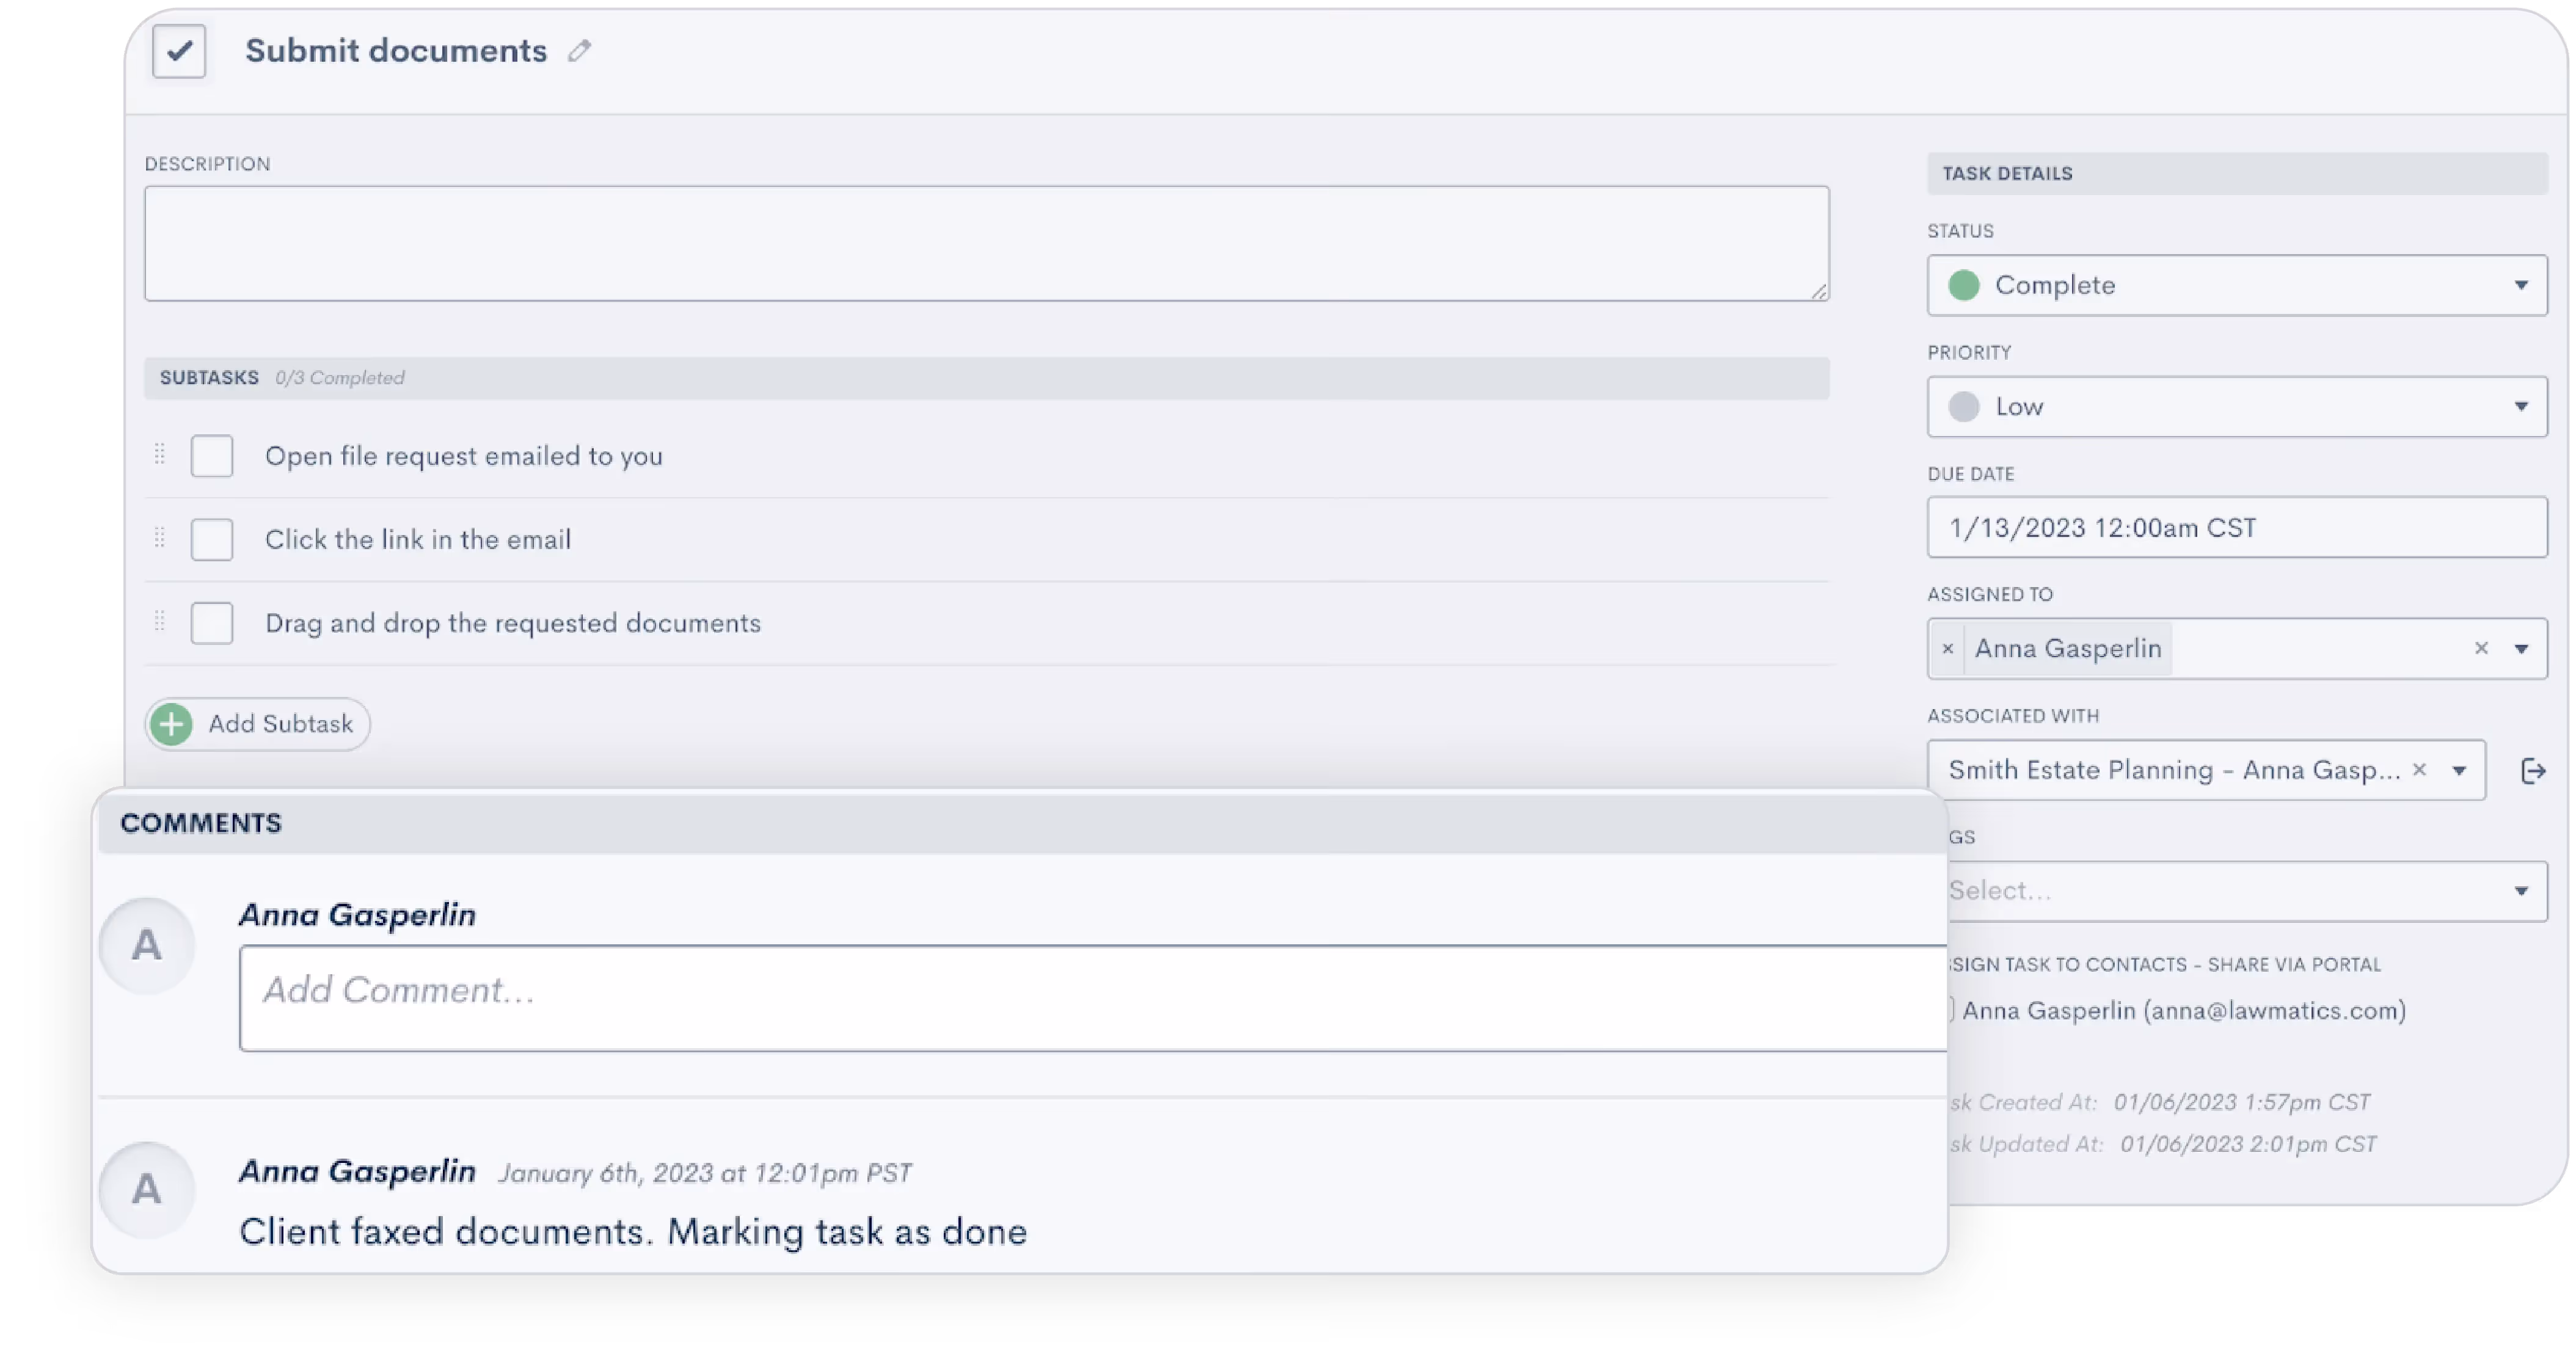
Easily view any comments left by fellow team members, along with data on when the comment was left and who left it.Use your comments to capture a particular team member’s attention by using the @ sign,

…and then selecting their username from the provided list of your firm’s Lawmatics users.
Be sure to encourage your firm’s Lawmatics users to turn on their Task Notifications in Settings to make the absolute most of this feature.
Marketing
Embarking on a successful legal practice involves not only managing cases proficiently, but engaging clients effectively. From Automations to email campaigns, Lawmatics’ suite of marketing features offers an arsenal of tools to elevate your firm's outreach and marketing strategies.
4Change Attributes Automation Action
You may think you know all about Automations, but you may not be aware of the huge potential of the Change AttributesAction.Change Attributes allows you to populate any data into any field within your CRM. This powerful Automation could be used for any of the following:
- Apply a Tag to a Matter or Contact
- Move a Matter through your pipeline
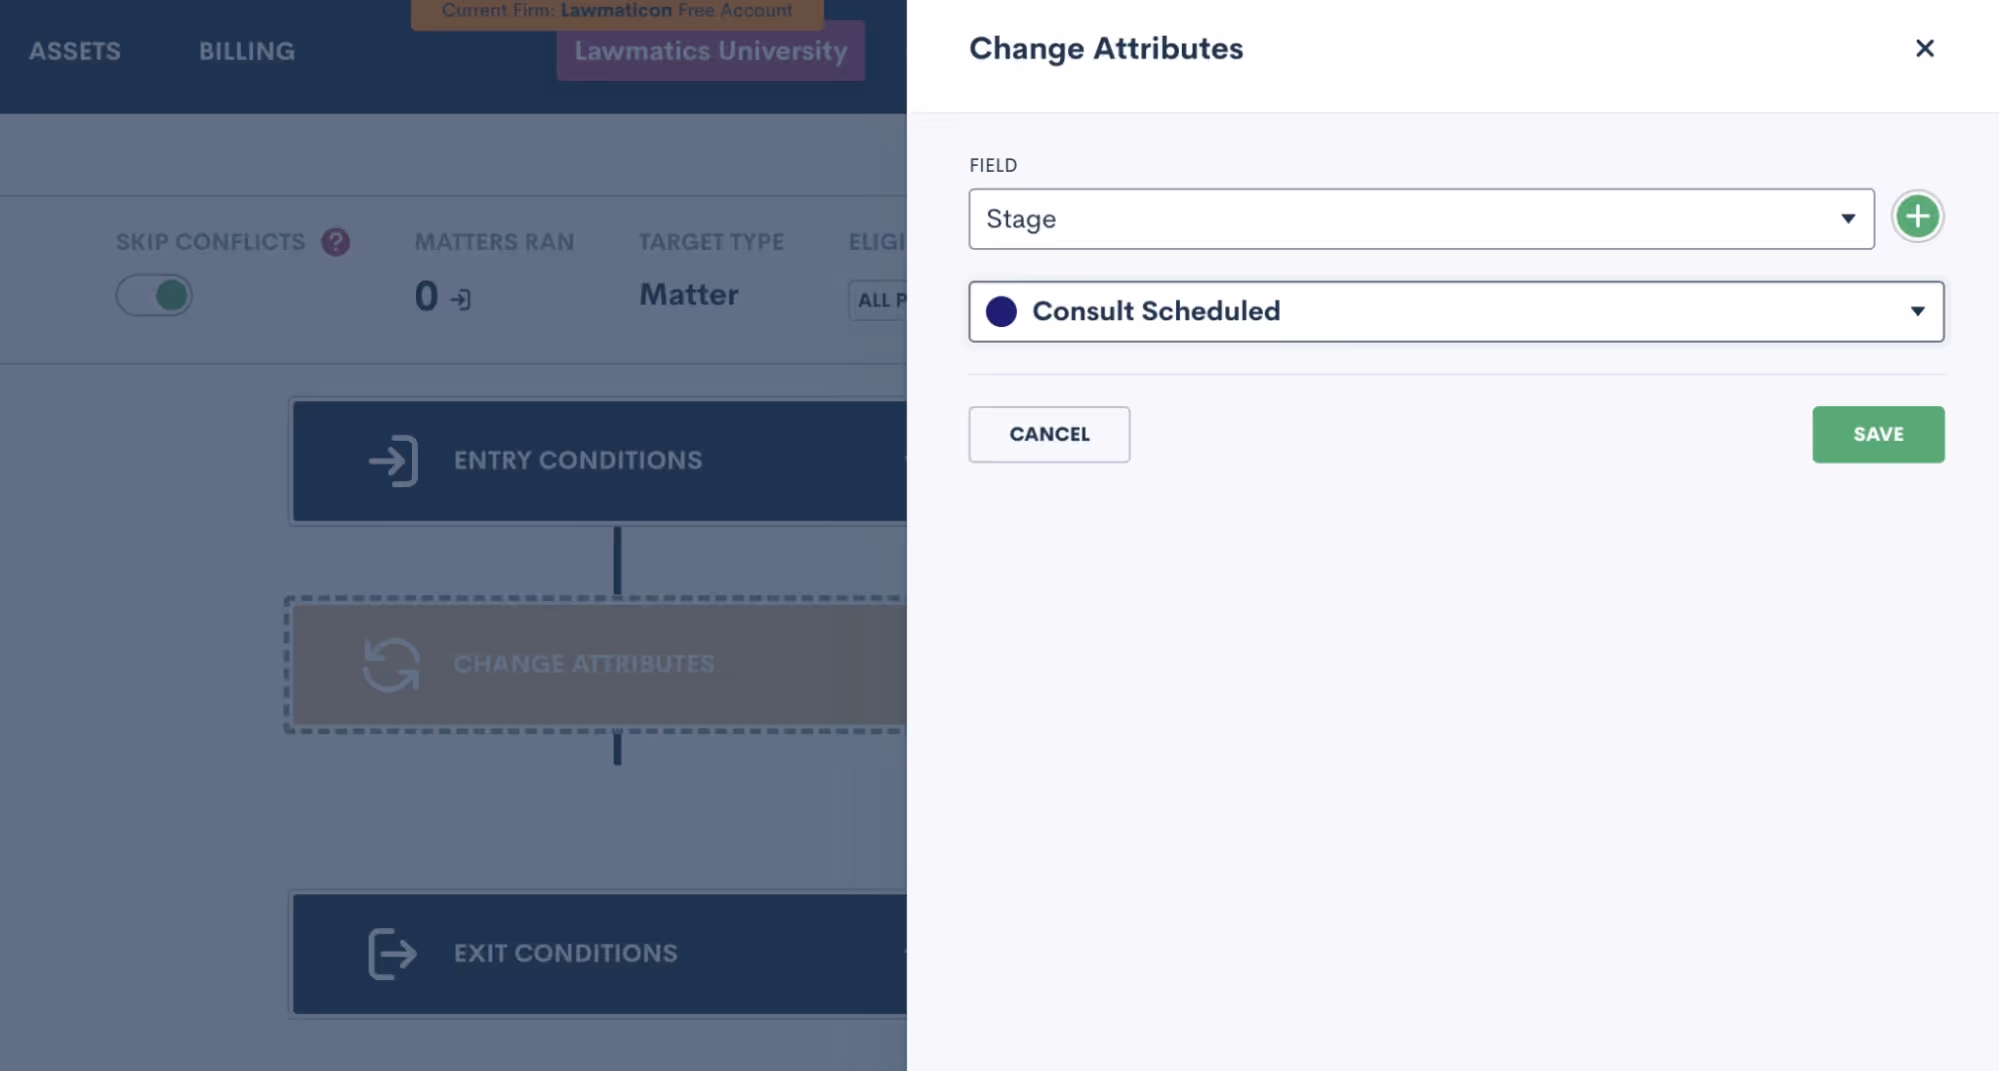
- Move a Matter to a different pipeline
- Assign a Marketing Source
- Change a Matter’s status during or after a drip campaign
- Assign a Matter owner based on practice area

- Populate any custom field
- And much more!
5Change Attributes Automation Run History
Often used for Automation troubleshooting, the Automation Run History is an incredibly handy reference. This history is found within each Automation, showing exactly which Matters have triggered through that Automation, along with their current status in relation to that Automation.You’ll find this history by clicking the Matters Ran button shown below.
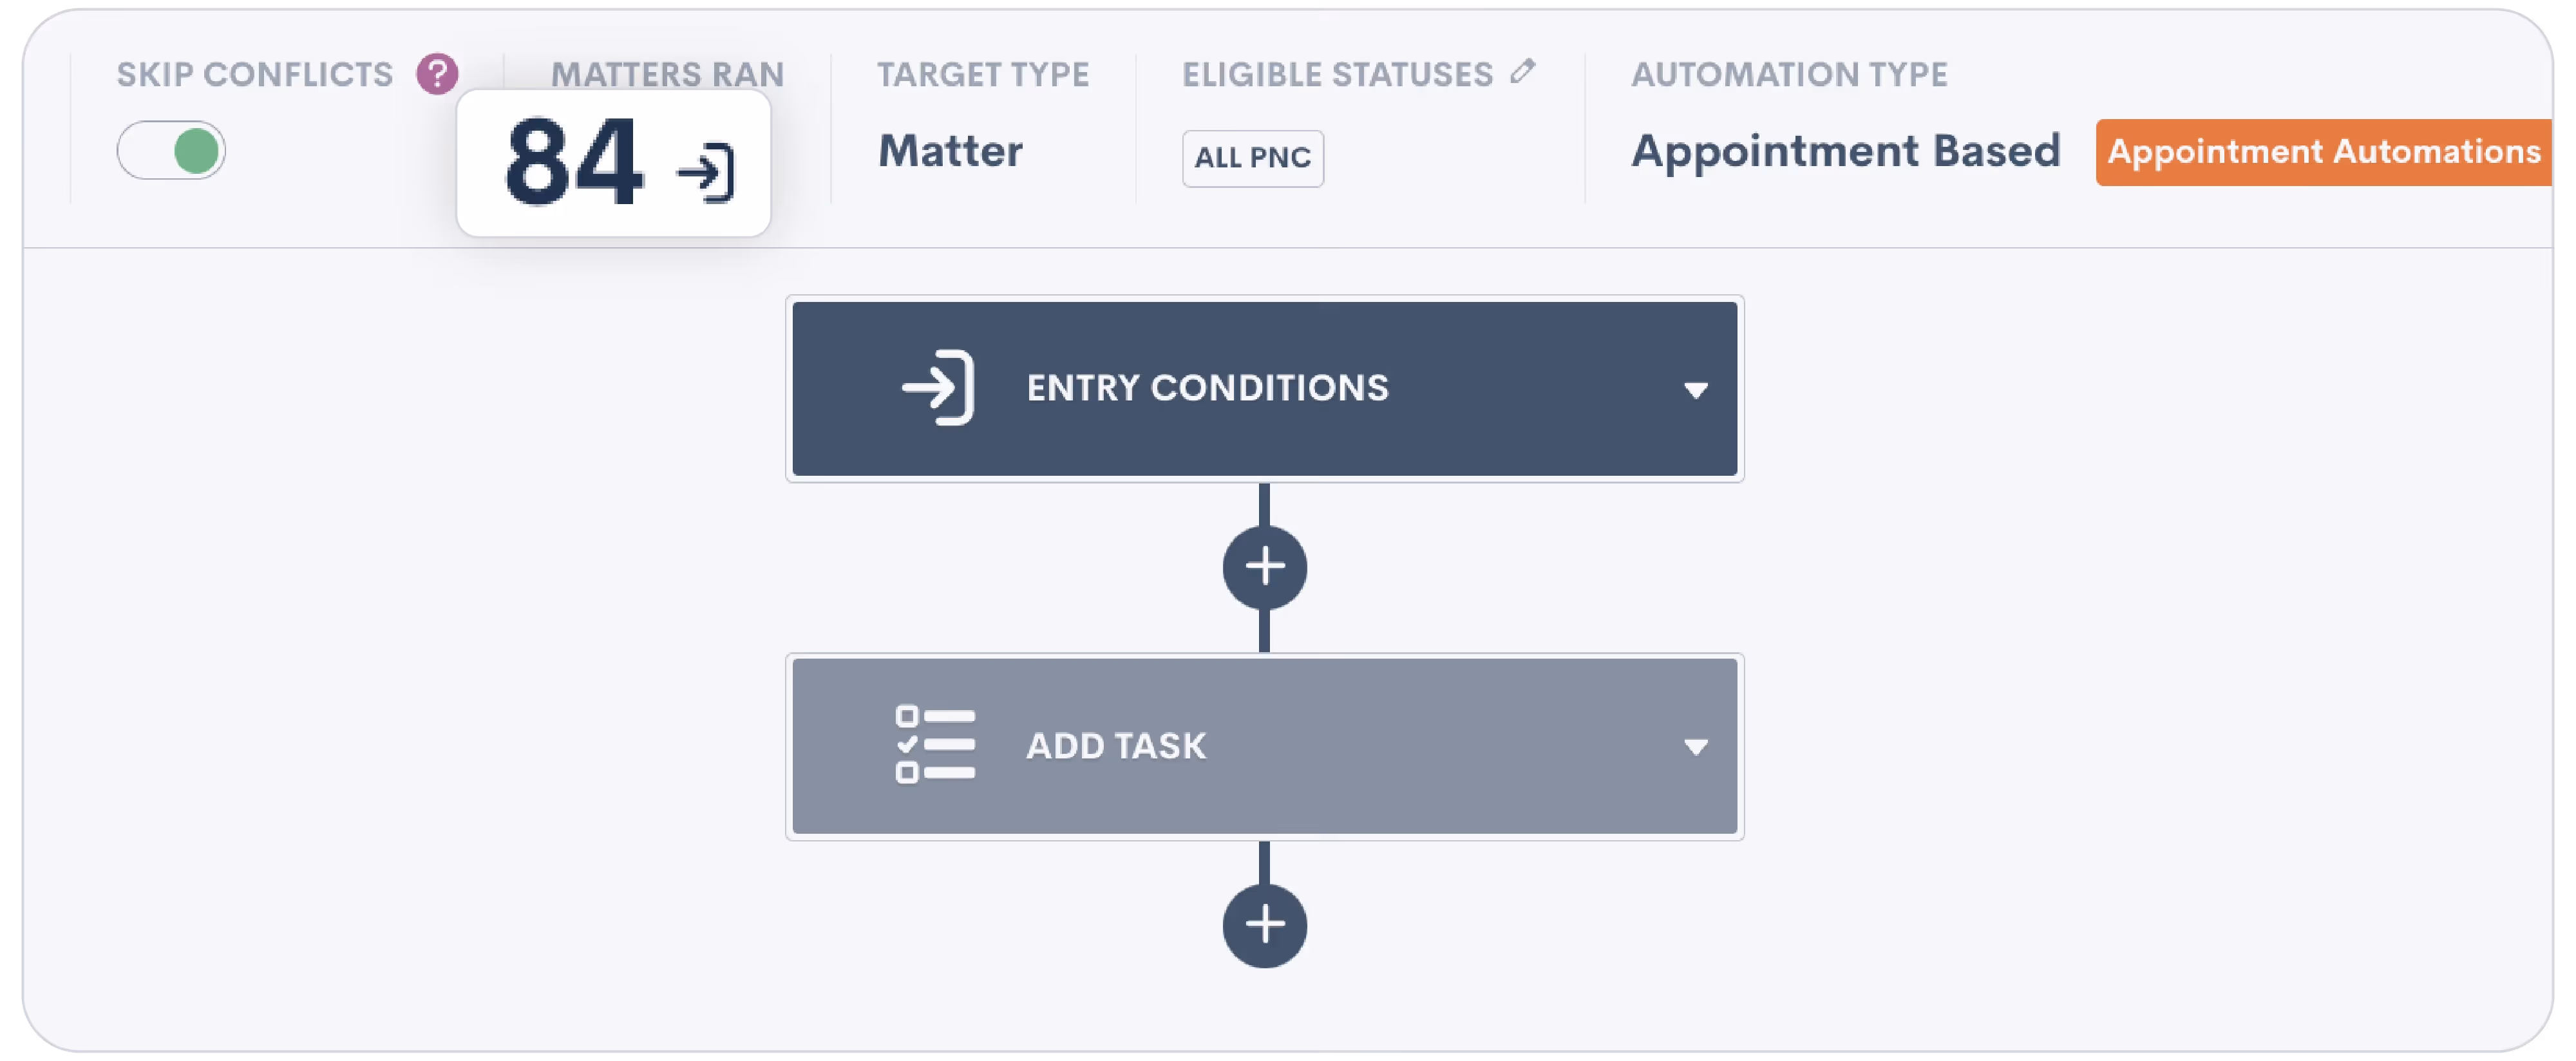
You’ll then see the list of Matters that have run through this particular Automation.

Expand a particular Matter to view details on each step it went through along with its status at each step. For example, in the image above we see that several Matters failed going through this Automation.In addition to viewing this information from the Automation, you can go to a Matter’s profile and find the Automation log on its activity timeline.
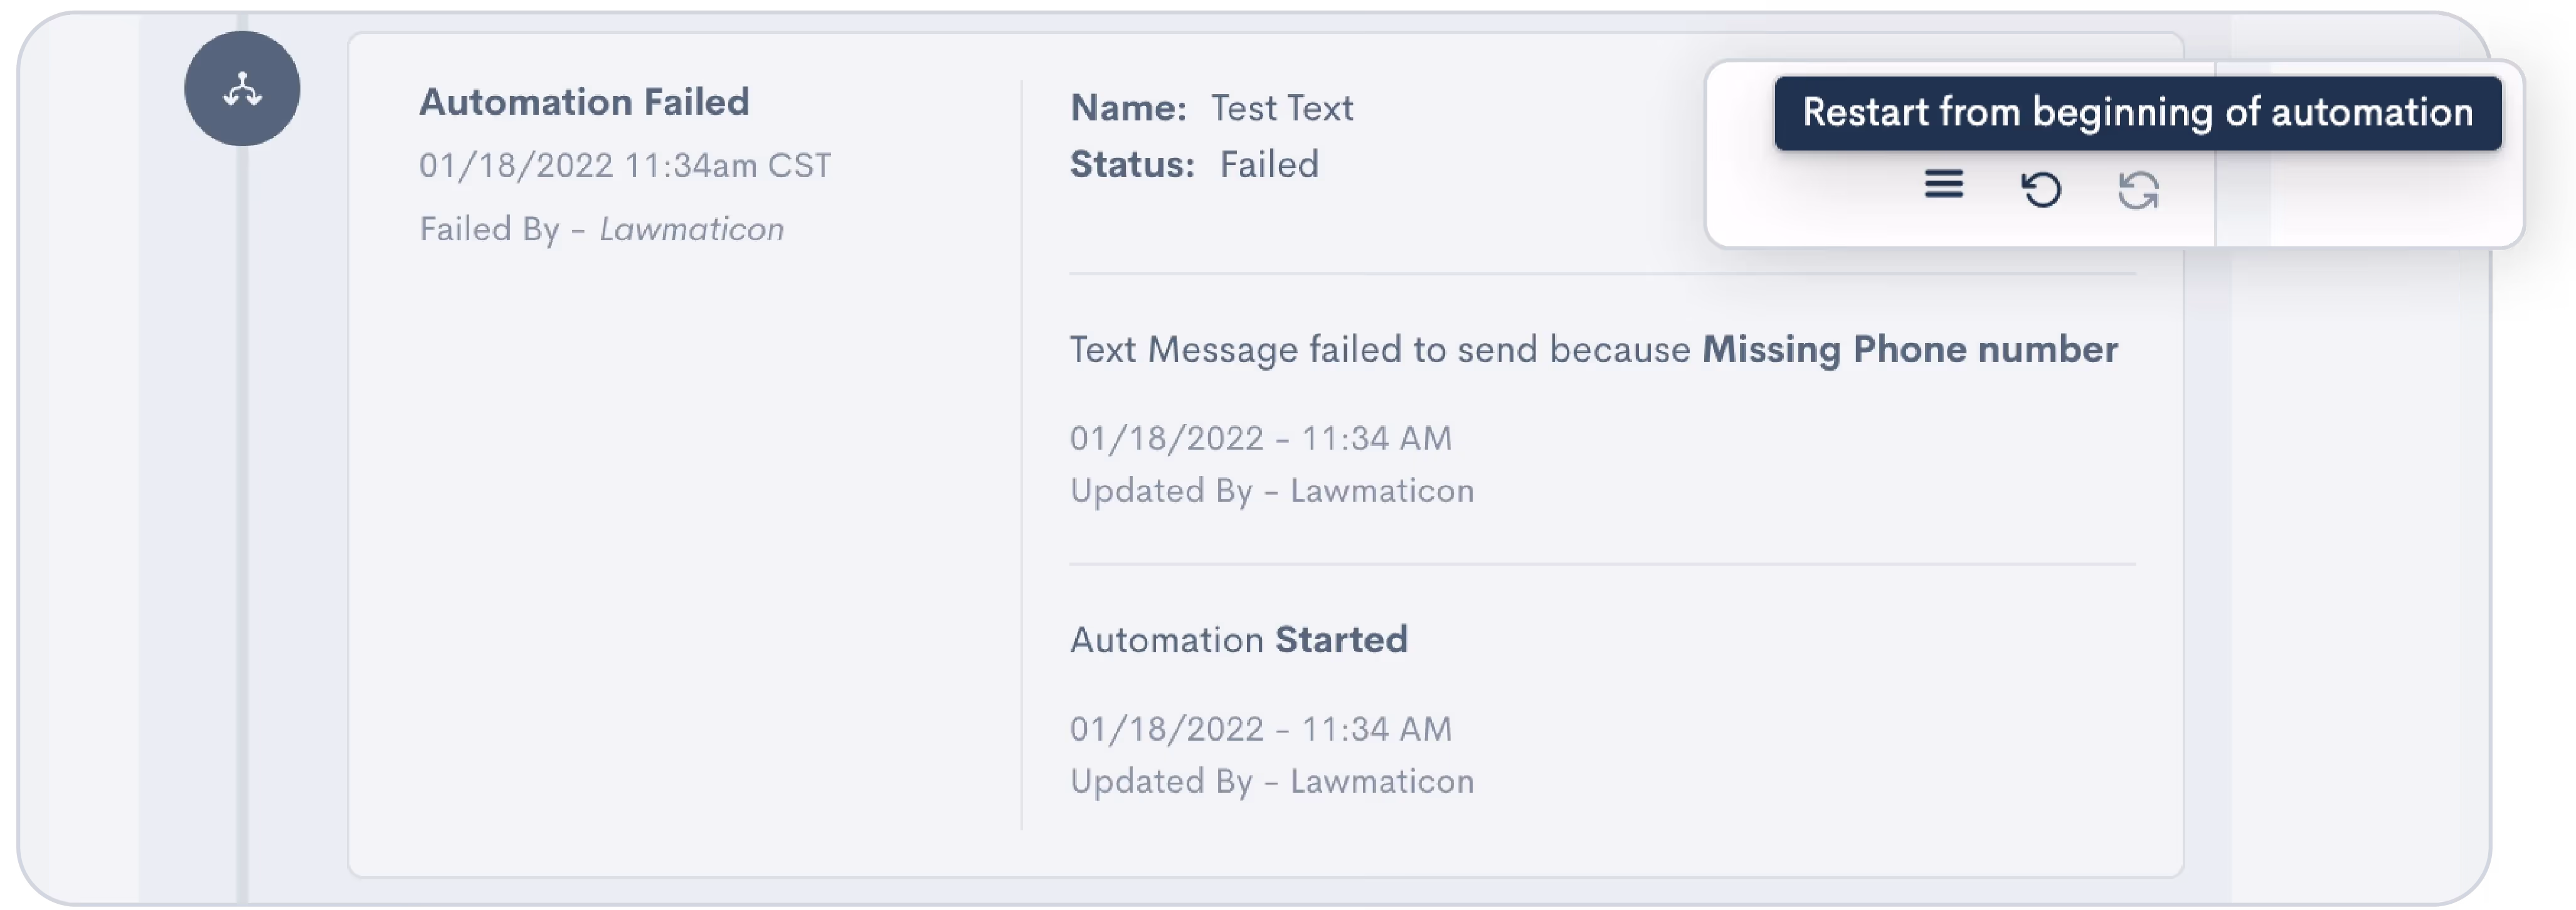
Here you can also select various actions, such as restarting or force exiting from an Automation when needed.Whether you’re still getting familiar with Automations or consider yourself an expert, you may want to keep the occasional eye on your Automation history log to make sure that everything is running properly.
6Audiences
Many firms use Lawmatics for sending out mass emails like newsletters or holiday greetings. While you may be sending out these emails to all Contacts, you can refine your Audiences to create highly targeted email campaigns as well.
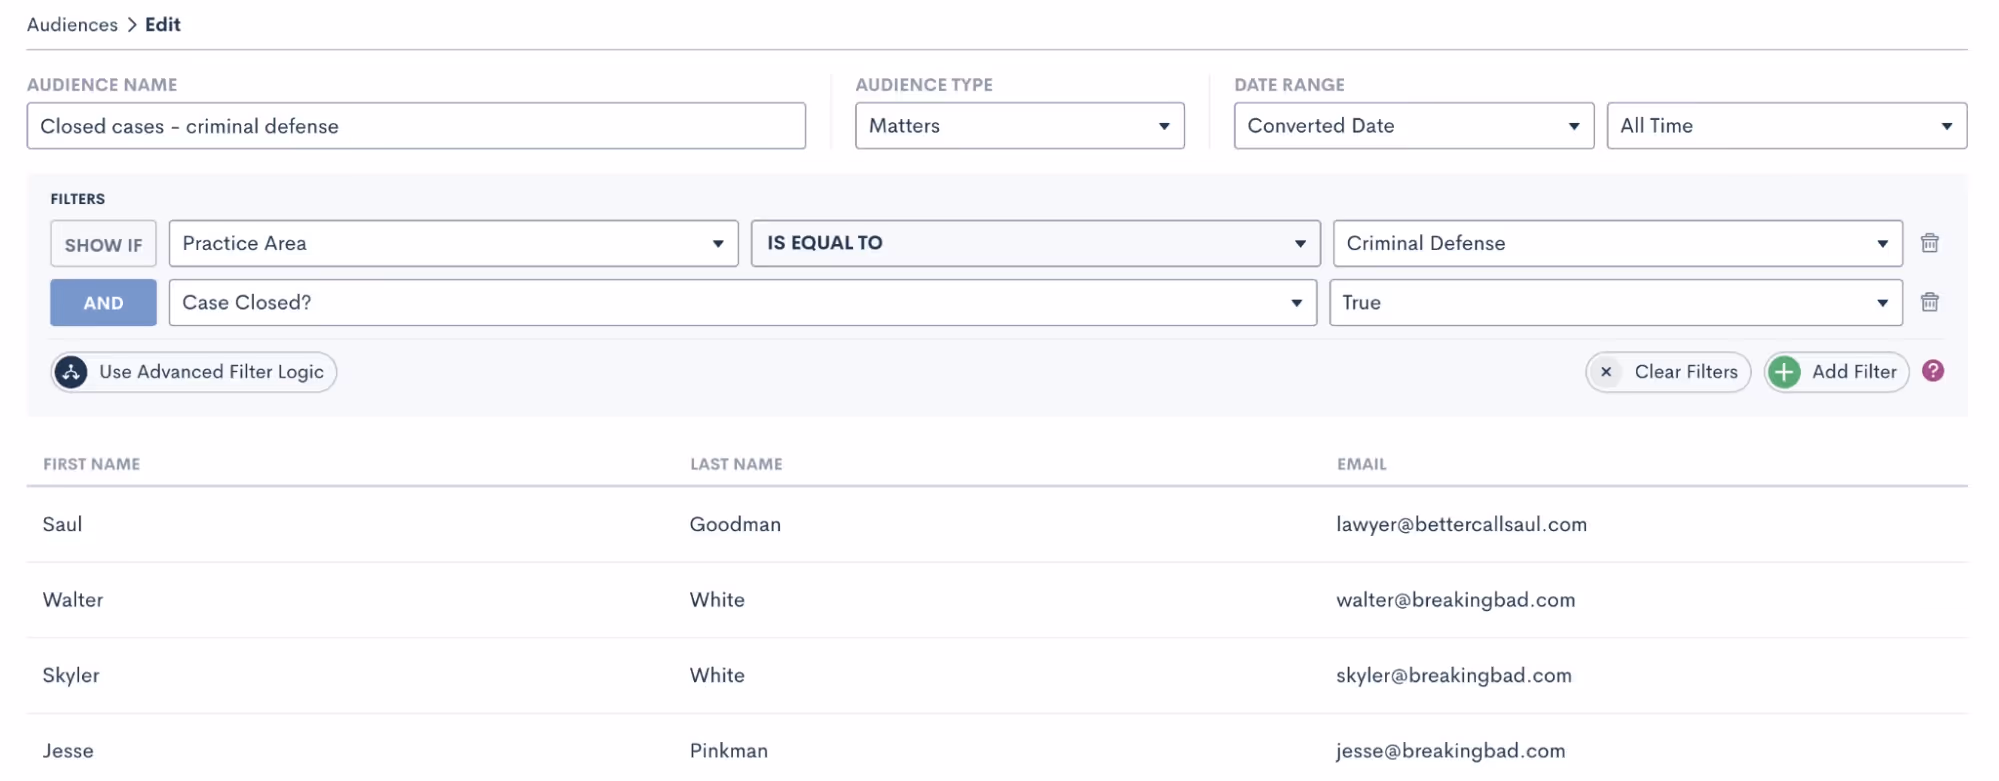
When creating an Audience, add as many filters as you wish to fine-tune your segmented list. For example, you might have an email tailored specifically for criminal defense clients whose case has been closed. By selecting an Audience, you can send an email to that highly specific clientele.Audiences can be saved and since they dynamically update, they can be used over and over again to target any filtered group of Contacts.
Insights
Lawmatics' robust insights and reporting features serve as the backbone for informed decision-making and strategic planning within your law firm.Understanding and harnessing some of these potentially underutilized tools can transform your firm's data into actionable insights, fostering greater efficiency and data-informed strategy.
7Custom goal tracking
Under the Analytics page, New Lead Goals allow you to create custom targets for how many new leads you want to bring in each day, week, month, and year. The system will automatically track your progress on your goals, conveniently displaying your progress on graphs.
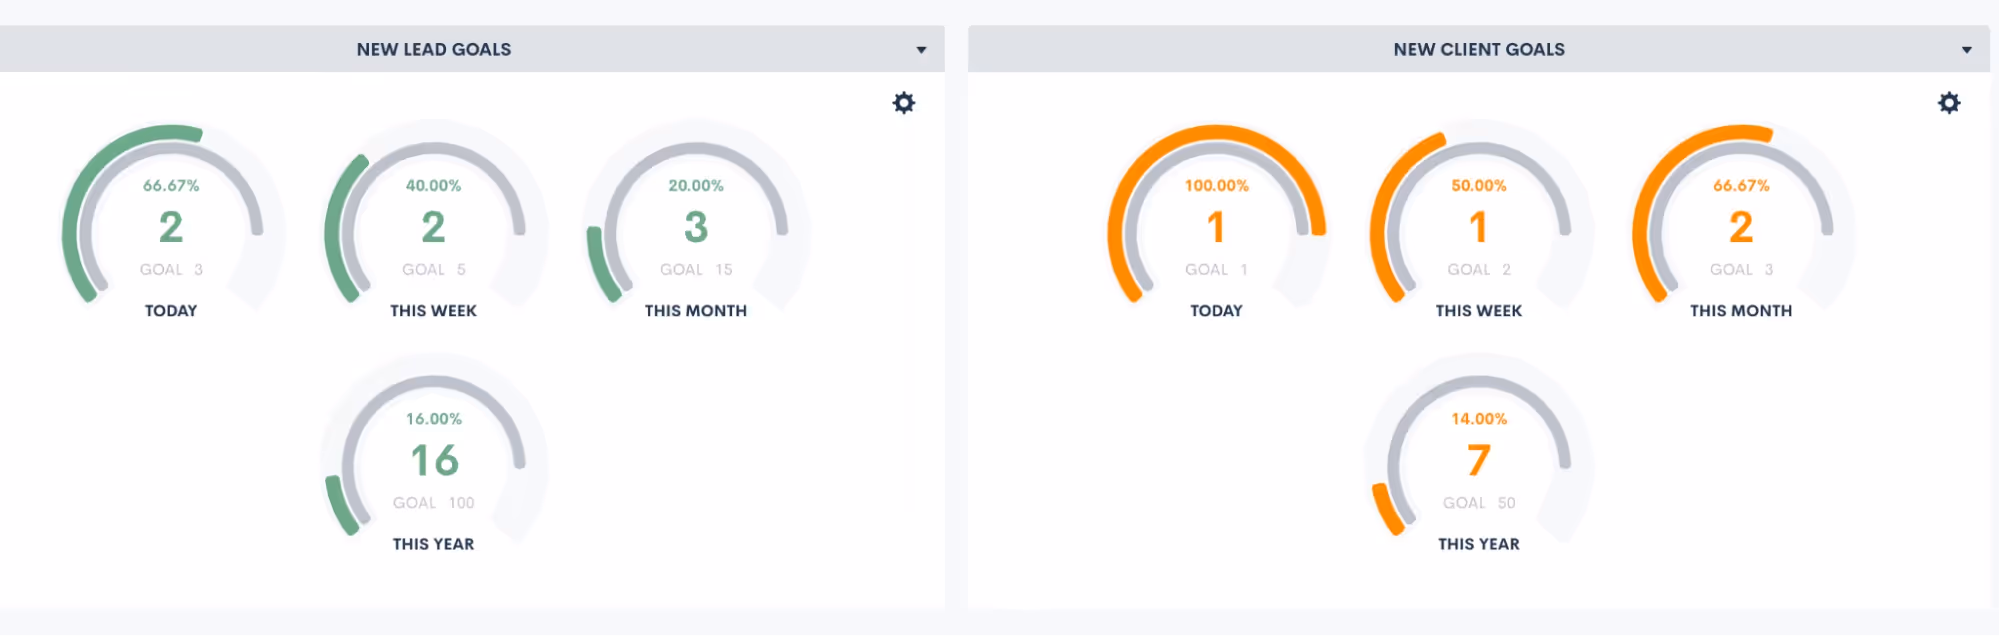
Similarly, New Client Goals can do the same goal-setting for how many of those new leads you aim to convert into new clients, shown on the right in the above screenshot.
8Cost per lead breakdown
Another highly useful statistic found on the Analytics page, Lawmatics provides automatic calculation of your cost per lead and cost per client for each marketing source.
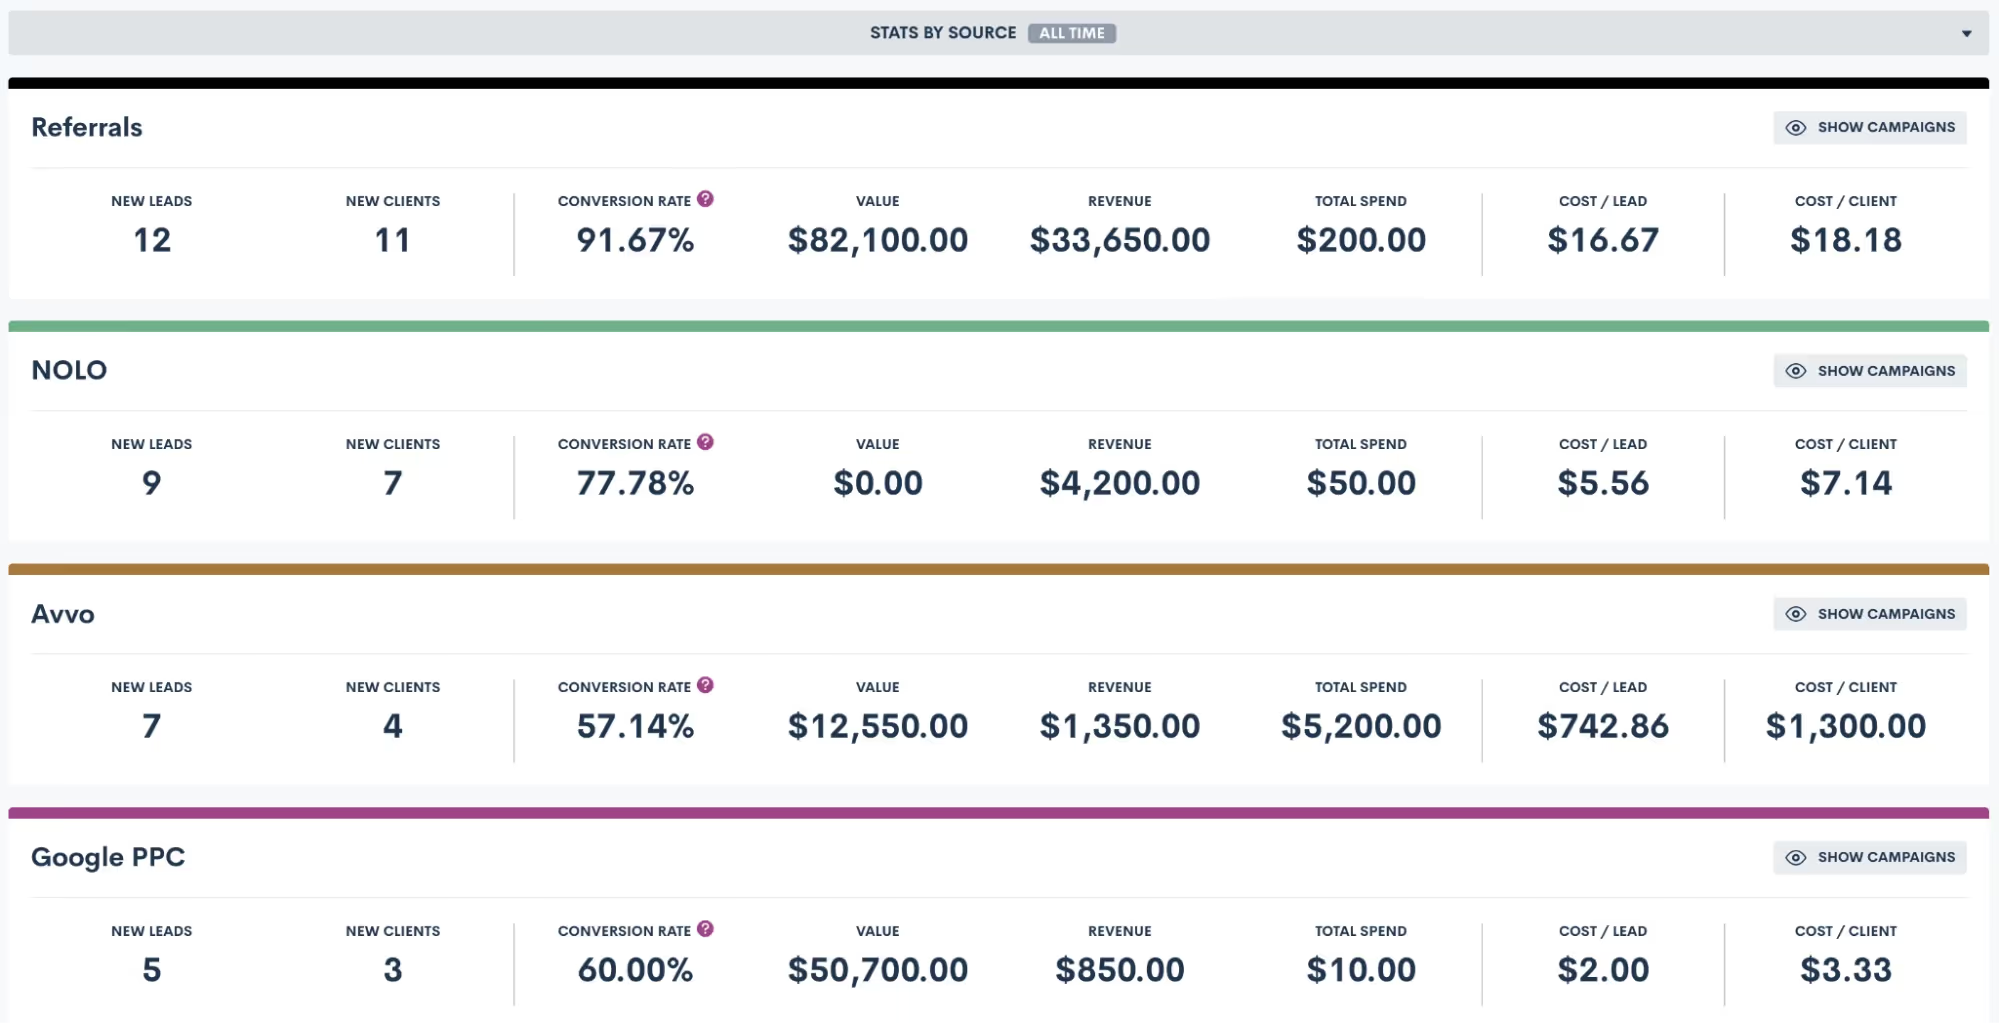
It simplifies measures of your marketing sources into a common denominator. This is an extremely important number, since it ensures you’re not comparing apples to oranges. You may have a gut feeling that one source is your highest performing, but once you see the actual breakdown of cost per client, the facts may surprise you.
9Report subscriptions
In addition to built-in Lawmatics Analytics, you can also create custom reports. You may currently view all your reports in Lawmatics, but did you know that you can get your most-used reports emailed directly to your inbox?To set this up:
- Go to your Reporting page found under the Insights tab
- Click the bell icon for the report you wish to subscribe to
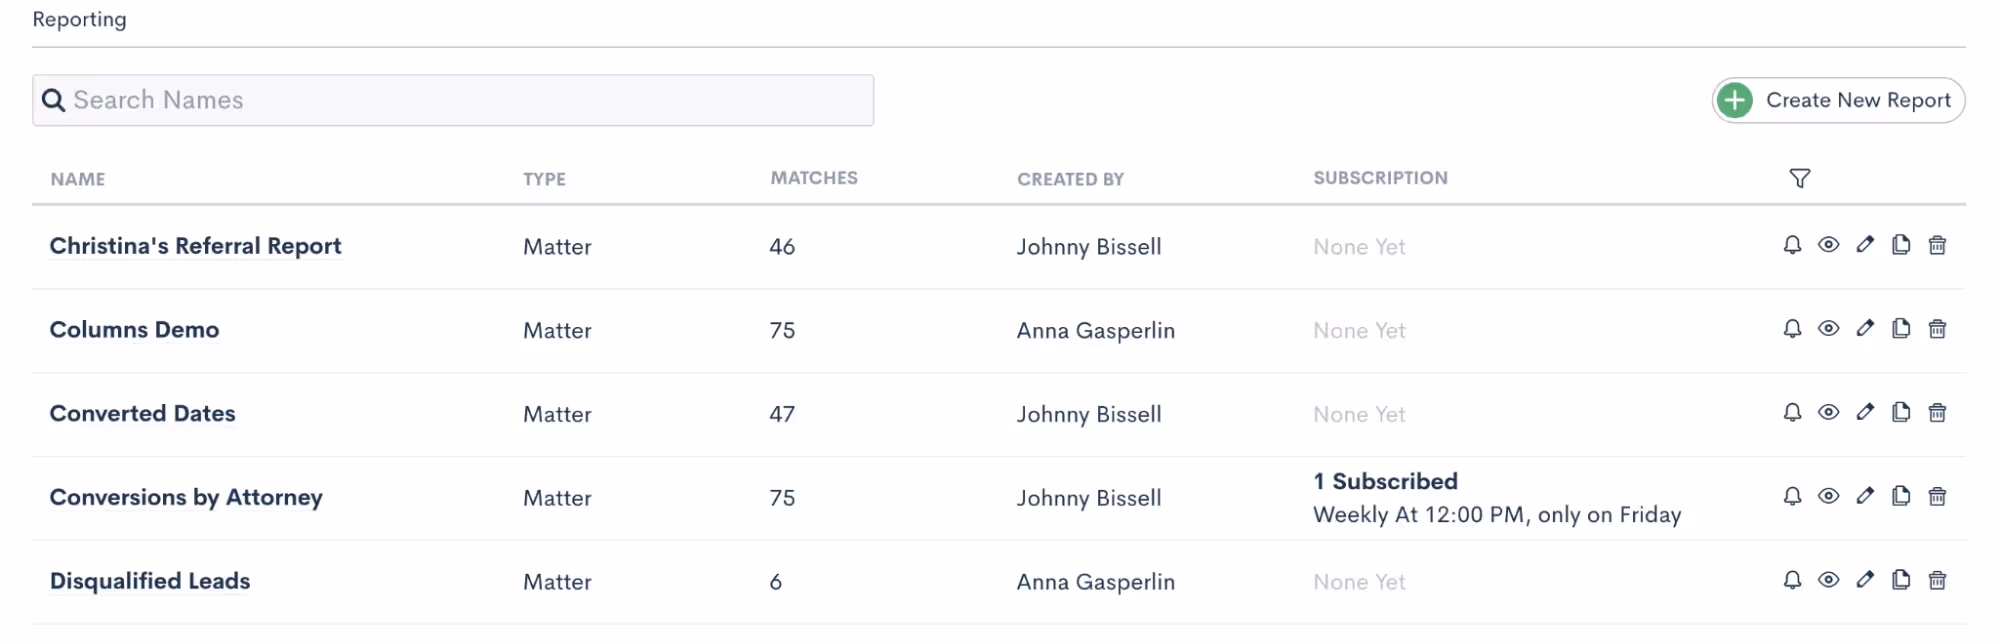
- Set up your subscription using the options shown below
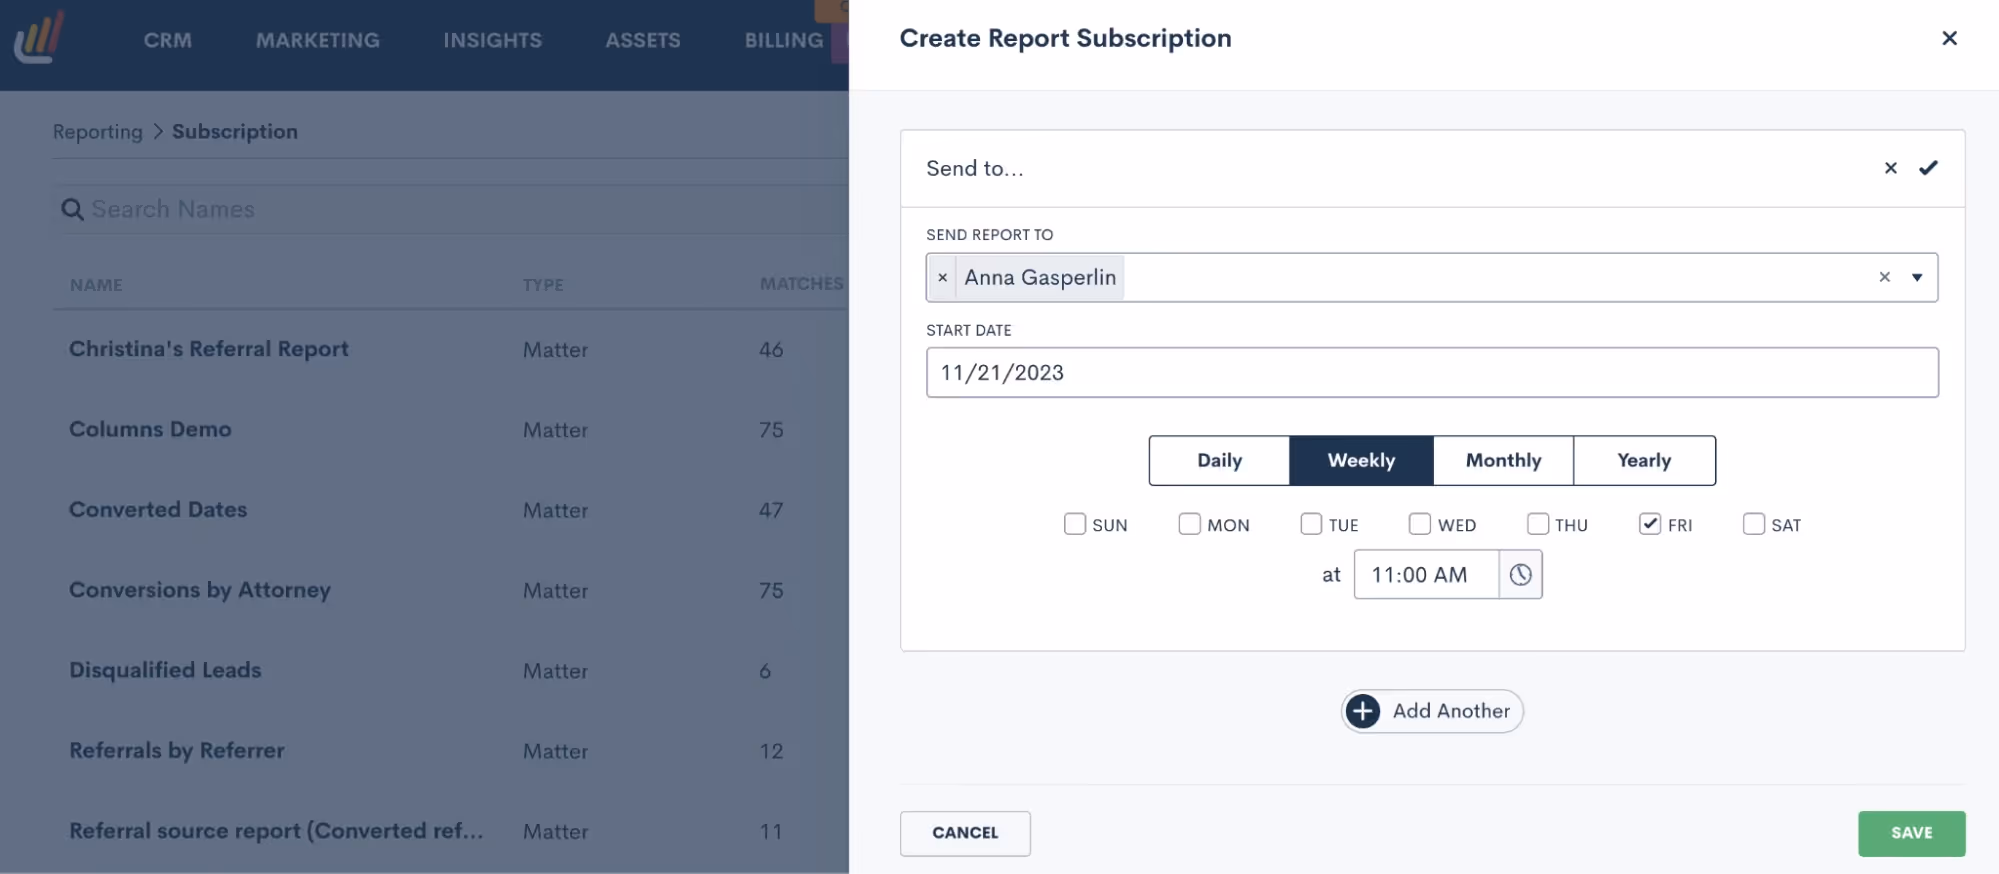
Now the report you need will be even more easily accessible from anywhere.AssetsIn today's digital legal landscape, managing assets such as emails, forms, documents, and esignatures is integral to maintaining the administrative end of your practice. Some of the lesser-known aspects of Lawmatics’ asset features can further streamline your operations.
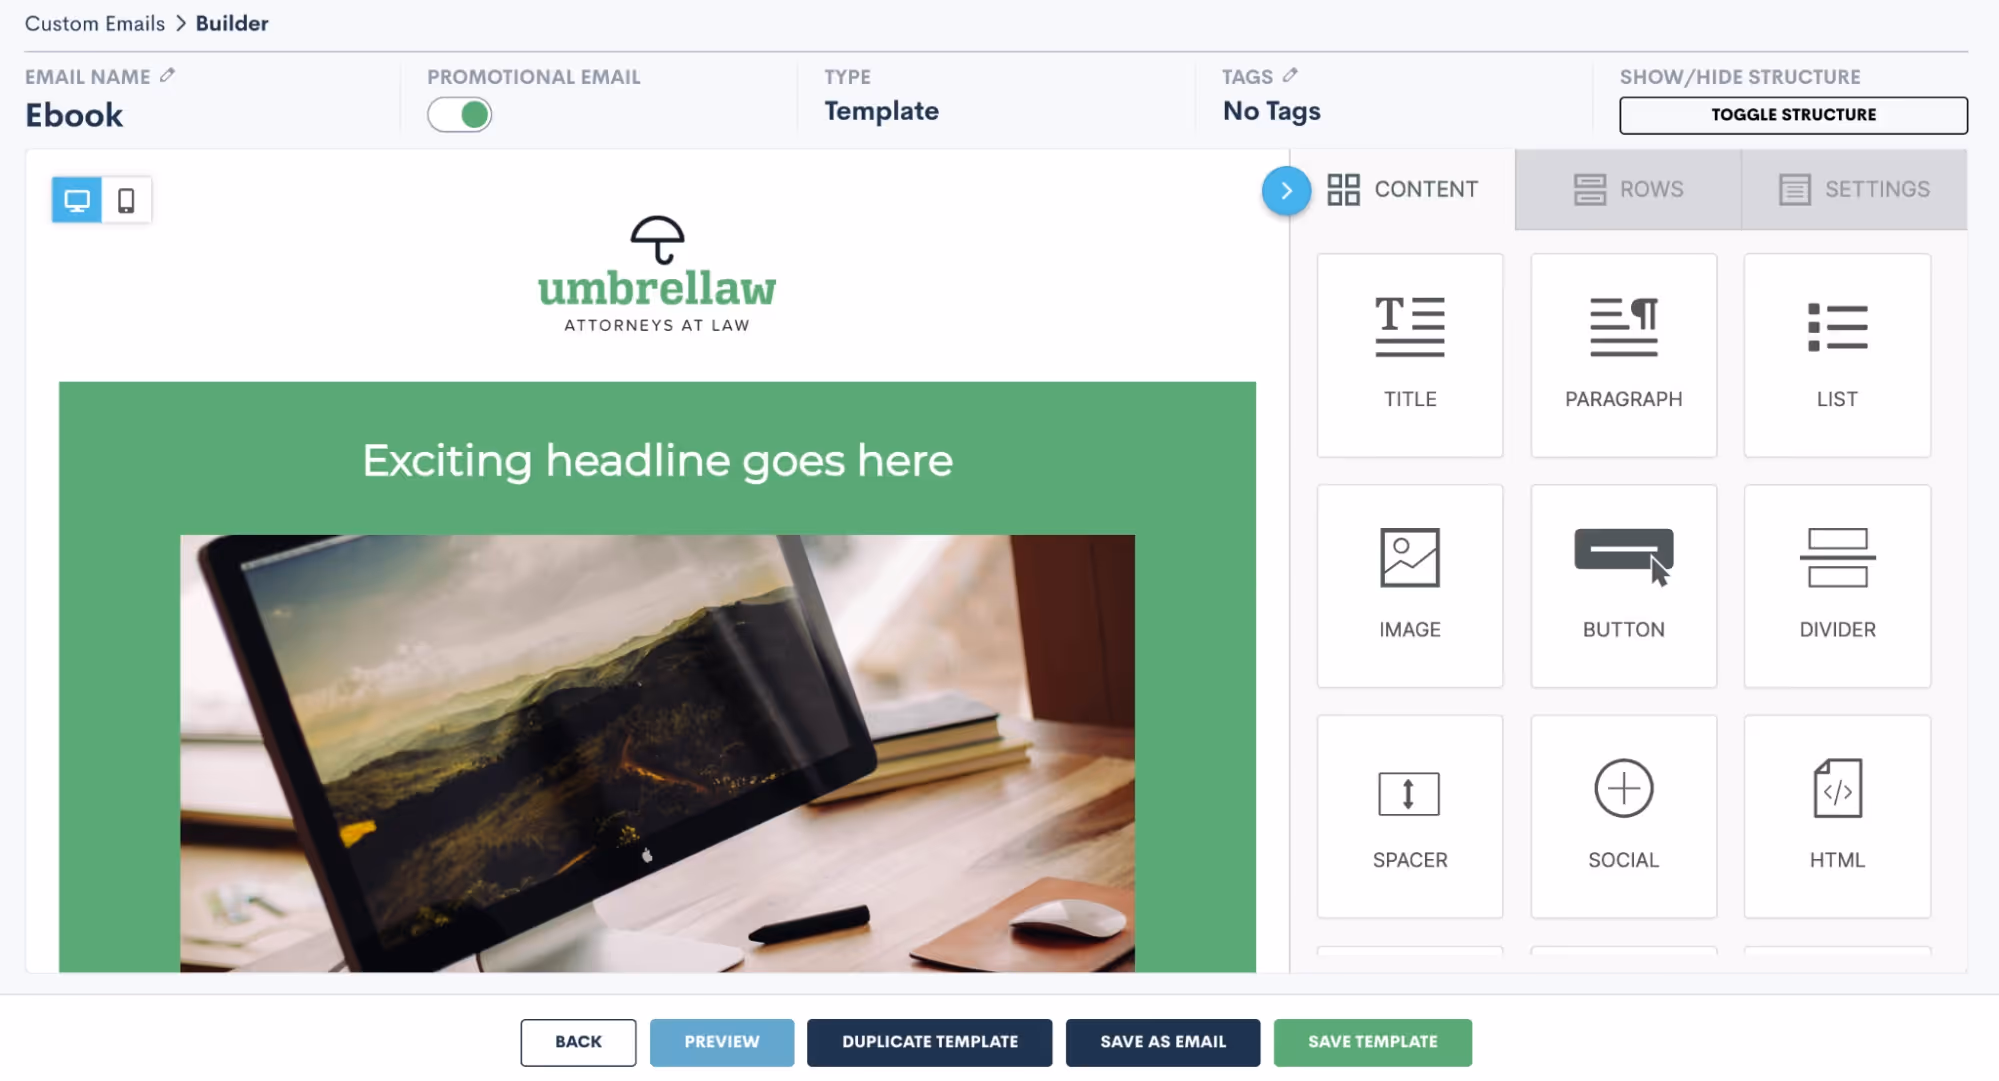
10Email templates & “Save As”
As a Lawmatics user you’re likely using email templates just about every day, whether manually or via an Automation. What you may not know about is the ease with which you can create new emails using saved templates.We recommend saving templates for your most common emails, especially HTML emails like newsletters or holiday greetings. Such a template will contain all your basic formatting like logo, color scheme, and signature. Preserve that template for future use by using the Save Template button shown in green below.
Whenever you have new email content ready to be sent:
- Open your template
- Update the content
- Click the Save As Email button shown above
This will keep your original template as-is, but save a copy with the new content.
11Email attachments
One often overlooked aspect of sending emails is the ability to include attachments. This can easily be accomplished within Lawmatics.
- Create your email templates in the Emails section under the Assets tab.
- Go to the Files page, also found under the Assets tab.
- Upload a bank of any files you wish to be able to include as attachments.
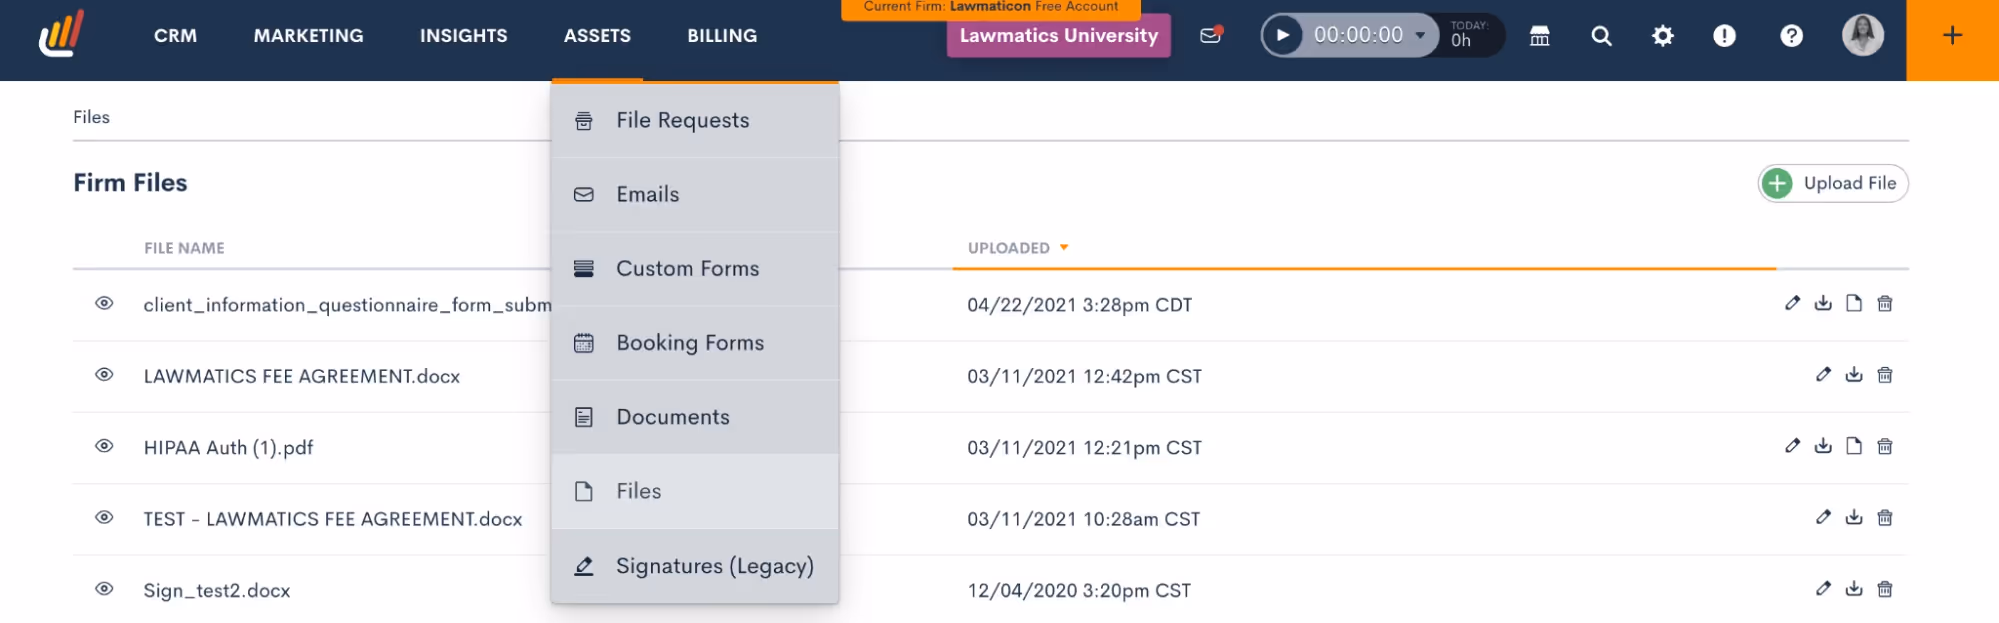
For example, you may have an FAQ page, parking instructions, and a new client packet.These items will live on the Files page. Any time you send an email (either via Automation or manually) you’ll have the option to select from any of these files as an attachment.

12Custom form blocks
Sometimes confused with Relationship Blocks, Standard Blocks can make your custom forms even more robust, but aren’t always used to their full potential.Blocks are used for groupings of fields that may repeat across multiple forms. For example, you may have a list of questions regarding a client's financial asset information that you use on several of your forms. Instead of dragging and dropping each individual field onto every one of your forms that requires this section, you can simply build the block once, then add the block to each form that requires it.
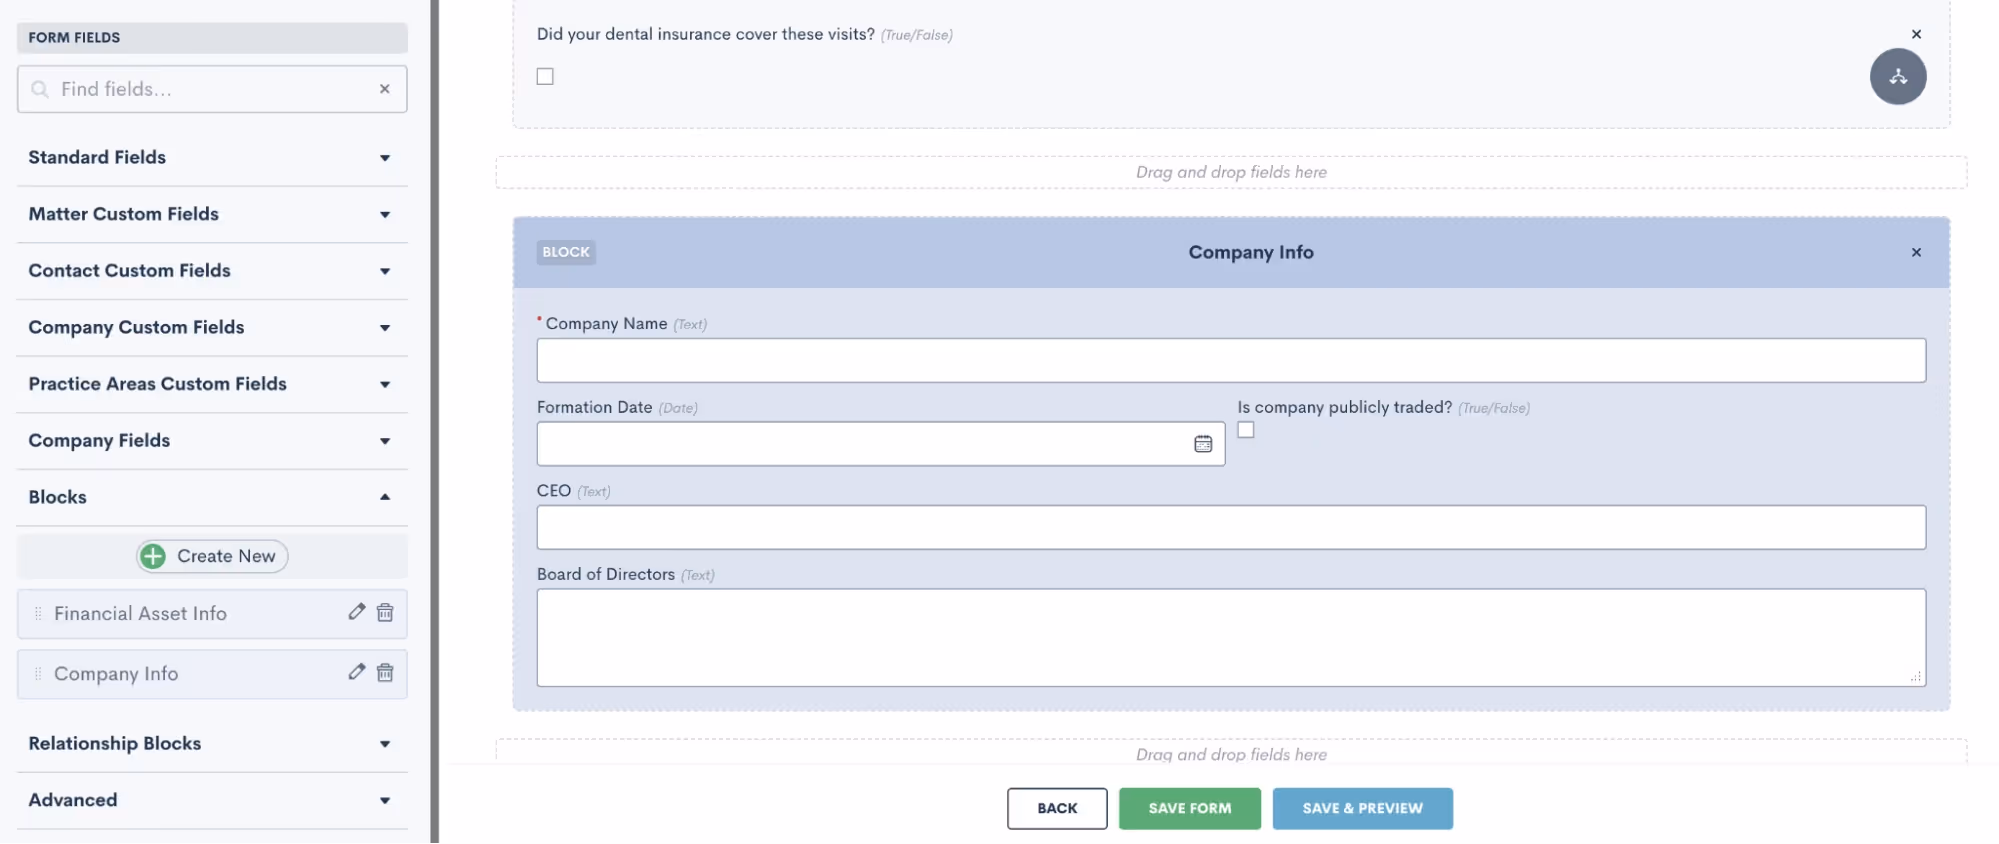
This feature is a huge time saver when it comes to building detailed custom forms.
13PDF upload esignature
The majority of firms use Lawmatics custom documents and/or DOCX upload features for creating documents. While these are the best option for creating highly customized docs, you may want to take another look at the possibilities of our PDF Upload option.With its own unique set of use-cases, PDF Upload is great for when you need to add a simple esignature to an already existing document.For example, you may have a document provided by a third party, such as a hospital, that needs your signature while keeping the text as-is. Using PDF Upload, you can simply upload the document and drag and drop fields, including esignature, onto the document.
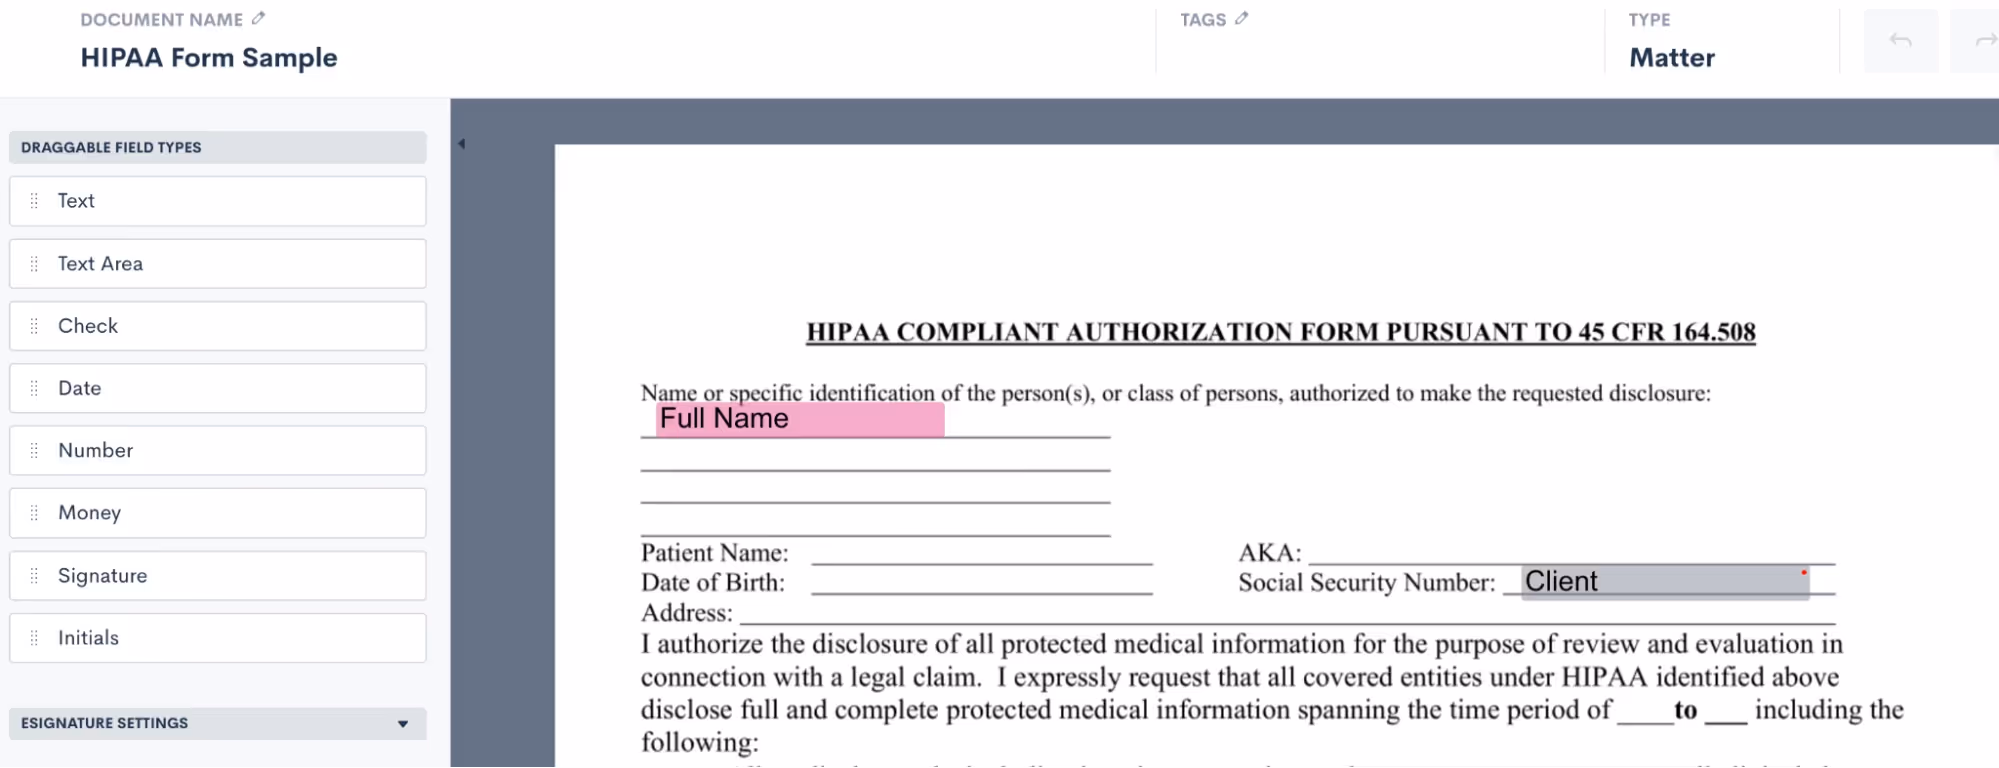
In a matter of a few seconds and clicks you can have your esignature added to the document and have it sent out to the required party for their esignature.
And there you have it!
Exploring the underutilized features within Lawmatics isn't just about discovering additional functionalities; it's about unlocking a reservoir of untapped potential that can redefine the efficiency, productivity, and success of your legal practice. By delving into these lesser-known aspects, you’ll find hidden gems across all areas of Lawmatics.Using Lawmatics to its fullest extent leads to enhanced client engagement, streamlined workflows, informed decision-making, and a competitive edge in our rapidly evolving legal landscape.

Automations are key to building a powerful workflow that doesn’t exhaust your human resources – but how does an Automation know when to start and when to end? How does it know which actions should be taken on which items?Welcome to the world of Automation entry and exit conditions. These conditions create Automations tailored to your firm’s unique clientele and sales cycle.In this Deep Dive, you’ll learn how to harness an array of entry conditions to trigger automated workflows, and we’ll explore best practices for utilizing exit conditions effectively. By the end of this read, you'll be armed with the knowledge and tools to craft highly efficient, precise Automations that both save time and increase your firm's productivity.But first, let’s delve into essential background on how entry and exit conditions function in Lawmatics.
Automation entry and exit - the basics
Understanding each component of an Automation is key to building one that truly serves to save you time. Here’s what you need to know about each component and its function.
Automation types
When creating a new Automation, you will be prompted to select the Automation Type. The three options are as follows:
- Trigger: These Automations trigger when the entry condition is met, and will run all the way through unless exit conditions are met.
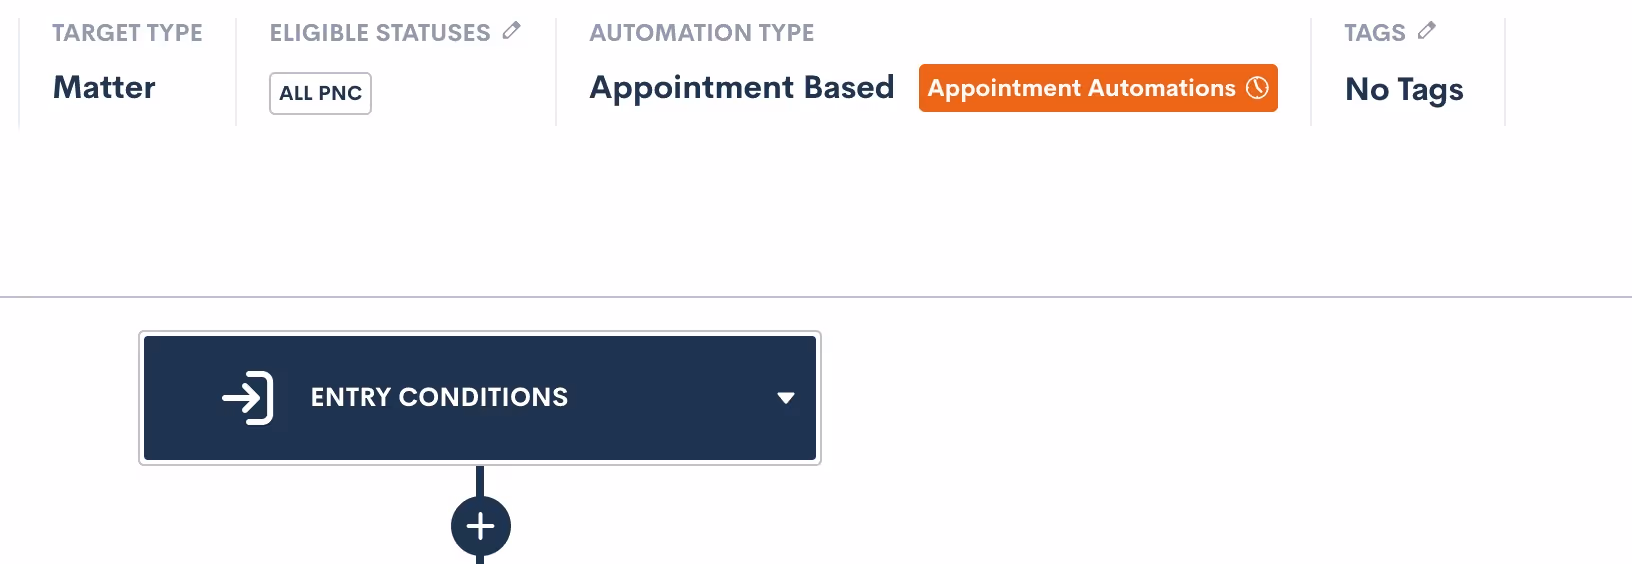
- Appointment: This type of Automation triggers when an appointment is scheduled, and allows you to create time-relative triggers within the Automation (done by clicking the orange button below).
- Date Field: Will trigger when the selected date field is populated for a given matter, and allows you to create time-relative Date Automations, much like Appointment Automations shown above.
These three Automation types determine the manner in which your Automation entry conditions function at the very start of your Automation. We’ll dive further into each of these as we break down all entry conditions later in this article.
Target Type and Statuses
In addition to selecting your Automation Type, you must define whether your Automation will act on Contacts or Matters by selecting a Target Type. If you choose Matter as the Target Type, you must also choose Target Statuses.

For any Automations that are intake or client related, your Target Type will be Matter. Use Contact type for Automations that could run on any contact, such as referral partners, other attorneys, etc.When the type is Matter, you also must select which status(es) can run through this Automation. This is essentially an entry condition in itself, since only Matters of the selected status(es) can trigger the Automation.
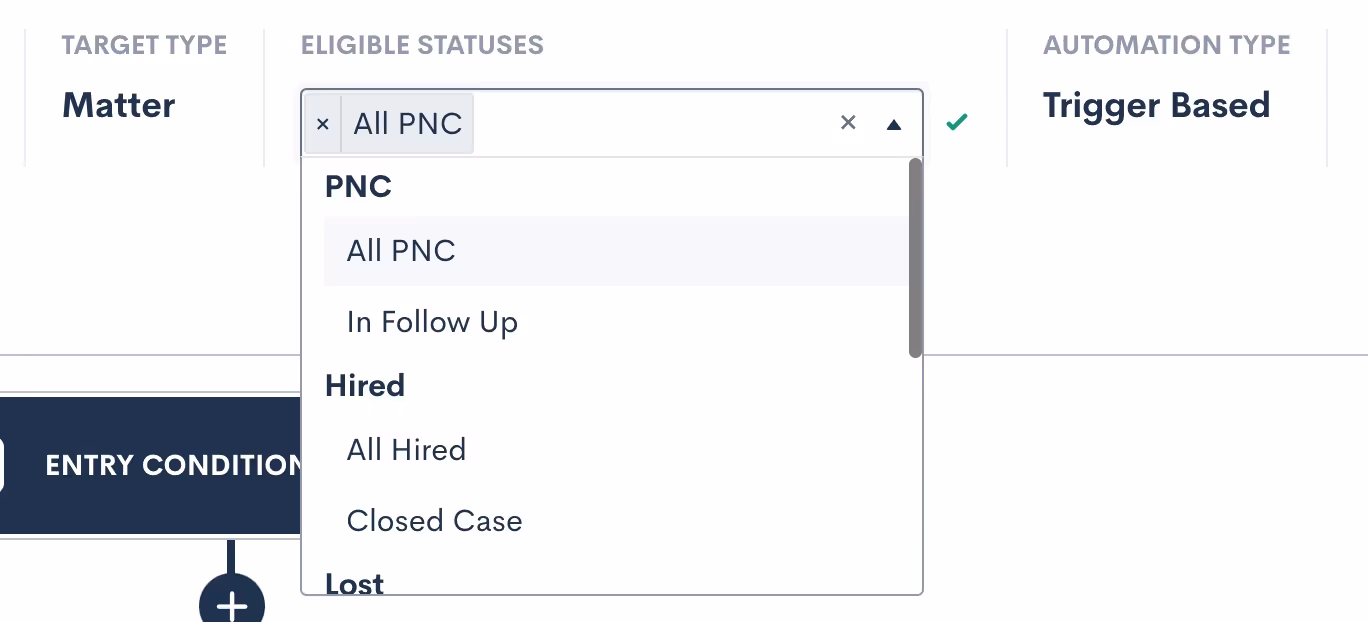
The eligible statuses can also be edited later after you create the Automation. Note: you can select more than one eligible status.
Activating and deactivating
In order to edit an Automation, it must be set to inactive. If you have already activated an Automation and wish to make further edits, simply deactivate it and make your edits. Any targets currently running in the Automation will stay exactly where they are in the workflow while the Automation is inactive, and only resume once it’s reactivated.Deactivating and reactivating an Automation will not cause targets to be re-run through that Automation from the start.When reactivating an Automation, you’ll receive a warning if any Matters who now meet the updated entry conditions will immediately run through the Automation upon activation.

Proceed with caution if you see this message — especially for Automations that you only want applied to new matches moving forward. To skip any current matches, simply click the Future Matches Only options.All Matters will only trigger into a given Automation once, with the exception of our Form Filled trigger (discussed later). While you can manually re-run a target through an Automation, that target will not trigger through the same Automation more than once.
Entry conditions
Entry conditions are arguably the most important part of your Automations, since they determine what will set the workflow in motion. Let’s walk through each available option for entry conditions.
Using multiple entry conditions
As we explore the various entry conditions, note that Automations can be further refined by combining multiple entry conditions with either an AND or an OR relationship.To use multiple entry conditions, first select your first entry rule. Then click the button labeled Add Entry Conditions, to add your second entry condition.
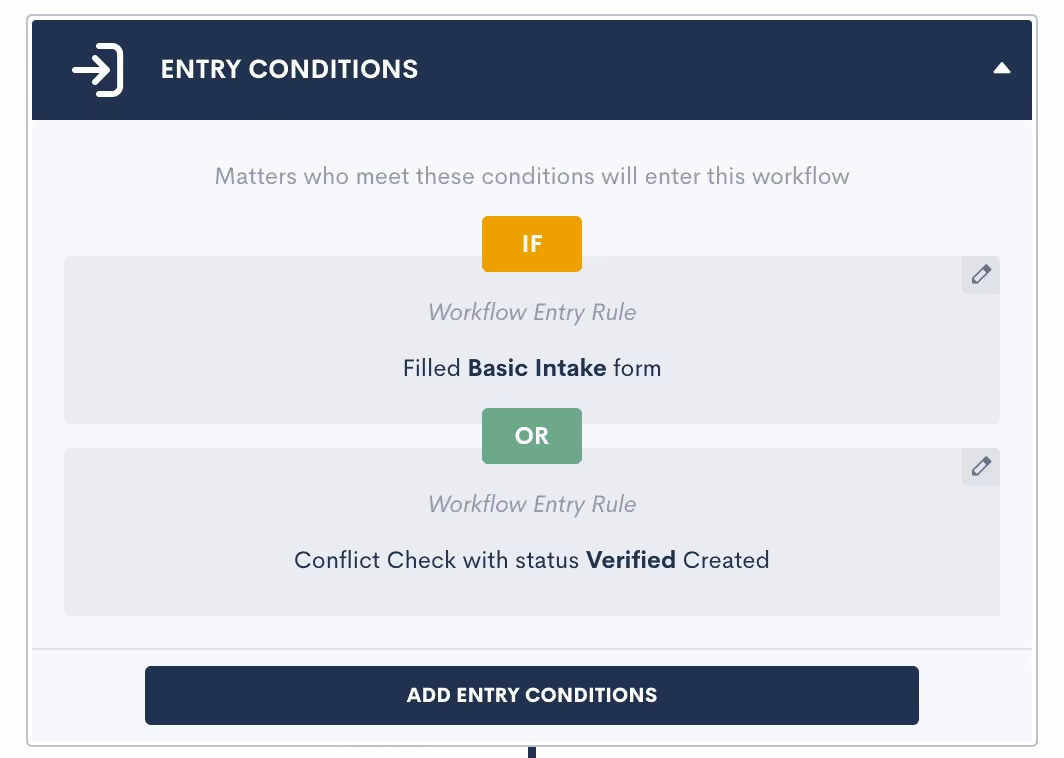
Once you have both (or all) entry conditions entered, simply click where it says OR in the image above to change to an AND relationship if desired.These entry conditions will be honored as they are selected. AND relationships require all the selected entry conditions to be fulfilled, whereas OR requires just one such condition to be fulfilled.OR ExampleA firm has multiple intake forms, one for each of their different practice areas. Once any one of these forms is submitted, an Automation should trigger to confirm the submission and follow-up with that prospect until they schedule a consultation. This Automation should be built with an entry condition for each form linked with an OR relationship.AND ExampleA firm requires a client to both fill out a form and submit a requested file in order to trigger the next action in the Automation. This Automation should be built with two entry conditions – one for the form and one for the file upload – linked with an AND relationship.
Match all
The first option you’ll see for setting an entry condition is also the most encompassing. Since your selected statuses also work as an entry condition, using the Match All entry condition will simply run the Automation on every possible target within the selected type and status.

In the example above, you’ll see that PNC was selected as the only eligible status. This means the Match All option will only match all Matters with the PNC status, and not ones with other statuses like Lost or Converted.While this entry condition can be useful, the most effective Automations are much more targeted.
Registered for event
Lawmatics has everything you need to manage mass events such as seminars, luncheons, and more. This includes the ability to trigger an Automation when someone registers for one of your events.
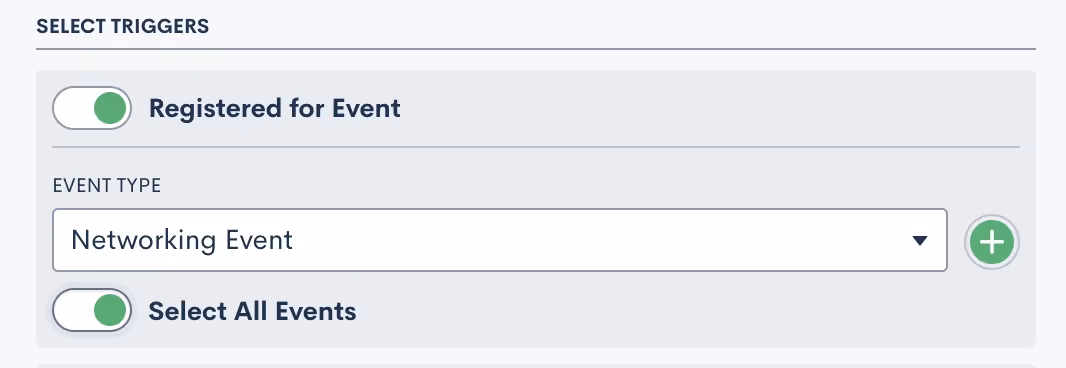
To automate different actions for different event types:
- Choose which event type should be the catalyst for each Automation
- Select a specific event within that type, or toggle Select All Events so that this Automation runs on any events of that type.
Custom email activity
Custom email appointment triggers in Automations are one of the most critical components of email marketing and automation. This trigger allows you to fire an Automation based on whether a specific email has been opened or clicked on (assuming there is a clickable link in the email).

- Select the email that you would like to base this Automation trigger on
- Select whether you want the Automation to trigger on the specific email being opened or clicked on by the recipient
Filled a form
This trigger allows you to select a specific form that, when submitted, will automatically trigger the Automation. If you wish to trigger an Automation on one of two or more forms, this can be accomplished by setting multiple entry conditions with an OR relationship.

As mentioned above, Lawmatics Automations only run once, meaning that if the condition is met multiple times the Automation will only run the first time the condition is met. The Filled a Form entry condition, however, gives you the option to have the Automation run every time the selected form is filled out.

If the latter is selected, then any given Matter will run through the Automation each and every time the selected form is submitted.
Requested files
Lawmatics file requests are a valuable tool, allowing you to easily send out templated file requests to your Matters. Use this entry condition to trigger an Automation based on the status of a particular File Request.

- Select a File Request template to base this Automation trigger on
- Select whether you want the status of the File Requested to be (IS) or not to be (IS NOT)
Note the following three status options:
- Pending: the File Request has been sent but no files have been submitted
- Submitted: some files have been submitted but not all the requested files.
- Completed: all requested files have been uploaded
Most commonly you will trigger an Automation when the status of a file request is Completed.
Signed a document
Lawmatics allows you to create an Automation trigger based on the signing of any particular e-signature document. A great example of this is fee agreements or retainers. Simply send one to a new client for signature, and then have an Automation that would only trigger once all parties have signed that fee agreement.

Select the document type, and then the specific document. Remember that you can always use multiple entry conditions to create an OR relationship with multiple documents.
Appointment created
When you use this trigger the Automation will become an Appointment Automation, discussed earlier in our Automation types. You can select this Automation type when you are first creating an Automation, or simply select this entry condition when choosing your trigger and it will change to that type automatically.

Appointment Automations allow you to create time relative Automations based on the date and time of your appointment. For example, you can trigger an Automation "one day before" or "two hours after" the appointment.The parent Automation (the part shown above) will trigger at the time the appointment is scheduled, whereas the Appointment Automations (shown below) will trigger based on their relative time selection.

Note that the Appointment Automations are activated and deactivated independently of the parent automation. If an appointment is rescheduled or canceled, the Appointment Automations will update accordingly.
Invoice paid
This entry condition is only available if you are using LMPay, Gravity Legal, or if you have a LawPay integration connected. This entry condition allows you to trigger an Automation when an invoice has been paid.

Task activity
While you can of course assign Tasks as an automated action, you can also trigger an Automation when a particular type of Task is either created or completed.

Select whether the creation or the completion of the Task should trigger your automation, and then select from your Task tags to determine which tag should trigger this specific automation.
Conflict check
Conflict checks are often a crucial part of your intake, so you may consider triggering an Automation based on the status of one of these checks.

Choose to create this entry condition when a conflict check is either Denied (conflict detected), Undecided (needs manual check), or Approved (no conflict). You may even end up creating a complete workflow where one Automation performs the conflict check, and another triggers upon the passed or failed check.
Match on fields
Last but not least, the Match on Fields trigger is one of the most powerful triggers, allowing you to create an entry condition based on the value of any fields in your CRM database.
- Select the target field. It’s common to use fields like Practice Area, pipeline stage (Stage), or Status with this trigger.
- Choose which condition should be evaluated
- Pick the value you are seeking a match on
The condition options will change depending on the type of the field that you select as your target. For example, a list type field will have Equals or Not Equals as condition options, whereas a number field will have Greater Than, Less Than, and other such options.
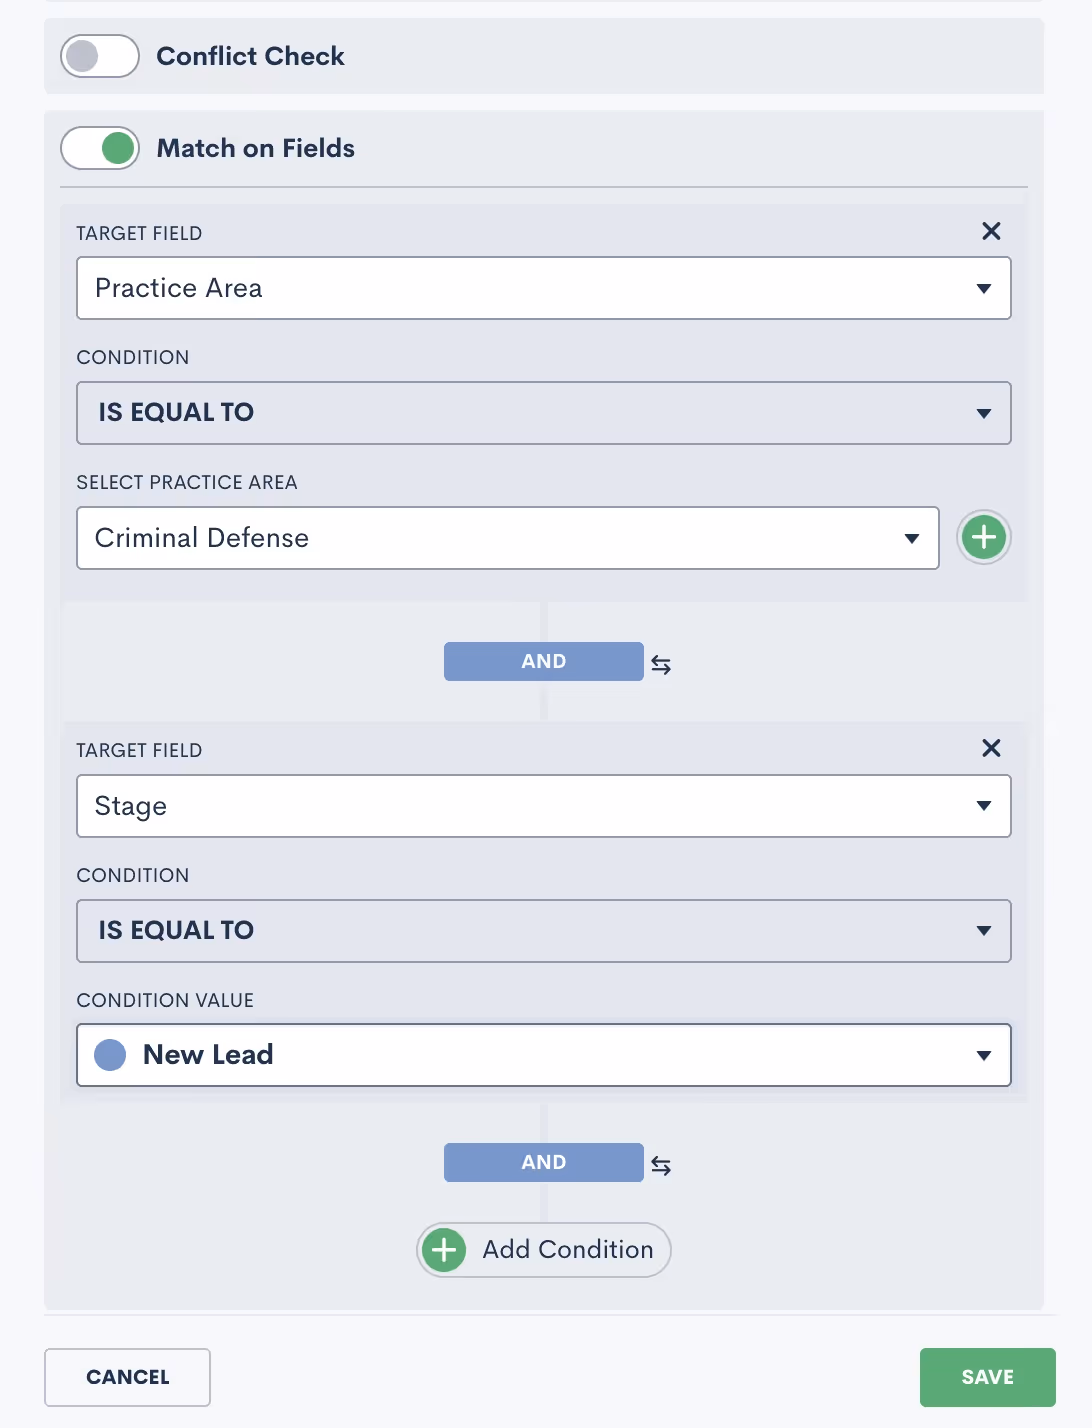
The Add Condition button allows you to add multiple conditions to the matching trigger, as shown in the image above. You can also give these conditions either an AND or OR condition. In the image above, you will see that they have an AND relationship. To change to OR, simply click on the word AND, and it will switch to OR.
Exit conditions
Guess what – the options for exit conditions are exactly the same as those for entry conditions!

While we won’t go through them all again, just remember that any of the conditions described above that can trigger an Automation are essentially used the exact same way to “trigger” a target to exit an Automation.ExampleWhile a filled form could be used to initiate an Automation, that exact same condition may be used in a different scenario to exit a target from the Automation. You might use this to stop an automated sequence of follow-up emails after a client has submitted the information your firm requires.As you set your Automation exit conditions, simply think of them as “triggers” in reverse.Exit conditions are checked at the start of each action in your Automation. If you happen to have an Automation with long time delays, the exit conditions are not taken into consideration while the target is within that delayed period.Instead, the exit condition will be checked once that time delay has run its course and the target starts to enter the next action in the Automation. At this point, that next action will not be run if the exit condition is met and the target will exit before any further actions occur.That being said, you typically want to select exit conditions that are more of a permanent condition rather than something static that may change by the time the next action is reached.
Exit vs. If/Else Conditions
One of the most common mistakes when it comes to exit conditions is to use an If/Else Condition branch instead of exit conditions. Ponder the following example:

The supposed goal of this Automation is to check if a Matter has filled out a form. If they have, we want to change a certain attribute, and if they have not, we want to re-send the form. This is an example of what NOT to do.The way this Automation is built with the If/Else Condition will NOT work. The condition will be checked at the time the target hits this branch in the Automation, not necessarily when the form is filled out.Instead, you need to have an Automation that sends out the form on spaced out intervals, with exit conditions of the form being filled. A separate Automation will trigger when the form is filled to perform the change attributes action. Read more below to see this example of what TO do.
Useful examples
Example: form reminders
When creating an Automation to send out a Basic Intake form (or any other form), your Automation should look similar this:

These actions can be repeated as many times and on any cadence that you would like. As you have the exit condition selected, as shown above, your target will stop getting reminders once they have submitted the form.Remember, if you want something to trigger once the form is filled out, make sure to use the filled form as your trigger for a separate Automation. Don’t try to use an If/Else branch to check for the status of the form.
Example: drip campaign
The same principle applies to creating a drip campaign within an Automation. Your drip campaigns could have any purpose you desire. For example, you may have one prompting a new lead to schedule an appointment, another following up with an old lead that has gone dark, yet another checking in with an ongoing client – or any other scenario you can think of.When it comes to exit conditions for these drip campaigns, you must think about what condition would cause this Automation to no longer be relevant for a given target. In other words, whenever the call to action (AKA the thing you’re trying to get them to do from this drip campaign) is accomplished, they should exit the Automation.The example below shows a hypothetical drip campaign set up to continue sending emails to a matter as long as they are in the New Lead stage of my pipeline.

Since I have set the exit condition to be “Stage is NOT New Lead”, this means that they will exit the Automation once they move to any other stage on the pipeline besides New Lead.
Conclusion
You now have the knowledge and tools to craft highly efficient, precise Automations that will not only save time, but also elevate your firm's productivity. You've gained a deeper understanding of these vital components. You've also learned to harness a diverse array of entry conditions to trigger automated workflows and to utilize exit conditions effectively.With these insights and relevant examples, you're well on your way to becoming an Automation maestro. Create the best possible client experience with Automations, and stay ahead of the curve to transform the way you approach automation in your firm.
Custom Forms play a pivotal role within the Lawmatics platform, but are you making the most of their capabilities? While you might have a grasp of the fundamentals, there's a world of advanced features waiting to be explored. Let's harness the full potential of Custom Forms by ensuring you collect precisely the information you need, and nothing more.Our journey into these advanced elements covers a range of powerful tools, including conditional logic, repeatable relationship blocks, and file uploads. Some of these components may still be hidden gems in your toolkit. In this exploration, we'll dive into the strategies of seasoned Lawmatics users who maximize the benefits of form creation at every turn.
Form settings
When you create a new form in Lawmatics, you'll notice the option menu in the upper left corner. You can access this menu by hovering over the "Assets" tab at the top of the screen and selecting "Custom Forms."
Form name and form type
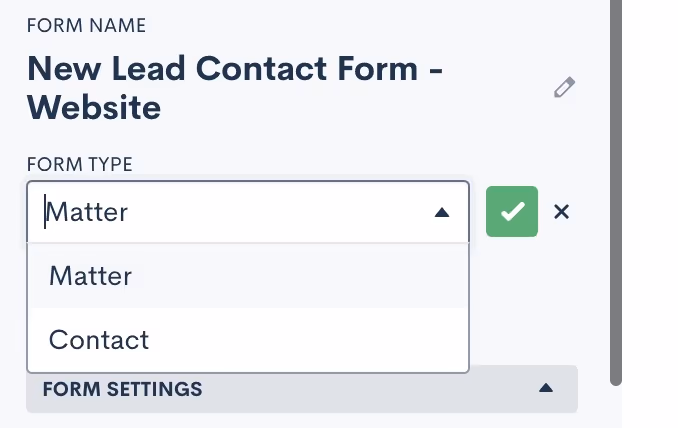
Start by giving your form a name. This name can be for internal use or client-facing, as we'll discuss further shortly. Next, select one of two form types:
- A "matter type" form will create a matter when submitted.
- A "contact type" form will create a contact when submitted.
Form tags
If you so choose, you can also assign a Tag to your form. This can be particularly helpful for organizing and locating forms, especially if you have numerous forms. For example, you might label all your intake forms as "Intake" or categorize forms related to specific practice areas accordingly.When viewing all your forms on the Custom Forms page, you can easily filter and sort them by tag.

Form share title & redirect URL
Once you've set the Form Name, Type, and tags, you can move on to the Form Settings section. Here, you have some additional options:
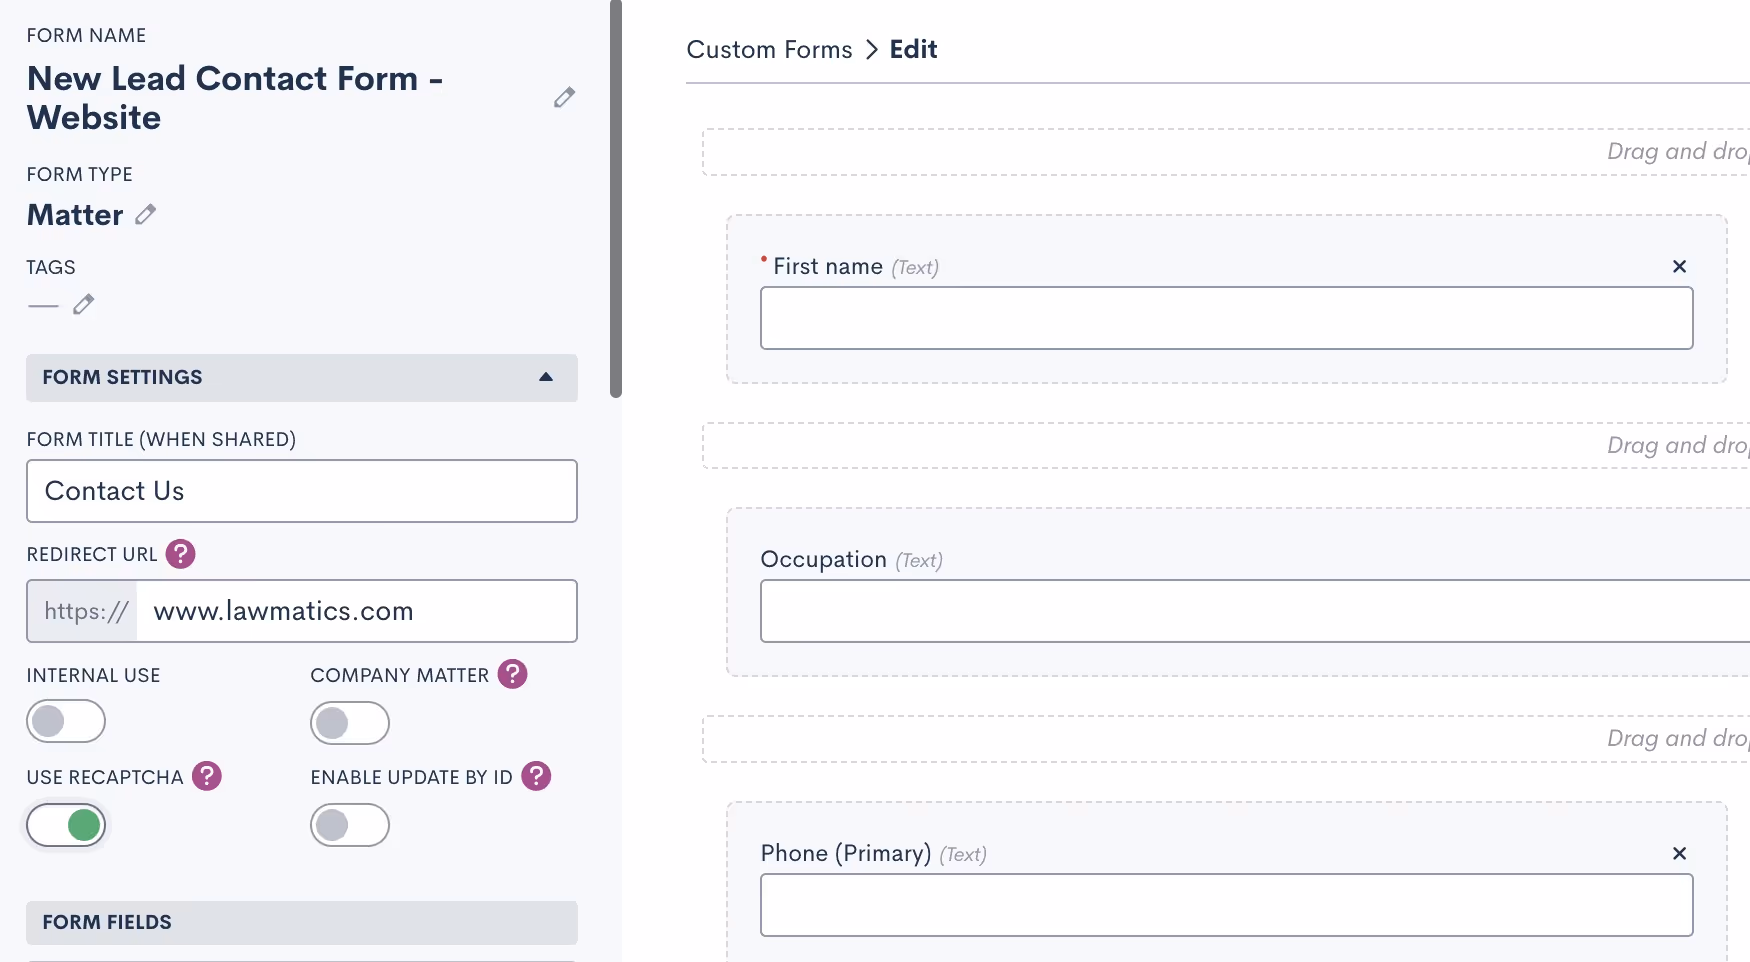
- You can give your form a Share Title that's different from the Form Name. This is useful when you want an internal name but something more client-friendly to appear as the form title.
- The Redirect URL is a valuable feature that allows you to redirect the person filling out the form to a different webpage after they submit it. For instance, you might want to direct them to an FAQ page on your website or a relevant article.
reCAPTCHA & additional settings
In the Form Settings section, you'll find several toggles for additional settings:
- You can make the form internal, which means it can only be accessed by a Lawmatics user signed in to the platform. Internal forms grant access to certain internal-only fields. This option is suitable for forms intended for internal staff, such as a phone intake form.

- Enabling reCAPTCHA helps prevent spam entries for forms embedded on your site or elsewhere. When enabled, you'll see the reCAPTCHA logo on your embedded forms.

- The Company Matter toggle, when enabled, will create each submission as a company matter by default. Ensure that the Company Name field is present on the form when selecting this option.
- You'll also find the option to enable Update by ID, a feature that's less commonly used but can be handy if you need matters to access their form from a static link, perhaps on your website or another source outside of Lawmatics. When this setting is enabled, a unique ID is required before accessing and filling out the form.
- Lastly, navigate to your Main Settings page (accessible via the gear icon near the top right) and select Firm Settings to make one additional selection. It's typically a good practice to enable the setting to Match Form Fills by Email to help prevent duplicates.

Data fields
Adding fields is a fundamental aspect of form creation. Although this isn't categorized as an "advanced component" of forms, it's still essential to grasp the various types of fields you can incorporate into a Custom Form.
Standard & custom fields
Standard fields are pre-built components within your Lawmatics CRM that capture basic information such as name, email, phone, address, and more. You shouldn't create Custom Fields for this standard data. Custom Fields, on the other hand, enable you to track unique data in your CRM.Creating and adding custom fields to your Custom Forms is a critical step. It allows you to later analyze or merge data collected from forms. When constructing your custom form, explore the Matter Custom Fields section to access existing fields and create new ones for inclusion in the form.

Drag and drop these fields onto the form canvas to add them to your form.
General Fields
General fields are intended only for questions where the answers don’t need to be stored on the CRM record itself. These fields are only used within the constraints of the form itself, and cannot be merged into a document, used in a report, synced to case management, etc.

Drag a general field onto your form, and then click on it to set the label and field type.These types of fields are typically only used for questions that require no further action on your part; you may only need to reference them within the form itself.
Conditional logic & required fields
Whenever you add a field to your form, whether it's a custom, standard, or general field, clicking on it reveals advanced options. These options encompass making the field required, hidden, and applying conditional logic.

Within your firm's intake forms, certain questions may be relevant based on the response to a previous question. Conditional logic ensures that the appropriate follow-up questions appear in your form only when necessary.Conditional logic enhances the experience for your leads and clients because they encounter only questions that pertain to them in your intake form. This approach reduces the likelihood of them feeling overwhelmed by a lengthy form with questions that may not apply to their situation.
Blocks
In the custom forms editor you will see options for two types of blocks: Standard Blocks and Relationship Blocks.
- Relationship Blocks are designed for creating separate contacts associated with a matter, such as a spouse, co-client, child, co-defendant, and so forth.
- Standard Blocks do not create contacts like relationship blocks do. Instead, they allow you to group a selection of fields into a single block that can easily be added to any of your forms with a single drag and drop.
Standard Blocks
Blocks are employed to group fields that may repeat across multiple forms. For instance, you might have a set of standard questions about a client's financial assets that's relevant to several of your forms. Rather than manually adding each individual field to every applicable form, you can create the block once and then include it in any form that requires it.

To use blocks start by expanding the Blocks section on the left sidebar of the form editor. Here, you'll find existing blocks and the option to create a new one. Drag and drop a block onto the form canvas to include it in your custom form.It's important to note that standard blocks do not offer the option to "add another" for collecting multiples of a specific type of data point.
Relationship Blocks
Enter relationship blocks. These blocks are invaluable for gathering information about other contacts connected to a particular matter. While every matter has a primary contact, you can link additional contacts using relationship blocks. Here’s how to use relationship blocks:
- First, you'll need to create your relationship types by going into your Settings (gear icon near the top right corner), and selecting Matter Settings from the left sidebar.

- Within Matter Settings, you can create relationship types by specifying a title, indicating if it's repeatable or not, and then clicking "Add Type."
- With your types in place, you can create relationship blocks for each of these types as needed. The process is similar to creating a standard block. Simply drag and drop it onto your form, and then click on it to access additional options.

- When you designate a relationship block as "Repeatable," you gain the ability to "Add Another" on the form. This feature is particularly useful for collecting data on children, siblings, and so on.
Advanced options
Working our way down the side panel of your Form Builder, you’ll see a section labeled “Advanced”. You might already be familiar with some of these features, but there are likely a few that you haven't had the chance to explore yet.
Instructions
You can add a text block by dragging an instructions block into your form. This text can serve as headings, notes, or guidance for the next section of your form.

Importantly, Instructions Blocks don't require the person filling out the form to input any information; they simply provide information or direction.After placing an instructions block, click on it to input your text. You can also merge fields, apply basic formatting, and incorporate conditional logic. Additionally, you have the option to include or exclude the instructions in your form submissions.
File upload
The File Upload object allows individuals completing the form to seamlessly upload files while filling it out. This is a convenient way to gather all necessary information and documents in a single step.

After adding the File Upload object to your form, click on it to access further options. When someone is filling out the form, they can easily drag and drop files or browse their local files to upload. Any uploaded files will be saved directly in the Files tab of their matter profile.

Event registration
**Note: The event management feature is available for our Pro Tier users and above**Lawmatics provides comprehensive tools to manage major events like webinars, luncheons, networking events, and more. Event management differs from appointments in that it can accommodate anywhere from one to thousands of registrants.Most commonly, you'll promote events and collect registrants using a Custom Form. Simply drag the Event Registration field from the Advanced section on the left side panel.Click on the field to make customizations, and people can easily register for the event when filling out the form.

Signature
Use the signature object to collect a hand-drawn signature from the person filing out the form.

It's important to note that this option isn't compliant with e-signature regulations, so it isn't considered a legally binding e-signature.Learn about our compliant e-signature features here.
Page dividers
For longer intake forms or questionnaires, you may want to use pagination to improve form organization. Drag a page divider onto the form to add pagination, and then use additional dividers to separate different sections or pages.This creates a well-organized and user-friendly form, enhancing the overall client experience.

Note
The Note feature saves a note directly to the notes section on the matter's profile.

While it resembles a field in the form, it's distinct from populating a field. You can access these notes in the notes tab of the matter.
Booking request
The Booking Request tool is ideal for scheduling appointments directly from a custom form, taking the host's availability into account and preventing double booking. After adding a booking request to the form, click on it to specify appointment details.

When clients complete this form, they'll encounter a calendar module where they can view the host's available time slots, select their preferred day and time, and confirm their appointment.

If appointment booking is the primary purpose of your form, consider using a booking form for a more streamlined experience.
Final settings
Once you’ve constructed your form, incorporating all these advanced components and features, there are a few final settings that can enhance the overall experience when sending and submitting this form.To access these additional options, navigate to the main Custom Forms page, displaying all your firm's forms, and click on the ellipsis icon (…) on the far right for the specific form.

Custom email template
While optional, the custom email template is a valuable tool for ensuring all firm communications are personalized and aligned with your brand.After clicking "Email Template" (as shown above), you can create a plain text email template for sharing this specific form, document, and more. You can seamlessly incorporate fields using the dropdown menus. Don't forget to input the custom link for the form.Whether you're sharing the form manually or through automation, you'll have the option to send it with your custom email template.

Embedding & styling
If you don't already have a "Contact Us" form on your website, it's highly recommended to add one, and Lawmatics makes this process straightforward.First, create the form by adding the fields you want to capture. Then, copy the Embed Snippet from the ellipsis menu, as shown in the images above, and paste it into your webpage.Once the form is embedded, you can further customize its appearance in Lawmatics. Click on "Embed Editor," also accessible from the ellipsis menu, to make styling selections.

You can adjust background and text colors, submit button text, success messages, and more to ensure the form seamlessly integrates with your website's aesthetics.
API Details
Utilizing the Lawmatics open API is considered an advanced feature and typically requires web developer expertise. However, it's a powerful tool to connect your existing web form to Lawmatics.You can access the API Details once again by clicking the ellipsis button.

Your developer will use this information to establish a connection between your existing form and Lawmatics.
Conclusion
Custom forms represent a cornerstone of the Lawmatics platform, and unlocking their full potential can significantly benefit your operations. While you may already have a strong grasp of the basics, delving into the more sophisticated aspects of custom forms can open up new possibilities.These advanced tools enable you to collect client information with precision, ensuring you capture everything essential. Whether it's conditional logic, repeatable relationship blocks, or file uploads, there may still be hidden features waiting for you to discover.As we conclude, remember that custom forms offer a wealth of potential. By embracing the insights of the Lawmaticians and the strategies of seasoned Lawmatics users, you can harness the full power of form creation to elevate your practice to new heights.
Effective communication lies at the heart of every successful law practice. From providing timely updates to ensuring seamless collaboration, staying connected with clients is a must. While email can be a necessity, text and Portal messages can take direct and customized communication to the next level.That's why we're excited to delve into the realms of texting and Portal messaging, and unveil our brand new Message Center that's set to transform how you engage with clients.
SMS text messaging
Text messages are delivered (and usually read) almost instantly, making them a fantastic tool for communicating with your prospects and clients. Most people have their cell phones with them 24/7, and often view texts with much more frequency and urgency than emails.Lawmatics empowers your firm to send and receive text messages right from your CRM. When following SMS best practices, texting can result in an excellent client experience and increased conversion rate while also making things easier for your team.
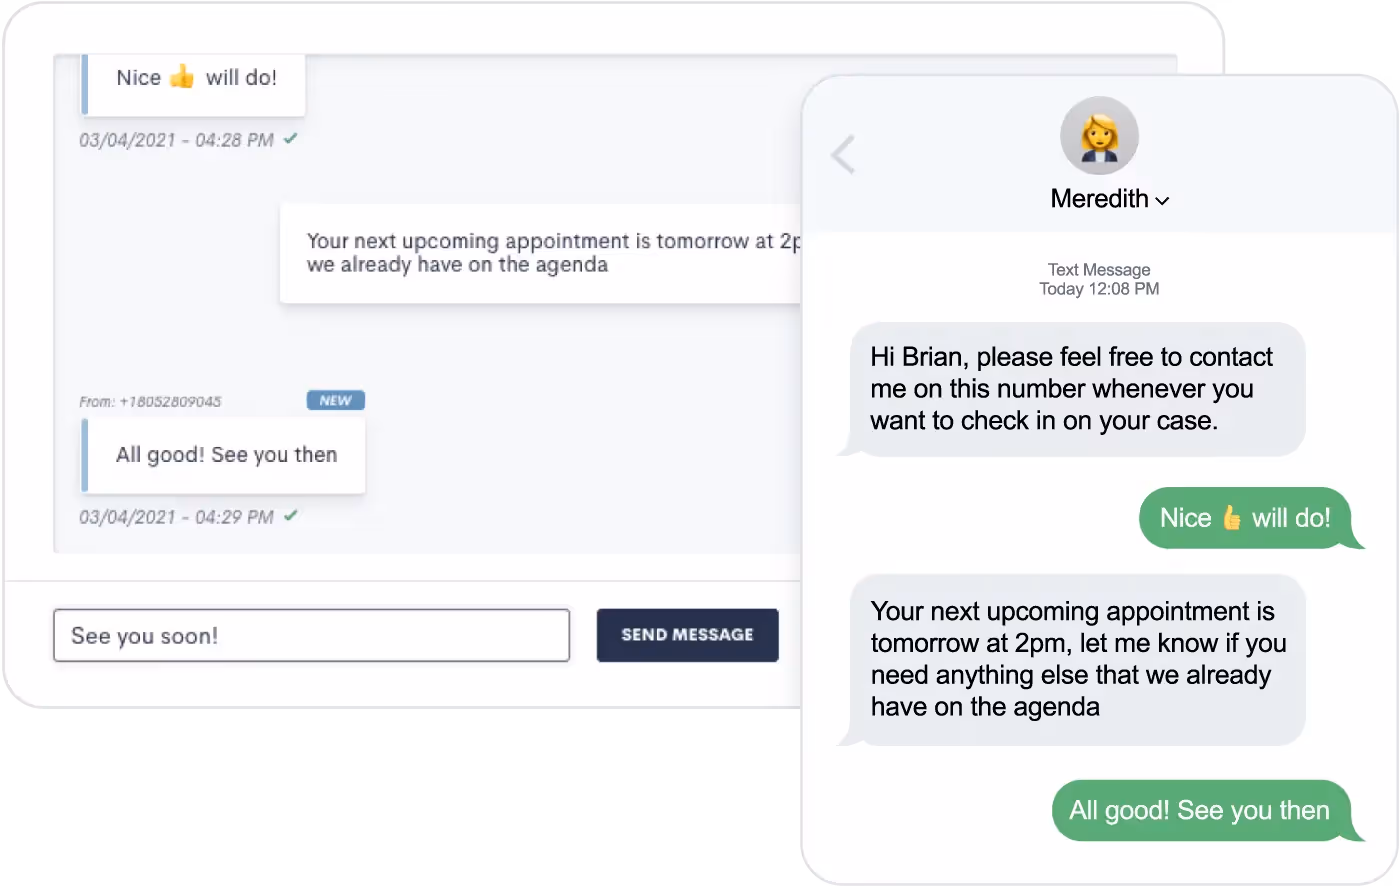
Text messages sent via Lawmatics will not come from your firm’s phone number. Instead, they’ll send from a randomly generated phone number with the area code of your choosing. This number will remain the same so clients will be able to save it as a contact in their phone.At this time Lawmatics offers SMS (short message service) texting, but not MMS (multimedia message service) texting. SMS allows you to send text-only messages, which can include hyperlinks. This means that you cannot share images or other media via text message.If you aren’t using Lawmatics for texting yet, feel free to email us at support@lawmatics.com to get started with this feature. Simply share your firm’s zip code and our team will activate a texting phone number for your account with no additional charge. (Note: only U.S. phone numbers available at this time.)
Automating text messages
You might choose to send texts instead of emails for client communication, or you may use a combination of both. Lawmatics makes it easy to send templated text messages directly from your automated workflows.To send an automated text message:
- Navigate to your Automations page
- Create an Automation
- Select the Send SMS action item
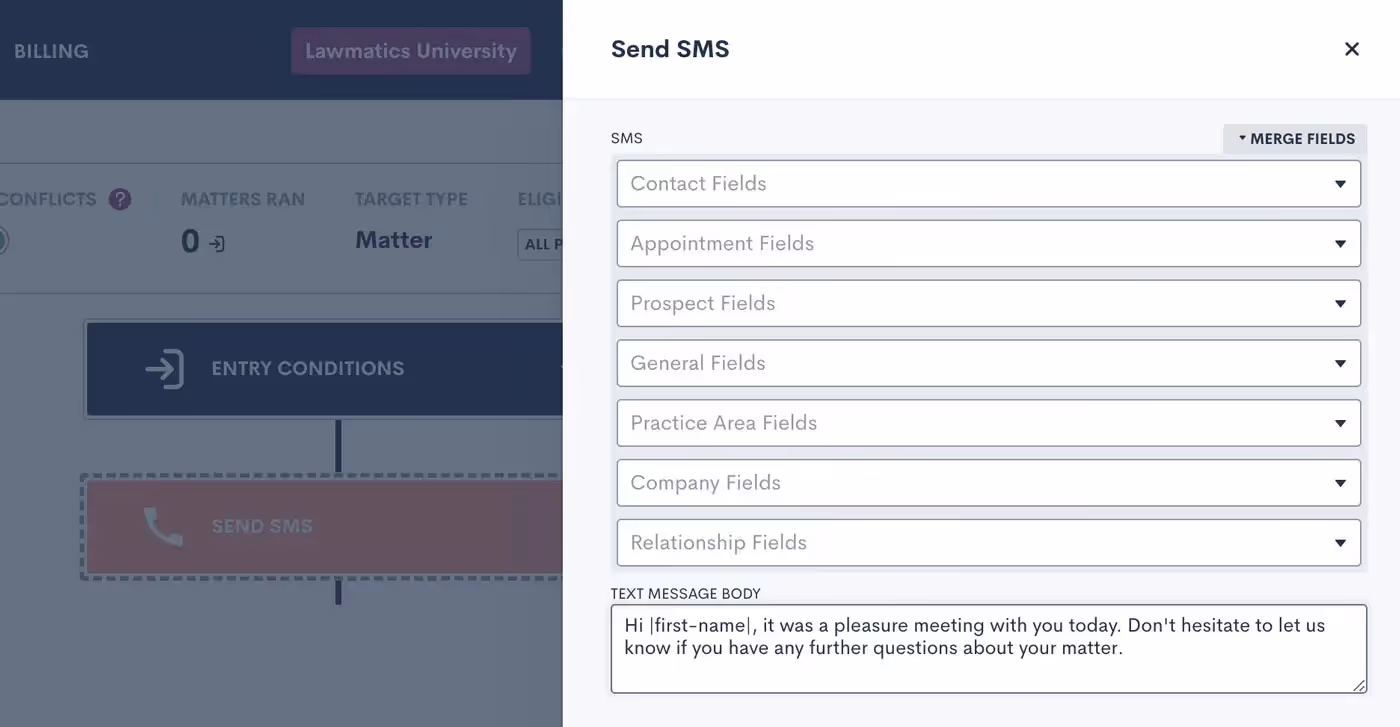
When composing your text message body, as shown above, you’re encouraged to use Merge Fields to address the recipient by name and include any other pertinent information, such as appointment time or other Matter-specific details. This text will function as a template, with each specific target’s information merged in if and when they run through this Automation.When writing your text message template, you also have the option to skip sending the text if the target doesn’t have a valid phone number saved on their Contact in Lawmatics. Enable this selection to avoid causing a failed Automation due to an absent phone number. The workflow will just skip the text and proceed with the rest of your Automation.

Above, you’ll see the Skip toggle as well as the option to set a Delivery Window. Whenever you are using automated text messages, it’s best practice to set a Delivery Window to make sure texts are sent at a time when they are most likely to be seen (and to prevent your texts from sending at inappropriate times).In addition to the Send SMS action item, you also have the option to send many of your assets as a text and/or email. For example, when sending a Form via Automation you’ll see the option to Send as Text or Send as Email.
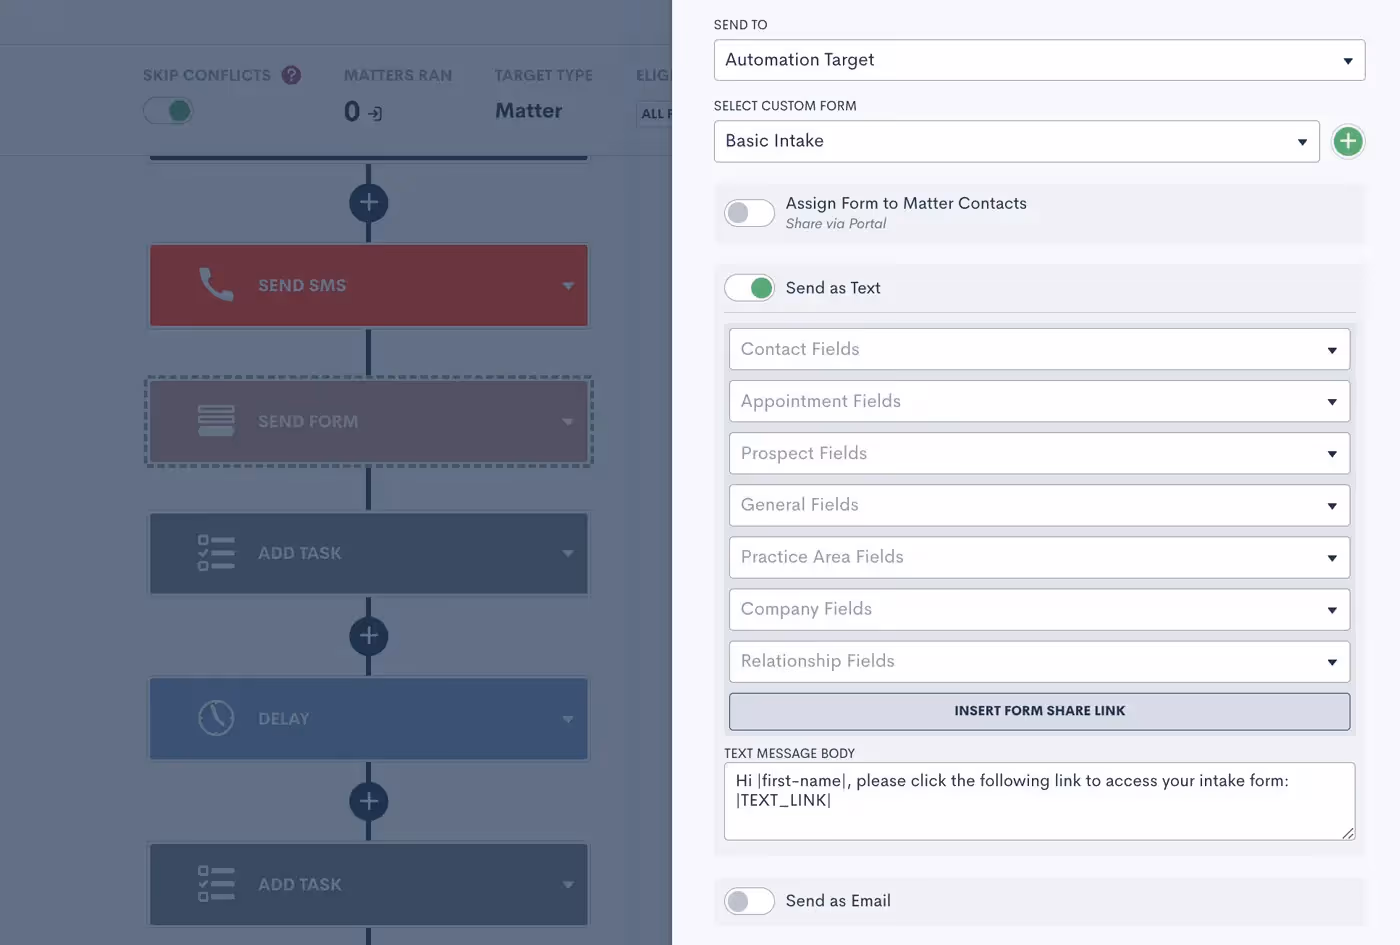
When sending an asset as a text, you’ll still have the option to create your custom text message body template using Merge Fields.In addition to forms, this also works for automated documents, e-signature requests, appointment requests, and more.
Two-way texting
Now that you know how to send automated text templates, let’s dive into our optional two-way texting add-on. This feature allows you to engage in back-and-forth text message exchanges right from Lawmatics. It also gives you the ability to initiate a one-off text to a client rather than relying solely on automated templates.Whether or not you opt for two-way texting, we suggest turning on your email notification for SMS Received in your Settings page.

Without the two-way texting add-on, this notification will let you know that someone has responded to an automated text. You can then call, email, or manually text them from outside of Lawmatics.With two-way texting — in addition to receiving this notification — you’ll be able to engage with the conversation directly from the appropriate Matter (and the new Message Center) in Lawmatics.
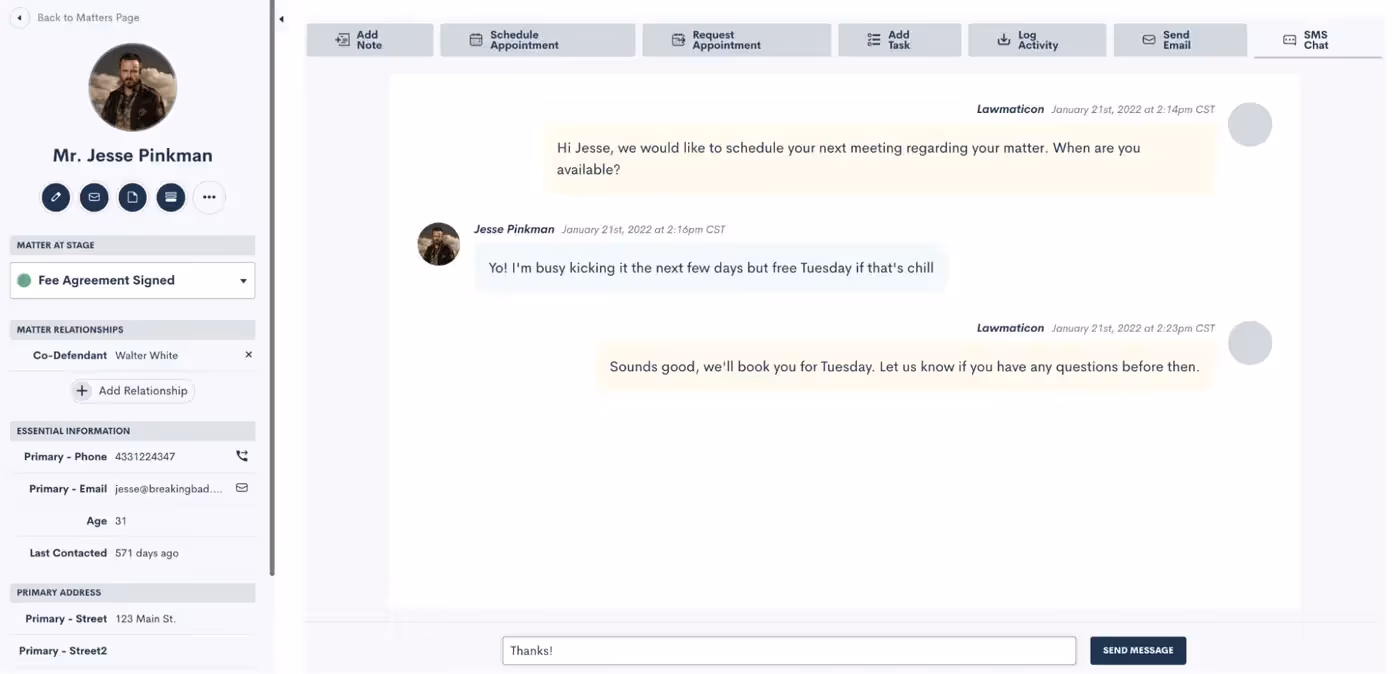
For firms with two-way texting, all text message threads are saved on the SMS Chat tab found on the Matter’s profile.
Client Portal Messaging
In addition to text messaging, Lawmatics also has a messaging function within our Client Portal. (If you’re not yet familiar with the Client Portal, review our past Deep Dive session to learn all the ins and outs of using the Portal.)The Portal is a powerful tool that lets your clients login to view their Matter details such as Forms, Appointments, Documents, and, of course, messages.Remember that you can invite Contacts to the Portal either via Automation…
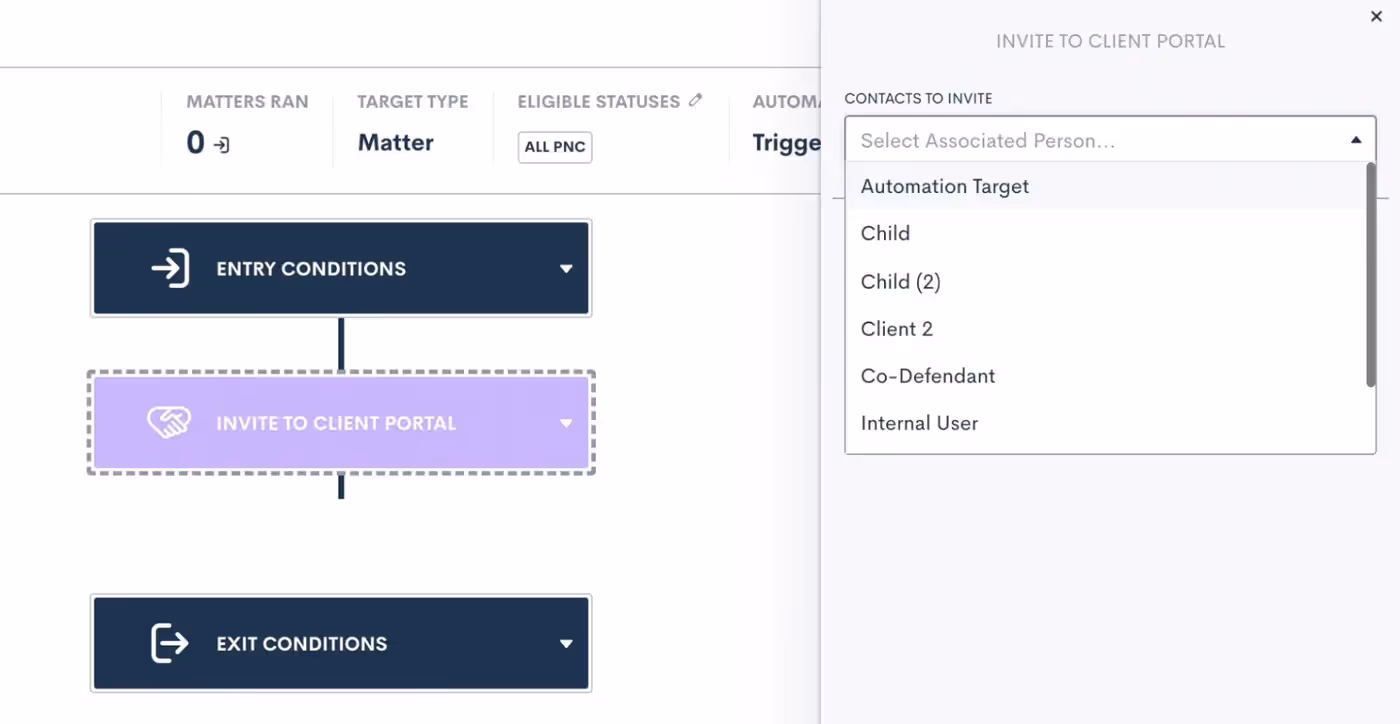
…or by manually clicking the Portal button on their Matter profile:
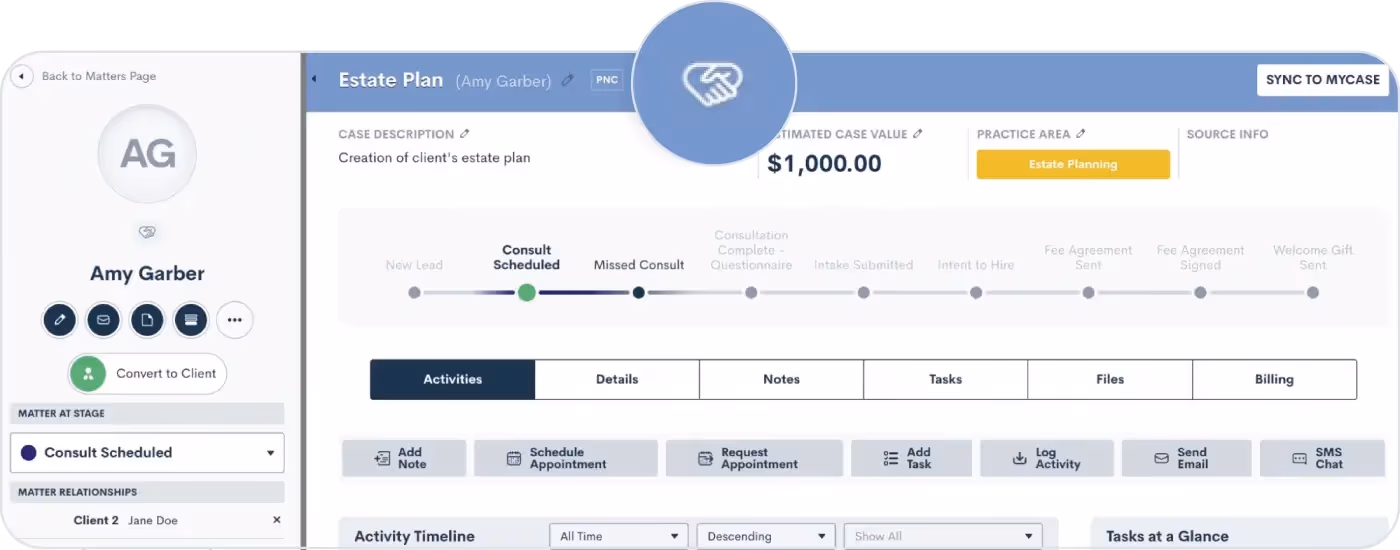
Once a Contact has been invited to the Portal, you can then share any important items with them via Portal, including messages.
Portal Messaging 101
Use our Portal messaging feature to send a message directly into a client's Portal. They can easily view it within their Portal and reply if needed.Unlike our SMS Texting feature, Portal messages do not send to the recipient’s phone as a text message. Rather they can only be viewed within the client’s Portal, as shown below.
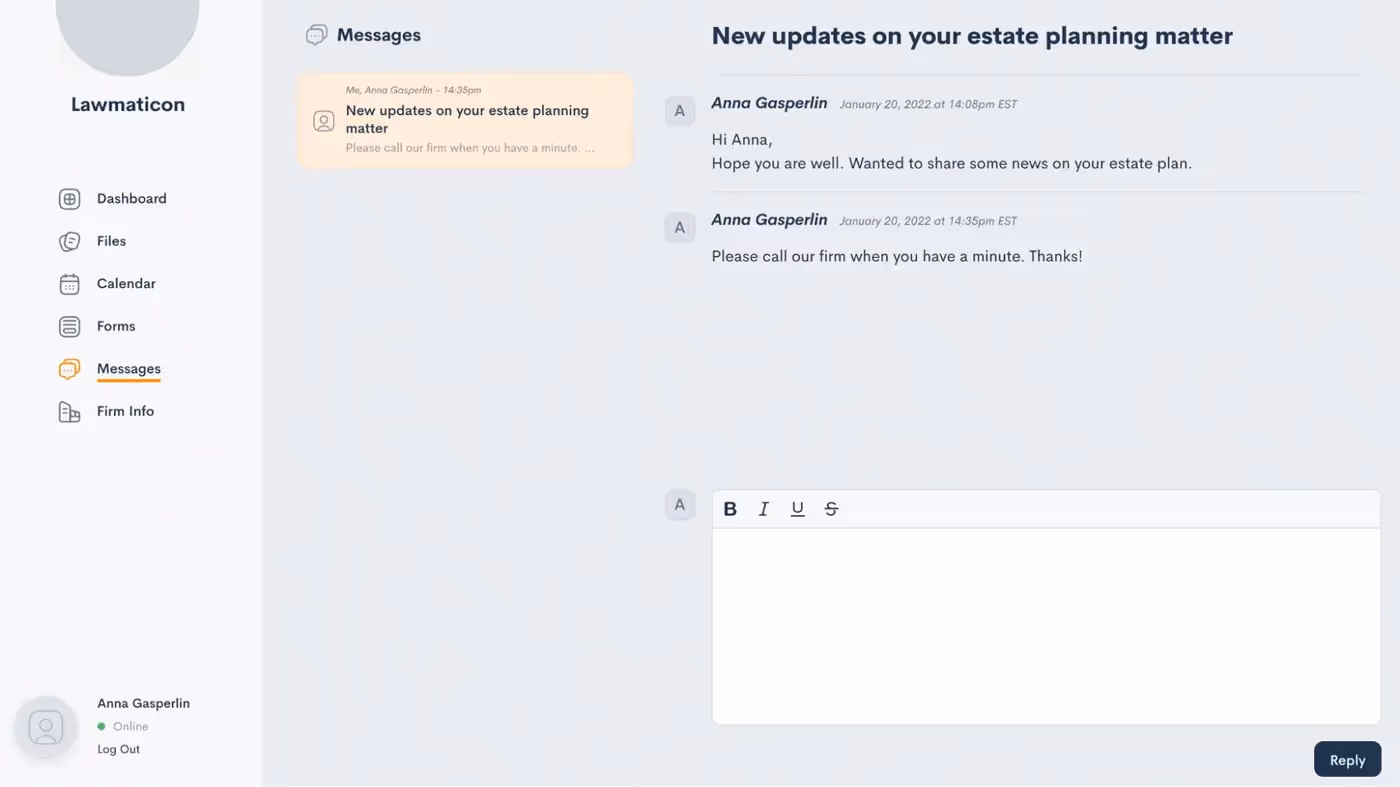
This can be a great option for clients who don’t use texting, opt out of text messages, or just prefer to be more hands off when it comes to their Matter.Previously, Portal messages could be viewed on their own designated page under the CRM tab in Lawmatics. They can now be found in our brand new Message Center.
Introducing the Message Center
The Message Center is your new hub for viewing both SMS text messages and Portal messages across your whole firm. With this powerful feature, staying connected with your clients has never been more seamless.Let’s set off on a guided tour of the Lawmatics Message Center, demonstrating how it centralizes all client communications into a single organized space.To access the Message Center:
- Hover your mouse on the CRM tab near the top left of your screen
- Click Message Center
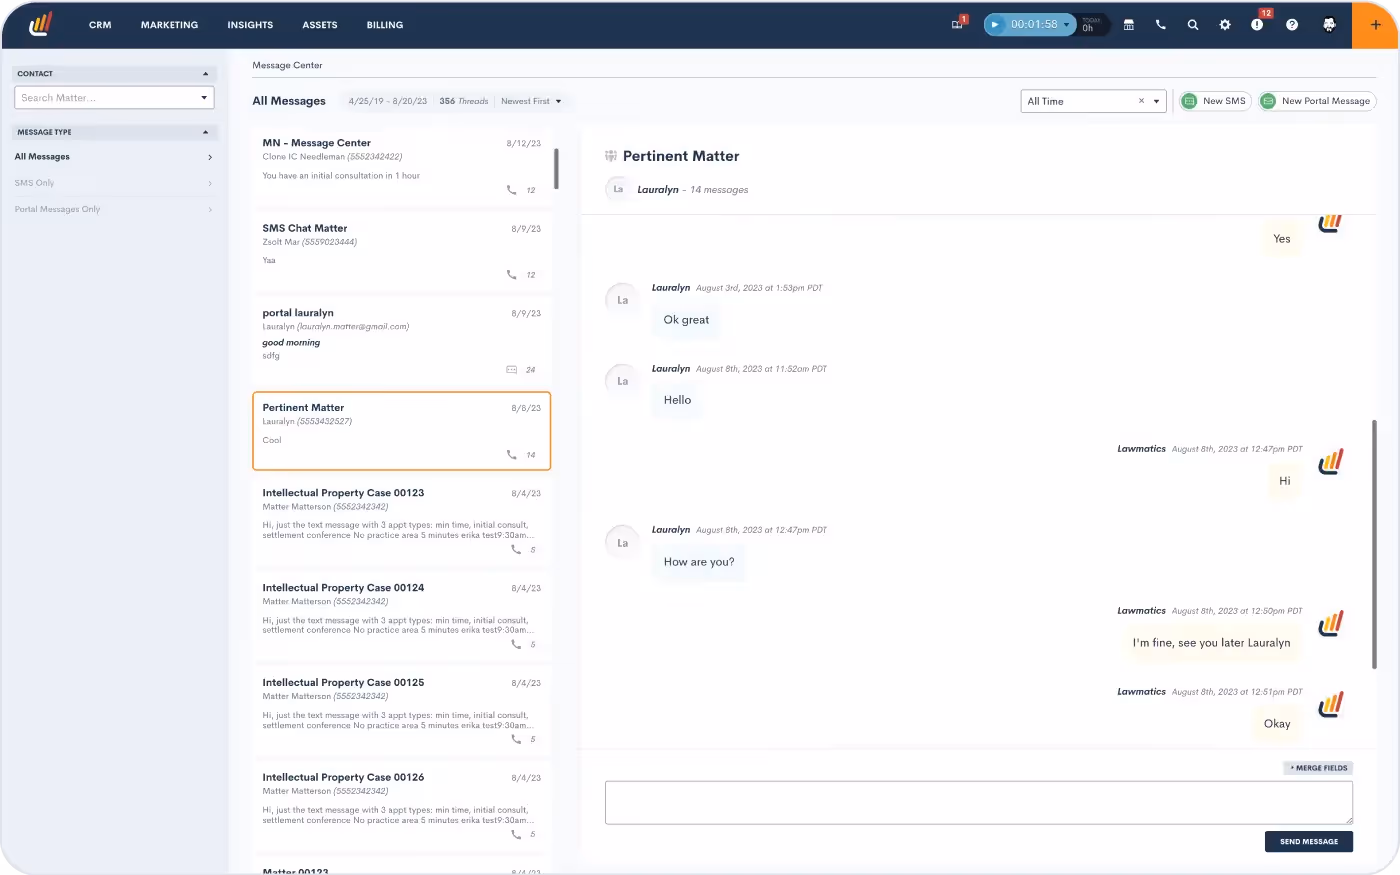
Here you will see a dashboard of all of your firm's messages with clients, tailored to your user's specific access level (read more below about setting users’ access levels).If your firm is using the Client Portal, you’ll be able to view all messages sent and received via the Portal. Note that you can use the button at the top right to create a new Portal message.You can also manage SMS text messages via the Message Center. All text messages sent via Lawmatics will be visible here. If your firm utilizes two-way texting, then you’ll also see message threads exchanged between your firm and the client.
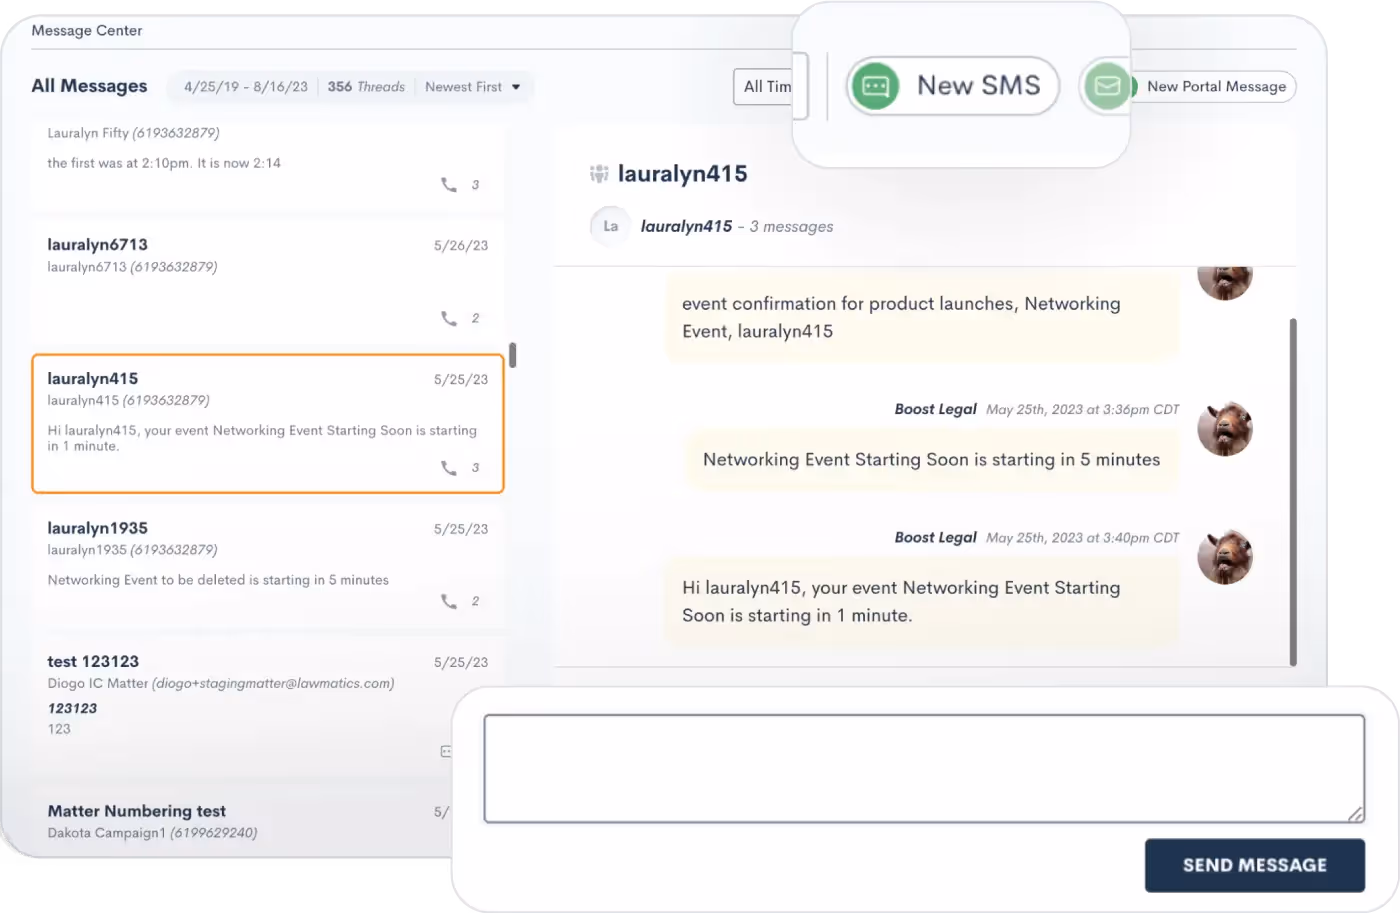
With two-way texting you’ll also have the ability to send out new text messages and reply to threads from the Message Center.
User viewing permissions
As mentioned briefly above, your firm's various users will only be able to view messages in the Message Center for Matters that they have access to. Each firm’s admin will define user roles on the User Management page in Settings.
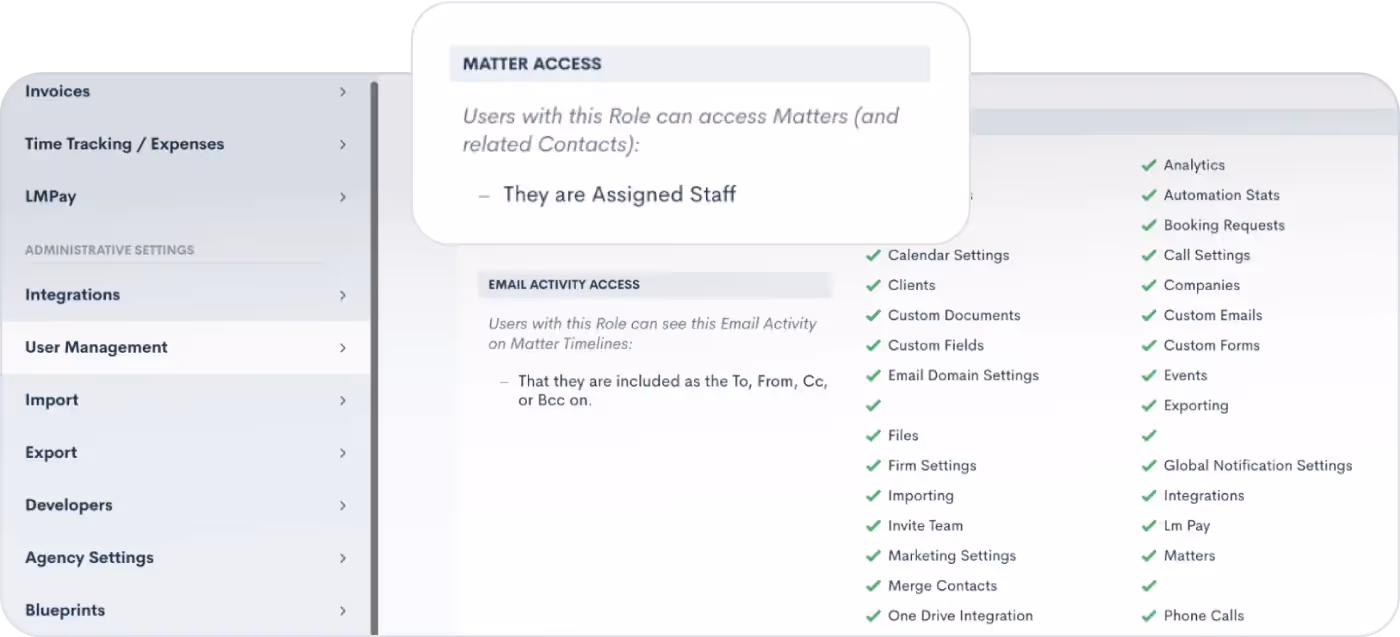
When editing your roles, you can choose the Matter Access level for each role, highlighted above.Whether you have chosen to give certain users access to only Matters that they own, created, etc, or if you wish to give them access to all Matters, this selection will also be reflected in their viewing capabilities for the Message Center. Any user roles that have been granted access to all Matters will be able to view messages exchanged with all Matters in the Message Center.
Filtering and sorting messages
By default, each user will see all messages for Matters that they have access to. However, the left sidebar of the Message Center provides options for filtering messages. You can use this menu to view only:
- SMS messages
- Portal messages
- Messages for one particular Contact
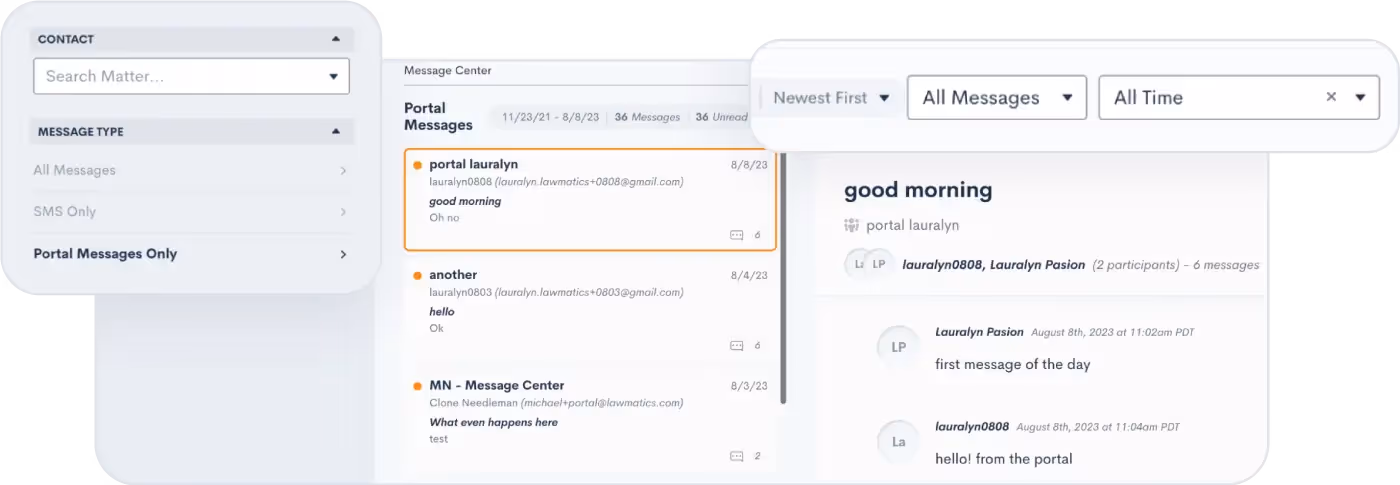
The options on the top right will filter messages by date or message status (i.e. unread vs. read), as well as sort your messages by either newest or oldest first.
Conclusion
As you navigate the landscape of client messaging and communications, know that you are not alone. Lawmatics is here to help you maximize benefits of text messaging and Portal interactions, including the innovative capabilities of our new Message Center feature.As you adopt this new feature, brace yourselves for streamlined communication strategies that can take your law firm's client relations to unprecedented heights.Get started with the Message Center today to dive in and discover the latest tools from Lawmatics that are reshaping the future of client communication in the legal world.

Register for upcoming Monthly Deep Dives here.Step into the paperless revolution with Lawmatics, where document drafting and e-signature requests are made easy and efficient. Say goodbye to the tedious tasks of physical document handling, printing, scanning, and mailing, and embrace a seamless and modern approach to legal processes. With Lawmatics, your firm's lawyers and clients can sign documents electronically from anywhere, at any time, making the whole experience hassle-free and convenient.Document templates allow for increased consistency and accuracy with your document drafting. Let Lawmatics handle the intricacies of merge fields, conditional logic, and fillable text fields, saving you time and hassle. Our document templates are versatile and highly customizable, ensuring that you’ll be able to set up your documents exactly how you need them.
PDF Document Templates
The first of our three types of document templates is PDF Upload. With this type of template, you will begin by uploading a base PDF file, and then you’ll drag and drop any merge fields or signature fields over the base file. For that reason, this is a great option for:
- Court documents
- Authorizations
- Forms from external organizations
- And more
This will help you create documents that are identical to the original base version provided.
How to create a PDF Document Template
- Navigate to the Documents page under the Assets tab
- Click the button to create a new document
- Select Upload PDF
- Give your document a name,
- Select Matter as the type (for anything client/case related)
- Select a practice area if desired (or leave blank)
- Drop a PDF file in the box to upload
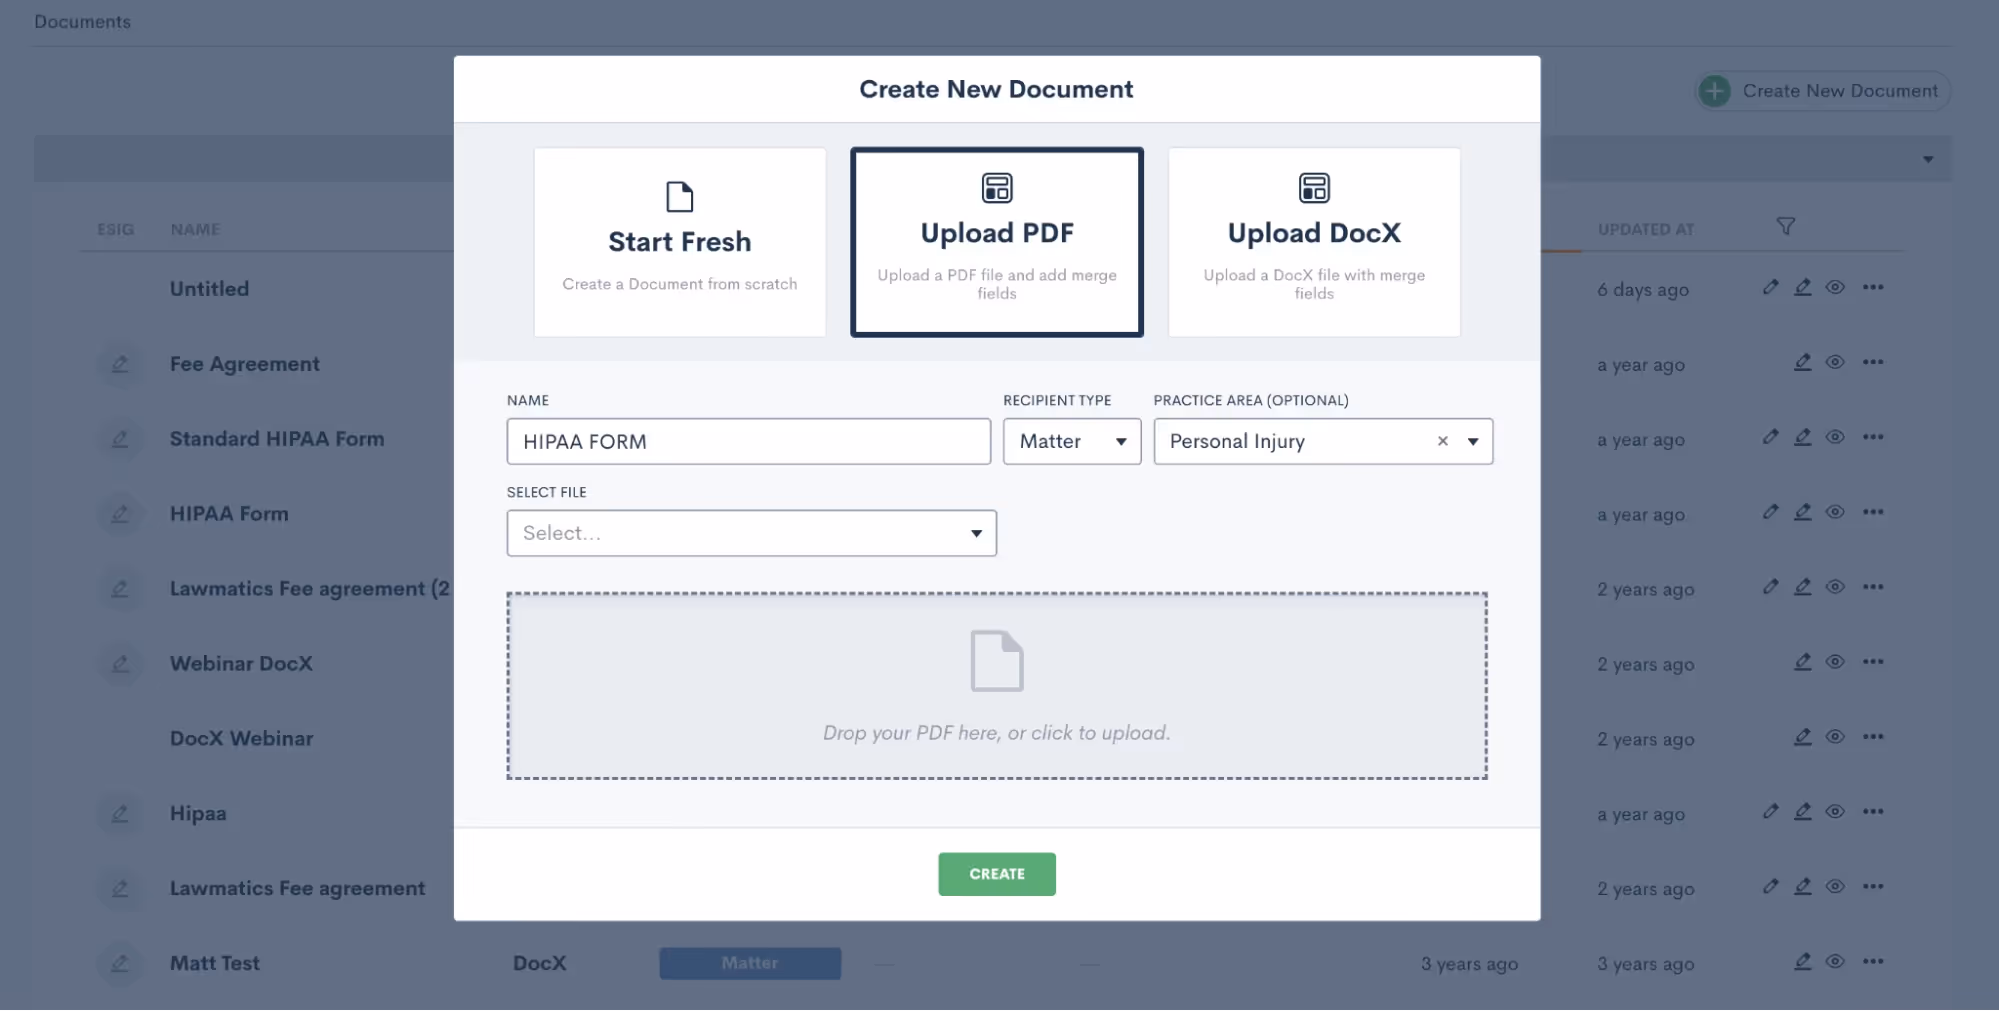
Again, it’s important to note that the PDF file will remain as-is when it is uploaded. So be sure to leave the appropriate amount of space for blanks, fields, etc.
How to merge data from the matter into your Document Templates
Once the document is uploaded, you will see field elements on the left sidebar that can be dragged and dropped into the document. These fields can be used to merge data from the matter, or as open text fields for the client to type in.Start by merging in the client’s name. Your first step is to drag a Text field onto the document wherever you would like it, then click on it to set the properties as shown below.

To merge data, such as the client’s name, simply select Merged from Matter in the dropdown for Field Set By, and then select which Field should be merged there.If this document requires e-signature, scroll down on the left sidebar to the section labeled ESignature Settings. Here you can feel free to add as many signers as you need, whether on the client or the firm side.

Once you have added your signer roles, you can now add e-signature fields into the document. You’ll see options for signature and initials as well as text. Text fields prompt the signer to simply type in information, such as social security number or date of birth. Select what you need and drag it onto the document. Then, in the section labeled Field Set By, select the signer role who needs to fill in that field, “Client” in the example below.
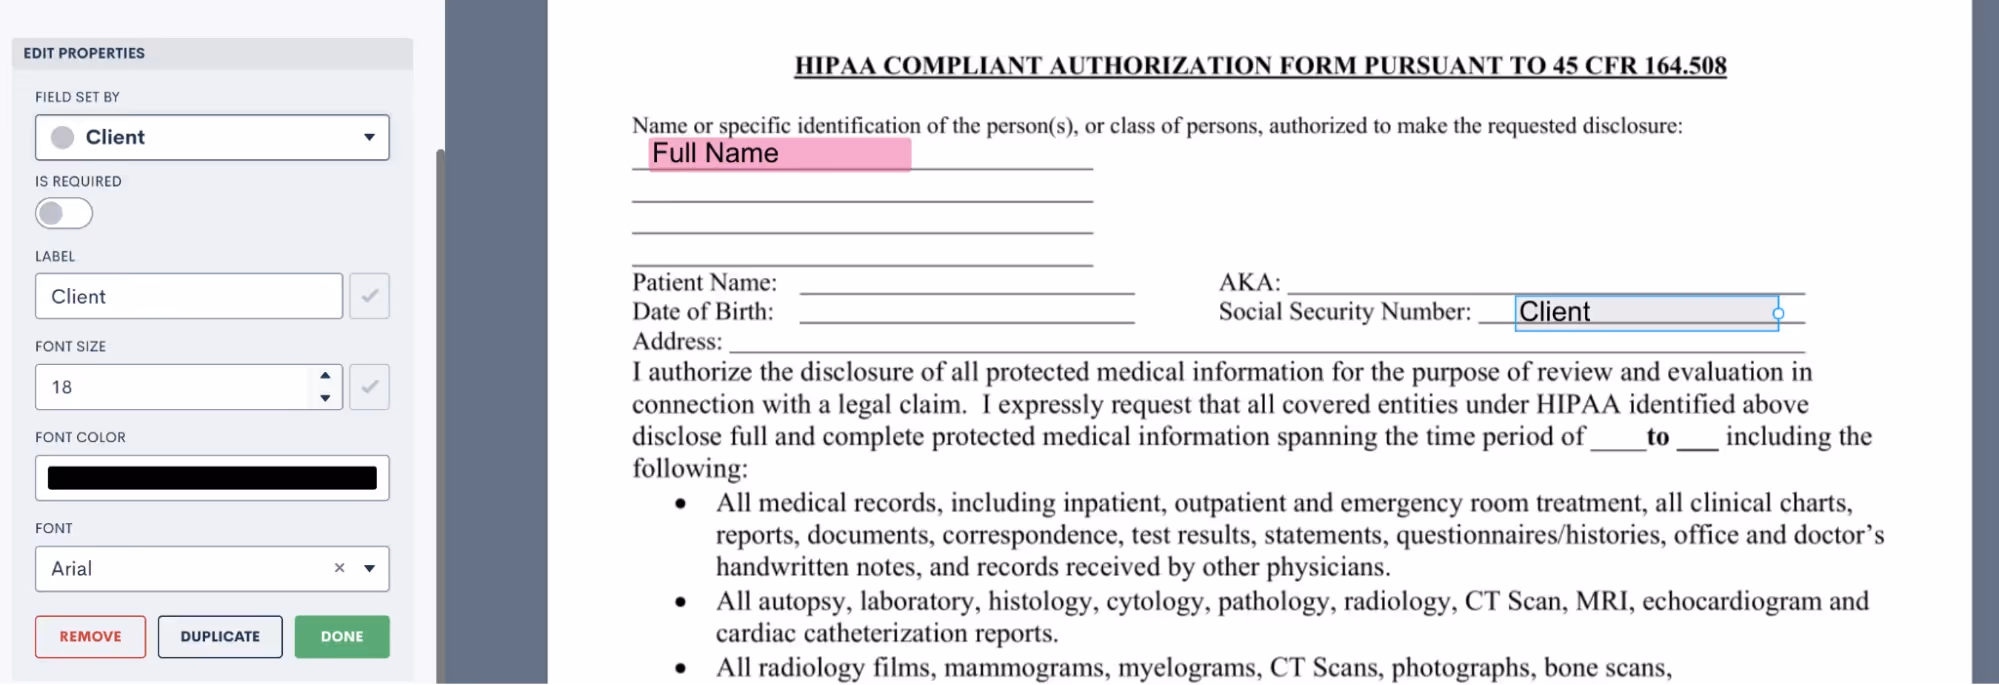
Now when this document is sent, it will prompt the Client signer to fill in that field accordingly.Take your time dragging and dropping all of your fields onto the document, then preview the document to see what it looks like with a particular matter’s information merged in.
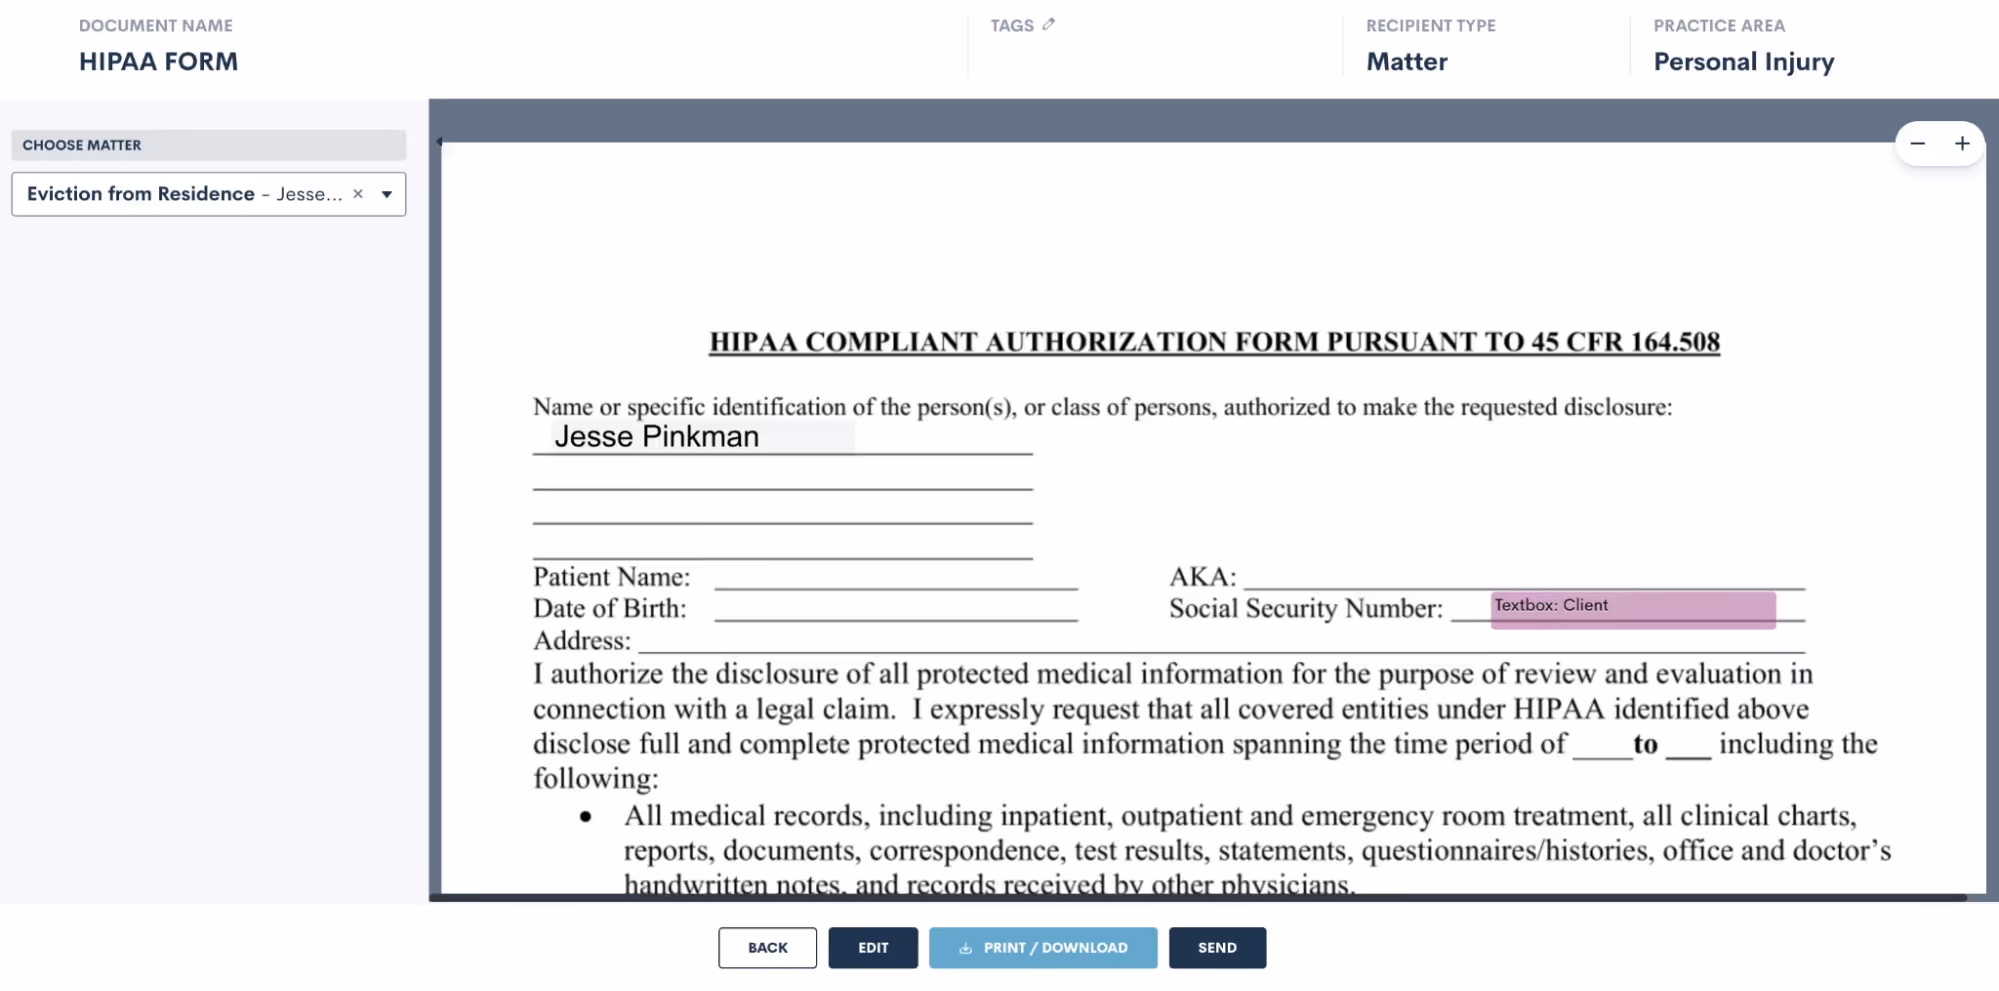
Use the selection drop down on the left to choose a matter, and then that matter’s fields will be filled into the document template for previewing. Easily send or download from there.
DOCX Document Templates
Create and edit DOCX documents seamlessly outside of Lawmatics using your preferred word processor. Just like our other document templates, you can easily merge fields and utilize conditional logic with these templates.While crafting DOCX templates might require a bit more effort, they offer unique advantages not found in our other options. These versatile documents can serve various purposes such as:
- Fee agreements
- Internal firm documents
- External court documents
- And authorizations
How to create a DOCX Document Template
To get started with this type of document, we recommend opening the DOCX Field Reference guide. You can access this guide by simply hovering over the question mark icon near the top right of your Lawmatics window.
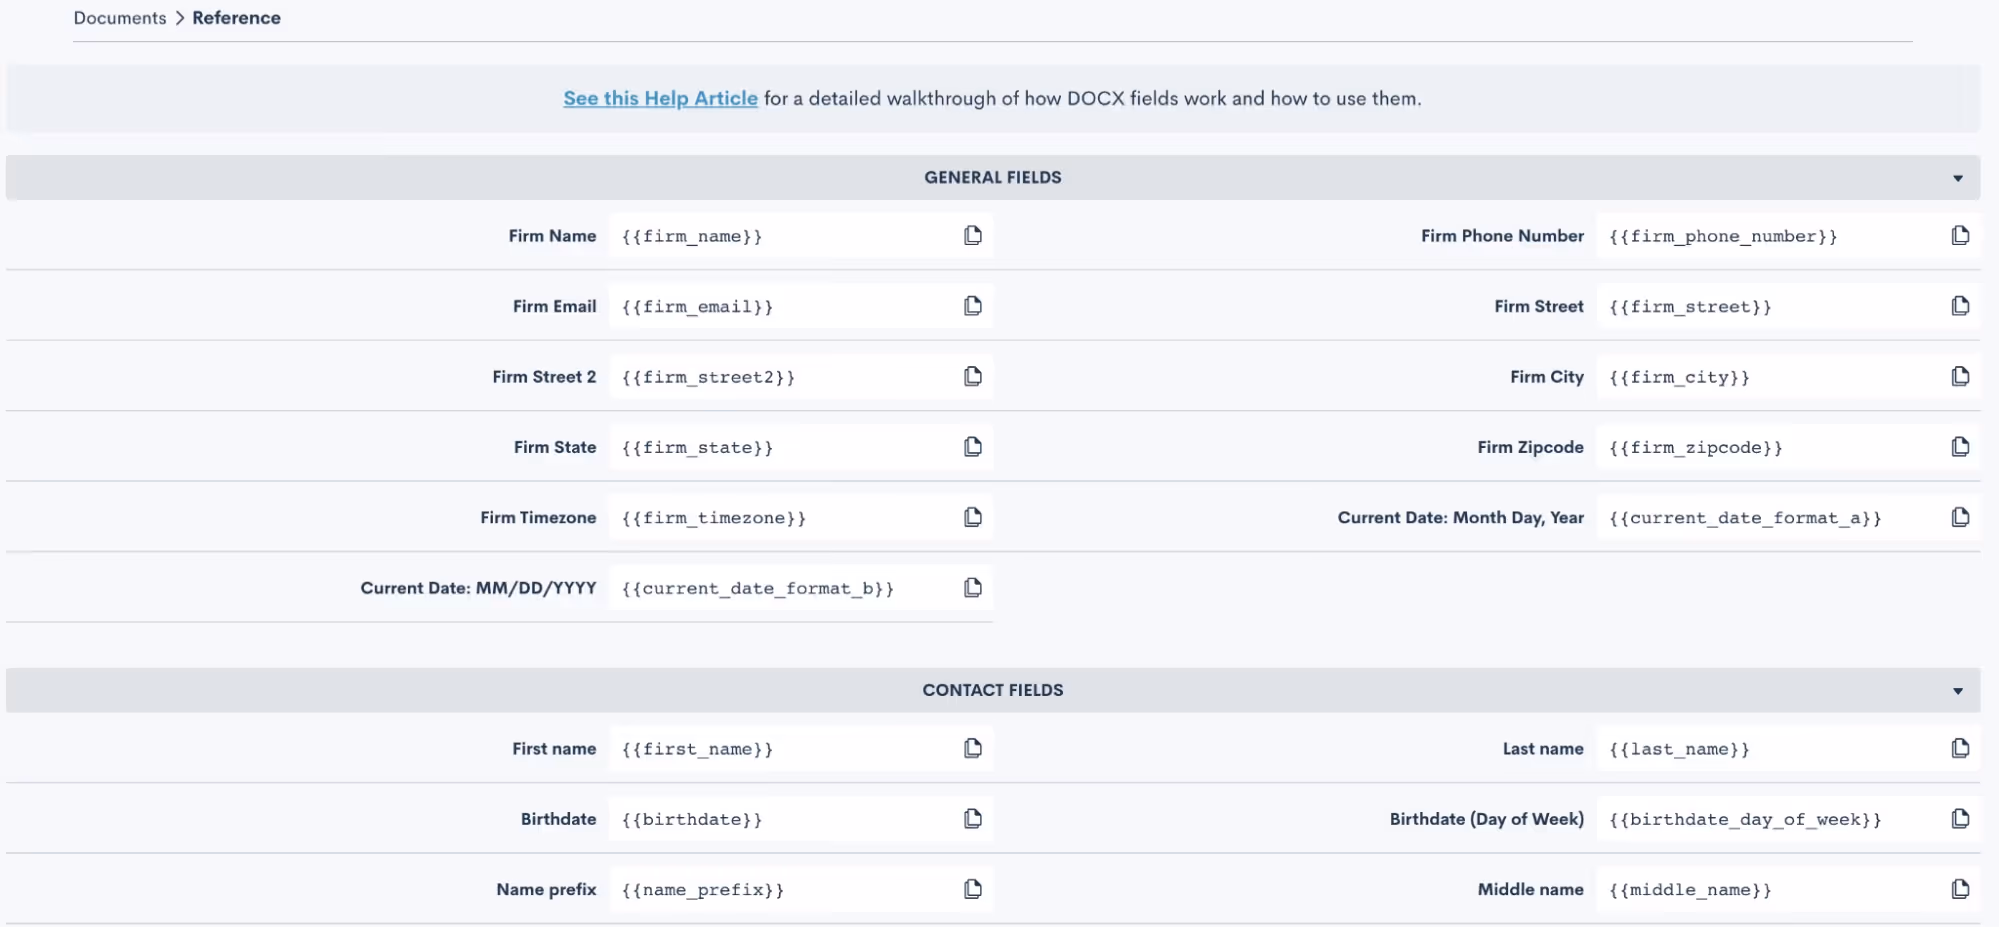
Here you will find the codes for all of your fields, including custom fields. Copy and paste these codes into your word document, and when the document is uploaded back into Lawmatics the field will merge in accordingly.
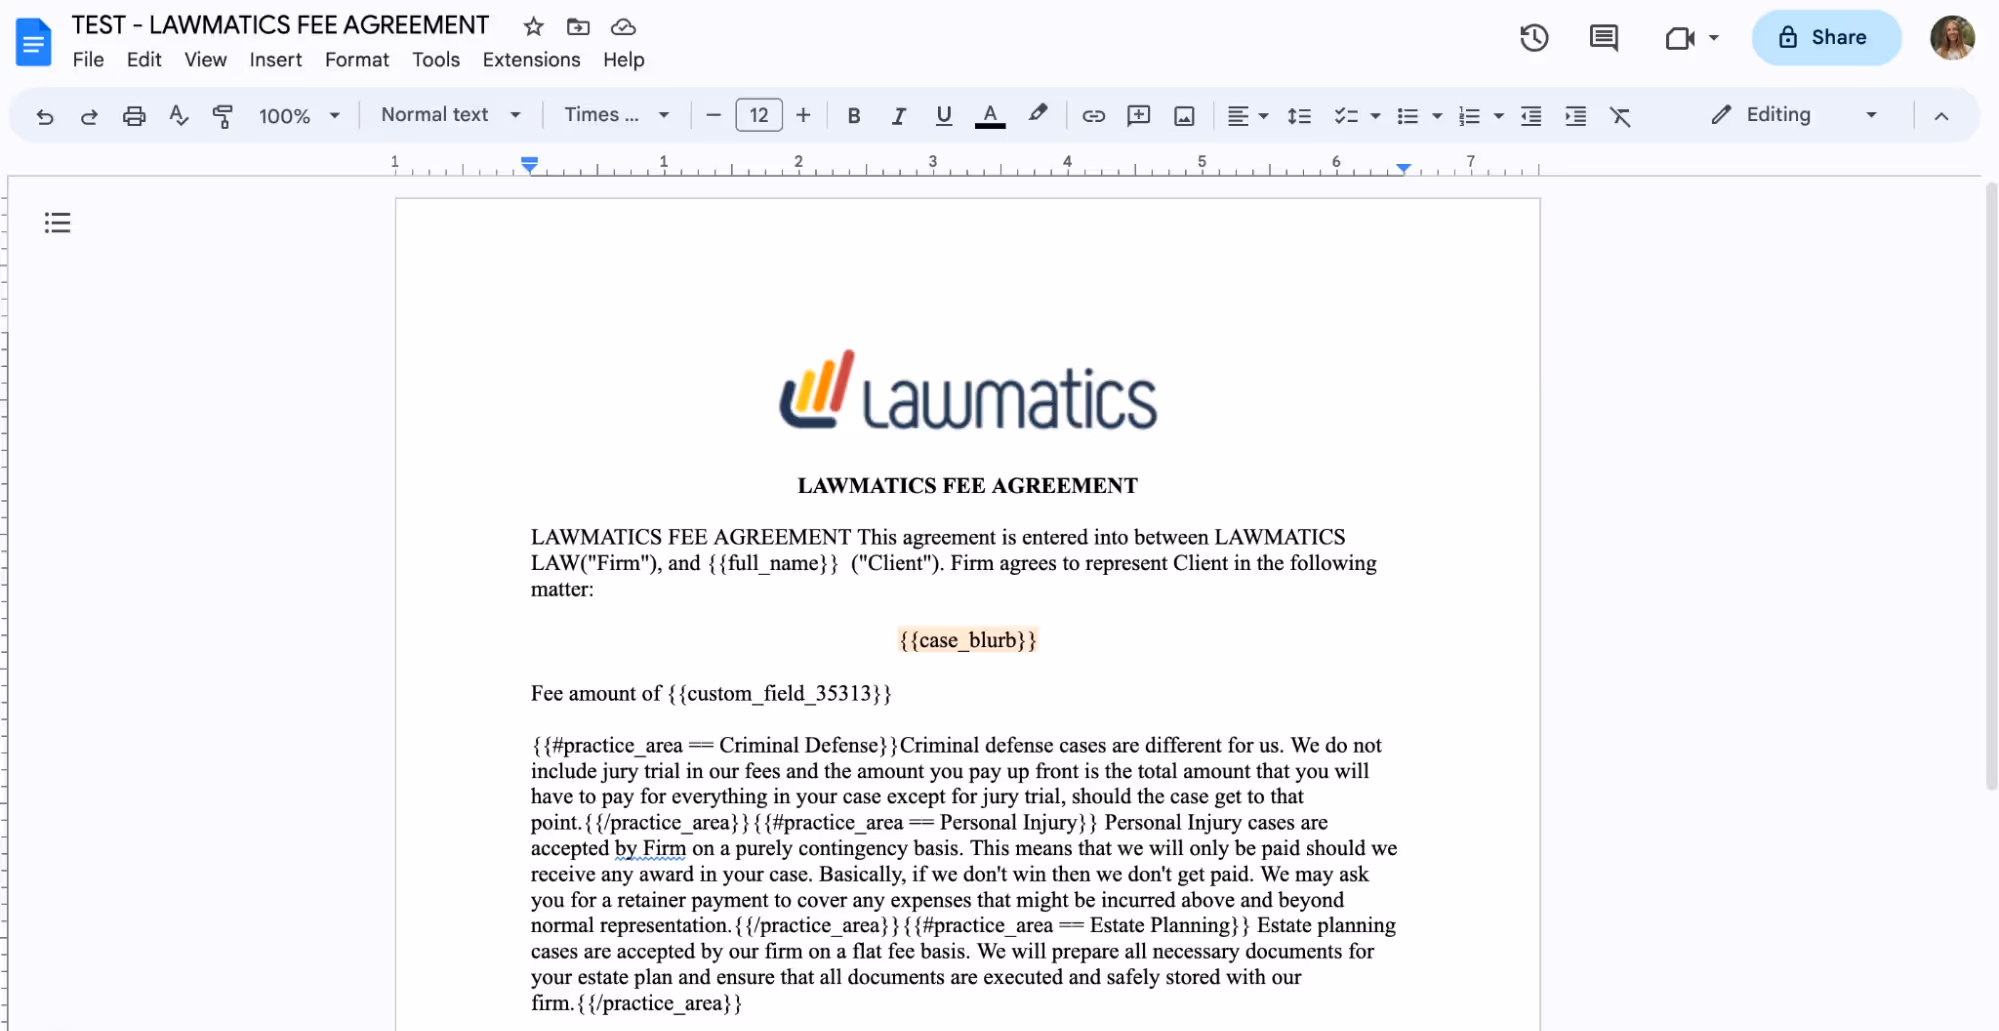
You can also add e-signature to these documents. When you go to the DOCX Field Reference page, mentioned above, scroll all the way down to the bottom and you will find a guide for using signature fields. Simply follow the guide provided to copy and paste signature fields into your document just like you would do with merge fields.

Once you have made all of your edits in your word processor, it is time to save the document as a .docx file and upload it into Lawmatics. At this point, do make sure you have made all necessary edits to the document base including grammar, merge fields, page numbers, header/footer, etc, because you cannot edit the content once it is uploaded into Lawmatics.After you have uploaded the file, it will appear in Lawmatics exactly as it did in your word processor. You’ll now have the option to preview the document by matter by simply selecting a matter from the drop down menu in the top right, shown below, and you will then see your fields merged.

From here you can always send the document manually, or preview and download it back as a .docx file with the fields merged in.
Start fresh custom Document Templates
Last but not least, our third option for creating document templates is the Start Fresh option, also referred to as Custom Documents. With this template, you will be using the Lawmatics built-in word processor to build your document right in Lawmatics.To get started you can either type your text right in, copy and paste text in, or use the Word import button to import the text right from a word document. You’ll then see something like this:
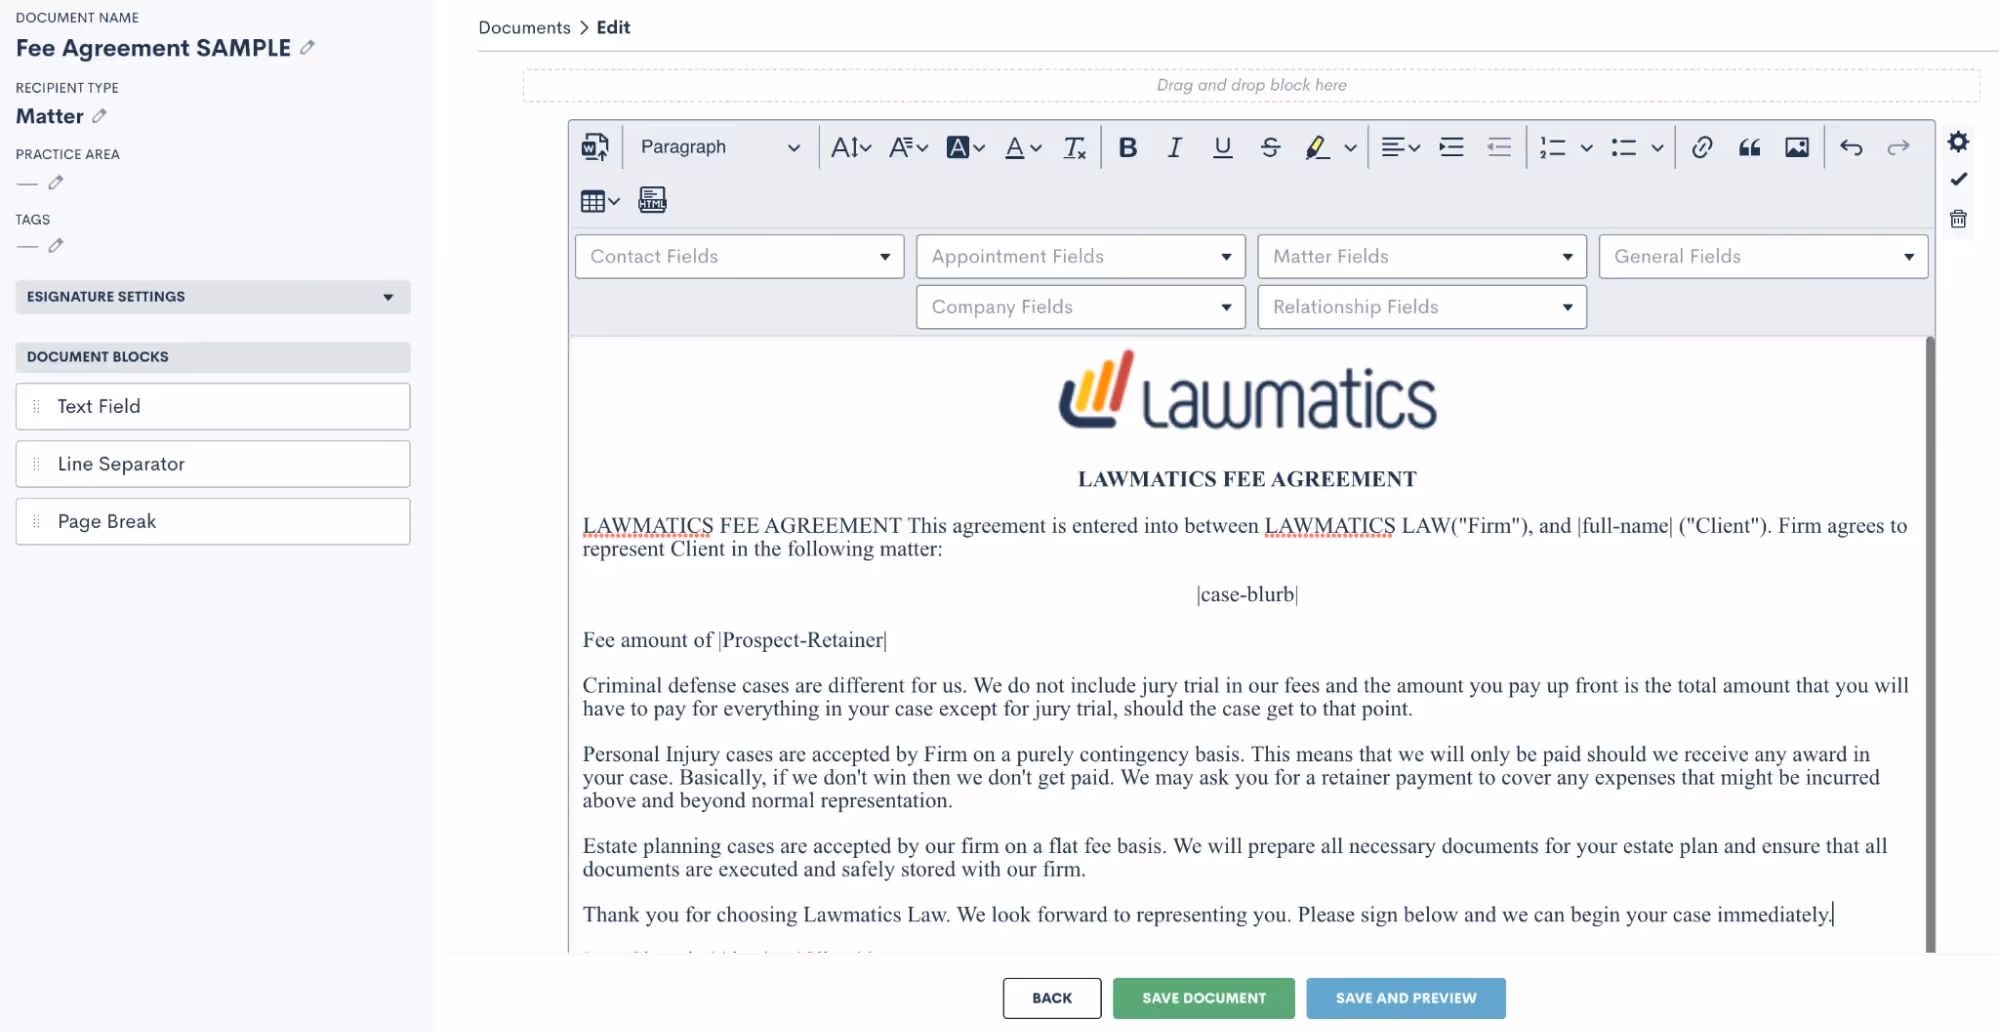
Above you’ll see some fields merged into the document. This template option makes merging fields very easy, because you’ll simply select them from the drop down boxes shown above and the fields will be merged right into the template.
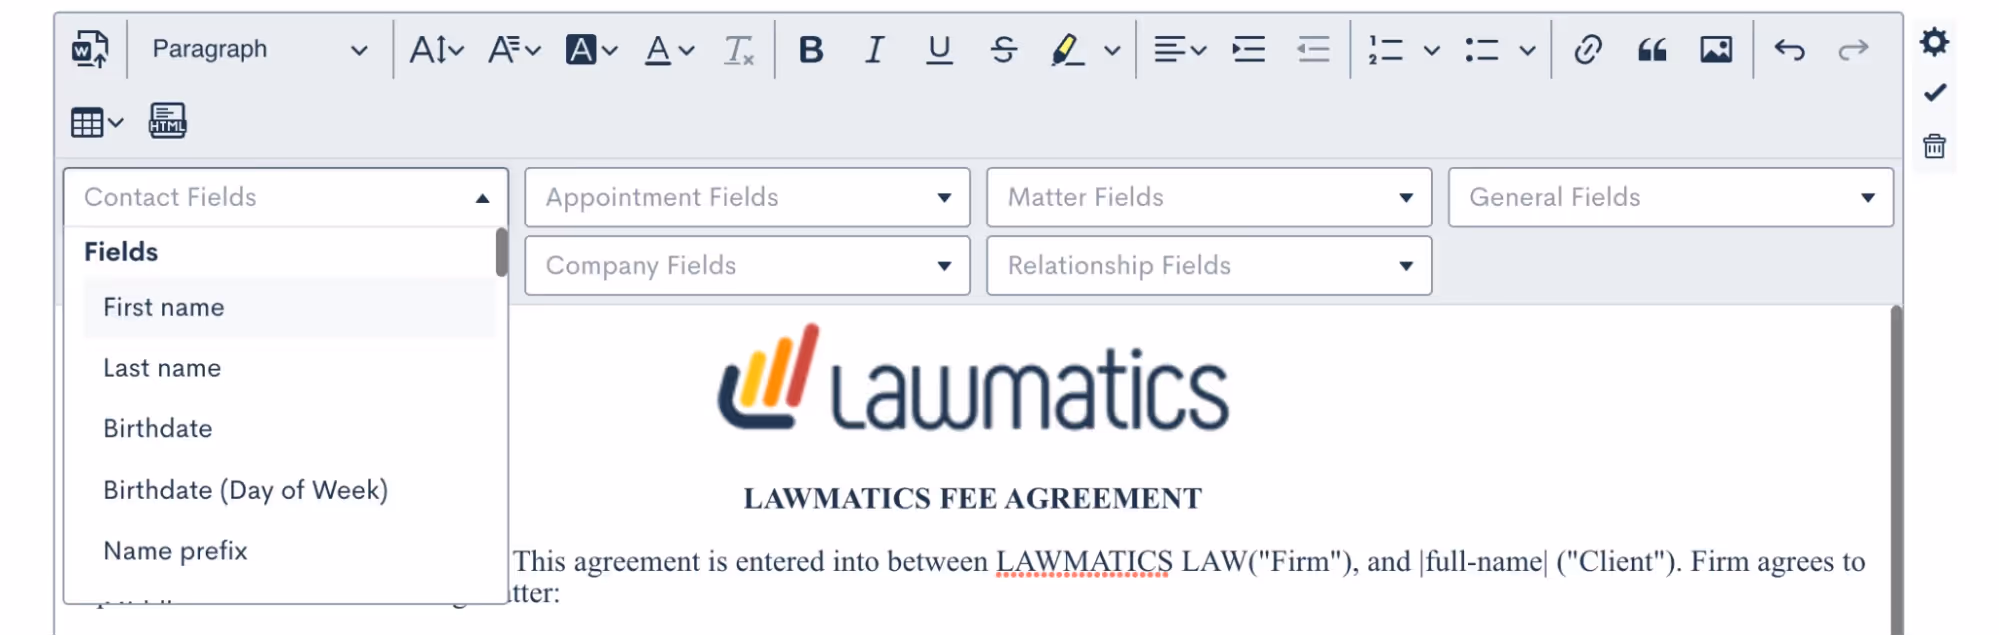
Conditional logic is also a key part of this template type. You may have certain paragraphs or sections of your document that should only apply conditionally, to make this happen you’ll drag over additional text fields (from the left sidebar menu), put the conditional text inside, and then set the conditional logic using the gear icon on the far right. You’ll set your logic like so:
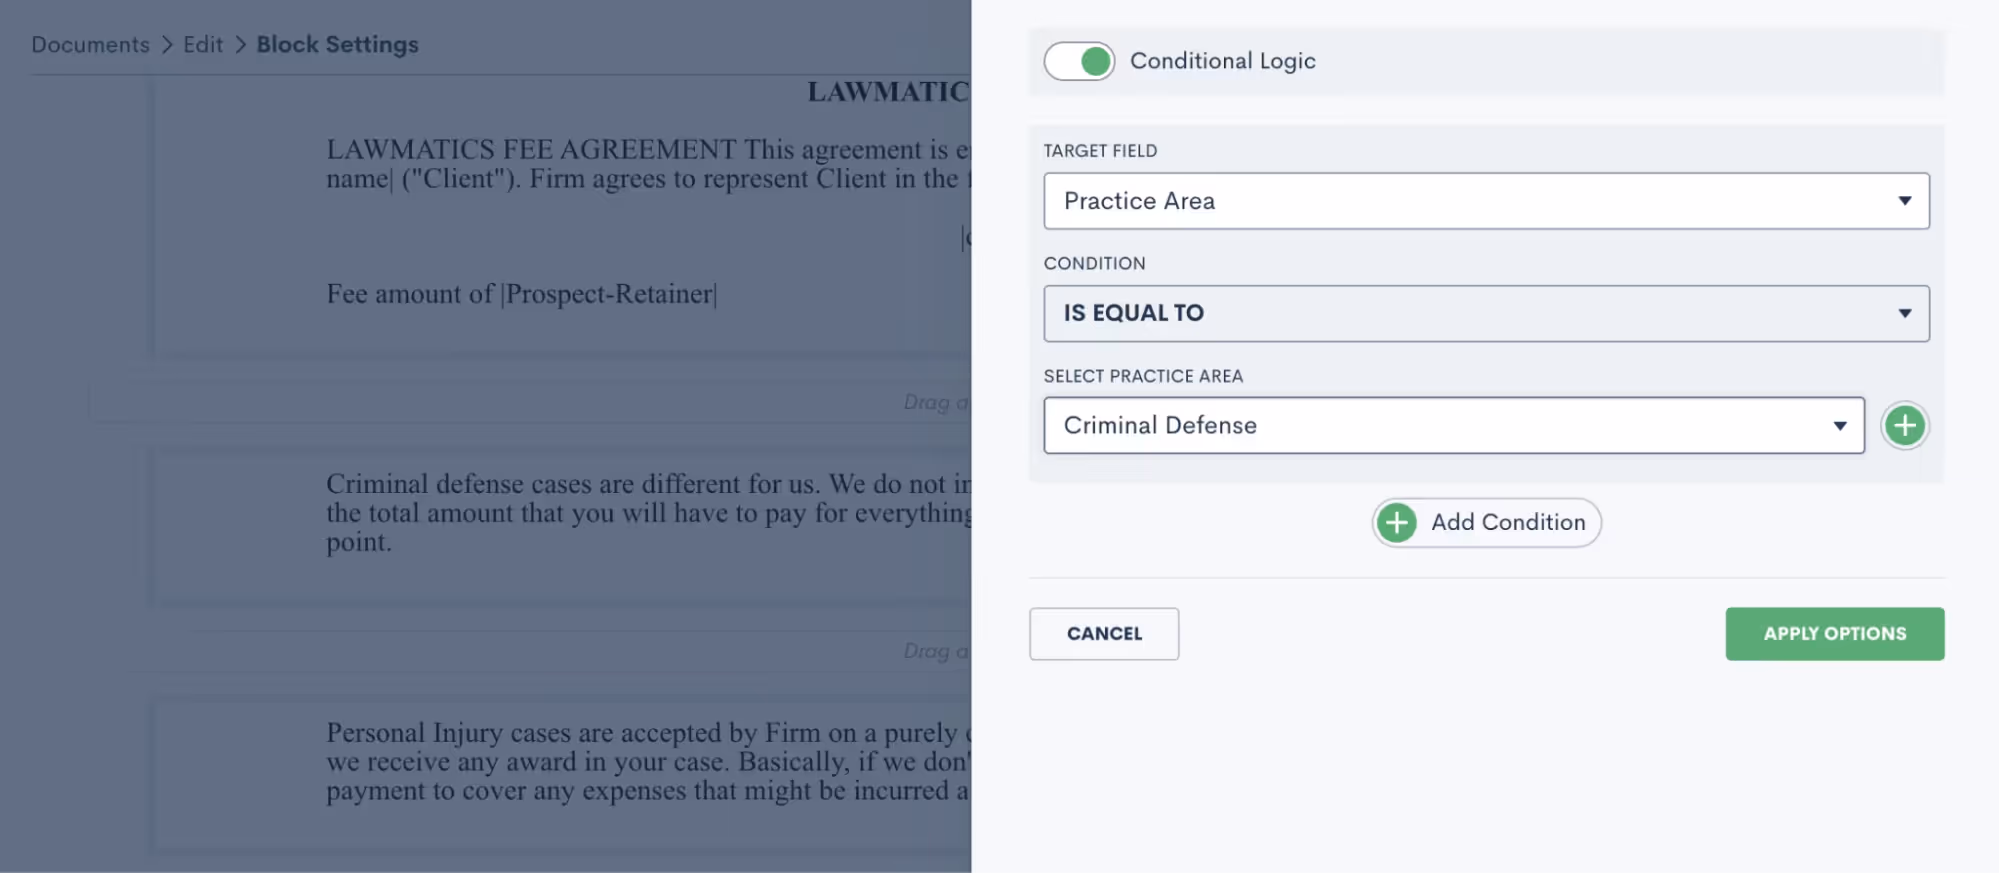
Practice area is a common field for setting conditional logic, but feel free to use any field in your CRM including custom fields.You’ll often want to add e-signature to this document. To do so, click to expand the e-signature settings section on the left sidebar and add as many signers as you need. Remember, your signers could be from the firm or on the client side. You’ll then use the signature fields drop down to add in any signature fields such as initials, date, signature, etc.

Be sure to save your document, and then it’s ready to go!Review a more in-depth comparison of the three Lawmatics document template types here.
Using document templates in Automations
Each of the above three templates can always be previewed for a particular matter and sent out manually when desired. More often than not, you will opt to build your documents into Automations so that they can be sent and signed automatically.Before we move onto Automations, let’s also take a look at your options for Custom Email Templates for documents as well as e-sign reminders. Go to your Documents page under the Assets tab, and then click the … icon on the far right for any document. You will see the options shown below.
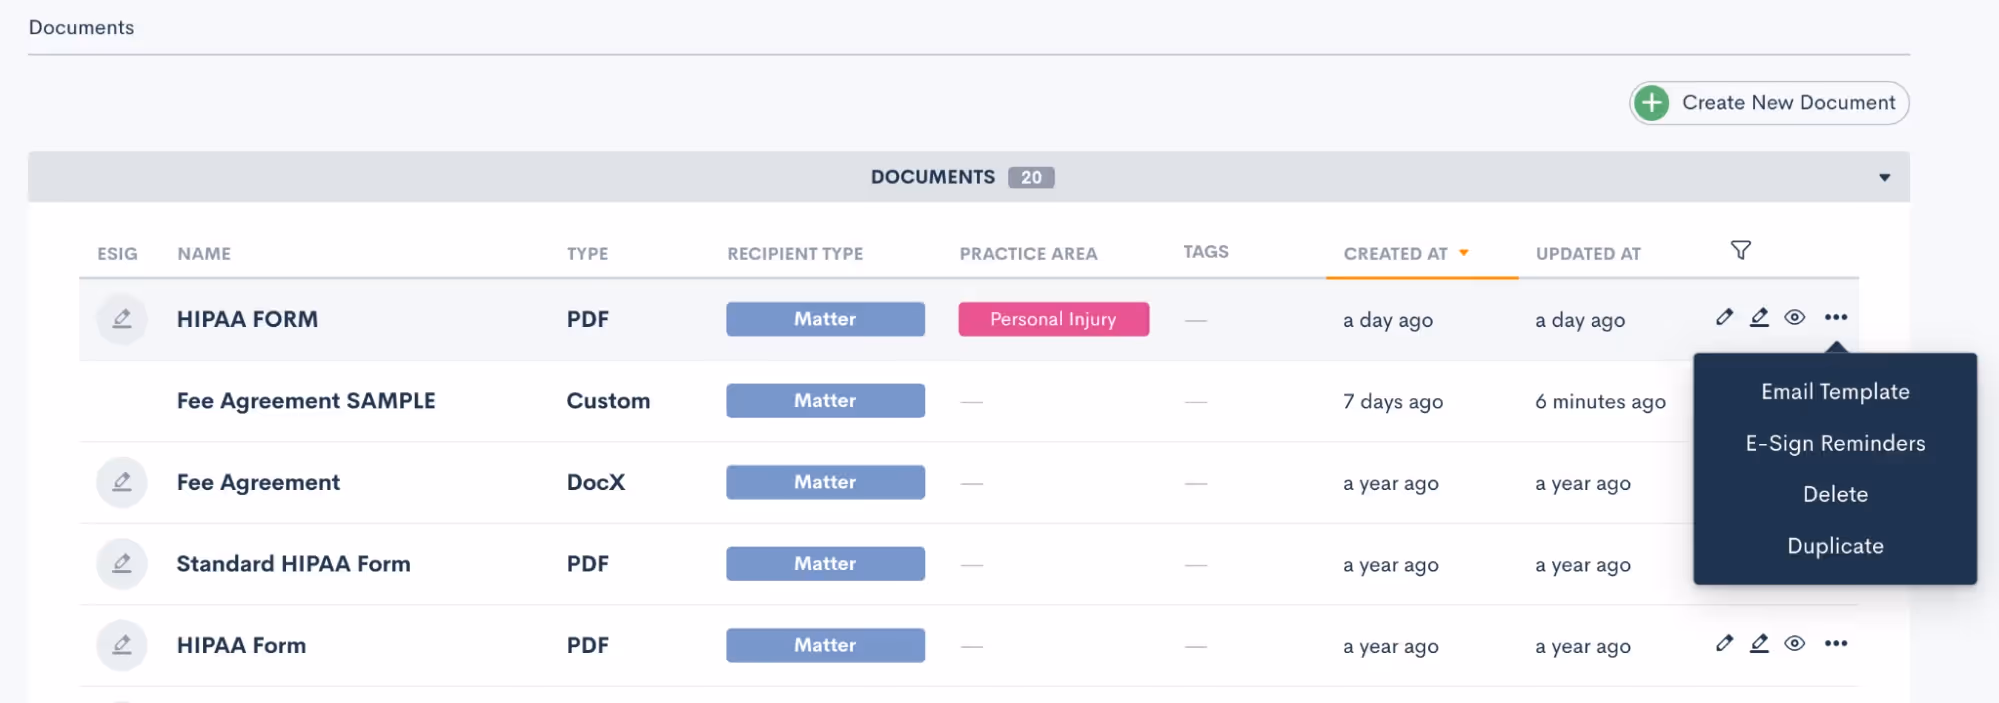
The email template gives you the ability to create your custom email that can be easily accessed any time this particular document is sent. E-sign reminders allow you to create custom built-in reminders for signature at any timing of your choice. Both of these options are great ways to not only add customization, but also to keep your templates highly functional. Both of the options above can be utilized when the document is sent manually or via automation. Now let’s take a look at sending documents automatically.Navigate to the Automations page found under the Marketing tab. When adding action items to an Automation you’ll see the options for both Send Document as well as Request Signature:
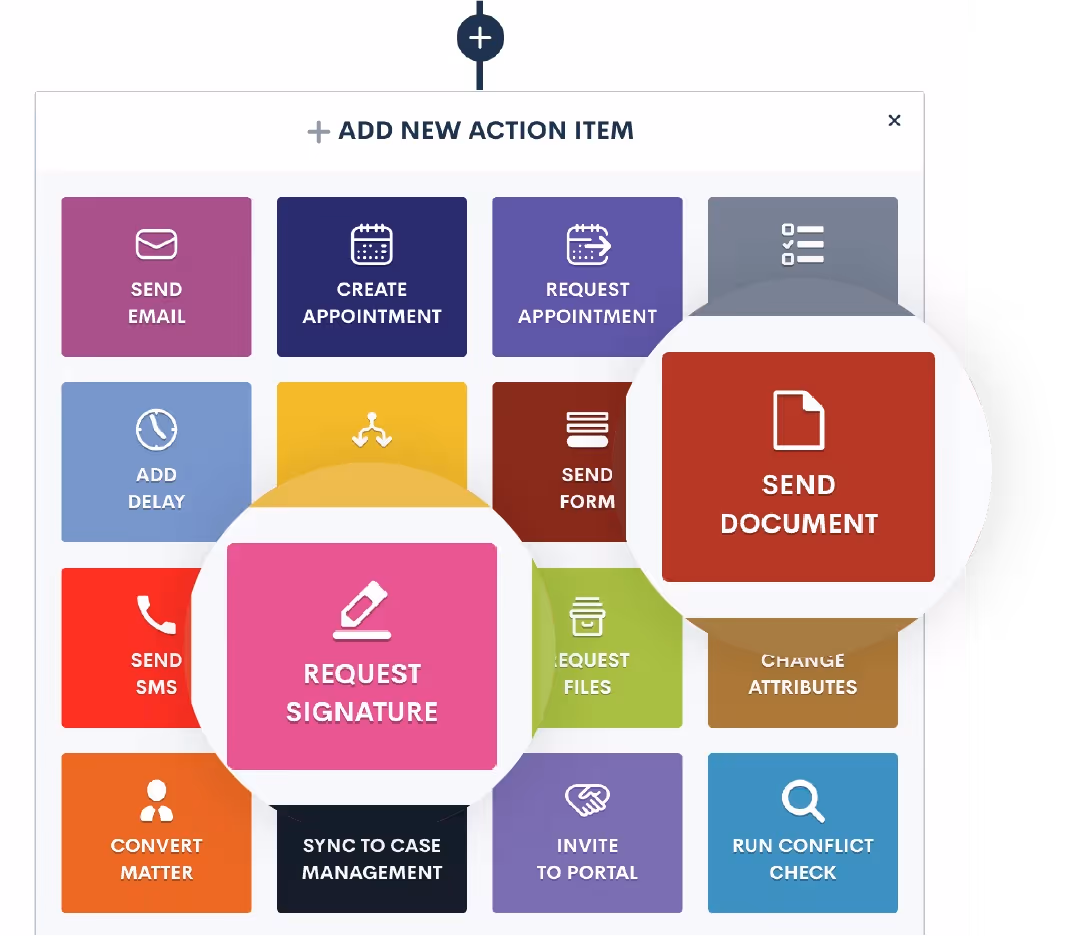
When you use the Send Document action, this will email the document (with fields merged in appropriately) as an email attachment. It does not include e-signature.Any time you want to send a document out for e-signature you will use the Request Signature action item. Once you select Request Signature in your automation you will then make selections for all the options shown below:
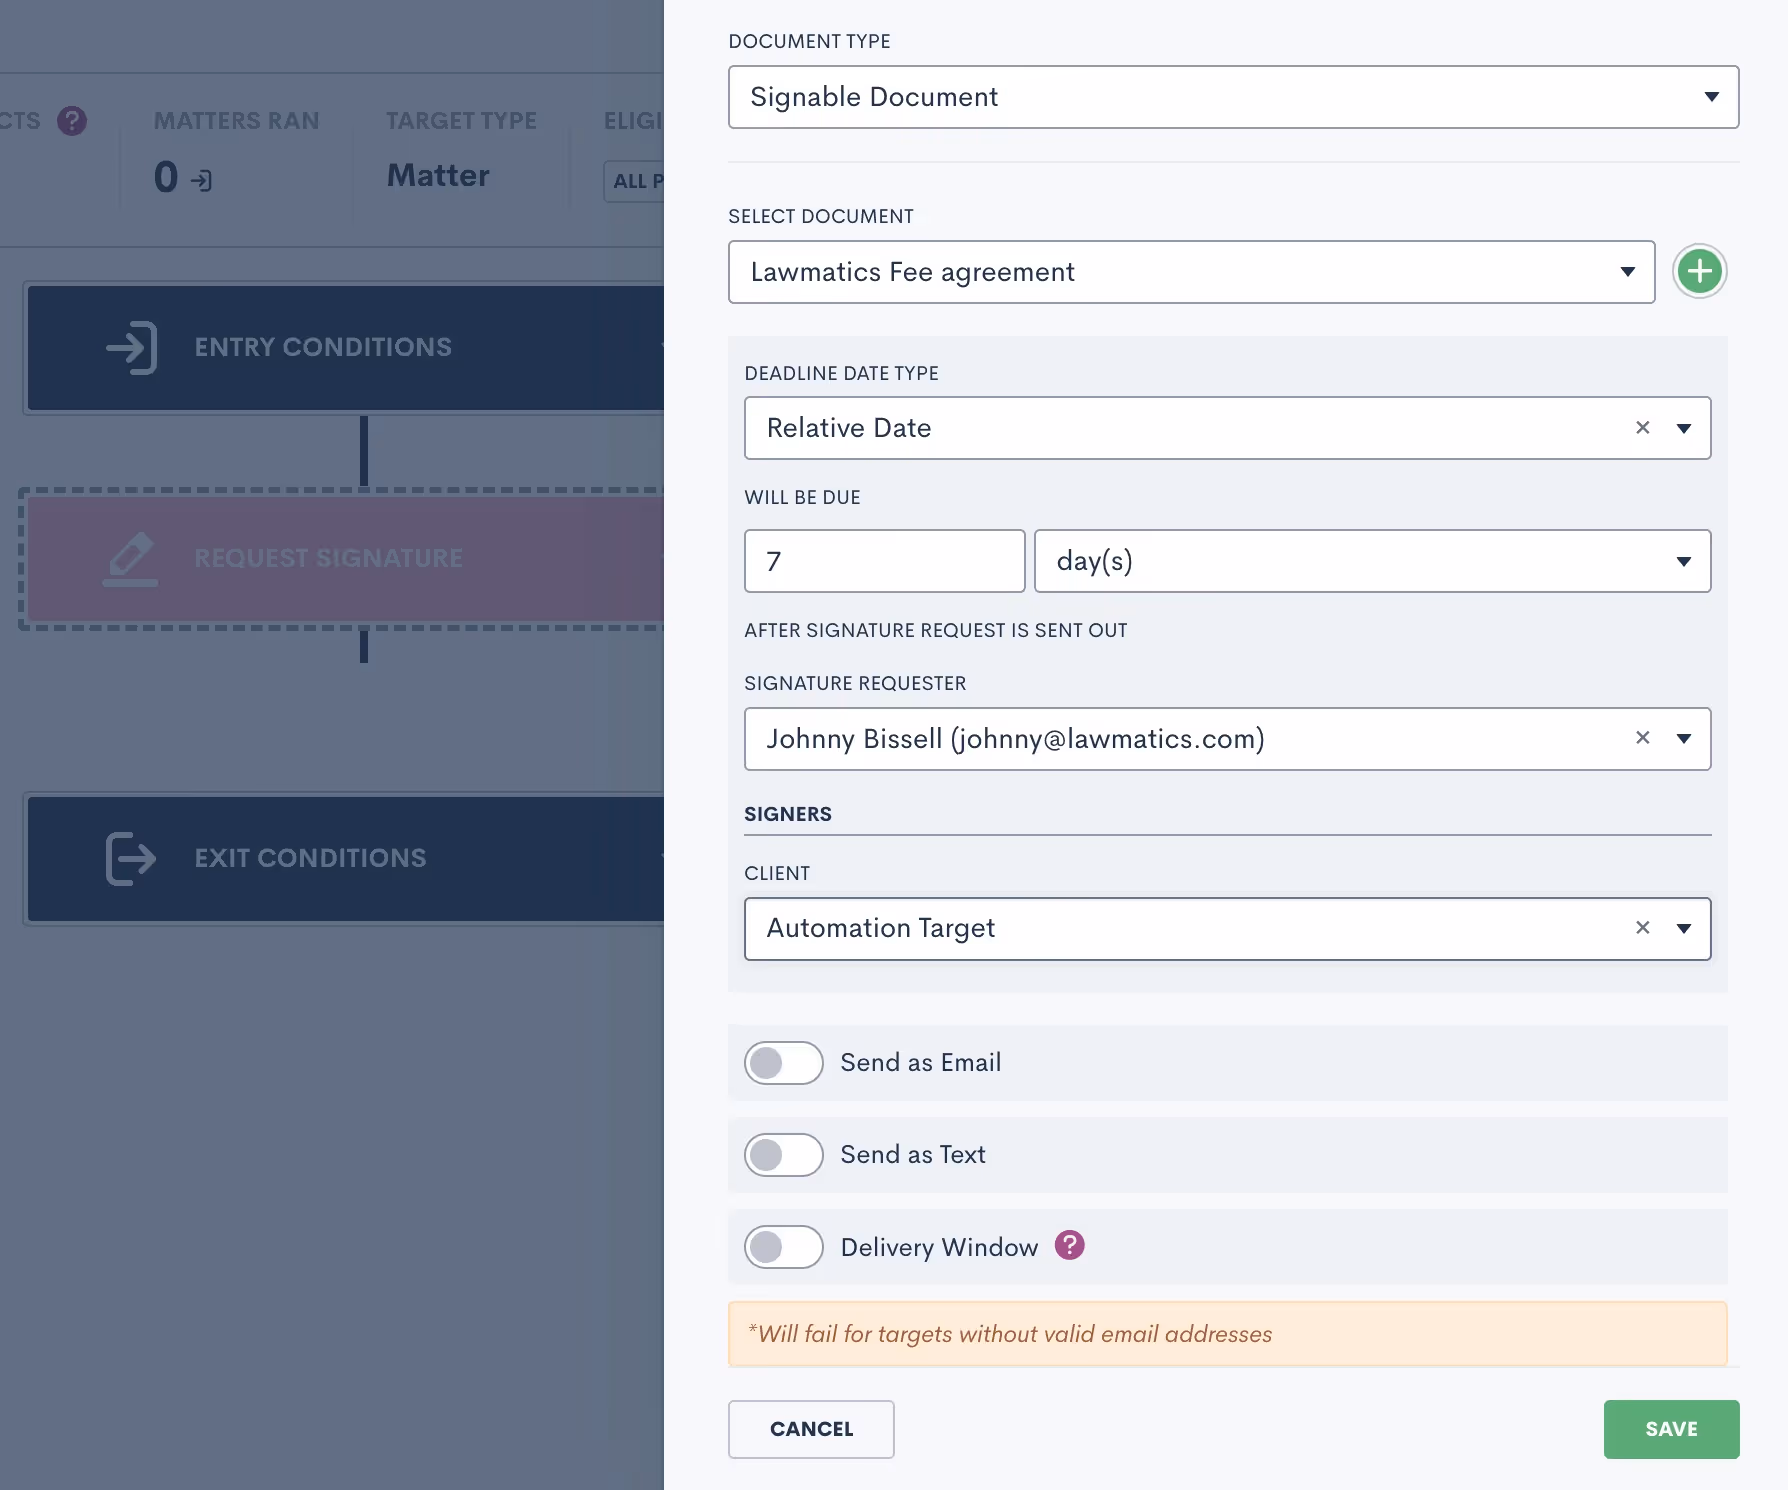
Select a due date if you would like, knowing that the signature request will automatically expire if it is not signed before the due date. You’ll also have options to send this document as an email, text message or both. When sending as an email you’ll have the opportunity to select your custom template for this document.You’ll also notice the option for Delivery Window shown above. We strongly recommend using this feature to make sure that important document are only sent during the hours of your choosing, in case you’re working on cases after hours.In addition to sending documents via Automation, you can also trigger an Automation when a document is signed. Add this as an entry condition by clicking the Signed a Document option, and then select your specific document.
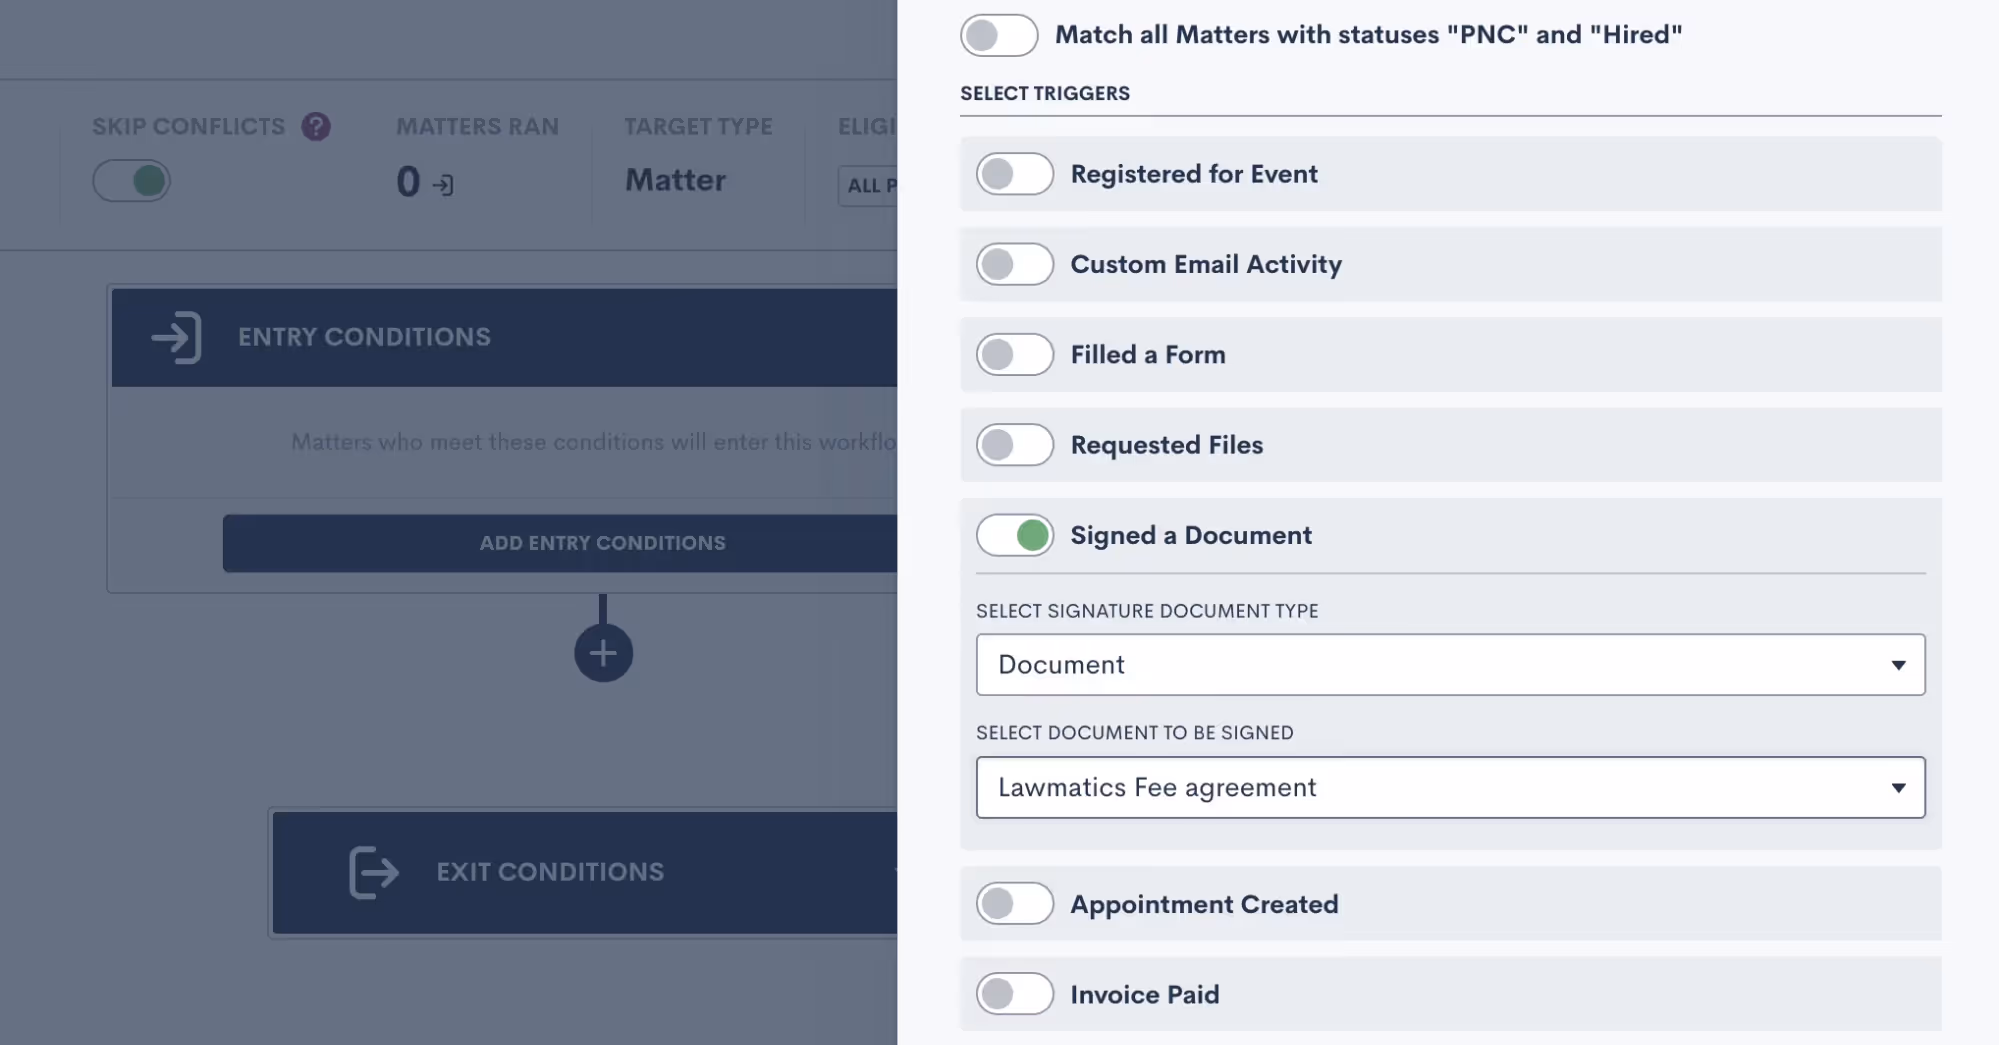
Managing e-signature requests
Once you have all of your document templates built out in Lawmatics, and have maybe even set up Automations to send them out for signature, you’ll want to be familiar with some of the ins and outs of managing your e-signature requests.Begin by navigating to the Documents page, and scroll down to the section labeled Documents Sent for Signature. Here you will see a summary of all signature requests that have been sent, including the current status, the document name, the primary matter, a list of all document signers, and more.
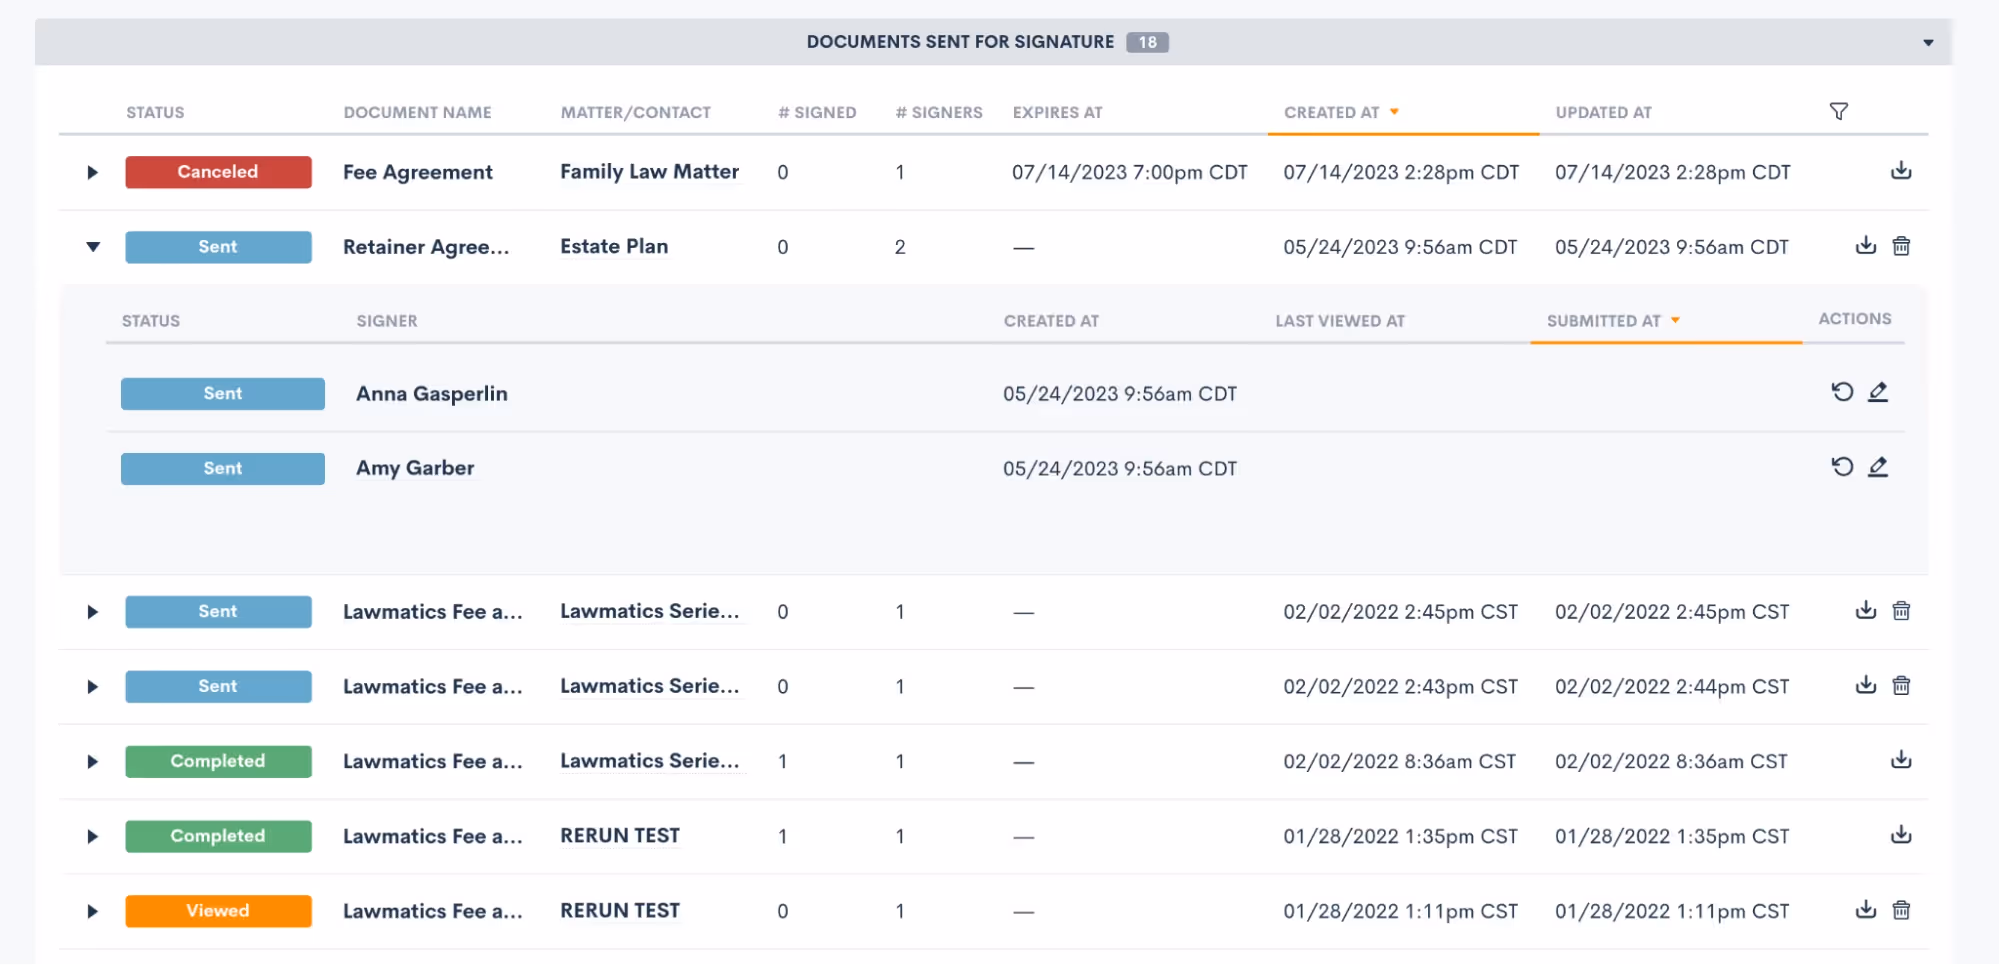
Expand a signature request, as shown above, to view the specific signer details. You can also manually resend a signature request to a specific signer when needed by clicking the circular arrow icon (shown above on the right) for the signer who needs it resent.You’ll also notice that for any documents with an expiration date you will see that clearly stated on this page too. Signers can no longer access and sign a document after its expiration date has passed, but you can manually reactivate and resend it here on this page if needed.Remember that if a document has multiple signers, the status for each signer may be different.

Here in this section you can also download and view a document or cancel one as needed.Any time you send out a signature request, whether manually or via Automation, you’ll be prompted to select one of your users as the signature requester. This person will automatically be copied on an audit trail of the document, receiving email notifications when signature requests are viewed and signed by each signer.To help ensure security and accuracy, you have the option to include the signer’s GPS location as well as IP address on this audit trail. These two options can be enabled or disabled as desired in your Firm Settings page.

Conclusion
Harnessing the power of document templates and e-signature solutions can truly revolutionize the way your law firm handles paperwork and interactions with clients. By streamlining document creation, improving accuracy, and enhancing security, Lawmatics helps empower you to focus more on delivering exceptional legal services.Our Document Templates allow you to create documents automatically. Instead of starting from scratch each time, simply use your pre-built template that tailors itself to each matter’s specific legal needs. E-signatures offer unparalleled convenience, speed, and compliance, making the signing process seamless for clients and attorneys alike.Embracing these technologies not only boosts efficiency but also showcases a commitment to innovation and client-centricity. As the legal landscape continues to evolve, adopting document templates and e-signature solutions is undoubtedly a forward-thinking step towards becoming a smart firm. So, embrace the future of legal document management and elevate your firm to new heights with these indispensable tools.