
Monthly Deep Dive


Will AI replace lawyers? Artificial intelligence (AI) will not replace lawyers, but it is fundamentally changing how they get legal work done. As AI becomes more embedded in research, document review, and client intake, firms are increasingly automating many traditional legal tasks. This article examines whether AI can truly replace lawyers, which legal functions are most affected, how law firms are using AI today, and what these trends mean for associate attorneys navigating an AI-driven legal industry.
AI is already reshaping how your firm gets work done. It’s changing how you handle research, drafting, intake, billing pressure, and the future of associate work.
For many firms, the real question is how to use AI without disrupting the way they already work. Firms are figuring out where AI adds value and where attorneys still need to stay hands-on, while navigating how these tools change the work without changing who’s ultimately responsible.
In this guide, we’ll examine where AI affects legal tasks, why associate attorneys feel the most pressure, how firms are using AI today, and what the next 12-24 months are likely to bring.
Will AI Replace Lawyers or Just Change the Job?
The short answer is no: AI will not replace lawyers. What it can do is automate or accelerate certain tasks lawyers have traditionally handled manually, and that distinction matters.
When people ask, "Will lawyers be replaced by AI?" or "Can AI replace lawyers?" they are usually reacting to how quickly these tools have improved at summarizing information, reviewing documents, and generating draft language.
But those capabilities are not the same as practicing law. Lawyers are still responsible for legal judgment, ethical obligations, advocacy, and client outcomes. And courts, clients, and regulators continue to hold licensed attorneys accountable.
A better question is: “Which parts of your work is AI already automating, and what does that mean for you?”
Why Associate Attorneys Feel Most at Risk
If any group in the profession feels exposed by AI, it is associate attorneys. Associates often spend a large share of their time on high-volume, repeatable work:
- Document review
- Contract comparison
- Drafting from templates
- Follow-up tied to matters in progress
Those are also the kinds of tasks AI is taking on.
It’s no surprise that many associates feel pressure as these tasks shift. Many associates are already under pressure to be faster, more accurate, and easier to justify to cost-conscious clients.
But "most exposed" does not mean associates are the most likely to be replaced. It means the tasks that make up their role are among the first to be reshaped by AI, while expectations for more substantive work rise earlier.
Legal Tasks AI Can Replace or Automate
AI is most effective at handling structured, repetitive, text-heavy, and rules-based work that slows your team down.
Legal research and case summarization
AI is already changing the first layer of legal research. Attorneys can use it for a faster first pass to:
- Scan cases, statutes, and regulations quickly
- Summarize large volumes of text
- Highlight recurring themes
- Spot potential issues faster
That means less time gathering information and more time testing whether the output is accurate, relevant, and persuasive. These are the kinds of outputs that actually move cases forward.
Contract review and document analysis
Contract review is another area where AI can help. AI can be useful in due diligence, compliance review, procurement workflows, and any matter involving large volumes of contracts or standard language, including:
- Identifying clauses
- Comparing language across document sets
- Flagging deviations from standard terms
- Surfacing inconsistencies that manual review might otherwise miss
Many firms are also exploring legal document automation software to streamline repetitive drafting and review tasks while keeping attorneys in control of the final output.
Intake, qualification, and administrative work
Some of the fastest wins come from automating intake and follow-up with predefined criteria, so no potential client gets lost. These are areas where automation and AI can reduce a major administrative burden:
- Client intake
- Lead qualification and routing
- Follow-up
- Automated scheduling and reminders
Legal Tasks AI Cannot Replace
For all the attention on automation, there are still core parts of legal practice that AI cannot replace.
AI cannot replace certain legal tasks
Legal work often involves high-stakes decisions where the details matter, and the right call isn’t always obvious. Many matters require attorneys to navigate uncertainty, emotional dynamics, and practical risk in ways that go beyond pattern recognition.
Lawyers do more than surface information. They interpret ambiguity, weigh tradeoffs, and make recommendations when the answer is not obvious. AI can help organize information and support analysis, but legal judgment still depends on attorneys.
Advocacy and negotiation
Legal advocacy is deeply human. Whether in court, at a mediation table, or in a negotiation, persuasion depends on judgment, timing, credibility, listening, and adaptation.
Strong advocates read tone, pressure, resistance, leverage, and opportunity. AI can assist with preparation, but it cannot respond to the human dynamics that shape negotiation and advocacy in the moment.
Ethical responsibility and accountability
The biggest boundary in legal practice around AI use is accountability. Lawyers have ethical duties to clients, courts, and the profession, including competence, confidentiality, candor, supervision, and professional judgment.
Those duties still rest with attorneys. They must verify the work, protect client information, exercise judgment, and stand behind the advice they give.
How Law Firms Are Using AI Today
Law firms are using AI in several practical ways today. It supports legal work by improving intake and connecting workflows inside a legal client relationship management (CRM) system.
AI as an assistant, not a replacement
In many firms, AI is being used to accelerate research, support drafting, improve consistency, and reduce time spent on routine tasks. It helps attorneys work more efficiently, but they still have to review outputs, make decisions, and stand behind the final work product.
AI in client intake, lead qualification, and routing
One of the clearest applications of AI for law firms is in client intake. AI can help firms improve the quality of information they collect, apply qualification criteria more consistently, and move leads through the right next steps with less manual effort.
For example, AI can:
- Evaluate urgency: Identify inquiries that may need faster attention based on timing, case type, or stated circumstances.
- Screen for practice fit: Help determine whether a matter aligns with the firm’s services before teams spend time reviewing it.
- Assess lead quality: Apply defined qualification standards consistently to help teams focus on stronger opportunities. Tools like QualifyAI support this process by helping firms automate intake screening and matter qualification without crossing into the realm of legal advice.
- Collect intake information: Use custom forms and structured workflows to gather client details and create more complete records from the start.
- Route inquiries intelligently: Sort leads by priority, stage, or next step and direct them to the right person or process.
- Automate follow-up: Trigger responses, reminders, and outreach to ensure promising leads do not stall due to delayed communication.
- Support scheduling: Move qualified leads into consultations with less back-and-forth and fewer manual touchpoints.
- Reduce administrative drag: Improve upstream intake so attorneys spend less time on triage and more time on billable work.
AI paired with legal CRM workflows
AI becomes more useful when it works inside a broader system. That works best when legal CRM software and legal software integrations connect intake, follow-up, and client information into a single centralized system.
When intake data flows directly into a centralized CRM, follow-up can happen automatically, and attorneys can work from more complete, organized information.
What Will Actually Change for Associate Attorneys in the Next 12-24 Months
The table below illustrates which legal tasks firms are already automating, which are likely to change in the next 12-24 months, and which still depend on human judgment.
| Legal task category | Examples of tasks | Level of AI impact | Timeline |
|---|---|---|---|
| Intake and administrative work | Intake data collection, lead qualification, follow-up, and scheduling | High | Already happening |
| Legal research and summarization | First-pass case law research, statute summaries, issue spotting | High | Already happening |
| Contract review and analysis | Clause identification, risk flagging, document comparison | High | Already happening |
| Drafting standard legal documents | Routine motions, template-based agreements with attorney review | Medium | 12-24 months |
| Litigation prep and discovery support | Document organization, evidence tagging, timeline creation | Medium | 12-24 months |
| Intake decision support | Applying firm-defined qualification rules without legal advice | Medium | Already happening |
| Legal judgment and strategy | Case strategy, risk assessment, application of law to facts | Low | Unlikely to be replaced |
| Client counseling and advocacy | Client advice, negotiation, courtroom advocacy | Low | Unlikely to be replaced |
| Ethical and professional accountability | Malpractice liability, ethical judgment, licensing responsibility | None | Not replaceable |
Fewer low-value tasks, higher expectations
Associates will likely spend less time on intake administration, document work, and other repetitive tasks that can be standardized. As a result, firms may expect associates to handle more substantive work earlier.
As routine work takes up less of the role, firms may place greater value on analytical skills, precision, and the ability to take on client-facing responsibility.
Faster feedback loops
AI-assisted systems can make performance more visible. When workflows are digitized and standardized, firms can see turnaround times, follow-up completion, response rates, matter progression, and other indicators sooner.
Faster feedback loops help strong associates stand out while also making expectations around consistency and execution clearer across the board.
Increased leverage for AI-literate associates
The associates who benefit most from AI will be the ones who adopt it quickly and use it responsibly. That starts with understanding how to prompt, review, verify, and refine outputs. It also involves knowing where automation adds value and where it introduces risk.
The real advantage comes from turning saved time into stronger work, not just faster work.
The real risks of AI in legal practice
AI can create leverage, but only if you understand the risks that come with it. Key concerns include:
- Hallucinations and inaccurate outputs: AI can produce confident-sounding errors, including fabricated citations, misread authority, or oversimplified legal distinctions. In legal work, every output requires attorney verification.
- Confidentiality and data privacy: Firms must handle client information carefully, and not every AI tool is appropriate for legal workflows. Tools can create risk when firms do not understand how data is processed, stored, or reused. That is why firms need clear policies, controlled workflows, and tools built for legal use cases.
- Unauthorized practice of law: AI cannot independently provide legal advice. Firms can use AI to support intake, qualification, and internal workflows, but if implementation crosses into unsupervised legal advice, the risk becomes regulatory exposure.
- Over-reliance and skill atrophy: Attorneys still need to build judgment, pattern recognition, and analytical strength. If AI is responsible for too much thinking, it can result in weaker legal reasoning over time.
How Associate Attorneys Can Future-Proof Their Careers
The strongest position is knowing where AI supports your legal work and where your judgment still matters most.
Focus on high-judgment legal work
The more your value depends on strategy, counseling, nuanced analysis, negotiation, and client communication, the harder you are to replace. Look for opportunities to build skills in asking better questions, improving communication, and taking ownership of recommendations.
Become AI-literate, not AI-dependent
Lawyers do not need to become AI experts. They need to understand how AI fits into their day-to-day workflows.
Learning how to evaluate outputs, identify weak reasoning, spot missing context, and supervise automated processes will better equip you to leverage AI without becoming dependent on it.
Use AI to protect billable work
AI should protect time for more meaningful work. When firms automate low-value administrative steps, intake bottlenecks, or repetitive drafting processes, you can focus your time where it adds the most value: analysis, advocacy, and client service.
The Future of Law in an AI-Driven Legal Profession
AI isn’t changing who’s responsible for legal work. It’s changing how efficiently you can get that work done.
For attorneys, AI is most useful when it automates administrative tasks and streamlines intake, follow-up, and qualification, allowing them to spend more time on substantive legal work.
As a legal CRM, Lawmatics helps firms automate intake, follow-up, and qualification through custom automations. You receive better information and fewer administrative bottlenecks, so you can spend more time practicing law.
To see how AI-supported intake fits into a modern Legal CRM, request a demo.
FAQ
Will AI replace lawyers entirely?
No. AI can automate parts of legal work, but it cannot replace legal judgment, ethical accountability, or advocacy. Lawyers are still responsible for advising clients, applying the law to specific facts, and standing behind the decisions and filings.
Are associate attorneys more vulnerable to AI?
Associate attorneys are more affected by AI-driven task automation because early-career roles often include more routine, document-heavy, and process-driven work. With AI, the structure of their work is changing, with more emphasis on analysis, judgment, and client-facing readiness.
Can AI practice law on its own?
No. AI cannot practice law independently or provide legal advice without attorney oversight. It can support research, intake, and administrative workflows, but licensed attorneys are still responsible for verifying outputs, protecting client information, and exercising professional judgment.
What legal work is safest from AI?
Legal work that depends on strategy, advocacy, negotiation, and client counseling is the least likely to be automated. These responsibilities require judgment, persuasion, relationship management, and the ability to respond to nuanced facts and human dynamics.
Should lawyers be worried about AI?
Lawyers should prepare for change, but not assume AI is replacing the profession. Firms and attorneys who learn how to use AI responsibly will be in a stronger position than those who ignore it.
Register for upcoming Monthly Deep Dives
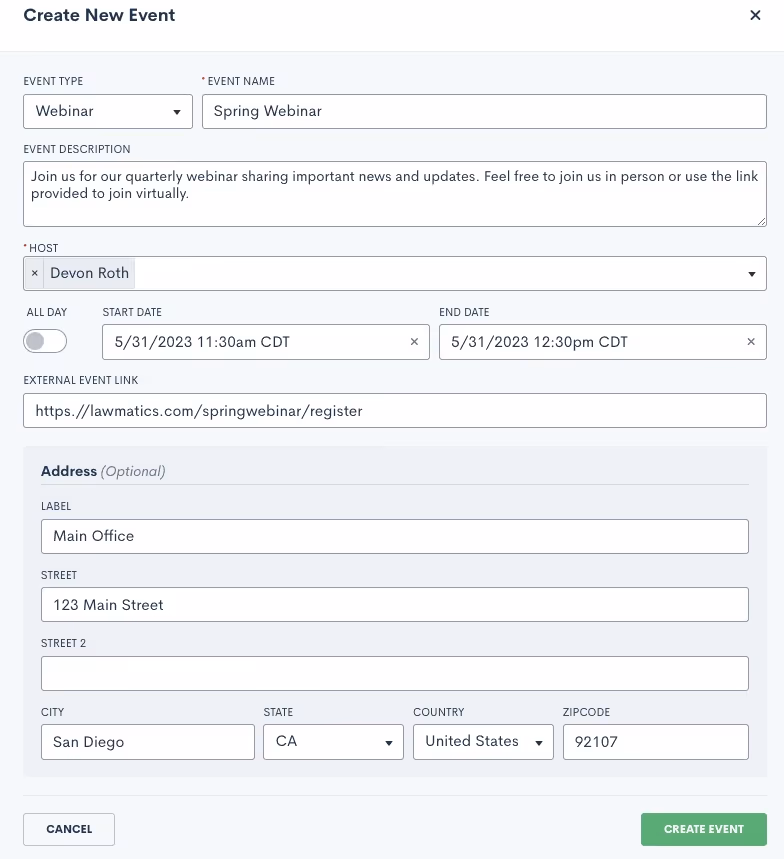
- Select the event type and give your webinar a name and a description. Remember that the event type is more broad, such as Webinar, whereas the event name is specific to this event, such as Summer 2023 Webinar.
- Continue making selections for the host and the date and time.
- You will also need to enter a location for the event, either an external link or a physical address. If this is a virtual event, simply put the external link in the box provided, and this will automatically be added to the description of the calendar invite that is sent to registrants for this event.
- Your virtual event may be held via Zoom, Teams, or some other platform, simply copy and paste the meeting link.
- For in person events, enter in the physical address. This will also be added to the event invite when applicable.
.Engaging events such as webinars, seminars, luncheons, are a great way for attorneys to fortify relationships with new and existing clients. If event management has been a technical roadblock for you up to this point, we’ve got great news: Lawmatics now allows you to effortlessly manage all such events without the hassle of integrating with other tools or relying on Zaps.With our Event Management feature, Lawmatics users can configure various event types (webinars, networking events, etc.), easily create and promote an event, and collect registrants. We’ve also added the following:
- A setting for built-in confirmation and reminder emails.
- A new entry condition for Automations to trigger a custom workflow upon an event registration.
Whether you are already a master event organizer or just looking to start implementing events into your firm, Lawmatics is your one stop shop for event management.
Event settings
Before diving into the world of event management with Lawmatics, let's get those essential event settings sorted out. Simply locate the gear icon in the top right corner of your Lawmatics window, and then navigate to Appointments/Events on the left sidebar.Now, let's take a quick moment to distinguish between appointments and events. In Lawmatics, appointments are reserved for a single matter or contact, like consultations, strategy sessions, or lunch meetings. On the flip side, events can accommodate anywhere from one to thousands of enthusiastic registrants and aren't tailored to individual attendees. Let the distinction sink in and get ready to unleash the power of Lawmatics for your event management needs!When you first arrive on the Appointments/Events page in settings, you will first see your settings for appointments, scroll down on the page until you land on the Events section.
Event types
To ensure seamless automation and precise triggers, you’ll need to first establish distinct event types for your diverse range of gatherings. These event types hold the key to orchestrating specific actions based on registrations. For instance, you might want to kickstart an automated drip campaign when someone signs up for a webinar, while reserving a different response for those joining a networking event. By setting up event types, you unlock the power to customize and optimize your automation game plan. Let Lawmatics do the heavy lifting while you effortlessly navigate the realm of tailored event experiences.
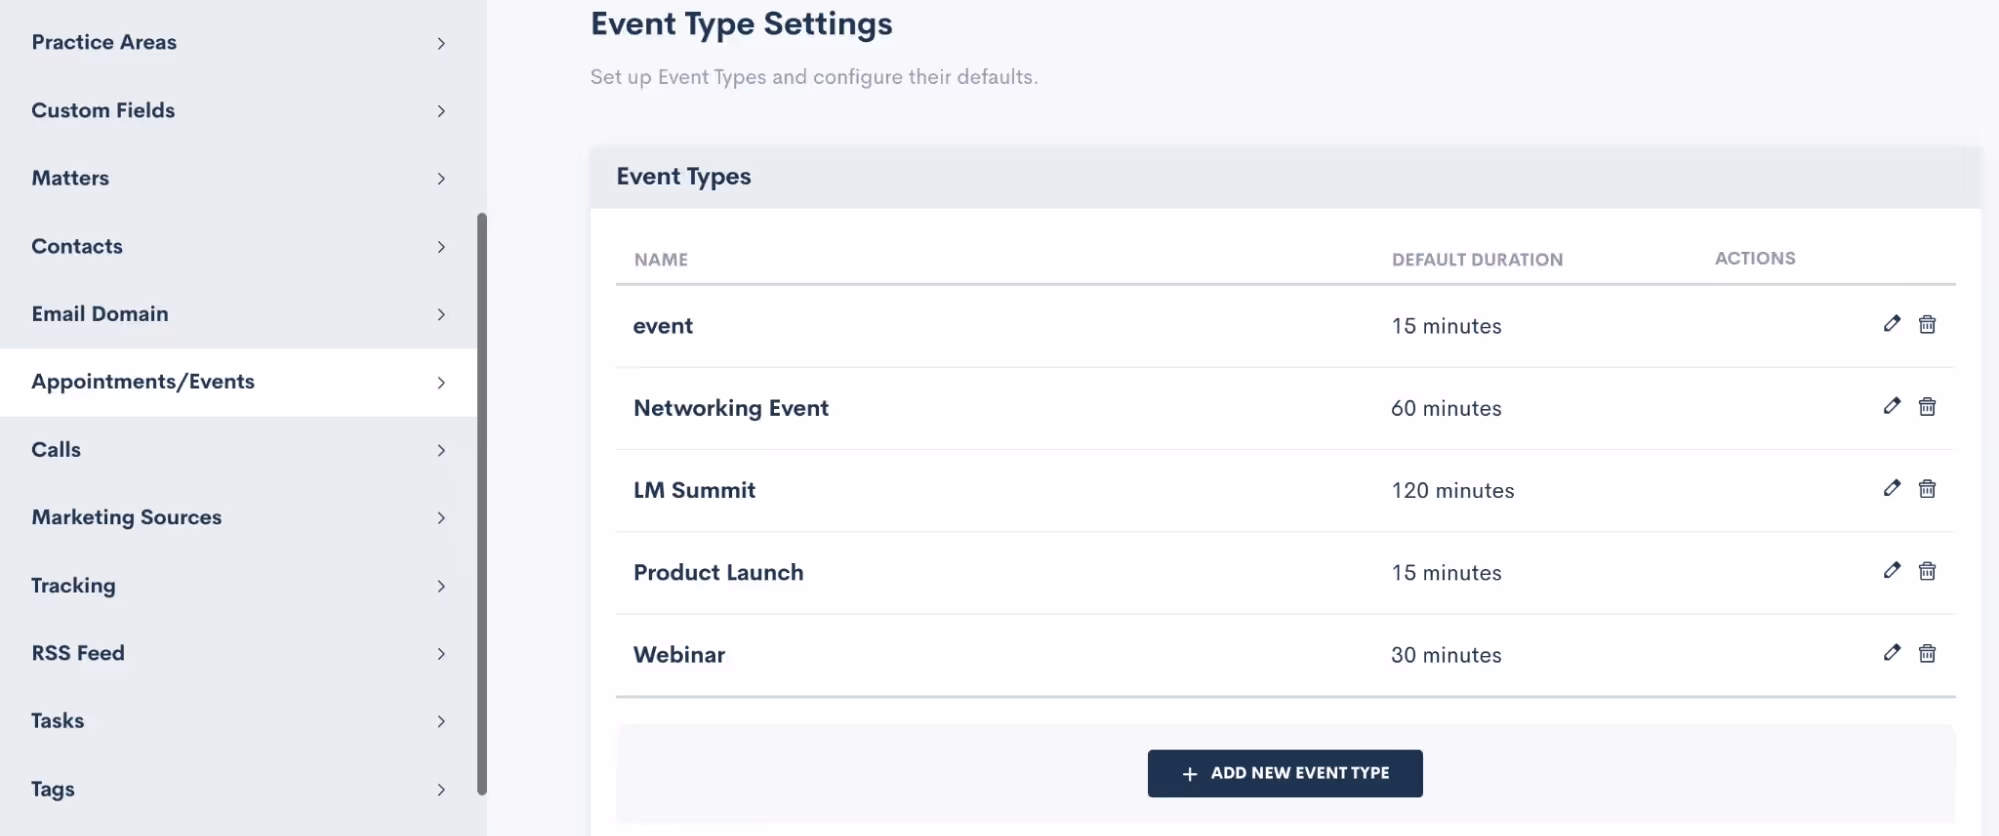
You also have the freedom to craft unique confirmation and reminder sequences for each event type according to your preferences, and we'll delve into that soon. Feel free to create as many event types as you desire, knowing that you can always return to add, modify, or delete existing ones. When crafting your event types, you even have the option to set a default duration, if that suits your needs.
Confirmation
Lawmatics offers built-in confirmation and reminder settings for your events, no need to build a custom email template and automation for each event. This confirmation will be sent to the registrant as soon as they have signed up for the event.Simply click the setting option for Add Confirmation, and you can then build out your own email template and/or text message as shown below.
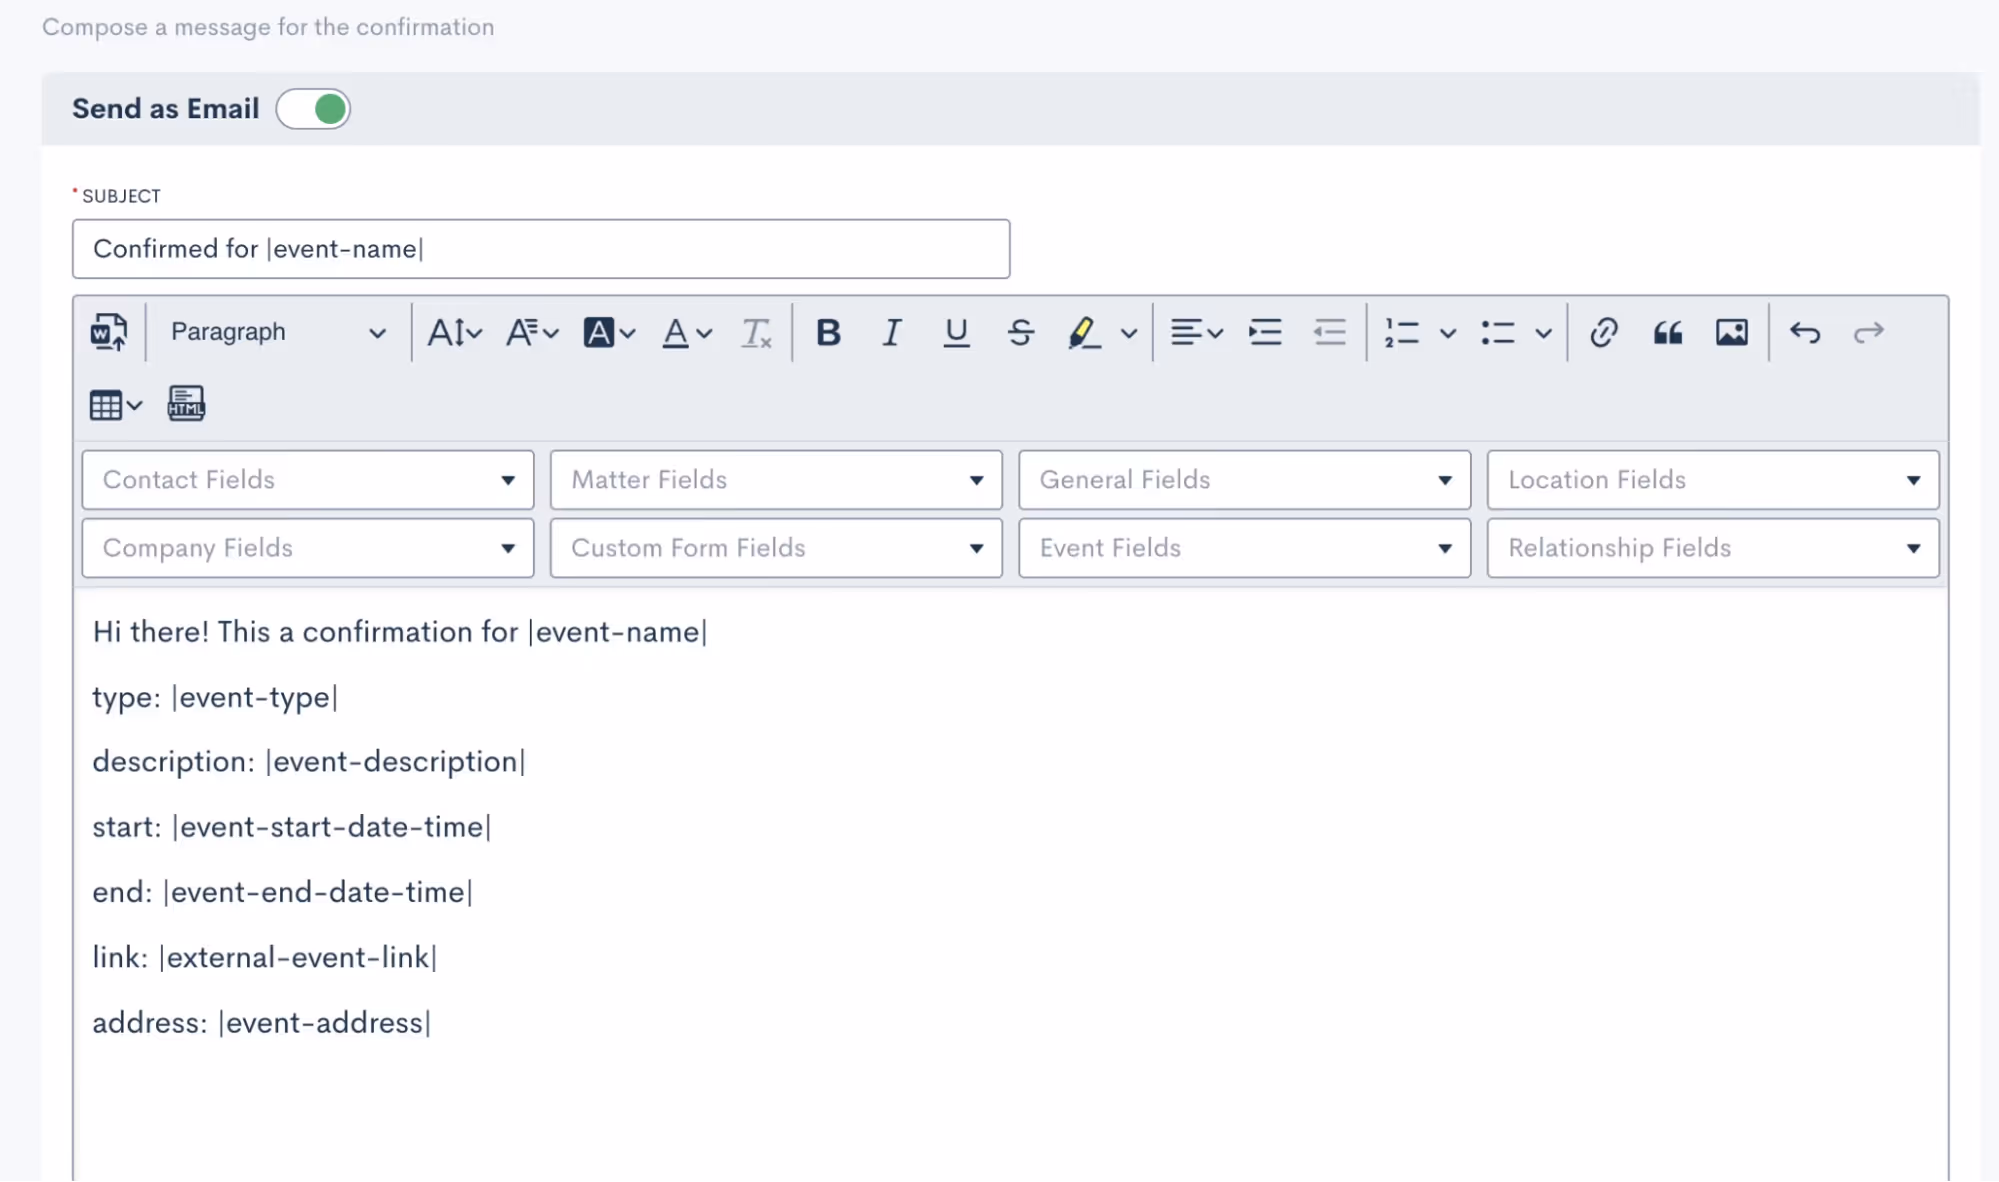
You’ll see that you can merge in fields as needed, including event fields to input the unique event date, description, link, etc for each respective event.It is then important to select which of your event types this confirmation email applies for. Depending on the nature of your events, you may use a generic confirmation for all of your event types or perhaps you’d like to create something more specific for each.
Reminders
As with event confirmations, reminders are built into Lawmatics although they are optional. However, we highly recommend utilizing them to ensure your event registrants stay on top of upcoming gatherings.
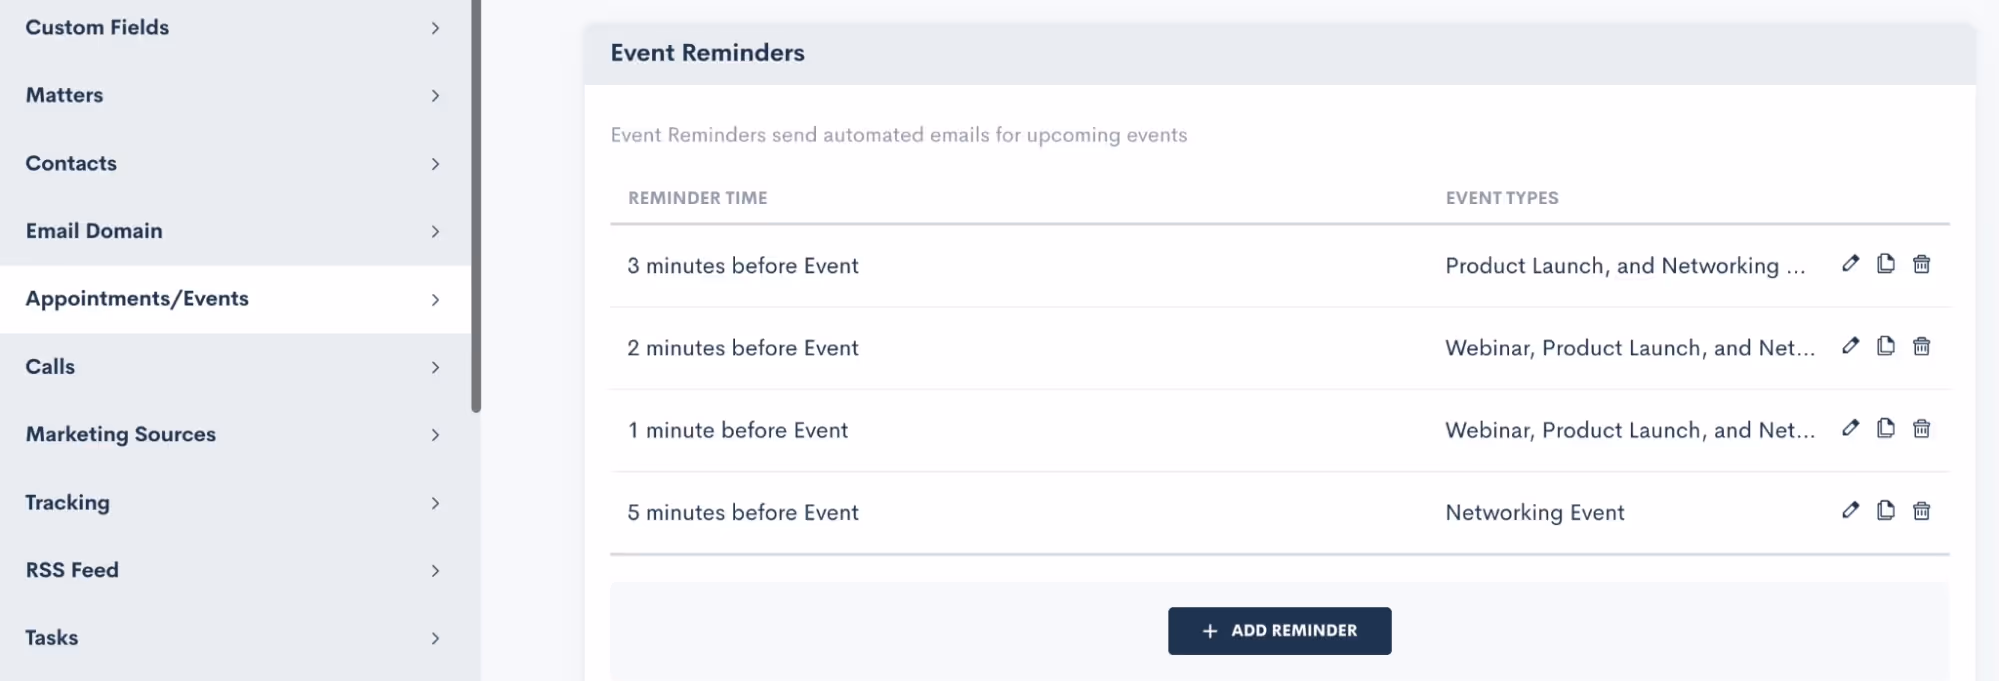
Feel free to create as many reminders as you desire, and once again, you have the power to apply them to any or all of your event types. It's all about keeping your attendees engaged, informed, and excited about the events they've signed up for.
Creating an Event
Now that you have finished setting up this groundwork, you are ready to create an event:
- Hover your mouse on CRM and select Event Management to navigate to the Events page. Here you will see all past and upcoming events with the option to add a new event. When adding an event, you will see various options as shown below:
Event registration
And now for the fun part: collecting registrants for your event! There are several ways you can go about doing this, we’ll break them down here.
Custom Form
In addition to using Custom Forms for collecting leads or contacts, utilizing a form is an excellent method for gathering event registrants. With the introduction of the Event Management feature, we've incorporated an event registration field that seamlessly integrates into your custom forms. You have the freedom to incorporate this field into your existing forms or even create a brand new registration form from scratch.
- When editing your Form, add any fields to the form as you normally would.
- Click the Advanced section on the left sidebar.
- Drag and drop the Event Registration field wherever you would like it on the form.
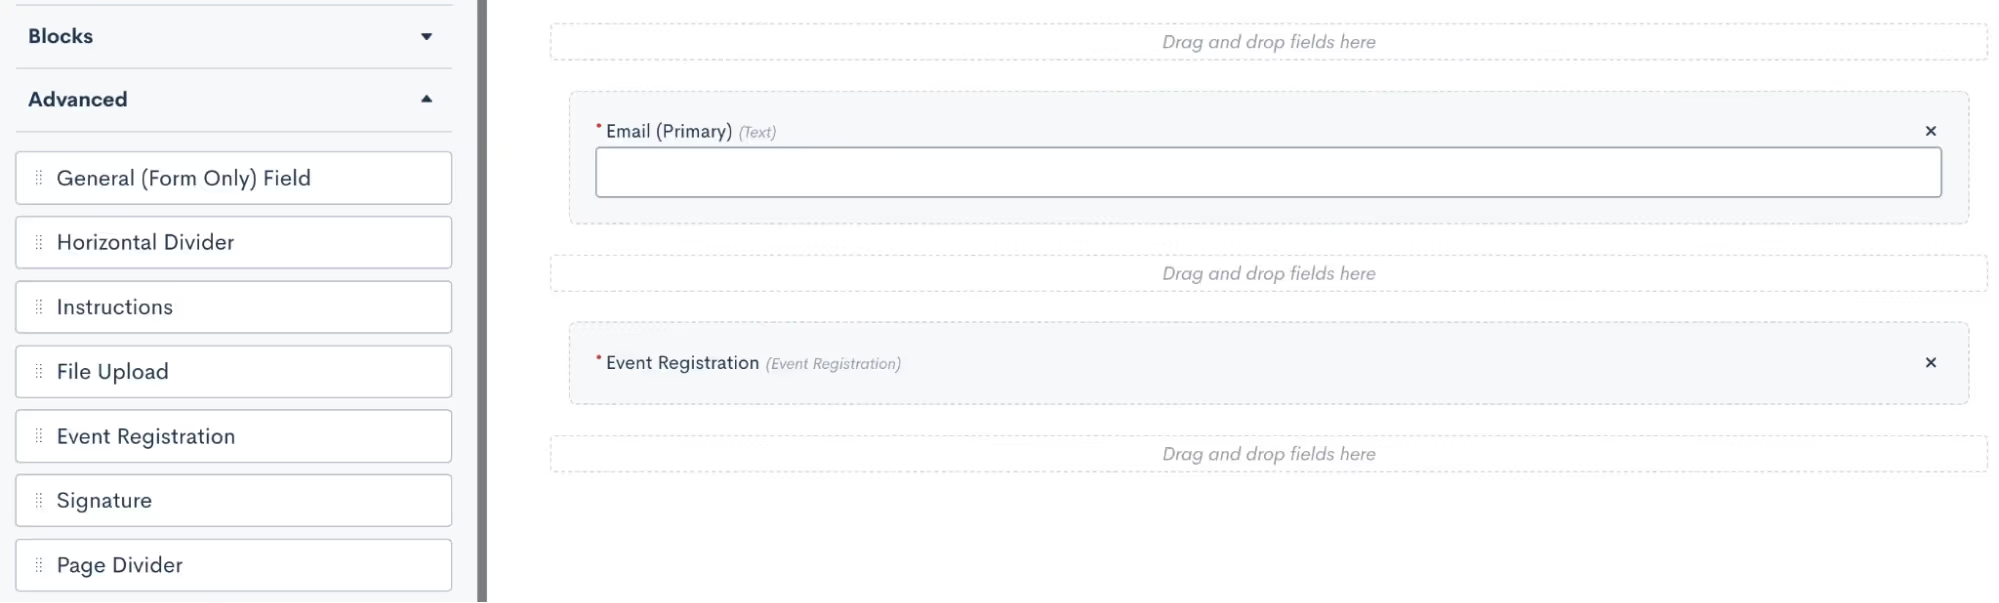
- Once you have this field in the form, click on it to make additional selections. In the options for this field, as shown below, you will select what label you want for the registration option, and then select which of your events can be registered for from this form.
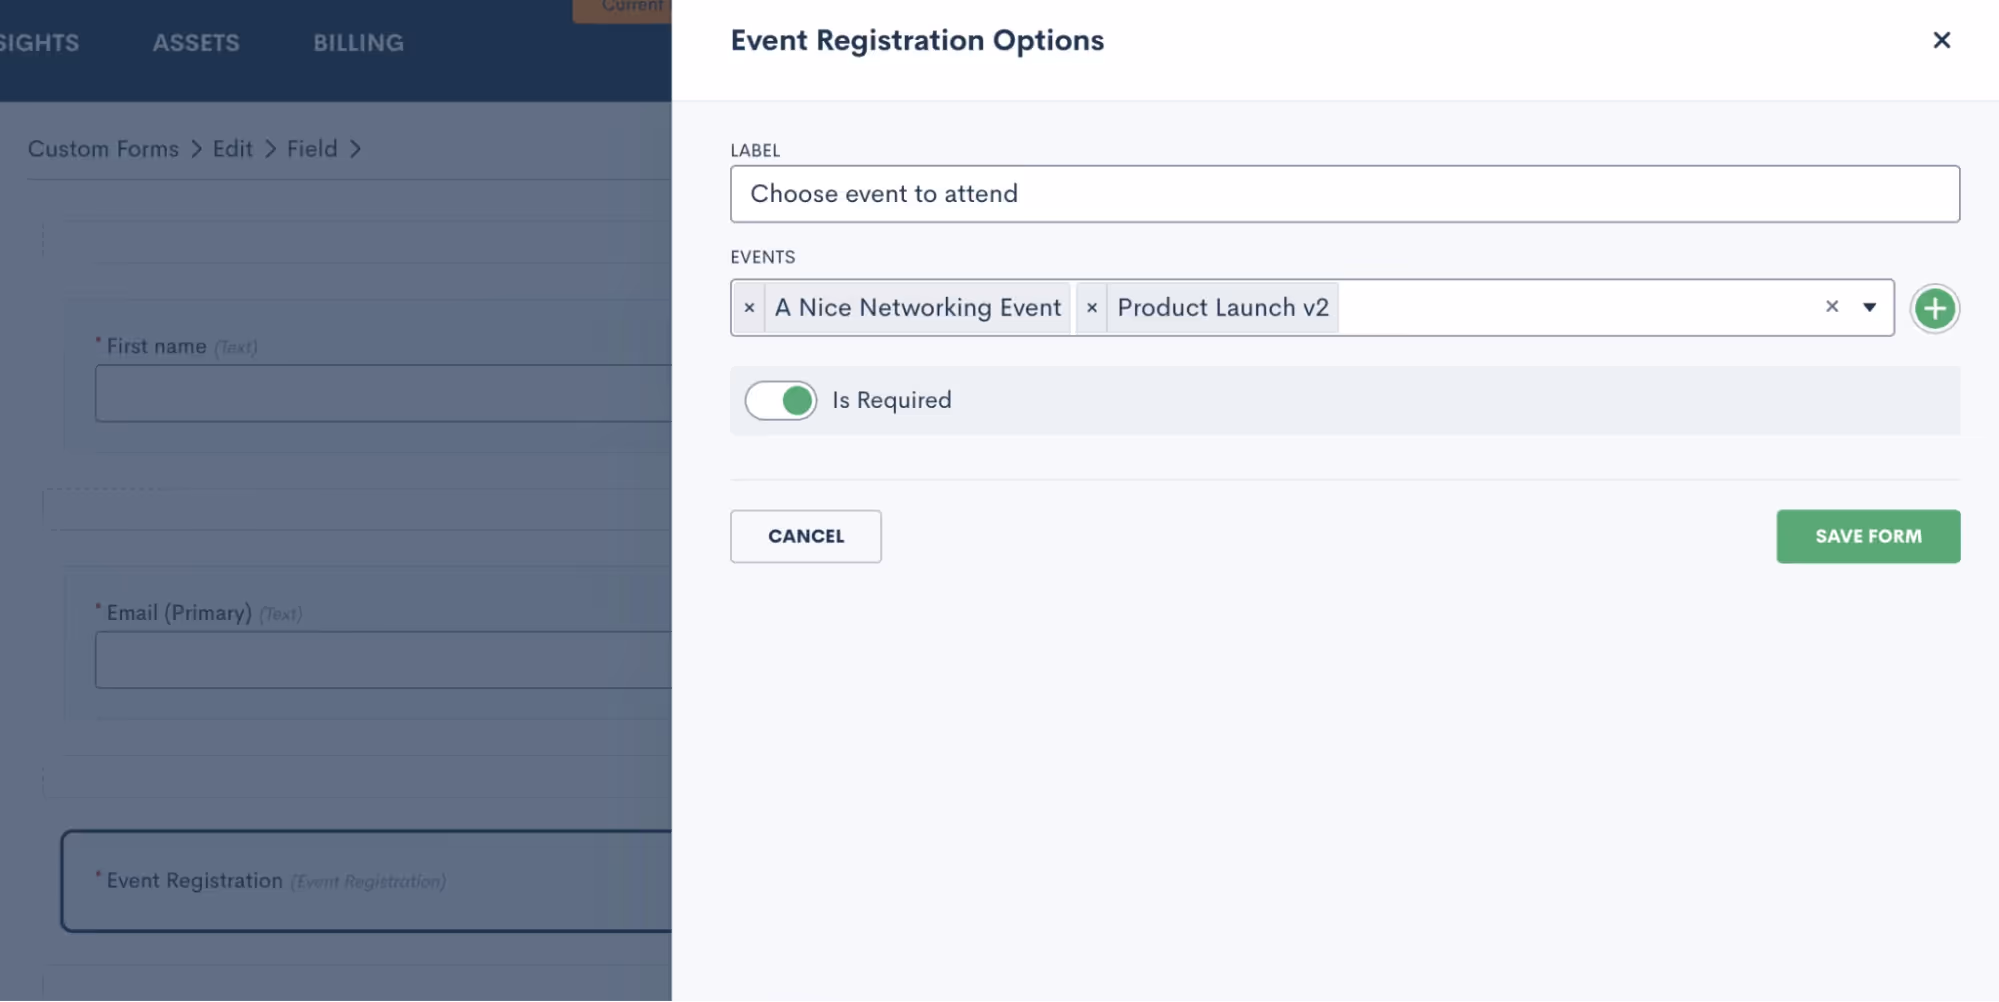
- You may choose to have just one event per form, and market that form specifically as a sign-up for that particular event. Alternatively, you can opt to include multiple events on a form so that potential registrants can register for any or all of them.
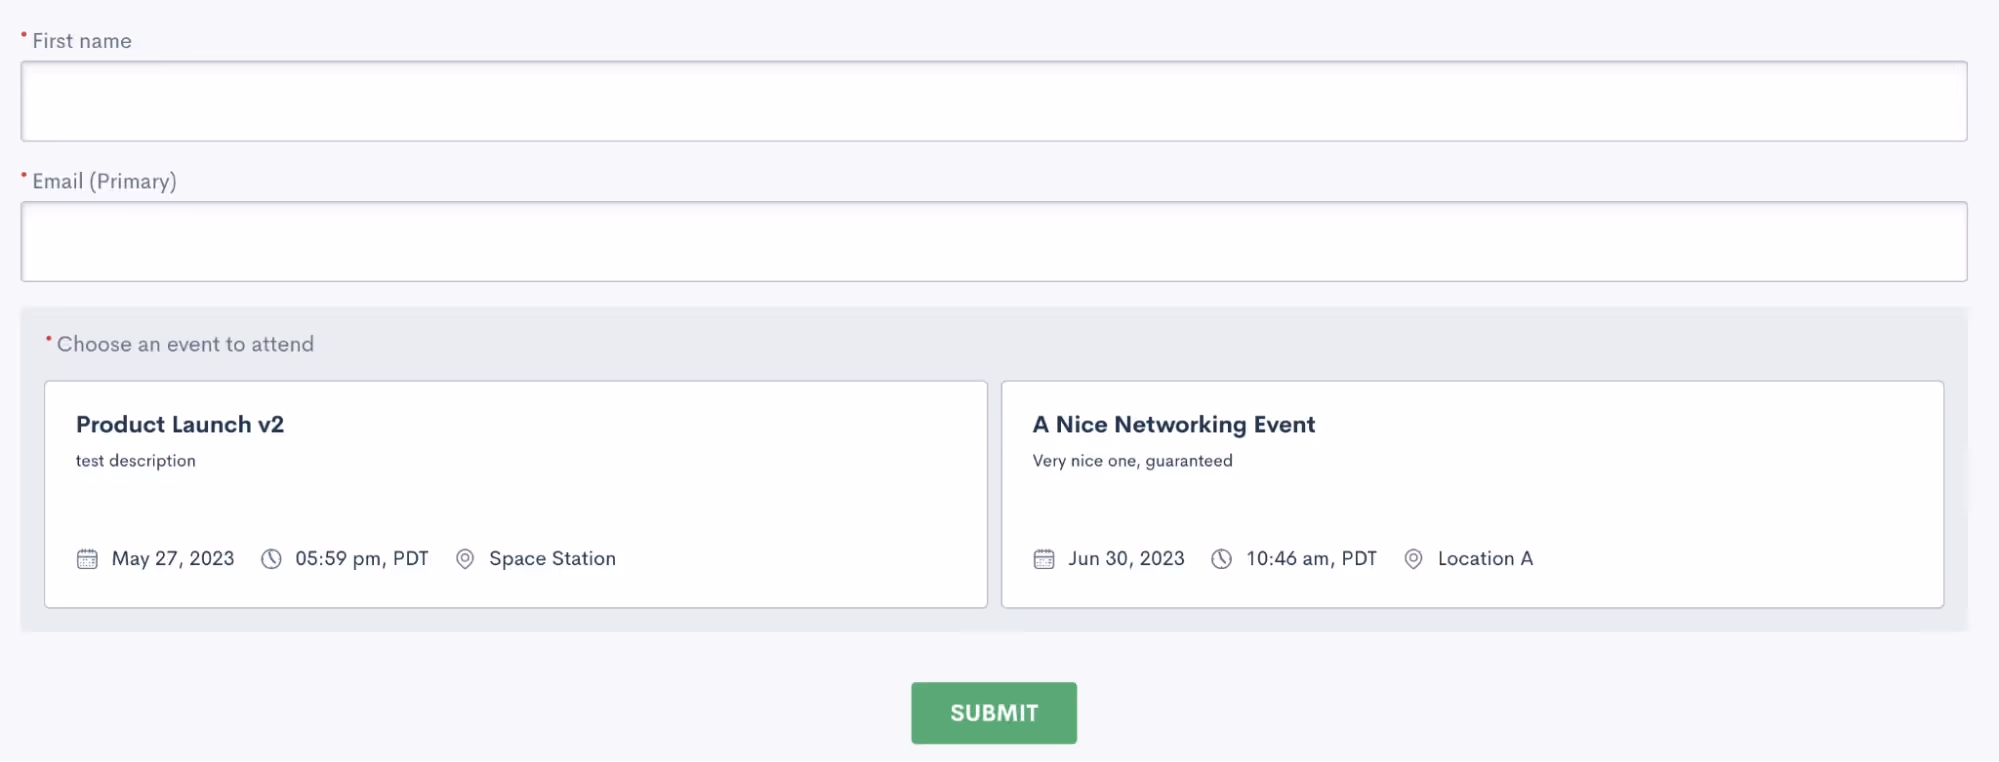
In the sample shown above, a registrant would simply enter their name and email, then click on both or either event to register respectively.Just like any other custom form, this form can be embedded on your site, shared via hyperlink, or even sent via automation.
Manual registration
Your other option for registering event attendees is to do so manually. This method is certainly not as efficient or automatic, so we definitely recommend using this as a contingency method to the Custom Form.To manually register an attendee, go to the Event Management page and click the plus sign icon. You can then search from existing contacts in your CRM or add a new one to be registered for the event.
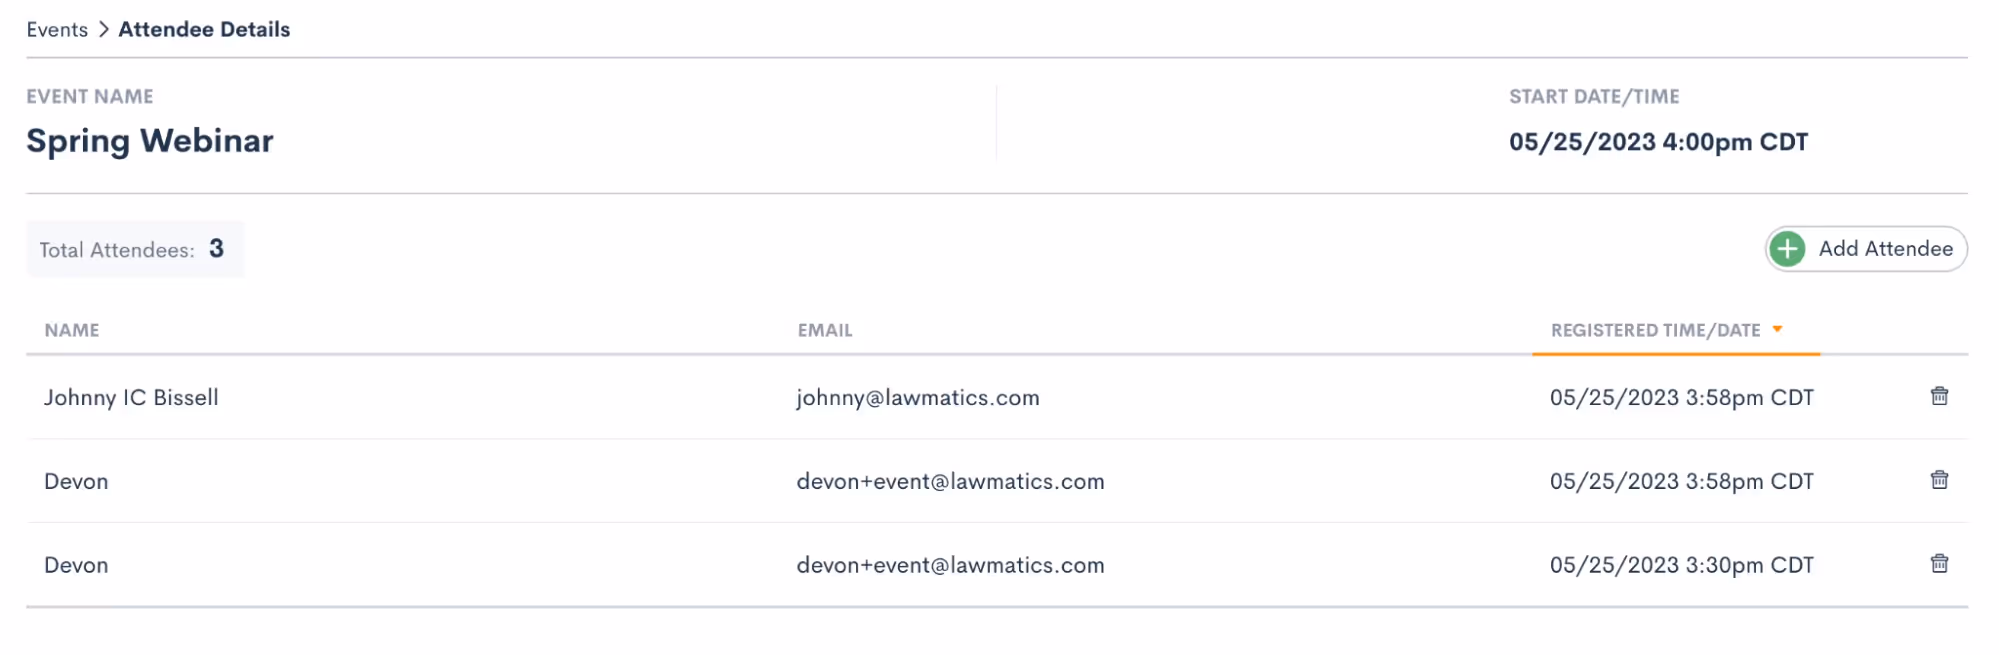
Regardless of the method you opt for to register individuals for your event, they will be seamlessly added to the registrant list. Once added, they will receive the confirmation and reminders you have set up in your settings. To conveniently view all event registrants, head over to the Event Management page and click on the specific event you're interested in. There, you'll find a comprehensive list displaying each attendee's name, email address, as well as the date and time of their registration. It's a hassle-free way to stay informed and organized throughout your event planning journey.
Events & Automation
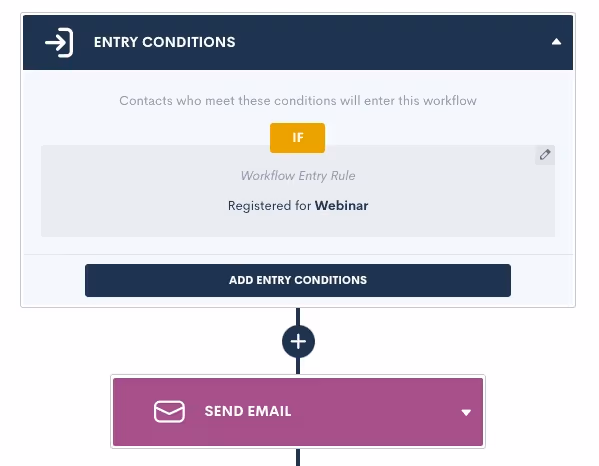
As with all Lawmatics features, Event Management can also be included in your Automations. With the introduction of this new feature we have added a new Automation Trigger: Registered for Event.
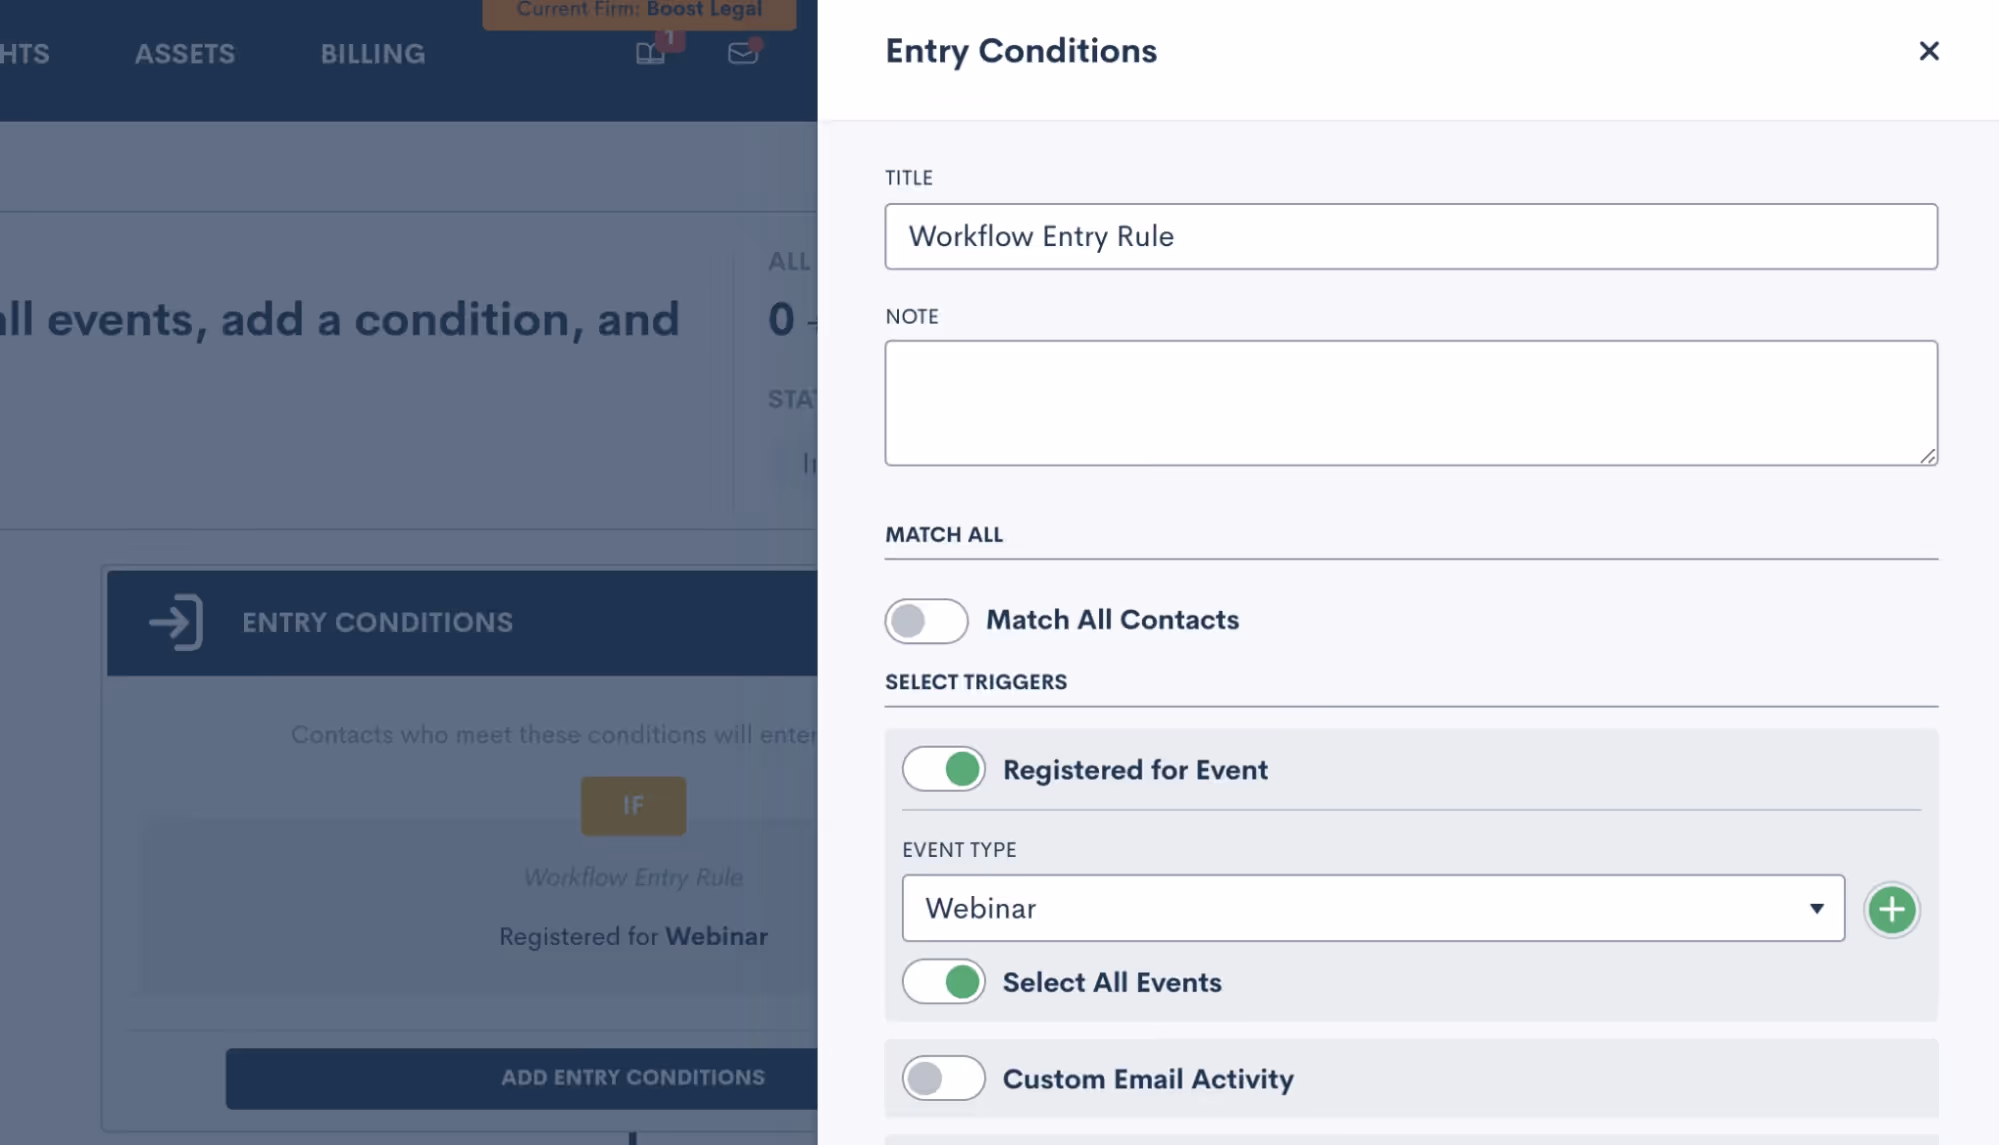
- Simply select the “Registered for Event” trigger, and then select an event type to trigger the automation. This goes all the way back to the first section regarding your Event Settings, it is very important to set up your event types so that you can trigger Automations appropriately for different events.
- Once you have selected an Event Type, you then have the option to let this Automation run for all individual events within that type, or you can select a specific event so that the automation only runs for that event.
- Now add in your various action items and build out your automated workflow. Whether you’re creating a drip campaign, internal tasks, data updates like tagging, or whatever else you wish to automate, simply select the action items to add them into the automation.
Remember that your event confirmation and reminders are built-in on the Settings page, so no need to create an Automation for those.Creating an Automation for event registrants is a great way to automate long term follow up with a goal of increasing conversion, or just to stay in touch and top of mind with that audience.
Conclusion
We’ve got all the tools you need to manage your major events such as webinars, luncheons, and networking events, all under the roof of Lawmatics.Set up custom event types and confirmation emails in Settings, then easily create an event, start promoting it, and collect registrants. Plus don’t forget that you’ll also find a new entry condition in Automations to trigger a custom workflow when someone registers for your event.Events are a great way to create new lead channels and bring in more business for your firm without having to spend big money on marketing campaigns. Whether you are a seasoned expert at event management or planning out your first event, Lawmatics is just the tool for incorporating events seamlessly into your firm’s marketing efforts.**Event Management is available to users on the Pro Tier and above**

Register for upcoming Monthly Deep Dives here.We are so thrilled to announce LM[AI], the brand new artificial intelligence text generative tool from Lawmatics, making us the first legal CRM to launch its own AI.For anyone who has had the experience of staring at a blank email draft not knowing what to write, this feature is for you.
What is LM[AI]?
Intuitive, easy-to-use, and found directly within the Lawmatics platform, LM[AI] is our brand new text generative artificial intelligence tool. LM[AI] allows you to turn a simple prompt into a fully developed email within a matter of seconds.This feature is available to users on the Pro Tier and above.
Why use LM[AI]?
First and foremost, LM[AI] will save you precious time. You’re a law firm, not a marketing agency, you don’t want to spend your time writing attention grabbing, actionable email content. LM[AI] does all that work for you.In addition to saving time, use this powerful tool to jumpstart your creativity and put your best foot forward in marketing your law firm. Whether you use it for nurturing, checking in, promoting, or anything else, LM[AI] will help keep your email campaigns robust and interesting.
How to use LM[AI]
When drafting a plain text email, you now have the option to let artificial intelligence write the email for you. Simply click on the Help Me Write button, provide a prompt, and LM[AI] will draft a complete email, including merge fields.
![UI showing the popout box for the Help Me Write button in Lawmatics using LM[AI]](https://cdn.prod.website-files.com/688005f0c89682201c6776e9/68d1bde3abf1236abcce48e9_68a8d834c86f5492edc669f6_image1.avif)
You can then manually edit the generated text as needed, or instruct LM[AI] to edit its own content by making it more friendly or formal, or just by rephrasing the text.
![LM[AI] Feature Zoom](https://cdn.prod.website-files.com/688005f0c89682201c6776e9/68d1bde3abf1236abcce48e2_68a8d834c86f5492edc669ef_Product_LMAI-Recap_BLOG.avif)
Conclusion
Breakthroughs in automation and AI are fundamentally transforming the business of law. By making this cutting-edge AI technology accessible and intuitive, this development bolsters Lawmatics’ position as the leader of the smartfirm revolution.Cheers to better emails in the future with LM[AI]!

Register for upcoming Monthly Deep Dives here.The Lawmatics Client Portal has everything you need to both ease communication and manage action items for an ongoing case. Everything about the Client Portal is designed for easy activation, easy adoption, and ease of use for both your staff and clients.But why use the Client Portal when you already have Lawmatics automating so much of your client communication? While Lawmatics Automations are great for sending out important information such as Appointment Reminders, Forms, and Documents, the Client Portal allows your clients to access all of these items on their own terms, all in one central place.
The client’s view of their Client Portal, as shown above, is easy to navigate and contains each and every item relating to their case that you have opted to share with them. While we refer to this as the “Client” Portal, note that it can also be used at any point during your intake process as well.Let’s dive into all the steps of using the Client Portal to create stronger communication with your clients.
How to grant access to the Client Portal
Your contacts and clients have no means of entry to the Client Portal until they are granted access. This is done on a one-off basis so that you have complete control over who can access your shared information. Depending on the nature of your firm, you may see varying interest or necessity to access the Client Portal across your clientele.Like most things in Lawmatics, Client Portal access can be granted either manually or via an Automation. You also have the option to grant access to the primary contact on a matter and/or any other related contacts.
Send a manual invitation
To send a Client Portal invitation manually, begin by navigating to the matter’s profile. Again, remember that this process can be done for PNCs and hired clients alike. Once on the matter profile, click the handshake icon, highlighted in red (below).
You will then see options to grant access for the main contact on the matter, as well as any other related contacts. Check the box accordingly to grant access as you wish.
Each contact to whom you grant access will receive an email invitation to create a password and sign into their own unique Client Portal. For matters with more than one main point of contact, you can choose to share certain items with both/either of them as needed.You will only need to invite each contact to the Client Portal once, after which they’ll have ongoing access. The only exception to this are contacts who have more than one ongoing matter. The portal is unique to each matter, so you’ll need to send an invite for each respective matter.
Automate Client Portal access
To automate Client Portal access, simply use the Automation action “Invite to Client Portal”, and then select which contact(s) to invite. If you only wish to invite the main contact on the matter then select the automation target.
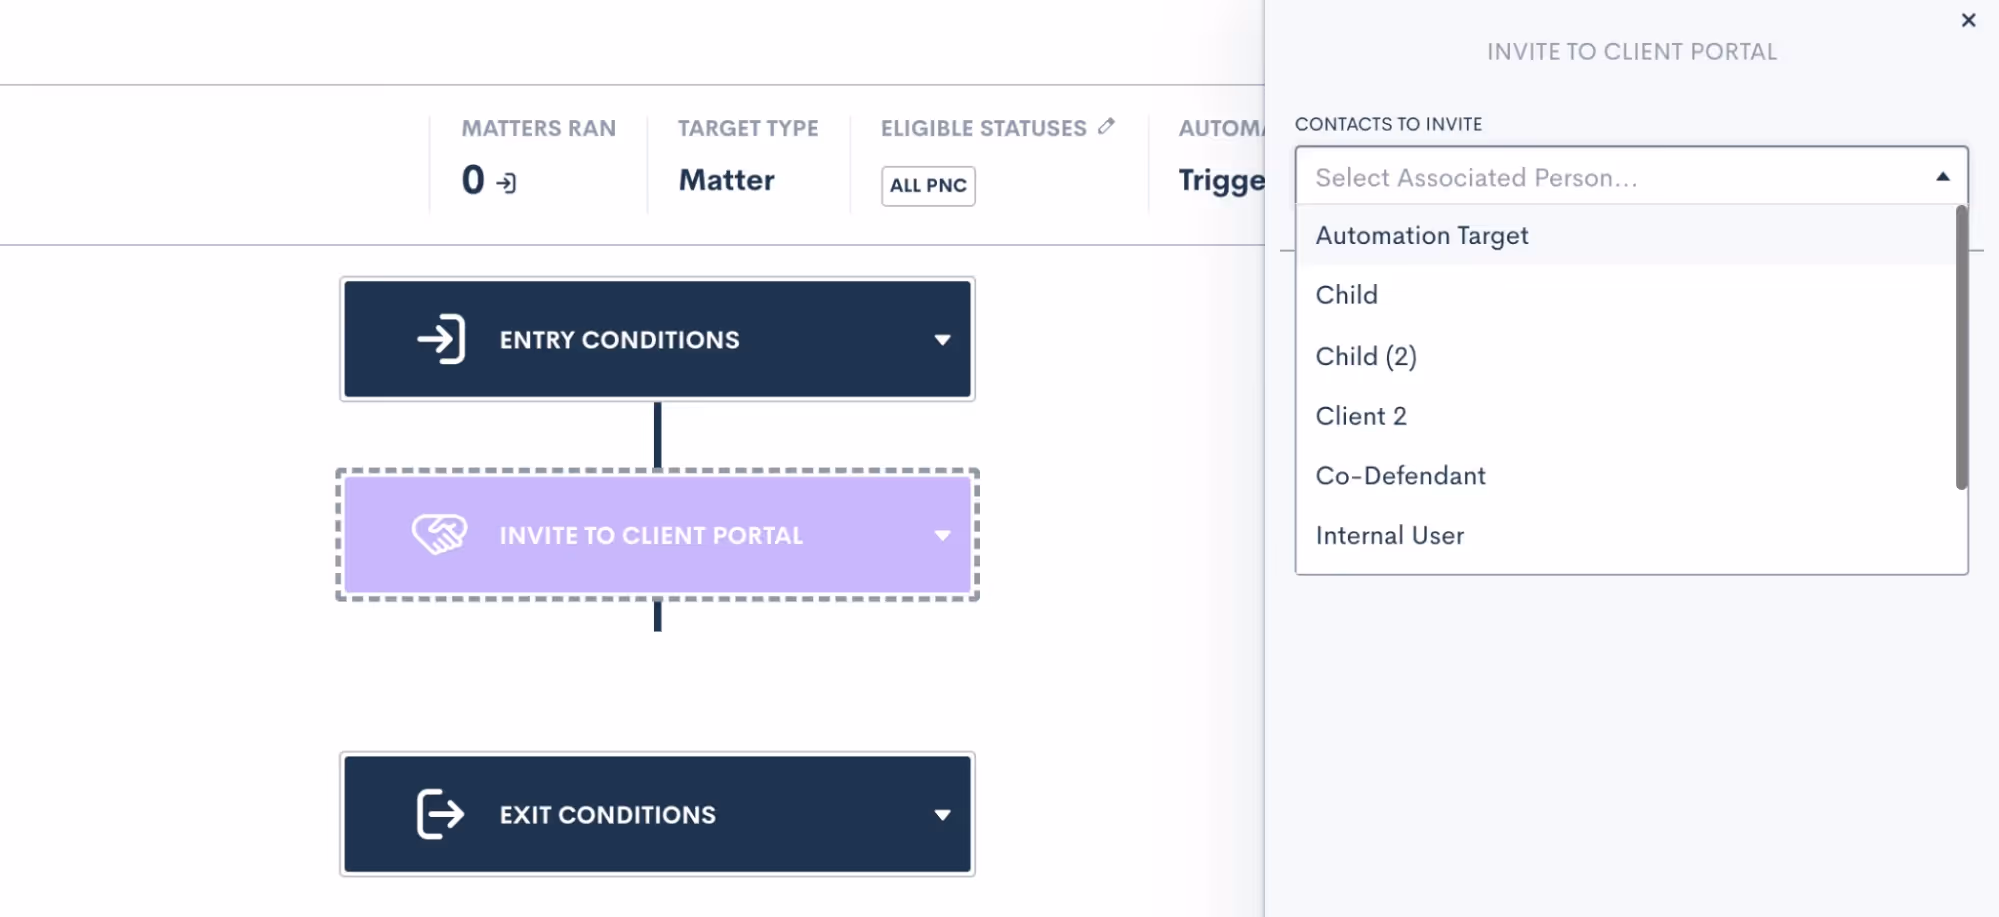
You can also choose as many other relationship types as you wish. For any matters who do not have the relationship selected, no invitation will be sent to those relationships.Sending the Client Portal invitation via Automation achieves the same end goal as granting access manually. The contact receives an email invitation to create a password and get signed in to their unique Client Portal.Once the client has created their password, they can then use that to login to their portal any time they wish – by means of manual or automatic action,
Sharing items via Client Portal
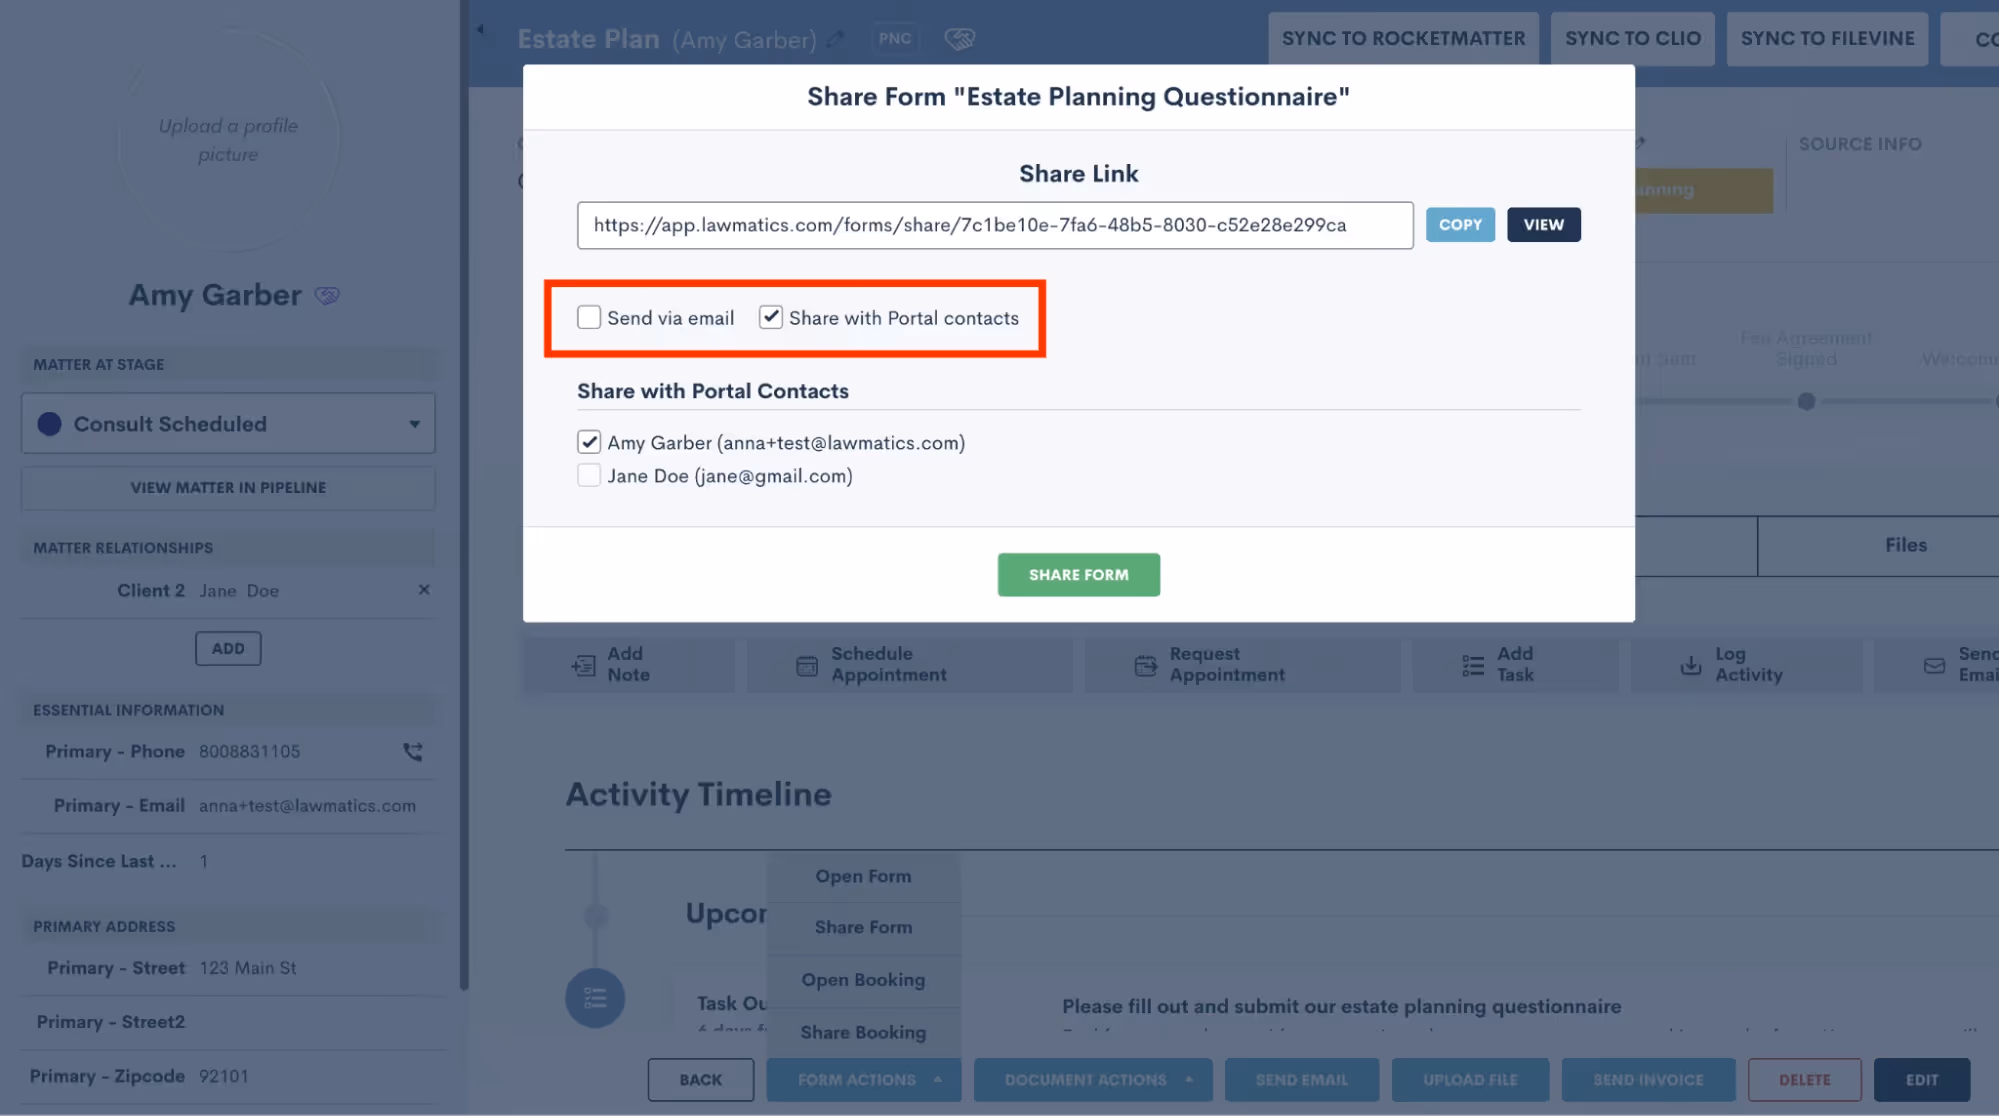
Now that your matter contact(s) have been granted portal access, you can begin sharing items with them. While you may still opt to share information such as forms or documents with a client via email or in-person, the Client Portal offers the added benefit of storing all such items in a central hub for the client to access on their own terms.As with a Client Portal invitation, you can choose to share any items to the Client Portal manually or via Automations. When sharing an item manually, simply follow your usual process for sharing via email, and you will see the option to share via portal as well.We’ll use Forms for our example here but this process is similar for any of your Lawmatics assets. When sharing a Form from a matter’s profile (shown below), you will see that you have the option to copy the share link, send via email, and/or share with portal contacts. Note that only contacts for that matter who have been granted access will appear in the checklist.
To share the Form to the Client Portal via Automation, simply use the Send Form action item in your Automation, and then make a similar selection to choose whether to share the Form via email, text, and/or to share via Client Portal.
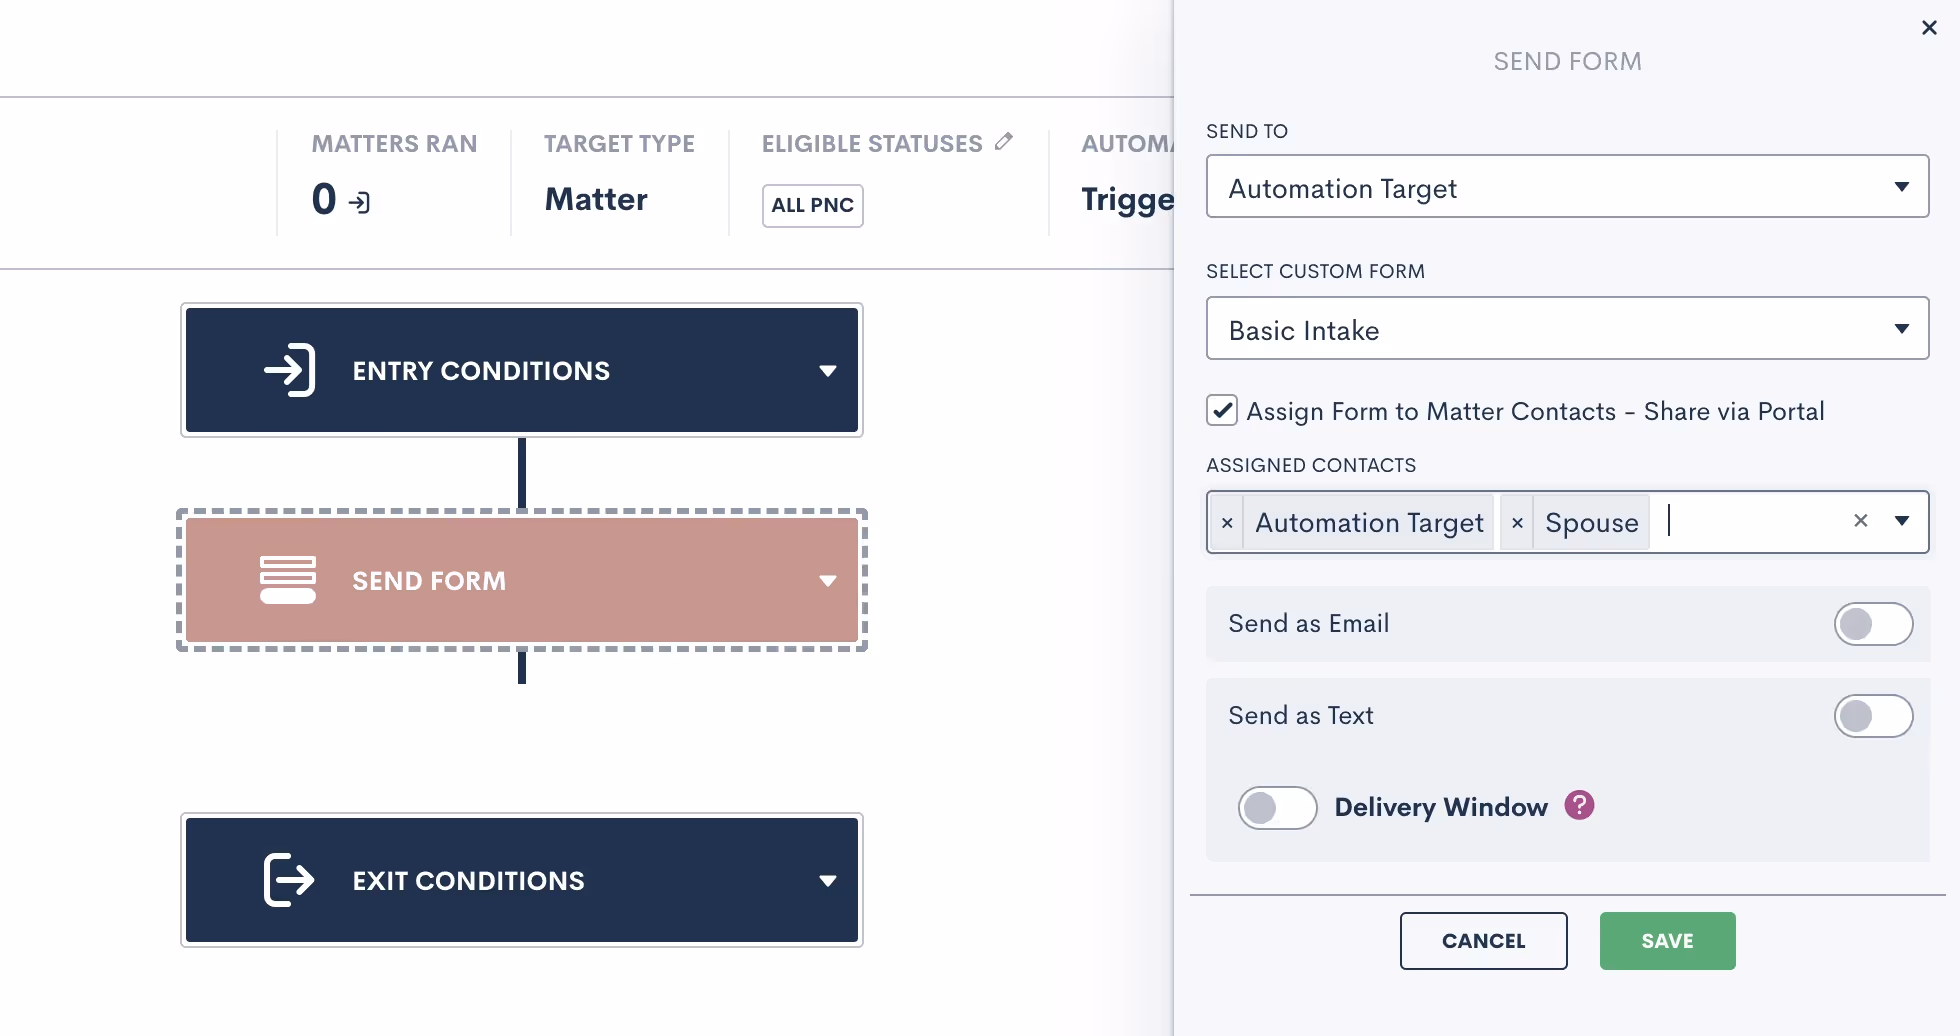
When sharing any items via Automation, note that you will select the assigned contacts as part of the Automation template, as opposed to the one-off selection when sharing manually. Any relationship types selected will receive the shared item to their Client Portal; if a matter triggering through the Automation does not have one of the relationship types assigned, it will simply share the item with the applicable relationships and skip over any that do not apply.Let’s walk through each of the different items that can be shared via client portal.
Files

The first thing your client will see when they log in to their Client Portal is the Dashboard. Here they will find an overview of everything that has been shared to their Client Portal so far. They can then use the navigation on the left sidebar to view each individual item.Starting with Files, on this page your client can view any files that you have saved on their matter and upload files at your request.
Forms
Share Forms to allow your client to view and fill them out right in the Client Portal. You can of course share the Form via email as well, in which case the client can access it from the email or from within the Client Portal, whichever they prefer.
Signature Documents
Here, your clients can view any documents that you have shared with them for signature. Once again, you can send the document via email as well if you would like, and they can feel free to sign it from their email or from the Client Portal.Clients will also be able to view documents that have already been signed.
Appointments
The calendar tab allows your clients to easily keep track of their upcoming appointments. They will also see any Tasks that you have assigned to them, appearing on the date that they are due.
Tasks
You already love using Lawmatics for your internal staff Tasks, but the portal allows you to use this feature to assign tasks directly to a client. Create a Task the same way you would for an internal Task, whether manually or via Automation, and then check the option to assign the task to matter contacts, as shown below.

The Task will be visible in the Client Portal on the Dashboard, shown below, as well as on the calendar, shown on the task due date.

Messages
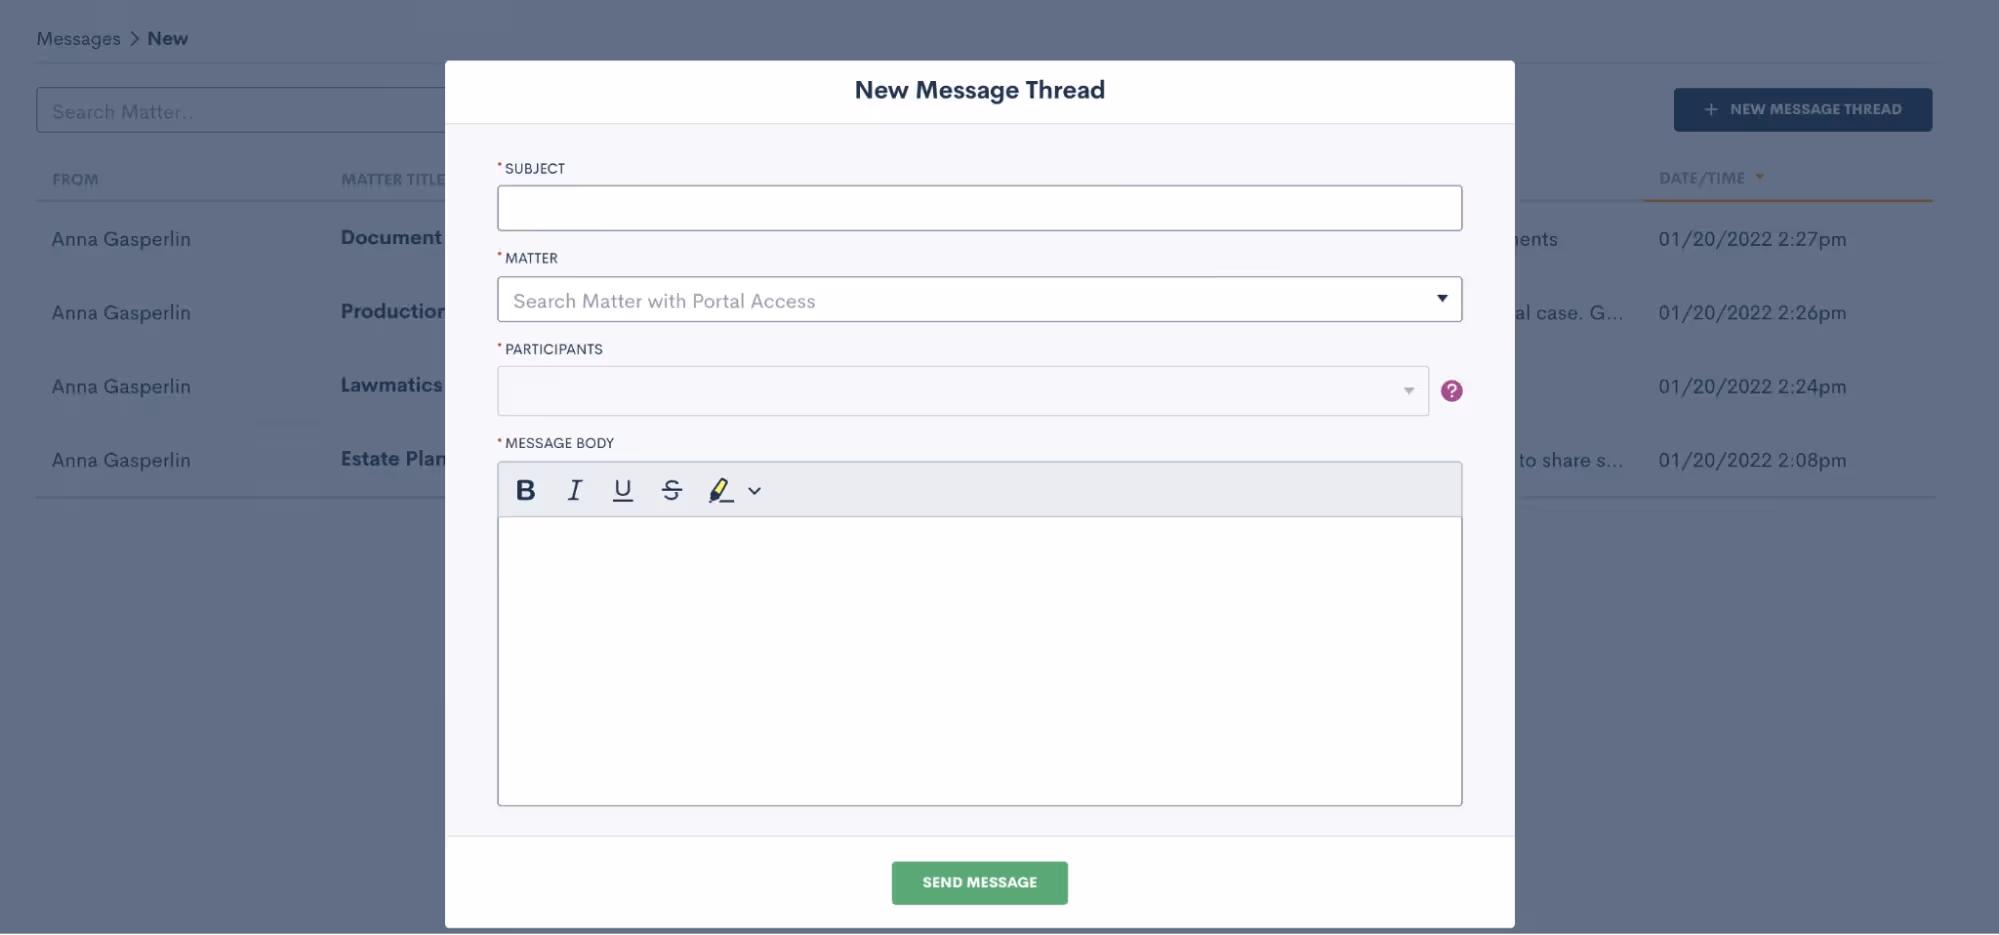
Last but not least, this feature is unique to the Client Portal and it allows you to message a client directly through their Client Portal. Sending a portal message is similar in concept to sending your client an email, however the benefit of sending via portal is that once again it helps keep all communication in one central hub.To draft a message, select Portal Messages from the CRM tab on your main Lawmatics navigation bar. You will then see a search box to easily search from any matters who you have granted Portal access to. Select the matter you wish to message, then draft the new thread as shown below.
Your client can then click on the messages tab within their Client Portal to view the full message thread as well as any past threads. The system will also alert them that they have an unread message. If a reply is needed, they can simply type their message in the box shown near the bottom of the image below, and reply right back to you.
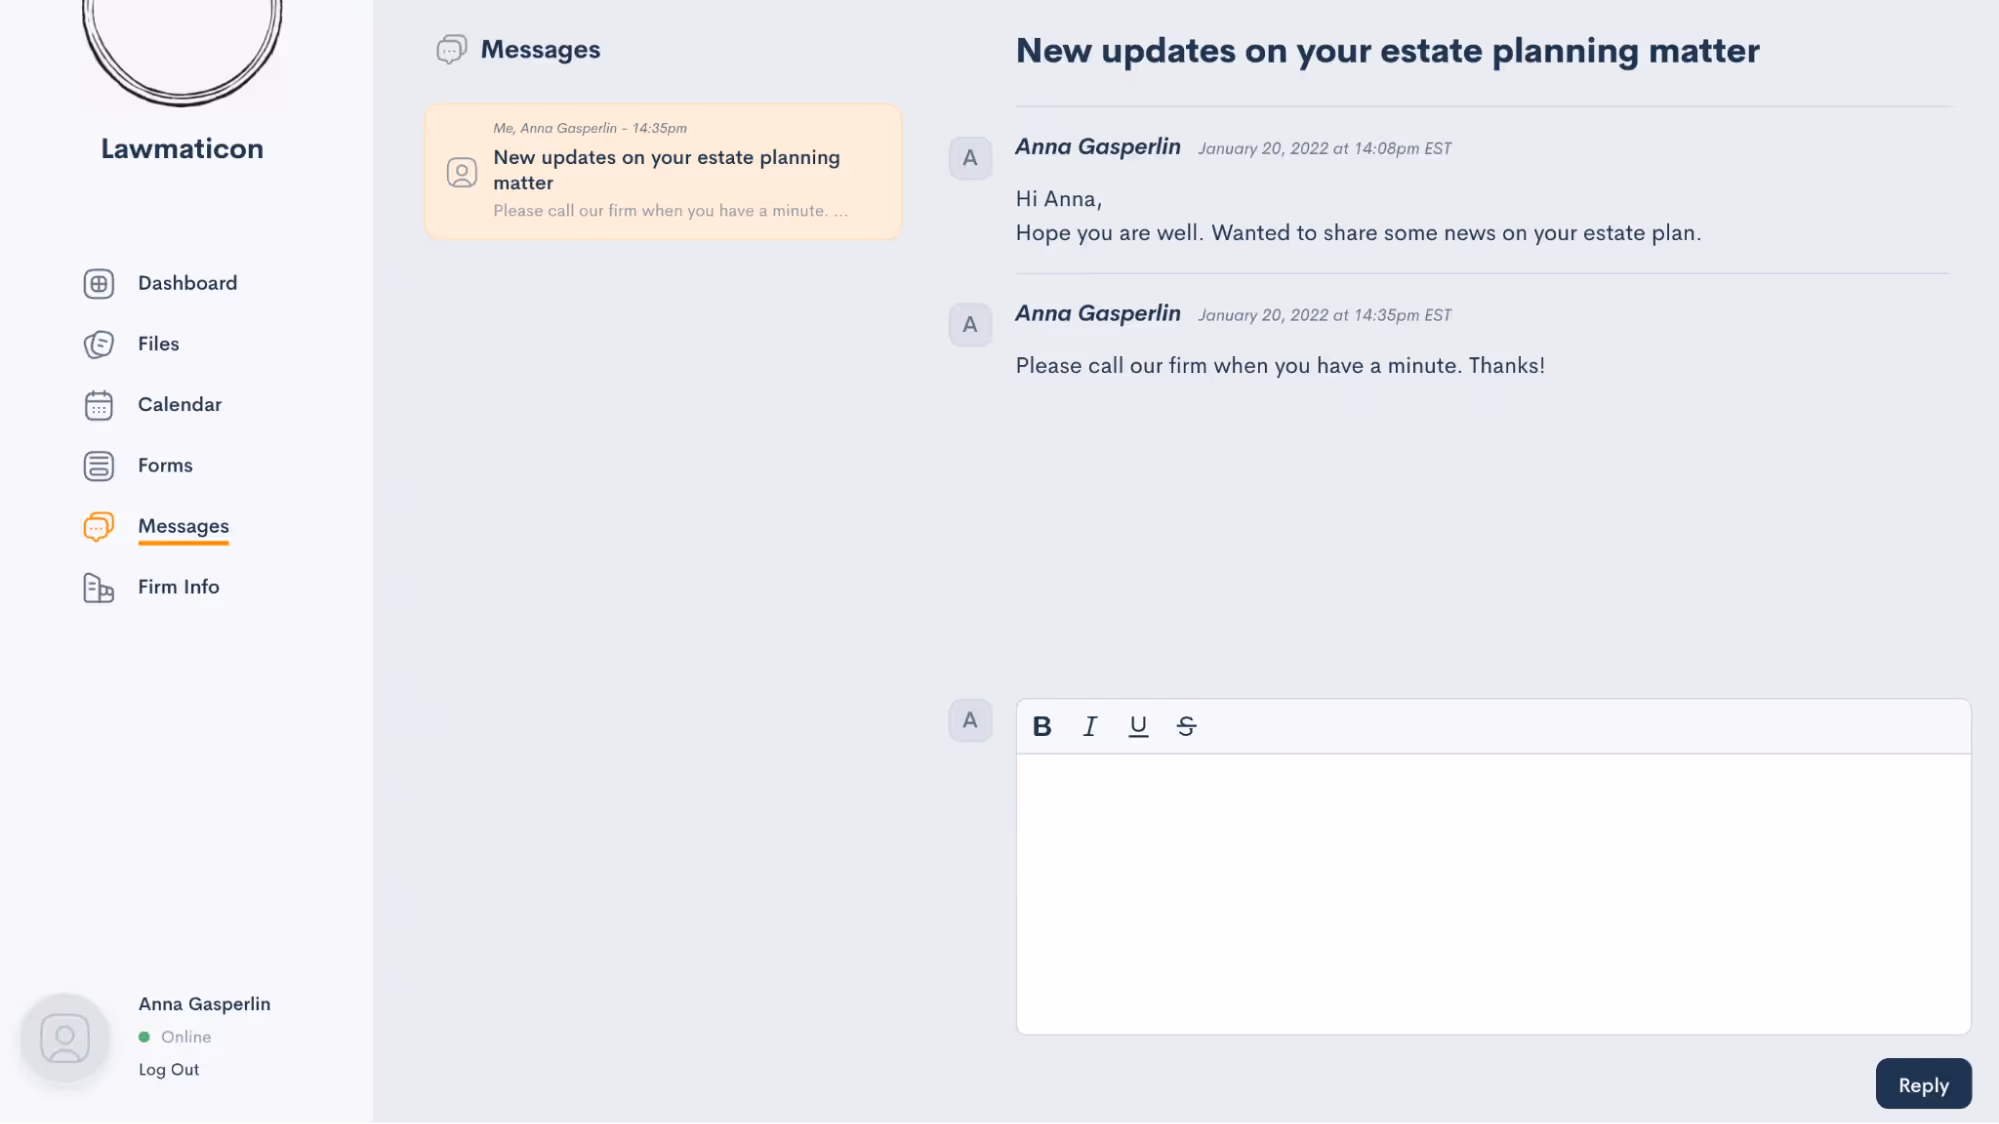
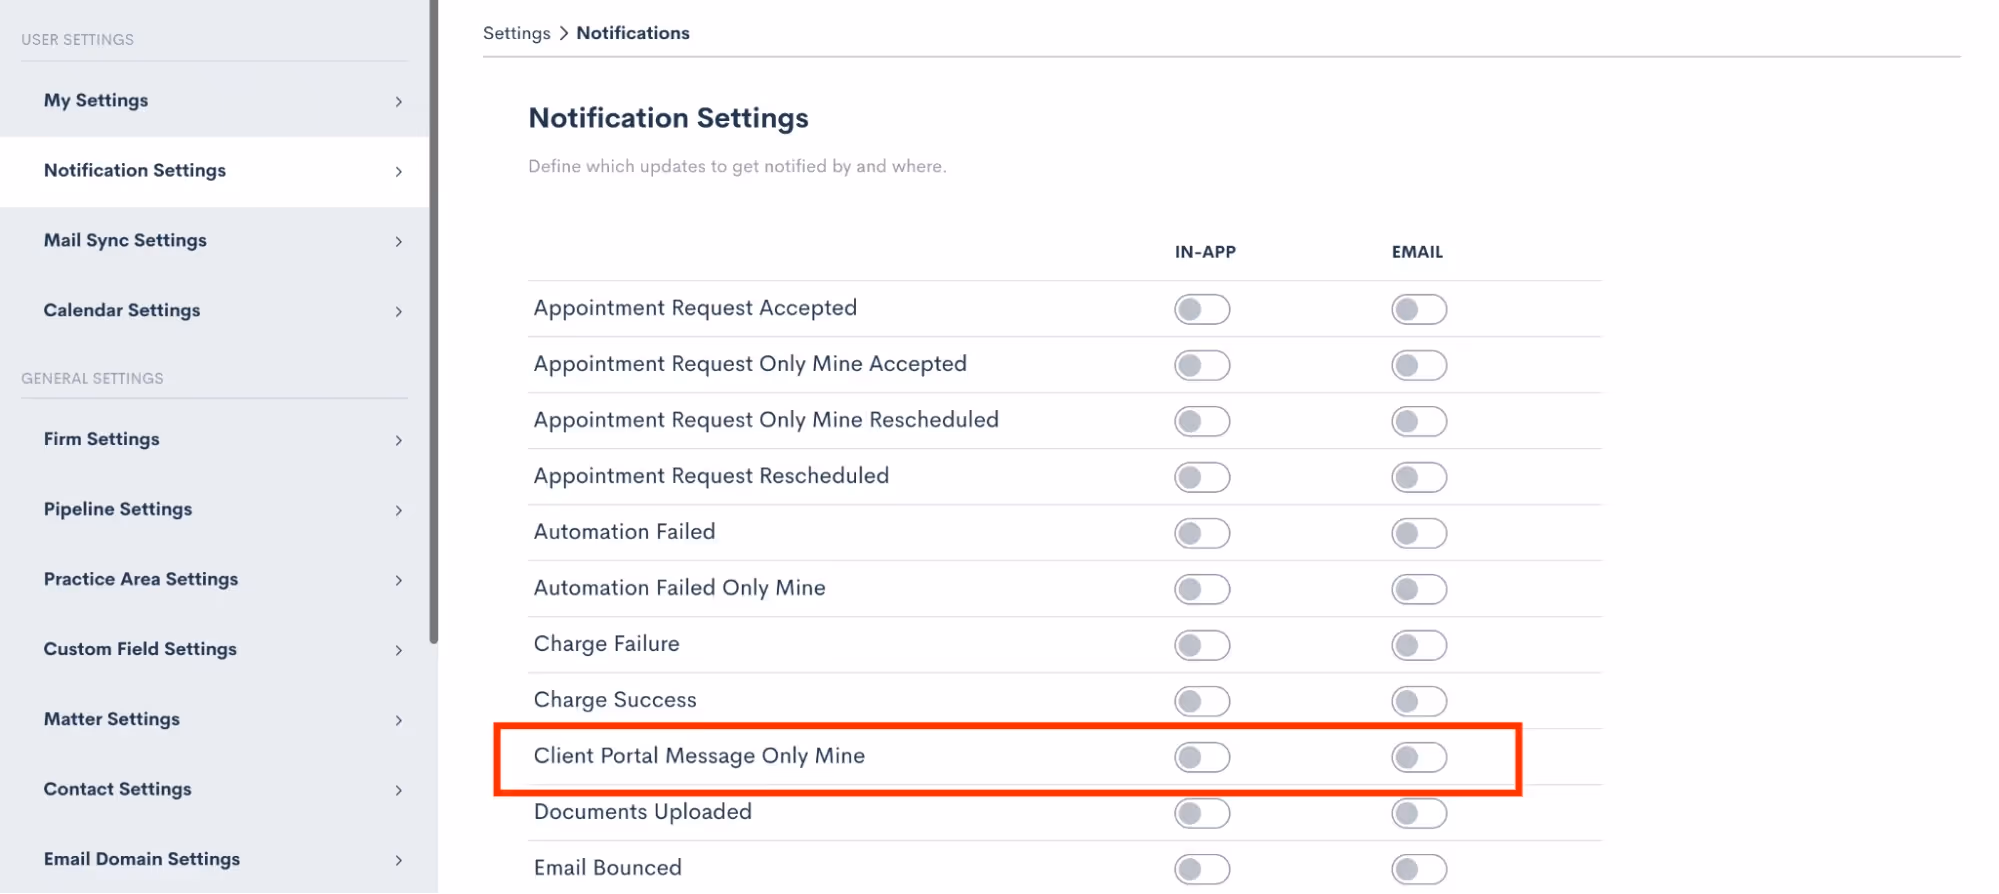
The reply will appear in your portal messages and you also have the option to turn on notifications for portal messages so that you can be sure not to miss anything.
Portal navigation
You now know everything you need to know about using the Portal and sharing items from Lawmatics to your clients. This whole process will function like a well-oiled machine once you have it implemented, requiring little to no intervention or checking in from your end.With that being said, you may still be curious what this all looks like from the client’s perspective. Let’s walk through each step from the client’s view and dive deeper into what they will see for each item.
Invitation
First and foremost, when you grant Client Portal access to someone they will receive an email just like the one shown below. Note that wherever it says “Lawmatics” in this email will be replaced with your firm name. Additionally, the individual matter’s case title will be filled in where you see “Anna’s Criminal Case” below.
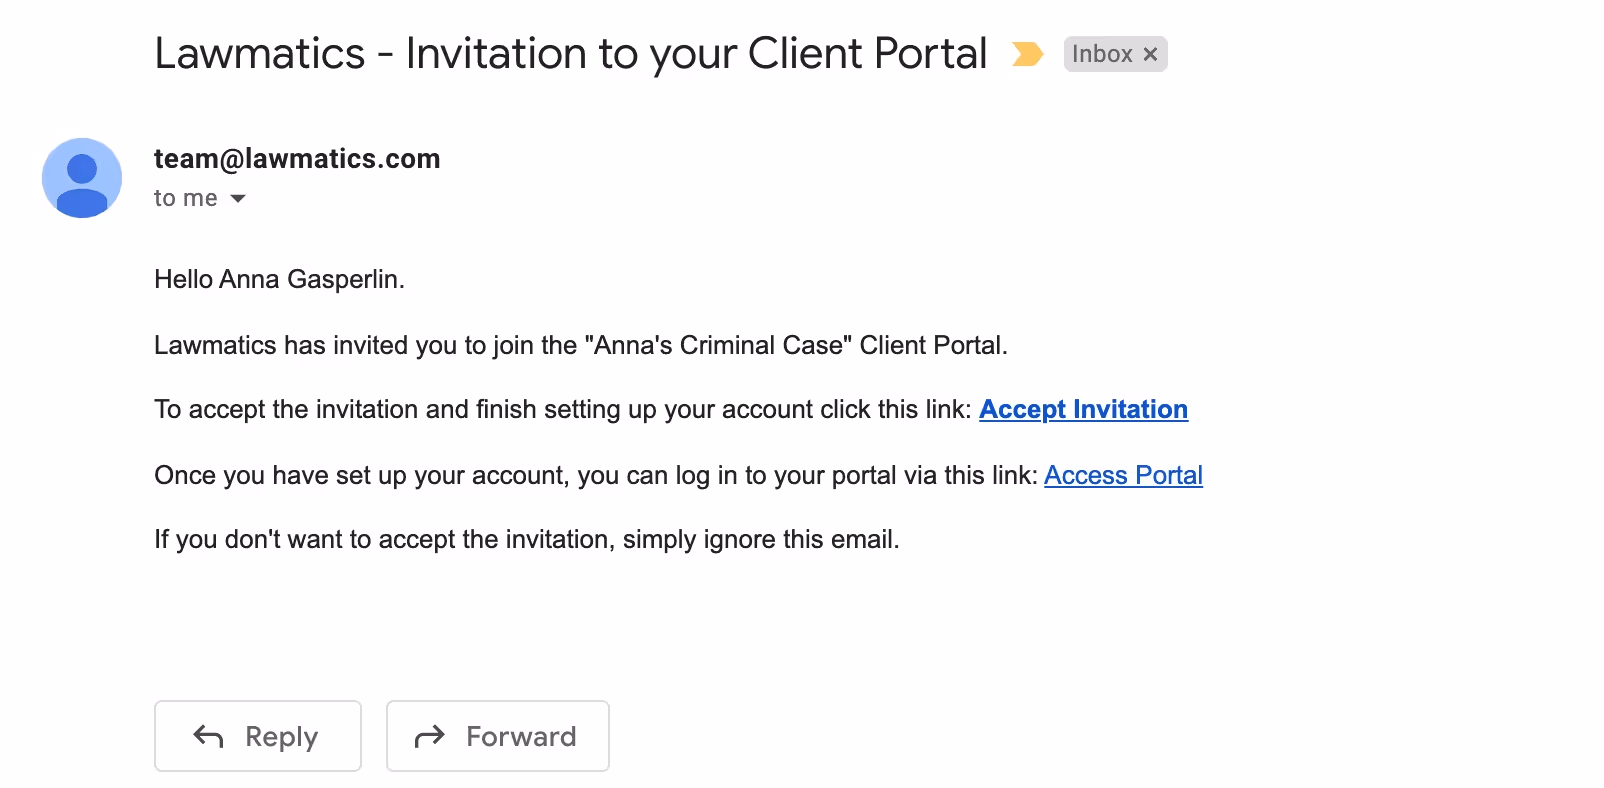
The Access Portal link doesn’t change, so you can suggest they bookmark that link or even save this email so that they can access the portal whenever they wish.
Portal
Whenever clients sign in to the Client Portal they will always first see their dashboard. This shows a summary of current events, messages, etc on their matter. They will then use the left side navigation to click through each different item.
Anytime you share an item with them, they will receive an email notification letting them know that they have something new in the Client Portal needing their attention.
Conclusion
The Lawmatics Client Portal is a simple, secure, and efficient way to keep your clients in the know throughout the whole course of their matter. Whether being used for intake or case management, the Client Portal is the client’s one stop shop to view everything for their case.With the ability to share invitations and items to the portal via automation, all of this can be accomplished without any extra work on your end. Not only is this a better experience for you and your staff, but this also creates a wonderful experience for your clients.Communication is such a key aspect of keeping your clients happy and engaged in their matter, with the help of the Lawmatics Client Portal it is now easier than ever to connect with your clients.

Register for upcoming Monthly Deep Dives here.Marketing can be a tall order for legal professionals to handle in-house, but Lawmatics has everything you need to become a master marketer. Unlike generic CRMs, our platform is specifically designed for legal specific needs, offering customized tools to help promote events, run promotions, and manage any other marketing needs.Lawmatics offers an impressive range of marketing features, and the best part is they are all highly customizable. With Lawmatics, it's easy to use these tools and implement them across your entire firm, and many of them can even be automated. Say goodbye to guessing about your marketing efforts. Lawmatics provides detailed statistics on email campaign performance, including open rates, click rates, and bounce rates. With this information, you can analyze engagement rates and make informed decisions about future marketing strategies.Read on to learn all the tools available to help you become a masterful email marketer.
Email design
To effectively send out a marketing email and track its performance, you need to begin by determining what you're promoting and crafting compelling email content to match. The possibilities for email topics are endless, but some examples include firm announcements, promotional offers, holiday messages, newsletters, and personalized birthday or anniversary greetings.Let’s use a birthday email as our example. For this email (as well as the vast majority of your other marketing-driven emails) you will want to create an HTML template as opposed to a plain text email. HTML emails offer a wide variety of design and content options for creating a beautiful and eye-catching email.
- To get started, navigate to the Emails page under the Assets tab and select Create Template. Here you will see options for a base email to choose from, or create from scratch. Selecting a base is a great way to get started with basic design elements of your email.
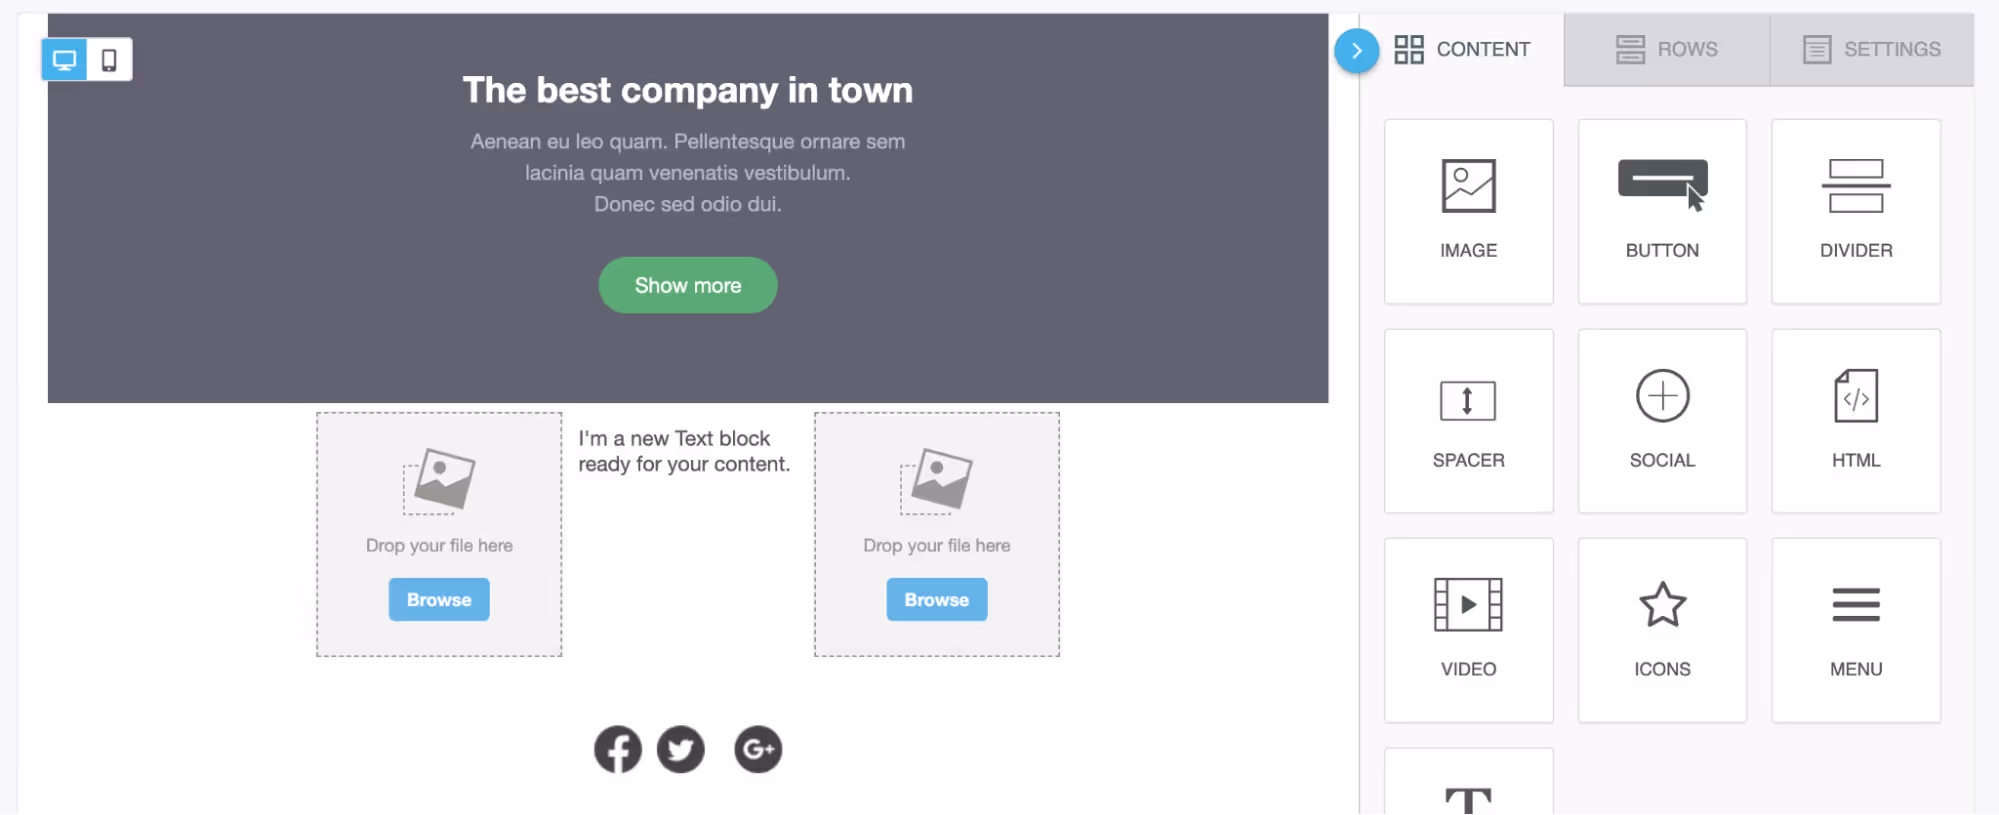
- Once in the email builder, you will have the option to add content to the email template of and adjust the structure by dragging and dropping Rows. Below you will see the different Row options on the right side of the screen, and a newly added row at the very bottom.
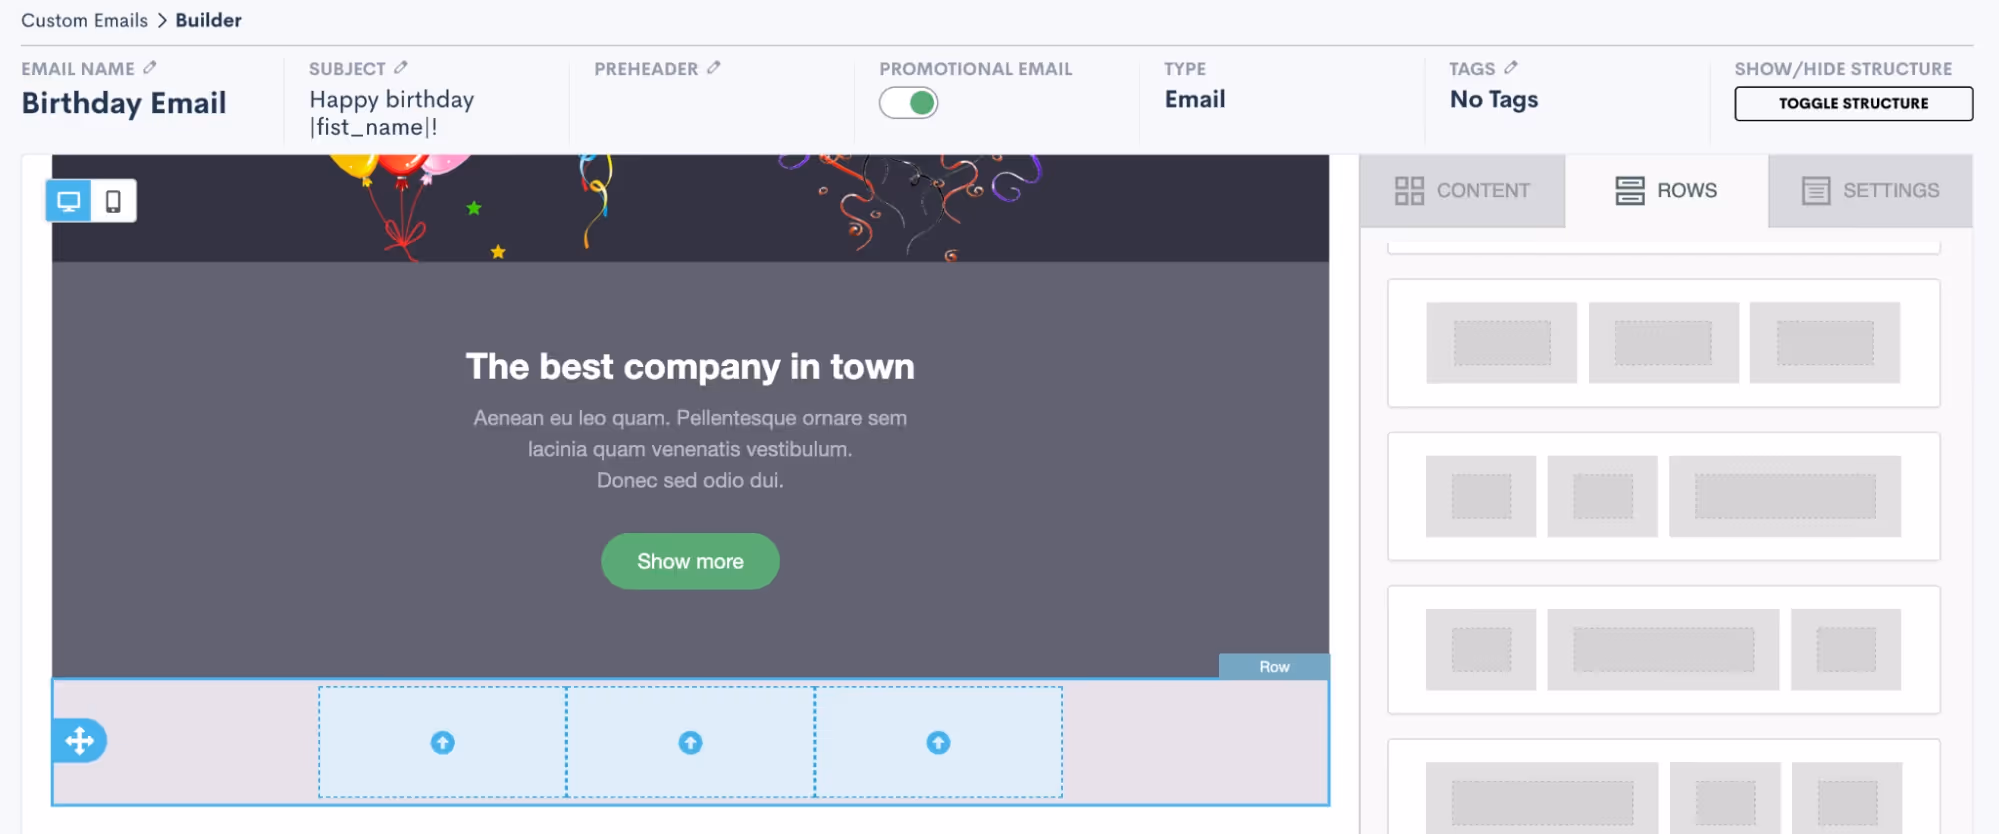
- Once you have added a row – such as the 3-column row added above – your next step is to add content into the row. Content can be anything from images, to videos, to text, to buttons, etc. Click on the Content tab over on the right side of the screen, and then drag and drop any content into your new row.
- In the image above, you can see that we have added an image, a text block, and then a second image into our 3-column row. Use the Browse button on the image content to upload your own image file or select from a variety of stock images. Similarly, click into the text box to type or paste in your text content as well as to select formatting options and merge fields as desired.

- Above you see the “first name” field has been added into a text block using the merge tags button, highlighted in red. You will see a full list of all of your fields, including custom fields, when clicking the merge tags button.
- Once you have your rows and content added into the email, you can also make other selections for email settings such as background color, layout width, etc. Click on the Settings tab on the right side of the screen to view these options.
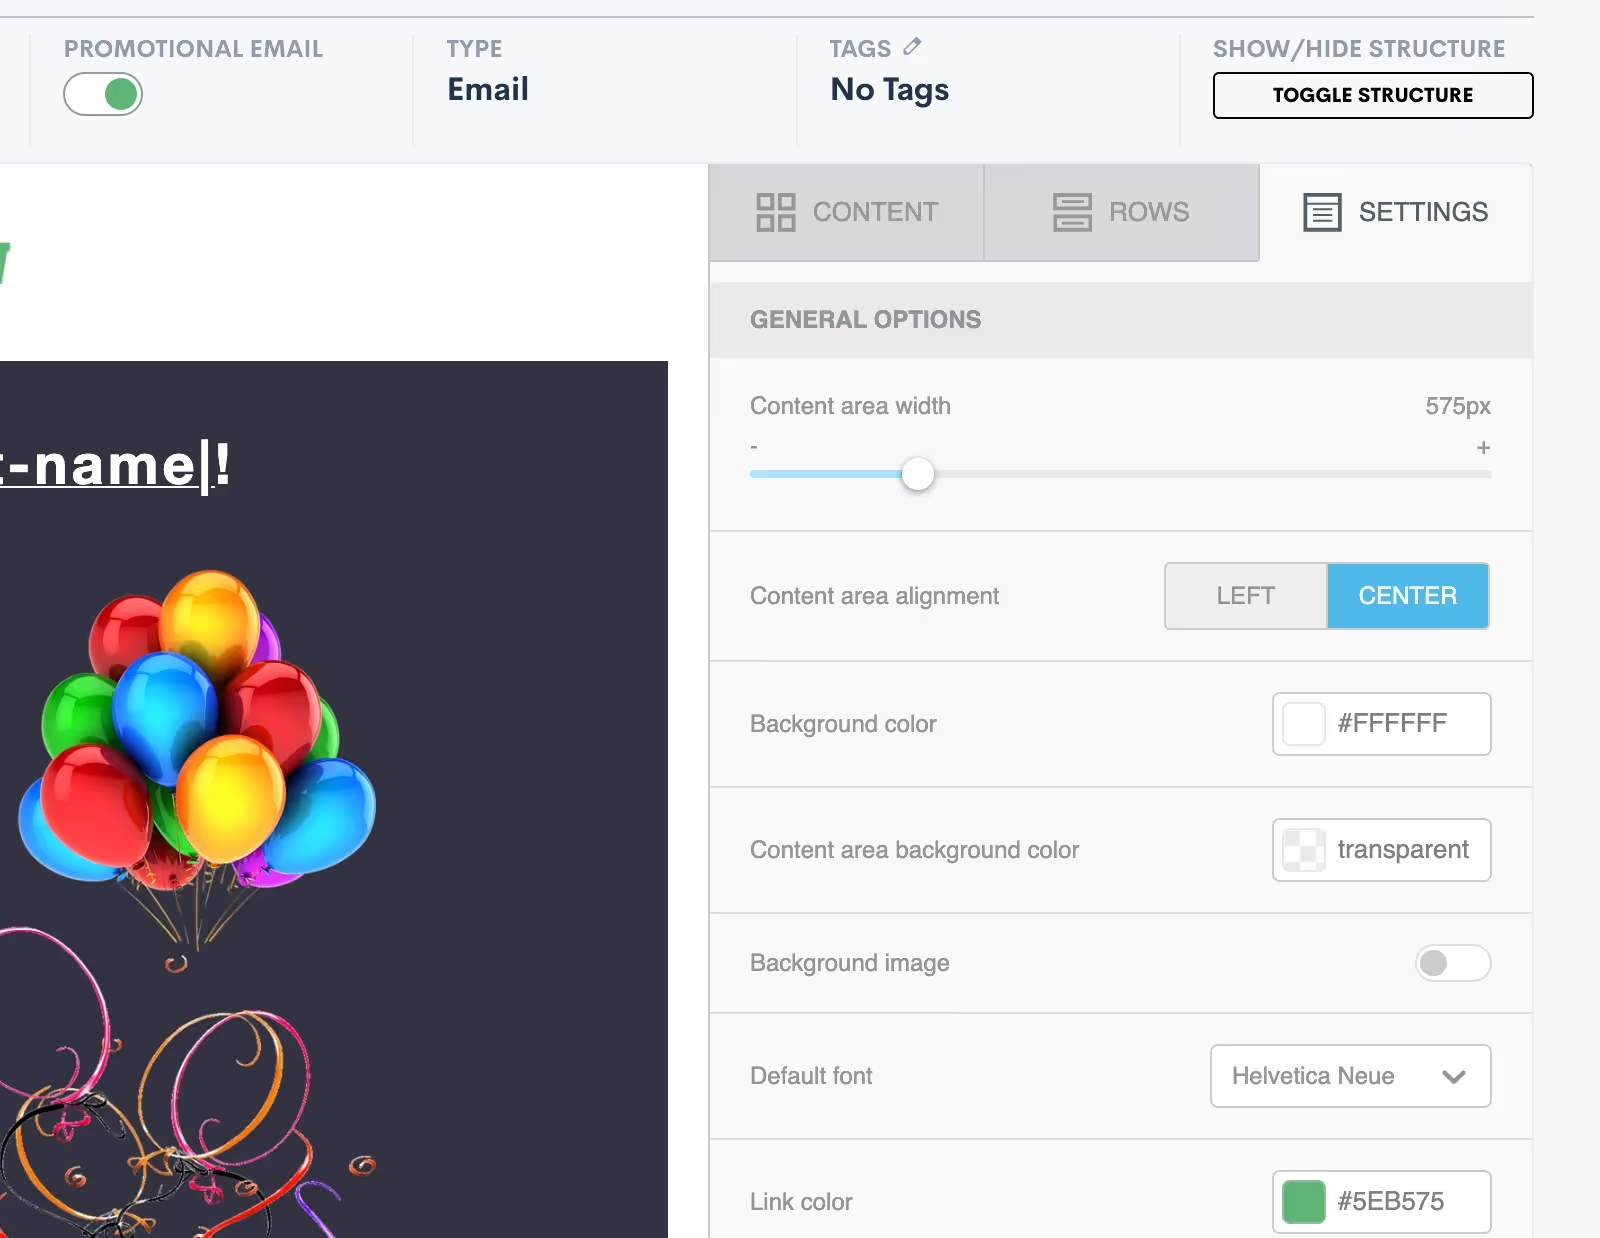
- For any of your marketing/promotional emails it is very important that you select the Promotional Email toggle button shown at the top of the image above. Activating this will add an unsubscribe link at the bottom of your email. This is legally required so that your target audience has the opportunity to opt out of future promotional emails. Anyone who clicks the unsubscribe link will no longer receive bulk (promotional) emails from you, but they still can get your one-off emails sent via Lawmatics.
- Once you are ready to save your email, notice that you have two different options: Save Email or Save As. Click Save As to enter your email title, subject line, and enter a preheader if desired.
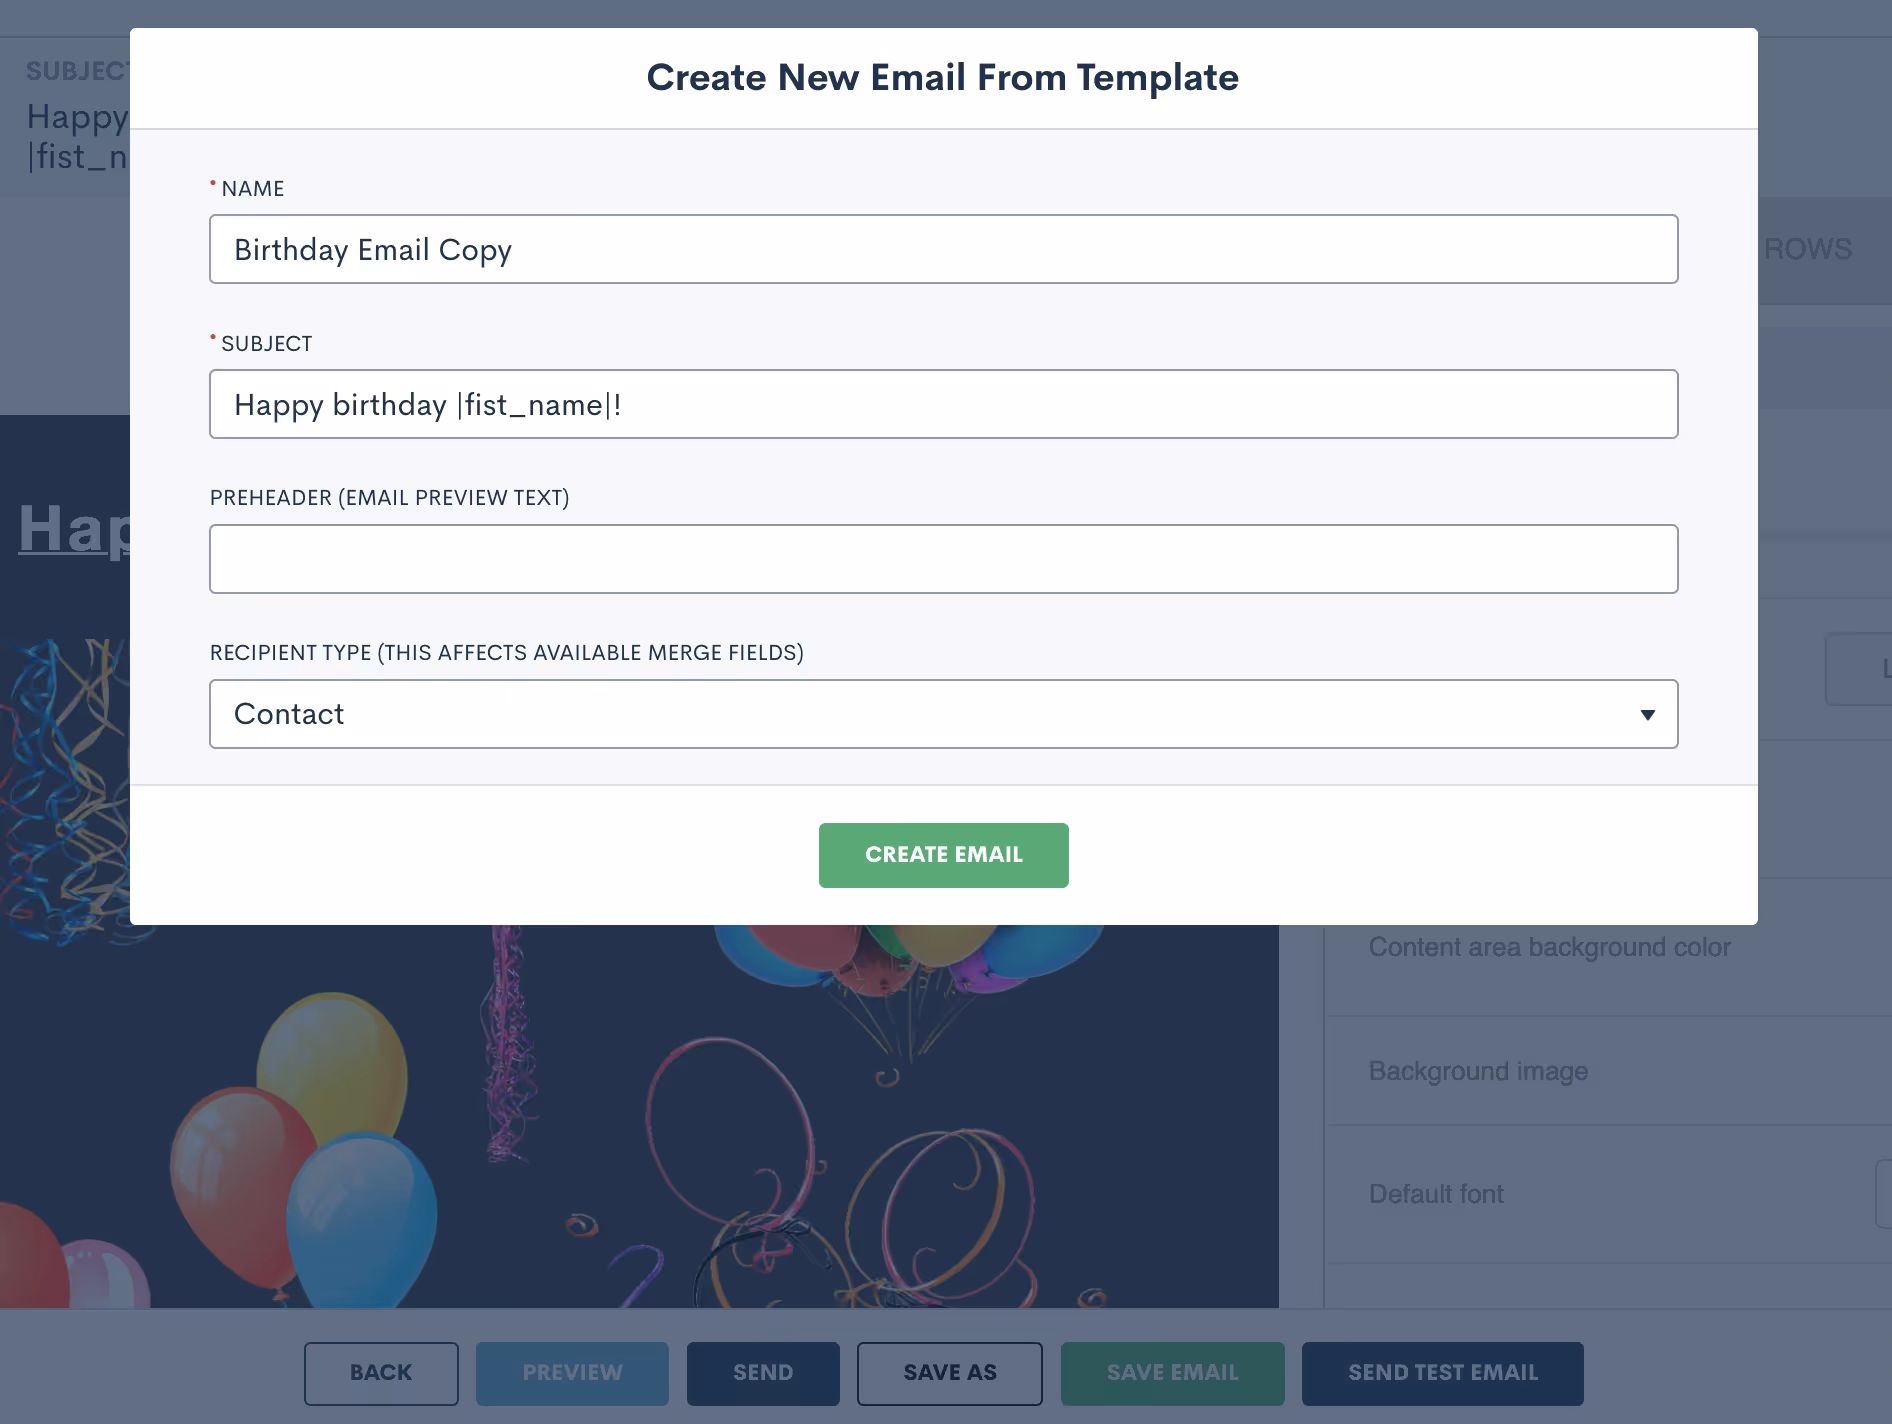
- Be sure to select the recipient type as Contact for any emails that are going to your general marketing audience. Once you have saved the email, you can always come back to make edits, updates, or “save as” to create a copy.
Create filtered target audiences
Now that you have your email content ready, your next step is to select the audience you’ll be sending the email to.
- Begin this process by selecting the Audiences option under the Marketing tab.
- Click Create New Audience and give your audience a name such as “All Contacts” or “Estate Planning Clients”, depending on the group you are targeting. For any broad marketing audiences used for sending a birthday email, holiday emails, firm newsletters, etc you will generally want to create an audience of Contacts as opposed to Matters.
- Once your audience is created, it’s time to select filters. For a broad audience of all contacts you will not add any filters, you simply want the audience to include your full list of contacts.

- For other instances, you may wish to create a more targeted audience. For example, let’s say you have an email targeted specifically for closed criminal defense cases. In this instance, you would add a filter for practice area as well as the case closed status, as shown below.
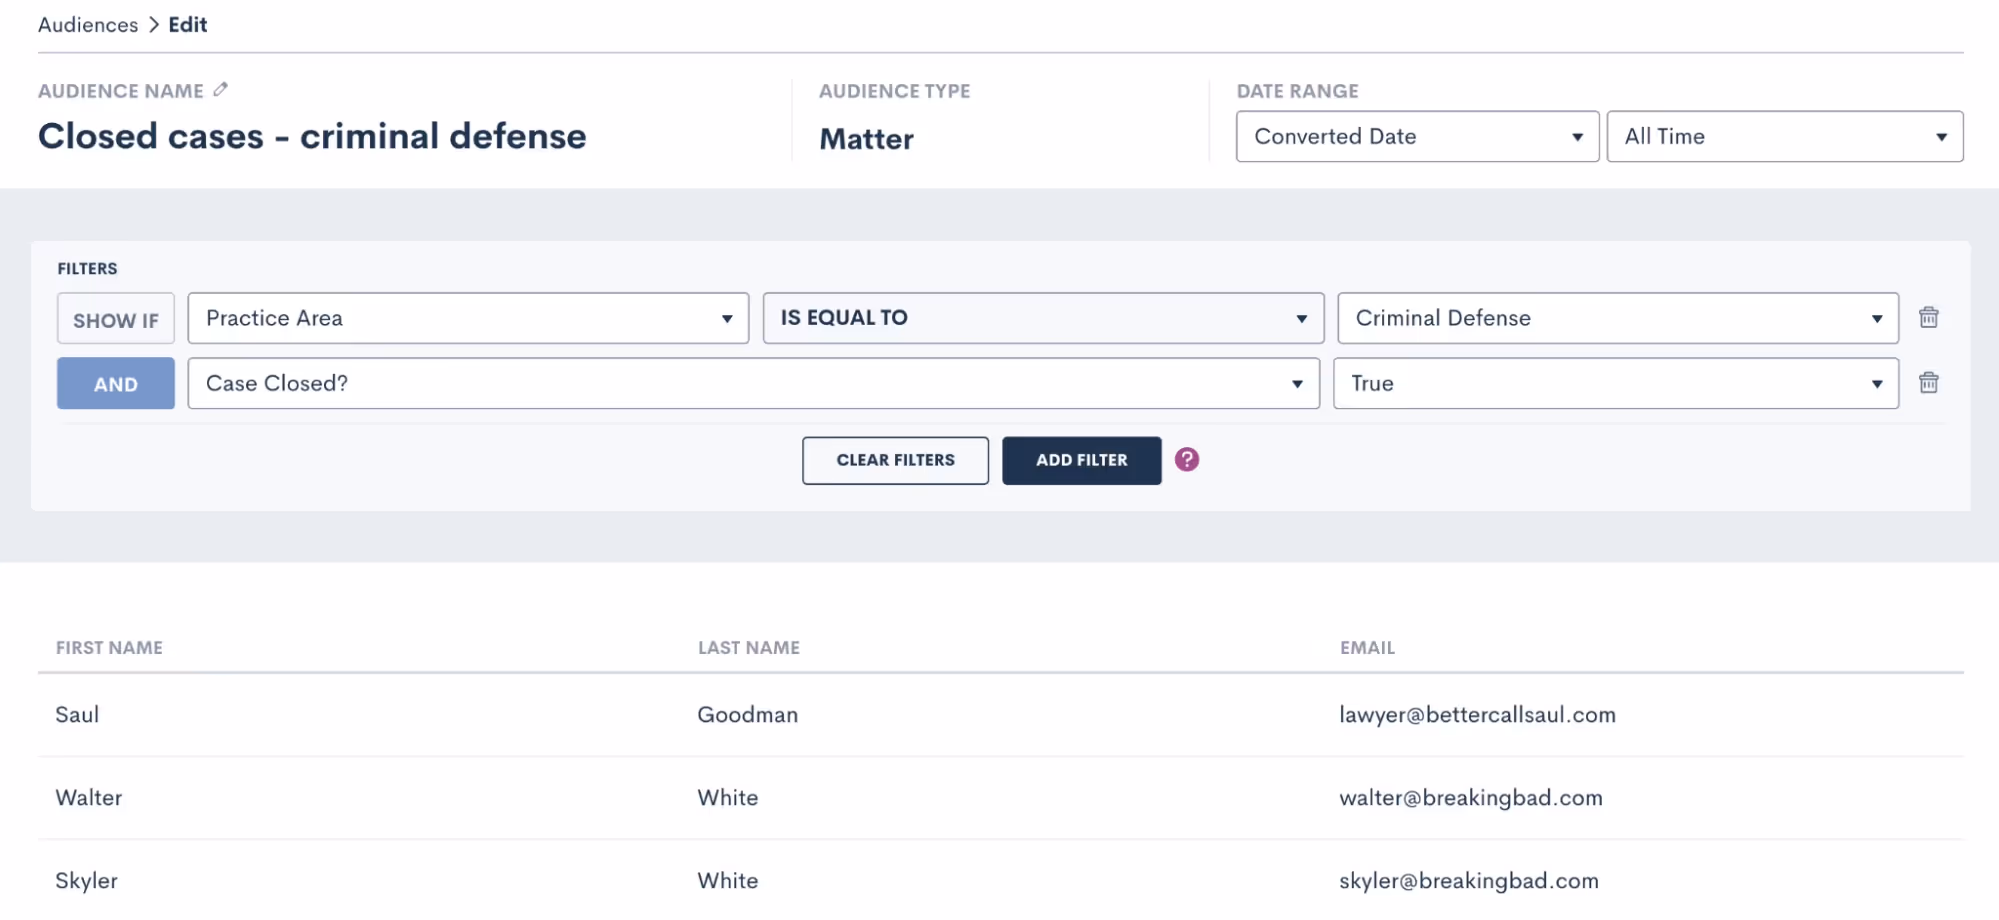
The system will filter out any contacts that don’t meet your specifications, so that you are targeting only those who do meet them in this particular audience.
Send emails with campaigns
You now have your email content created as well as the audience you wish to send the email to, it’s time to send the email! Select Campaigns under the Marketing tab and then click Add New Campaign. There are three different kinds of email campaigns you can create, you’ll see those options at the bottom of the pop up. Let’s run through each of them.
Run once
Run Once will likely be your most commonly used campaign type since you will use it for holiday emails, newsletters, and general one-off announcements or promotions. Think of this campaign as your option for “email blasts”.
- For any campaign type you select, you will first need to enter a campaign name, select your email template, audience list, and select which of your firm users (or the firm email) the email should send from.
- Once you select Run Once as the type, you will be prompted to select when to run the campaign. When Manual Activation is selected, it will be up to you to activate the campaign whenever you would like to actually send the email.
- If you wish to add more automation to this campaign, you can opt to run the campaign on a specific date.
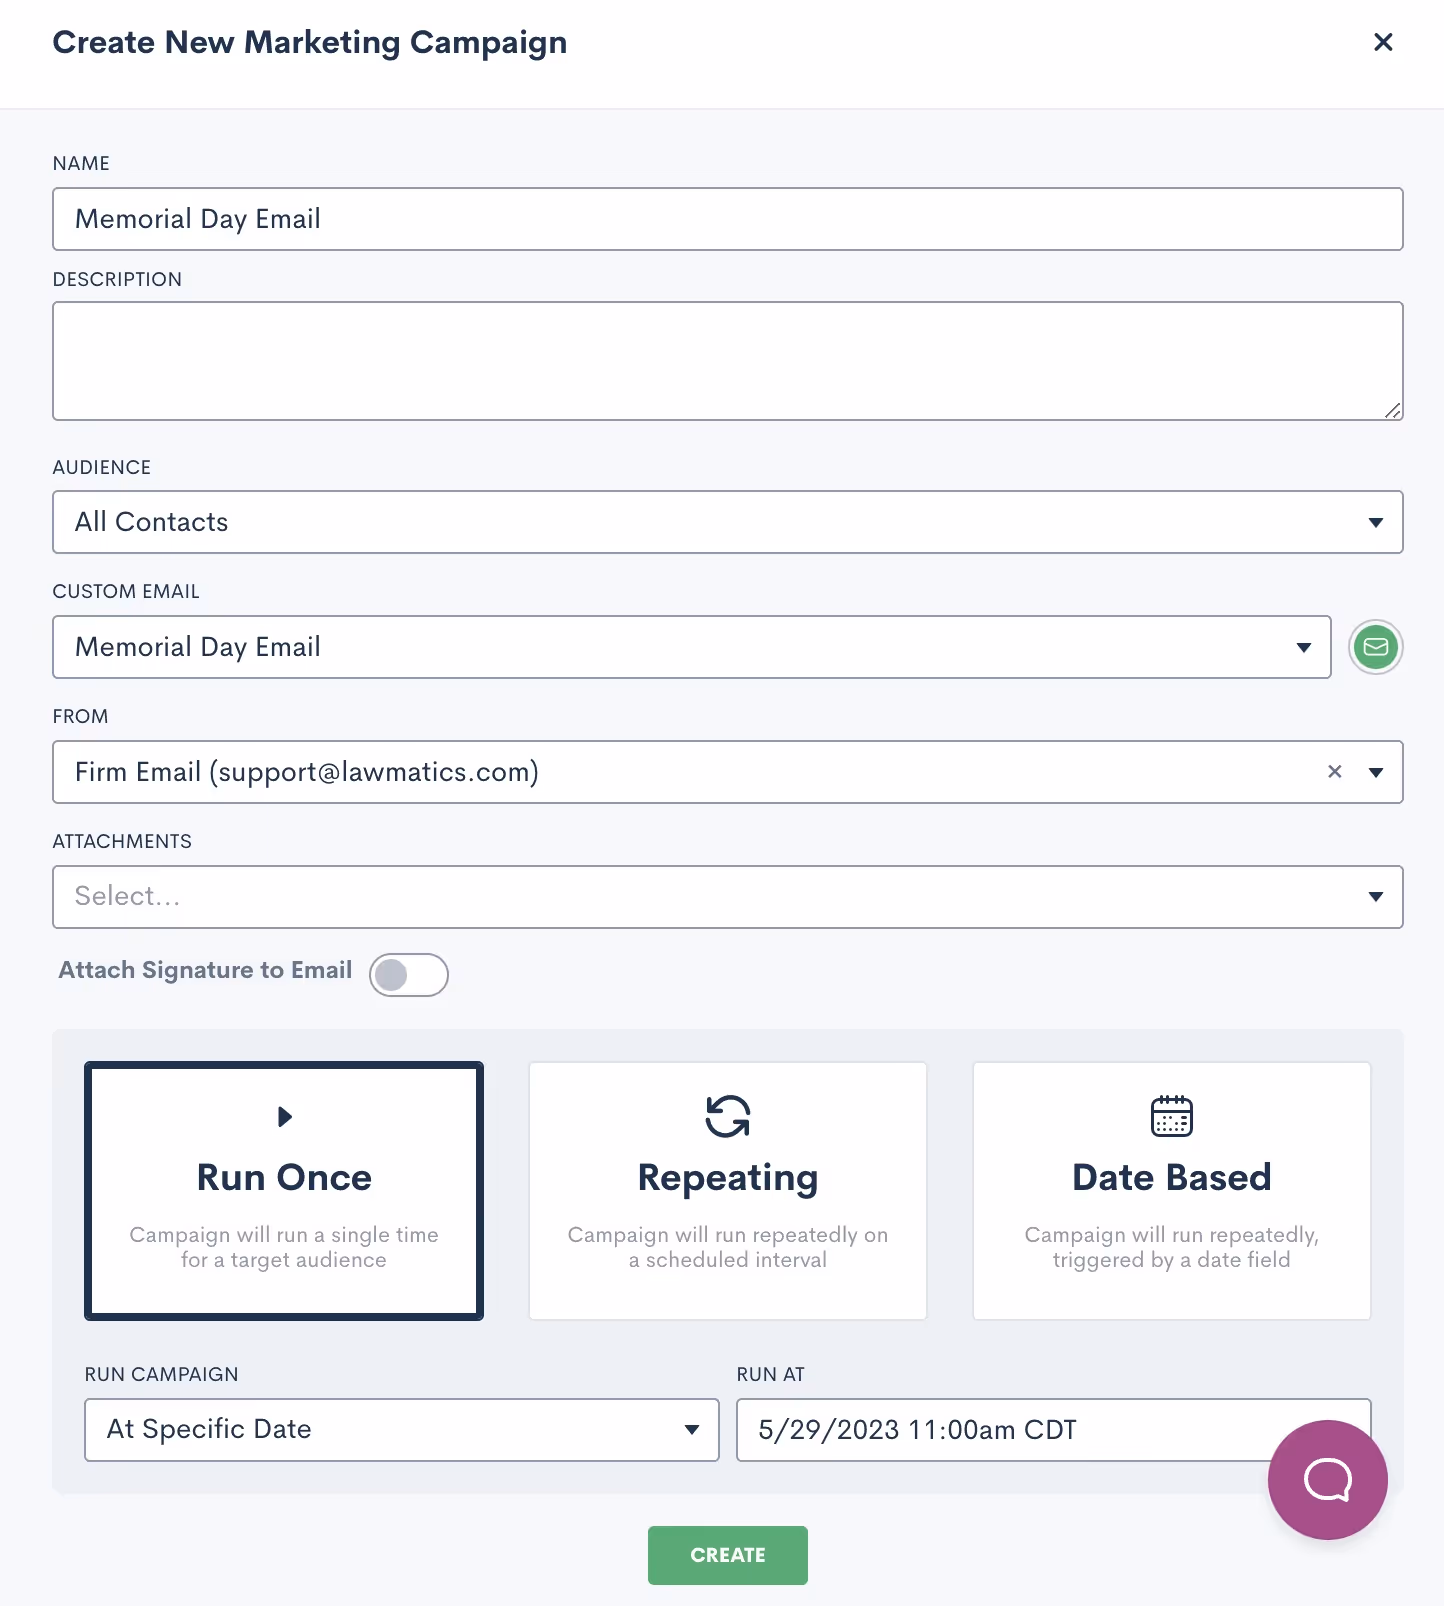
- When this option is selected, you will not need to manually activate the campaign to send the email. Rather, the email will be sent automatically at the date and time that you have selected on the calendar. All you need to do is hit the Create button, and then the email sends automatically on the correct day.
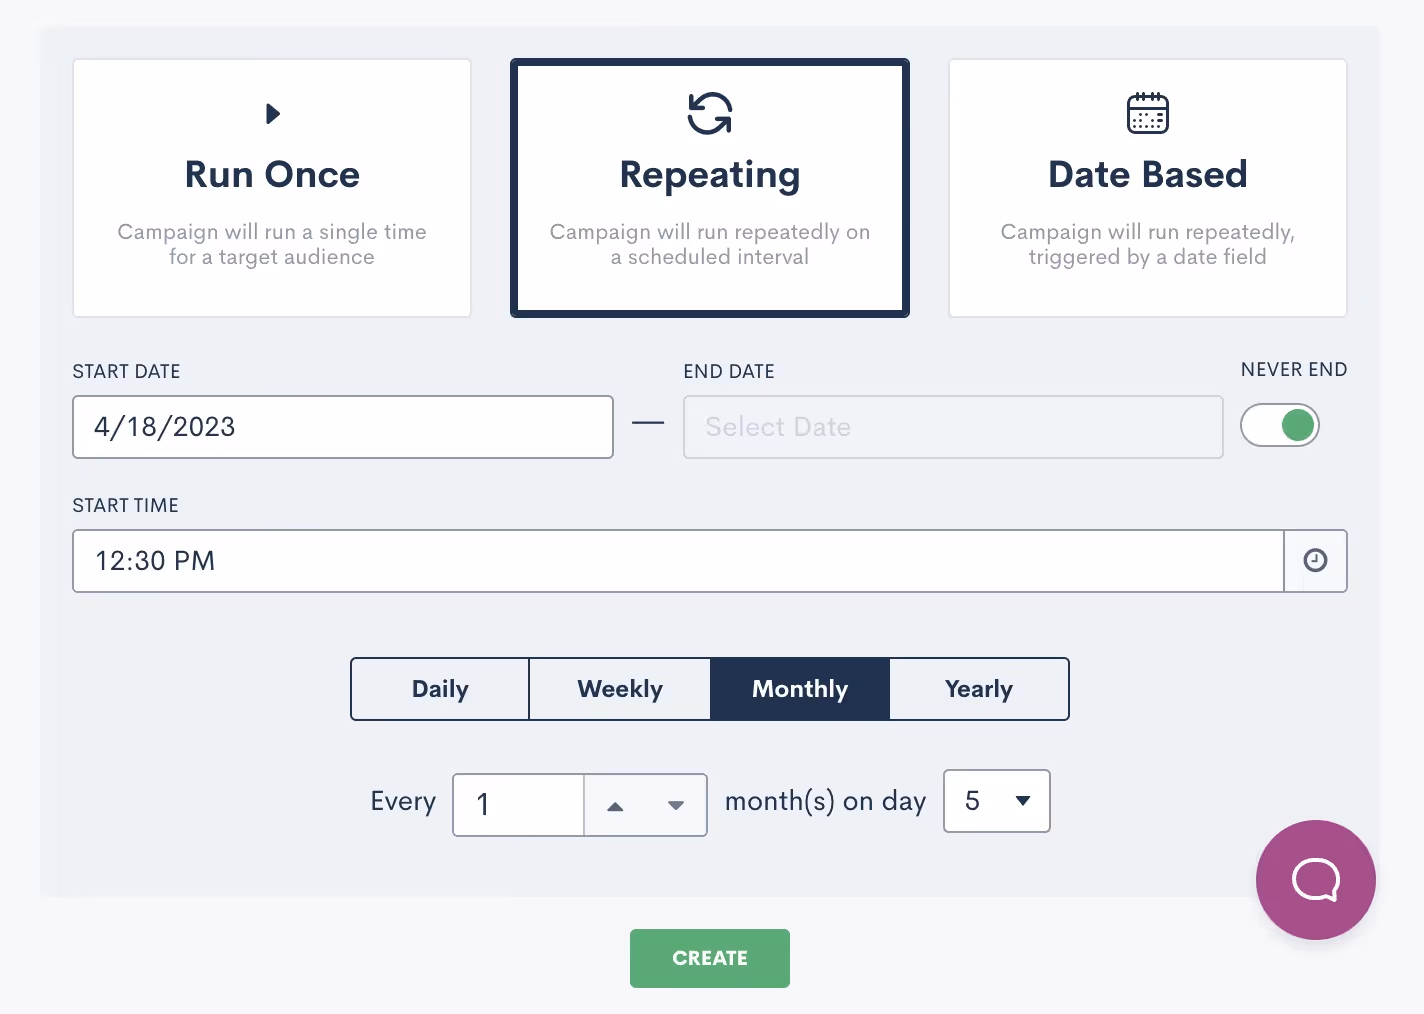
Repeating
The key thing to remember when creating a Repeating email campaign is that the same email template will be sent on a repeating interval. With that being said, this does not work for newsletters or holidays, since those emails will be different each time.Repeating campaigns allow you to create a custom schedule for sending a particular email on a recurring basis. When you select Repeating, you will be able to set the custom schedule for the campaign.
Date based
Finally, Date Based campaigns are your method for sending out birthday or anniversary emails on a particular date that is unique to each contact.
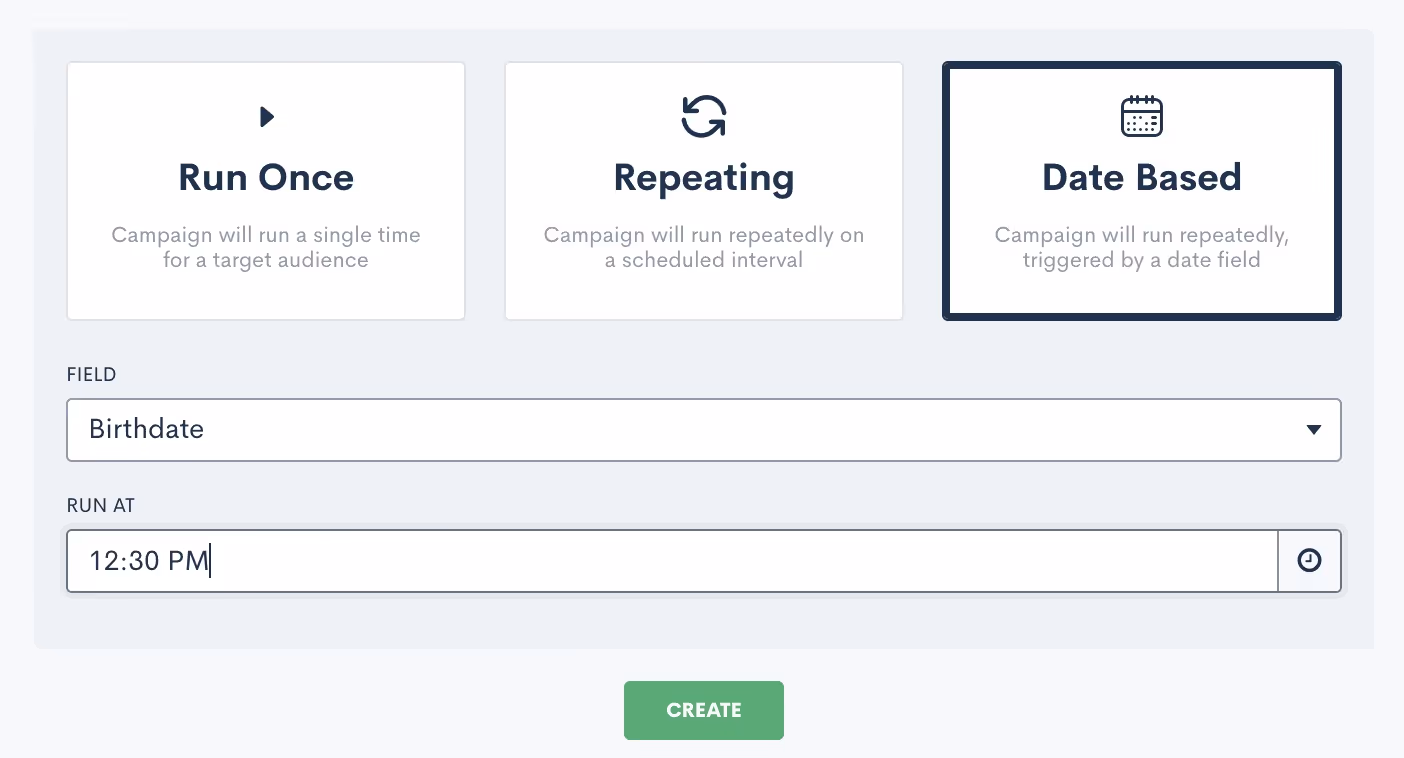
After you select Date Based, you will need to select which field should be used for the date for this campaign, I’ve selected Birthdate above. You will be able to select from any date type fields in your CRM, including custom fields. Note that if you have selected an audience of contacts, as opposed to matters, you will not be able to select a matter field as the date field for this campaign.Once the campaign is active, it will start sending the email on the appropriate date for each individual at the specific time you have selected.
Track campaign performance
One of the main reasons to use an email campaign to send out your firm's marketing emails is to track the performance of each campaign. This includes bounces, opens, and clicks. To view the stats for an email campaign simply click on the name of the campaign to open up the campaign details. You will then see a page similar to the one shown below.

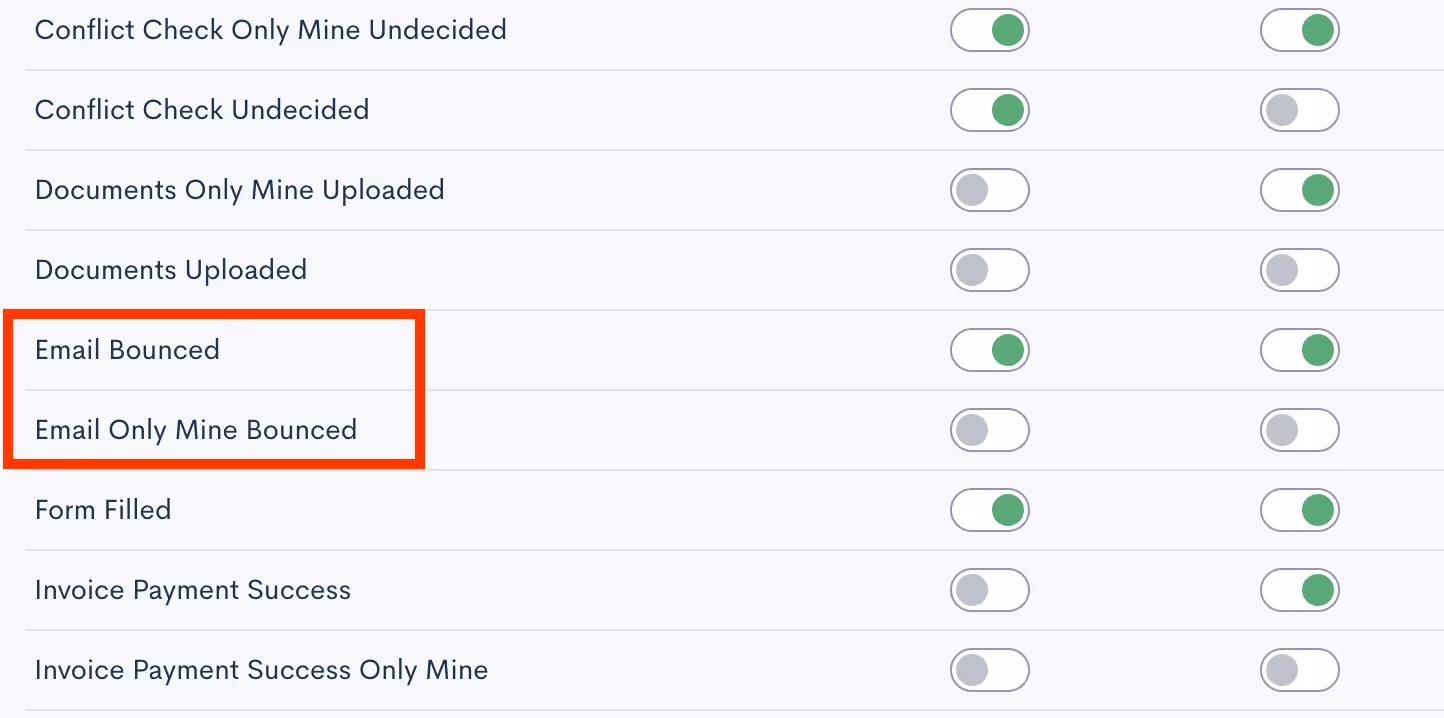
For run once email campaigns you will be able to view your stats as soon as the campaign has been activated and the email has been sent. This could be from manual activation or from a scheduled send. If you check the stats immediately after the email is sent, you will get a good indication of the delivery/bounce rate, but keep in mind that the additional stats like opens and clicks will be logged over time as the recipients open or click on any links in the email. With repeating campaigns, keep in mind that your stats will not necessarily appear as soon as you activate the campaign, since these campaigns will be running on a specific interval over a period of time. Also remember that with this type of campaign, you may see the same contacts listed several times in the stats, since they are receiving the email repeatedly.With date based campaigns, you will generally see the stats slowly tick up after you have activated the campaign. By definition, your recipients in this type of campaign will only receive the email once a year on the appropriate date for them, so as time passes more recipients will have received their email. When it comes to emails bouncing, you may choose to be notified of email bounces in the platform so that you can be sure to correct an invalid email when possible. To enable this notification go to the Notifications page in settings, then choose either the Email Bounced option to be notified of all bounces, or the only mine option to only be notified of bounces on an email sent from you.
Now that you know how to access your campaign stats, it’s important to take the next step of analyzing and interpreting these metrics to make informed decisions for future campaigns. Pay attention to the time of day the email was sent, the specific filters on your audience list, and the type of content in the email to see what generates the highest engagement rate.As you discover what works and what doesn’t, feel free to incorporate those findings into your future email campaigns for improved engagement and overall results!
Conclusion
Promotional email marketing is a great way to keep your firm top of mind among your target audience. With Lawmatics, you’ll find that you can implement professional-seeming email campaigns with no additional financial investment and very extra little time investment.Lawmatics has also taken things a step further and provided you with the ability to monitor and track all of your email campaigns. Without the ability to track your marketing efforts, you’ll never know which ones to invest further in or which ones to ease off of. This feature alone is one of the many things that distinguishes Lawmatics from many of your other options.Say goodbye to piecemealing multiple marketing softwares and setting up complicated zaps and integrations. Lawmatics has everything you need to master promotional marketing all in one platform.
Register for upcoming Monthly Deep Dives here.
From consultations to court dates to signing meetings, you undoubtedly schedule a plethora of appointments with potential clients. Lawmatics has all the tools you need to facilitate a smooth process, from the initial booking to confirmation, reminders, and post-meeting correspondences.While you may know that all of these tools exist in Lawmatics, you may not yet be using them all to their full potential. We are thrilled to share this deep dive into every aspect of appointment in Lawmatics.
Calendar Sync
Before you even begin booking appointments, we first recommend that you sync your external calendar to Lawmatics. Note that this is an individual user setting, so each of your firm’s users can connect their own calendar account. By initiating this sync, you permit that any of your appointments booked via Lawmatics to seamlessly sync onto your external calendar. The sync eliminates any need for you to be hopping back and forth between multiple calendars, such as your Google Calendar or Outlook and Lawmatics, when booking an appointment.To sync your Calendar to Lawmatics:
- Navigate to the Settings page in Lawmatics by clicking the gear icon near the top right of your screen.
- Select Calendar from the left sidebar. If you have not yet synced your calendar, you will see options to sync for each calendar provider.
Once you have walked through the necessary steps, your page will look similar to the one shown below.
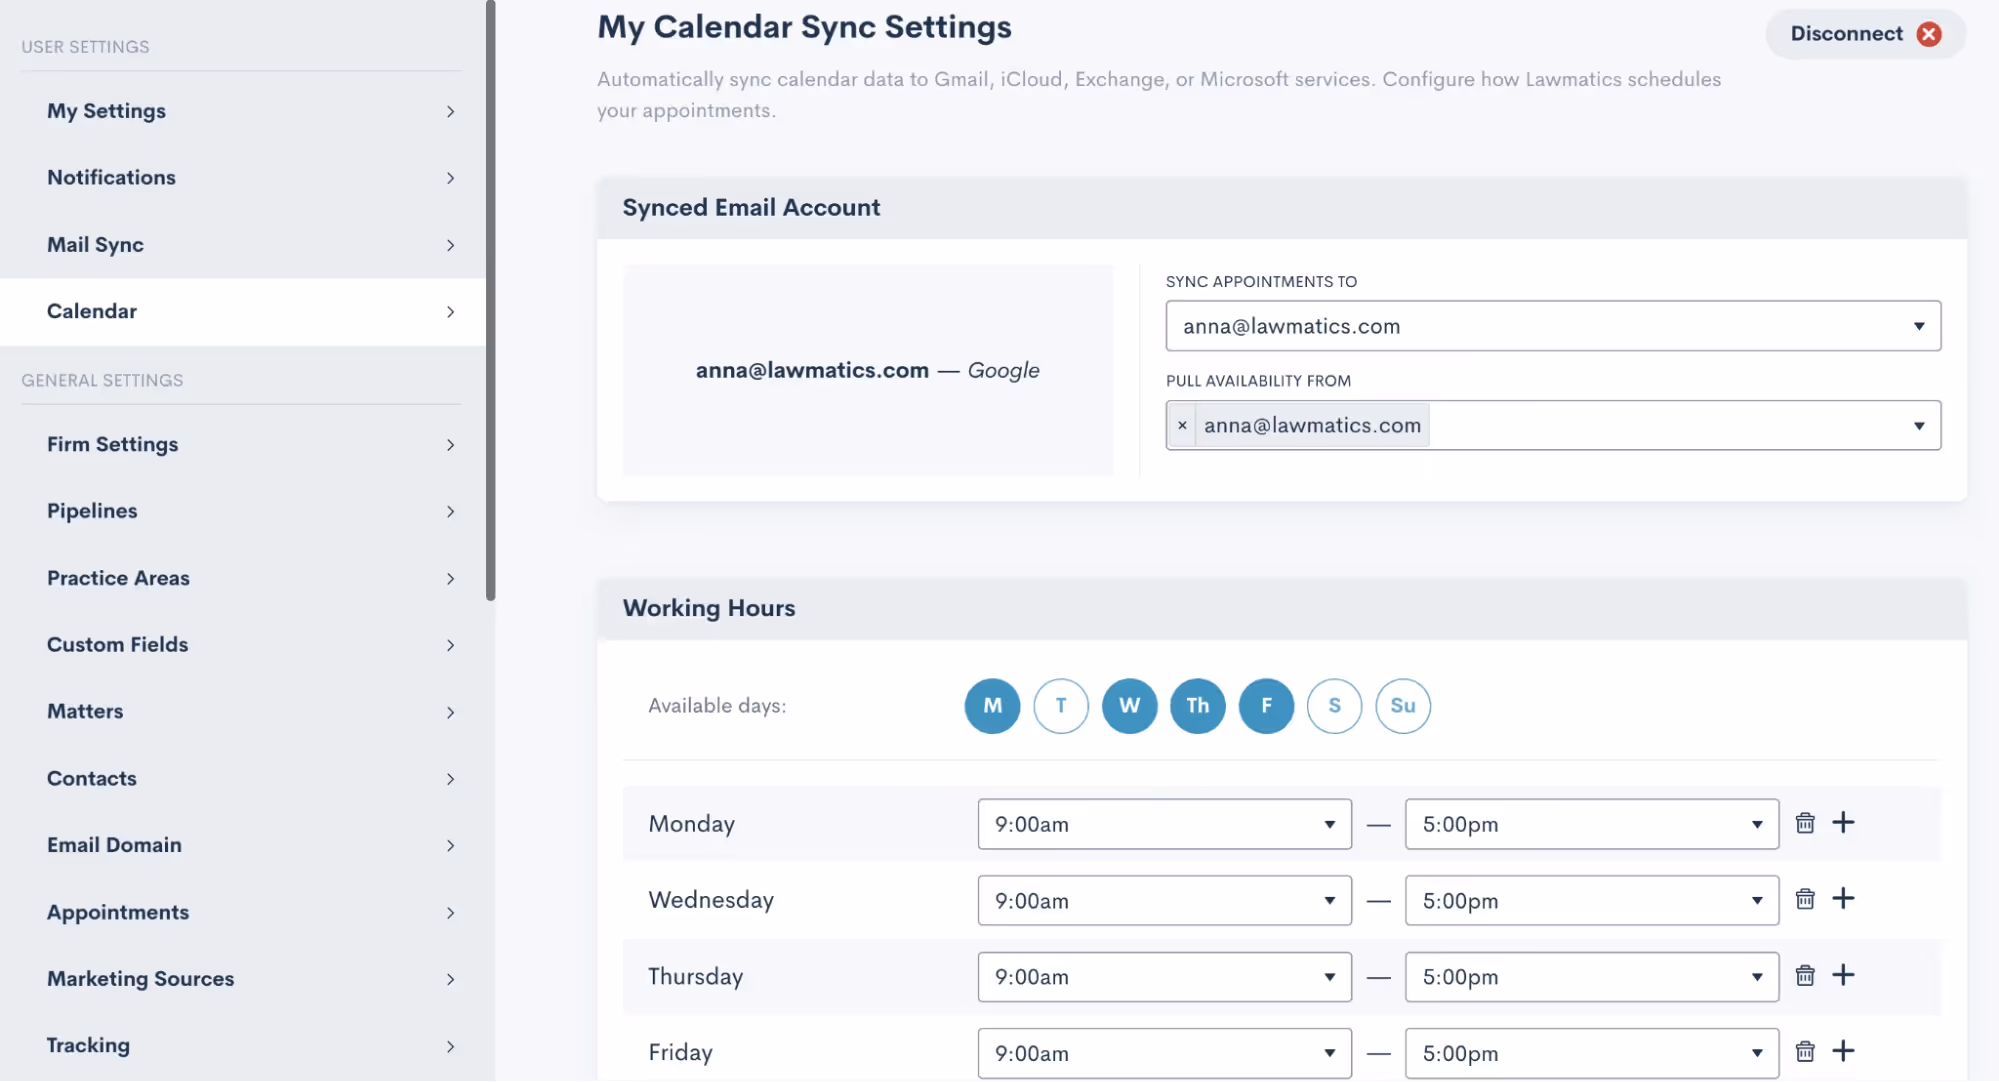
From here, you can easily select your availability hours as well as Buffer Time, Lunch Hour, and other availability settings. These options will come into play for our automatic scheduling, which we’ll discuss more later.
Appointment Settings
In addition to syncing your calendar, there are a few other settings relating to appointments that you’ll want to get squared away. Select Appointments from the main settings menu to get started.First, make sure you create your firm’s various Appointment Types. This is an essential step before you begin booking appointments in Lawmatics. Appointment Types are used to distinguish between the different emails, reminders, follow-ups, etc that are used for each different type of appointment your firm may hold.
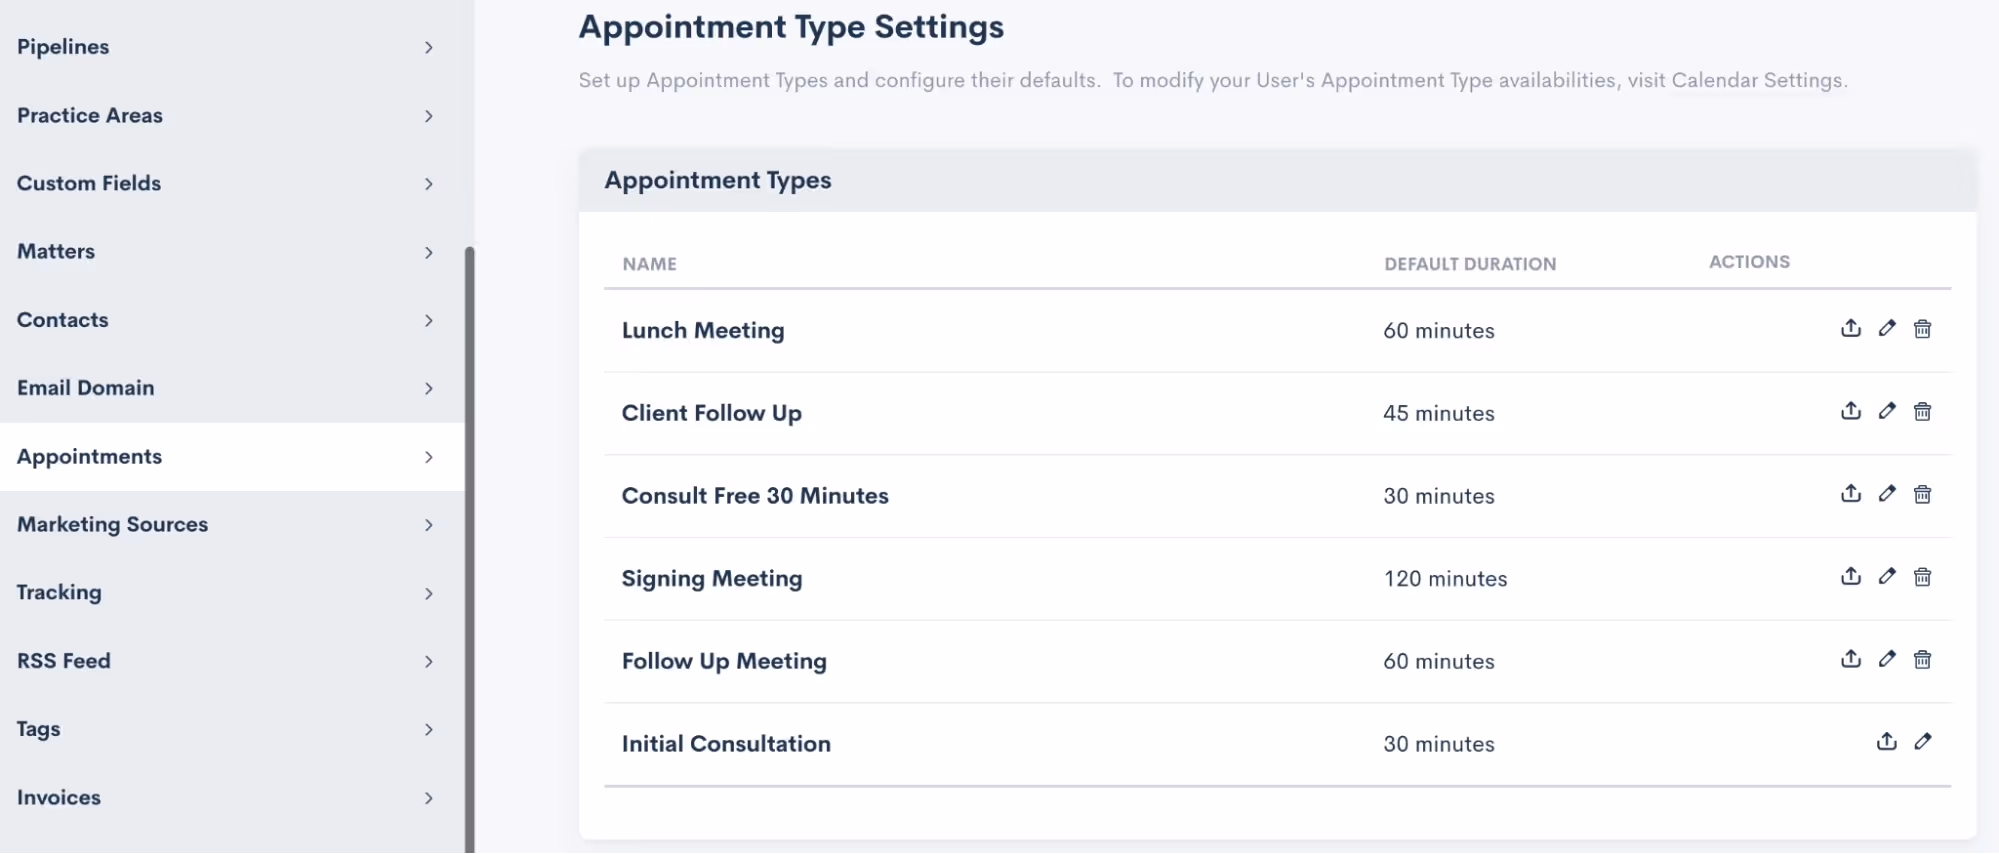
Note that these are completely customizable and can be edited or updated at any time.
Scheduling Appointments
Now that you have synced your calendar and set up your appointment types, you are ready to start booking appointments in Lawmatics. Within the platform you will find many different ways to go about scheduling your appointments. Throughout your intake process you may wind up using some combination of these methods. Let’s walk through each of them.
Calendar
The first and perhaps the most obvious way to book an appointment is from the Calendar, found under the CRM tab. Simply select Calendar from the drop down menu, and you will then see a summary of your Lawmatics appointments, as well as your Tasks.
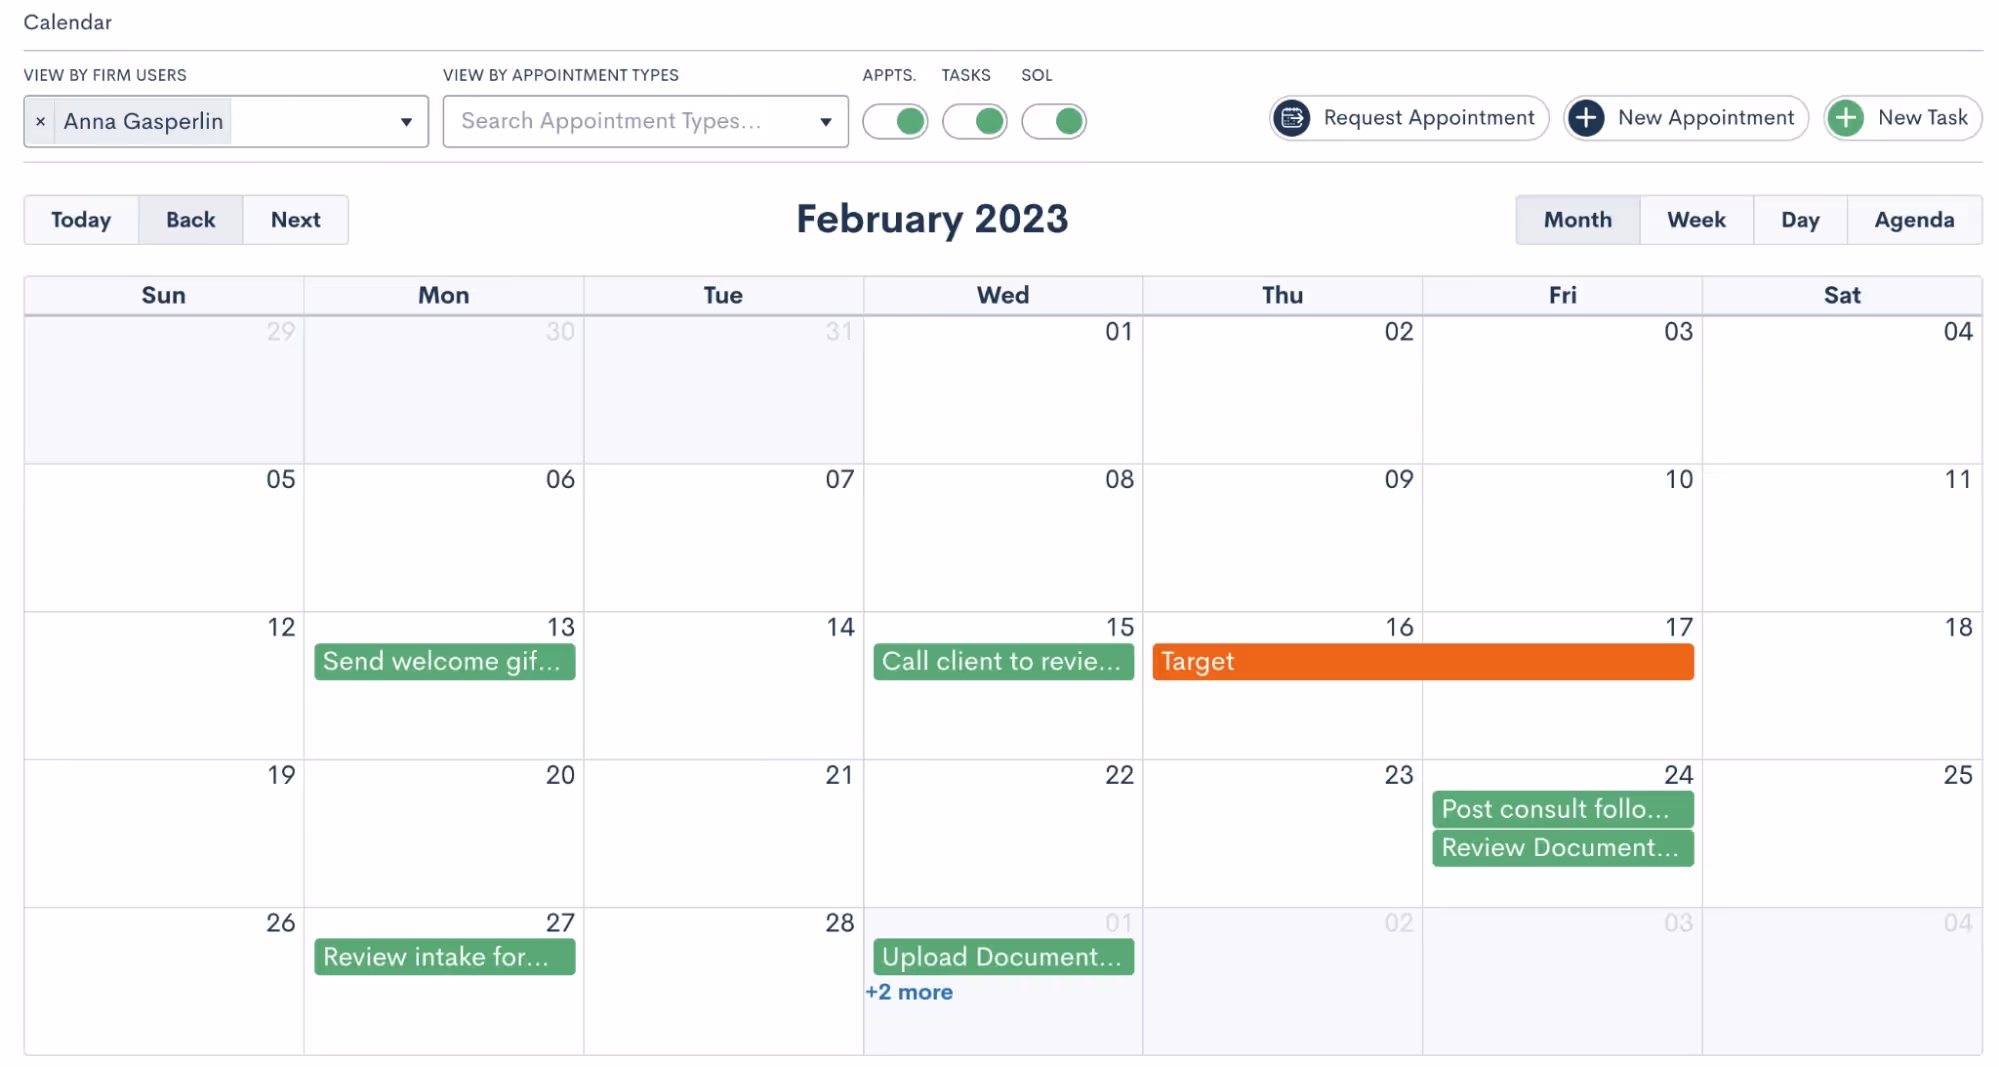
Click on the New Appointment button at the top of the page to book a new appointment. You will then be prompted to fill in details on the appointment and make selections such as the location, attendees, etc. No matter which method you choose to book an appointment from the options outlined here, you will see a similar window when scheduling.
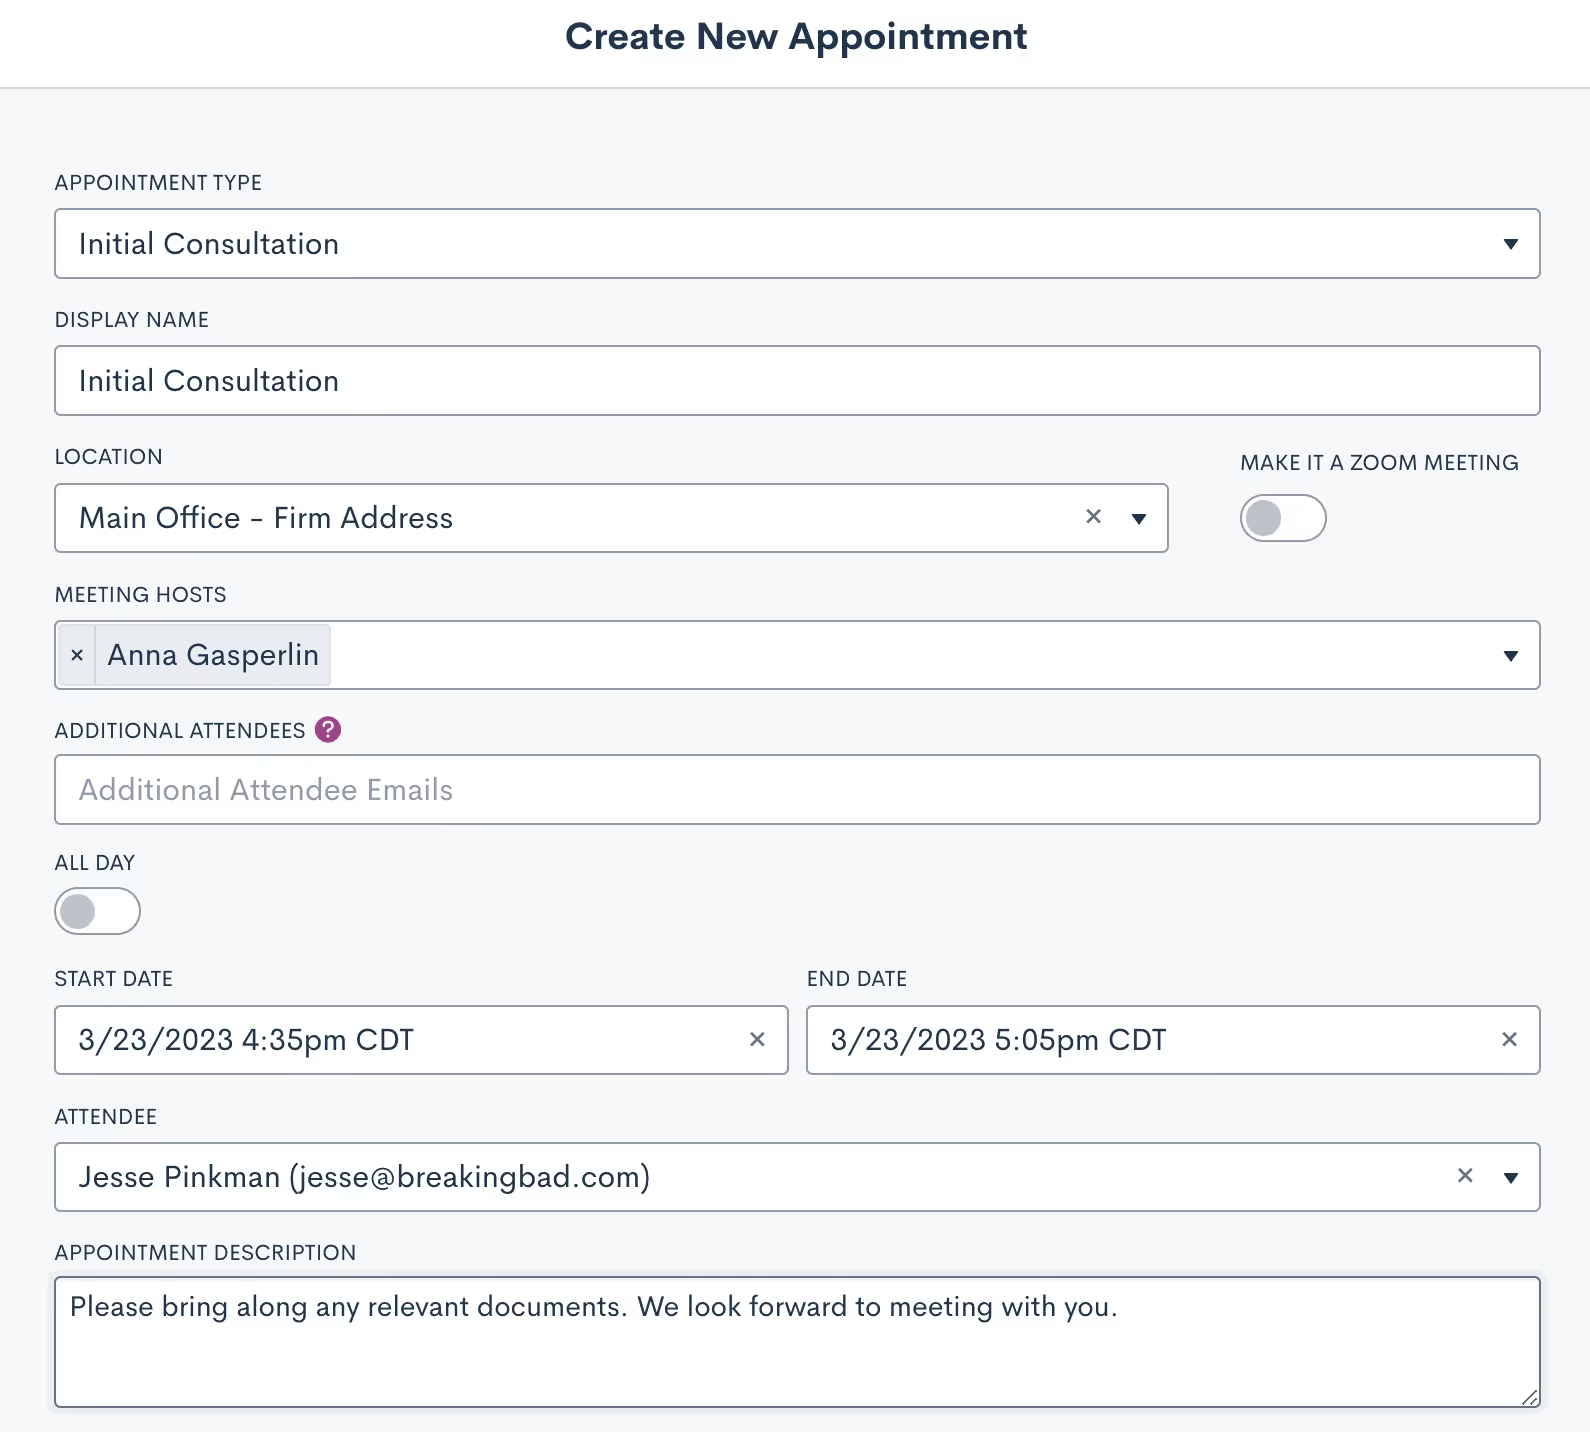
Matter Profile
You can also book appointments directly from a matter’s profile. Simply navigate to the matter using either the search tool or clicking on their name from the pipeline, then click the Schedule Appointment button.
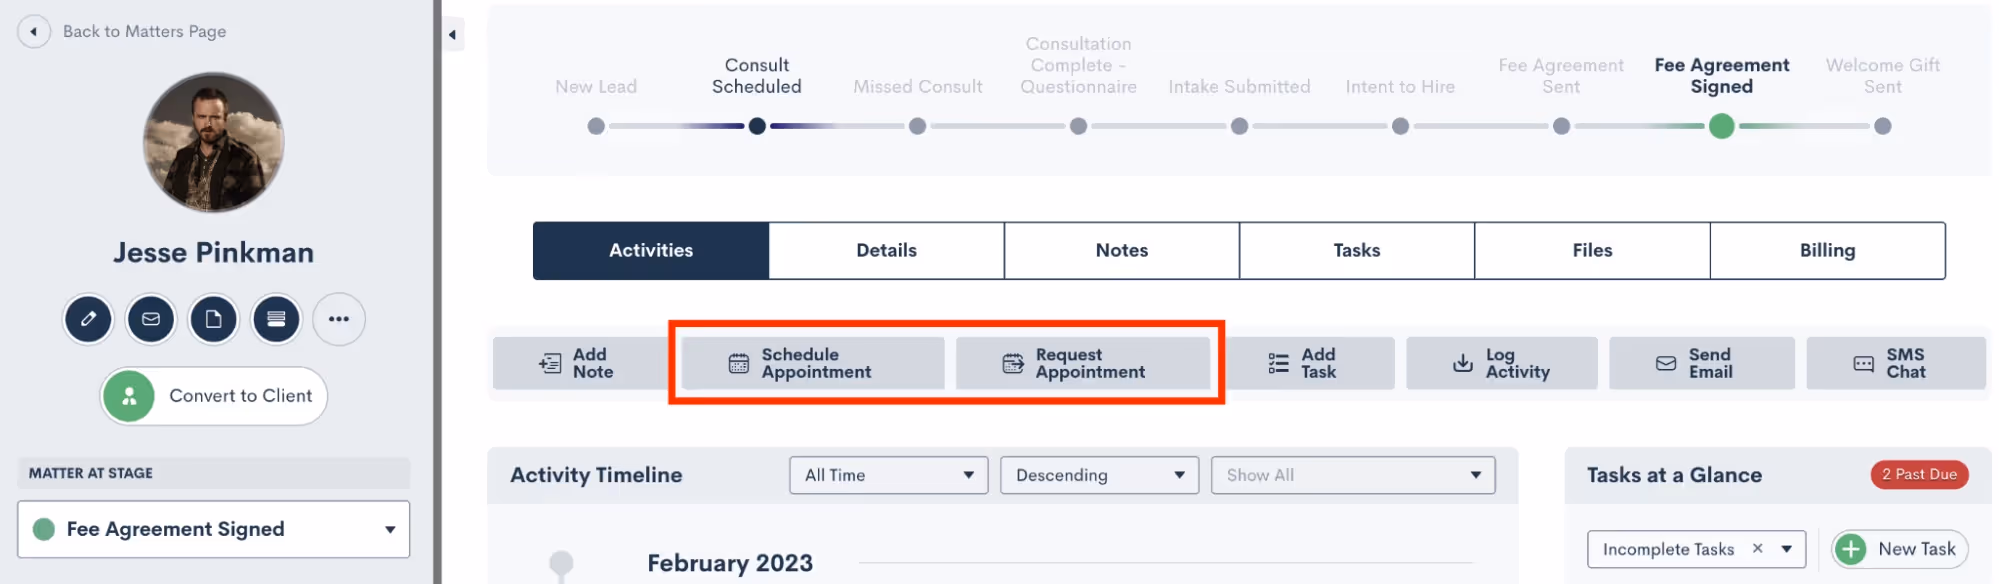
Note that there are two options for appointments, highlighted above. Schedule Appointment allows you to simply choose the date and time and book the appointment. Request Appointment on the other hand sends out a booking link for the recipient to choose their own appointment time based on the host’s availability. Read on to learn more about that feature.
Custom Form
Forms are another common method for booking appointments. If using an internal Form, you have the option to select either an Appointment field, or the Booking Request field, both highlighted below.
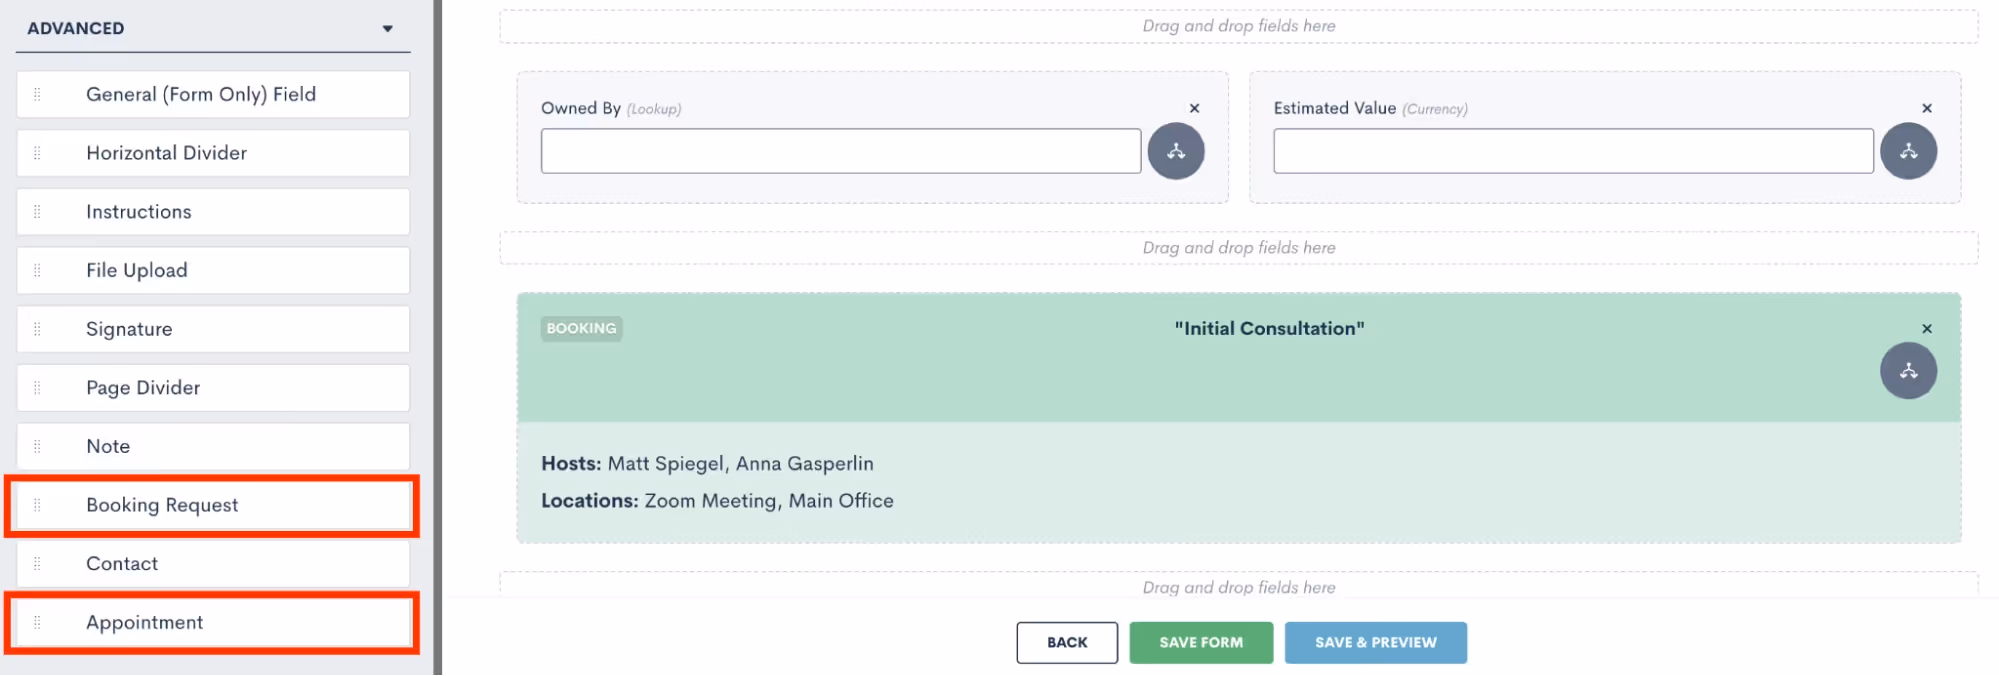
The Appointment can only be used on internal Forms, since it allows the internal firm user to select the exact date and time for scheduling the appointment. The Booking Request option gives the client the chance to schedule for themselves based on the host availability.
Booking Form
A Booking Form is similar to a Custom Form but with one exception, it will always contain a booking request whereas this is merely an option on a Custom Form. This scheduling method is great for embedding on your website, since it can simultaneously capture a new lead and prompt them to schedule their own appointment.

Bonus: Use a booking form with our new Payment Gateway feature to easily collect a consultation fee
Booking Link
Last but not least, you can also use a simple Booking Link to allow leads or clients to book their own appointment. Booking links are generated from the Appointments page in settings, click the arrow icon (visible on the far right for each appointment type) and then make your selections as shown below.
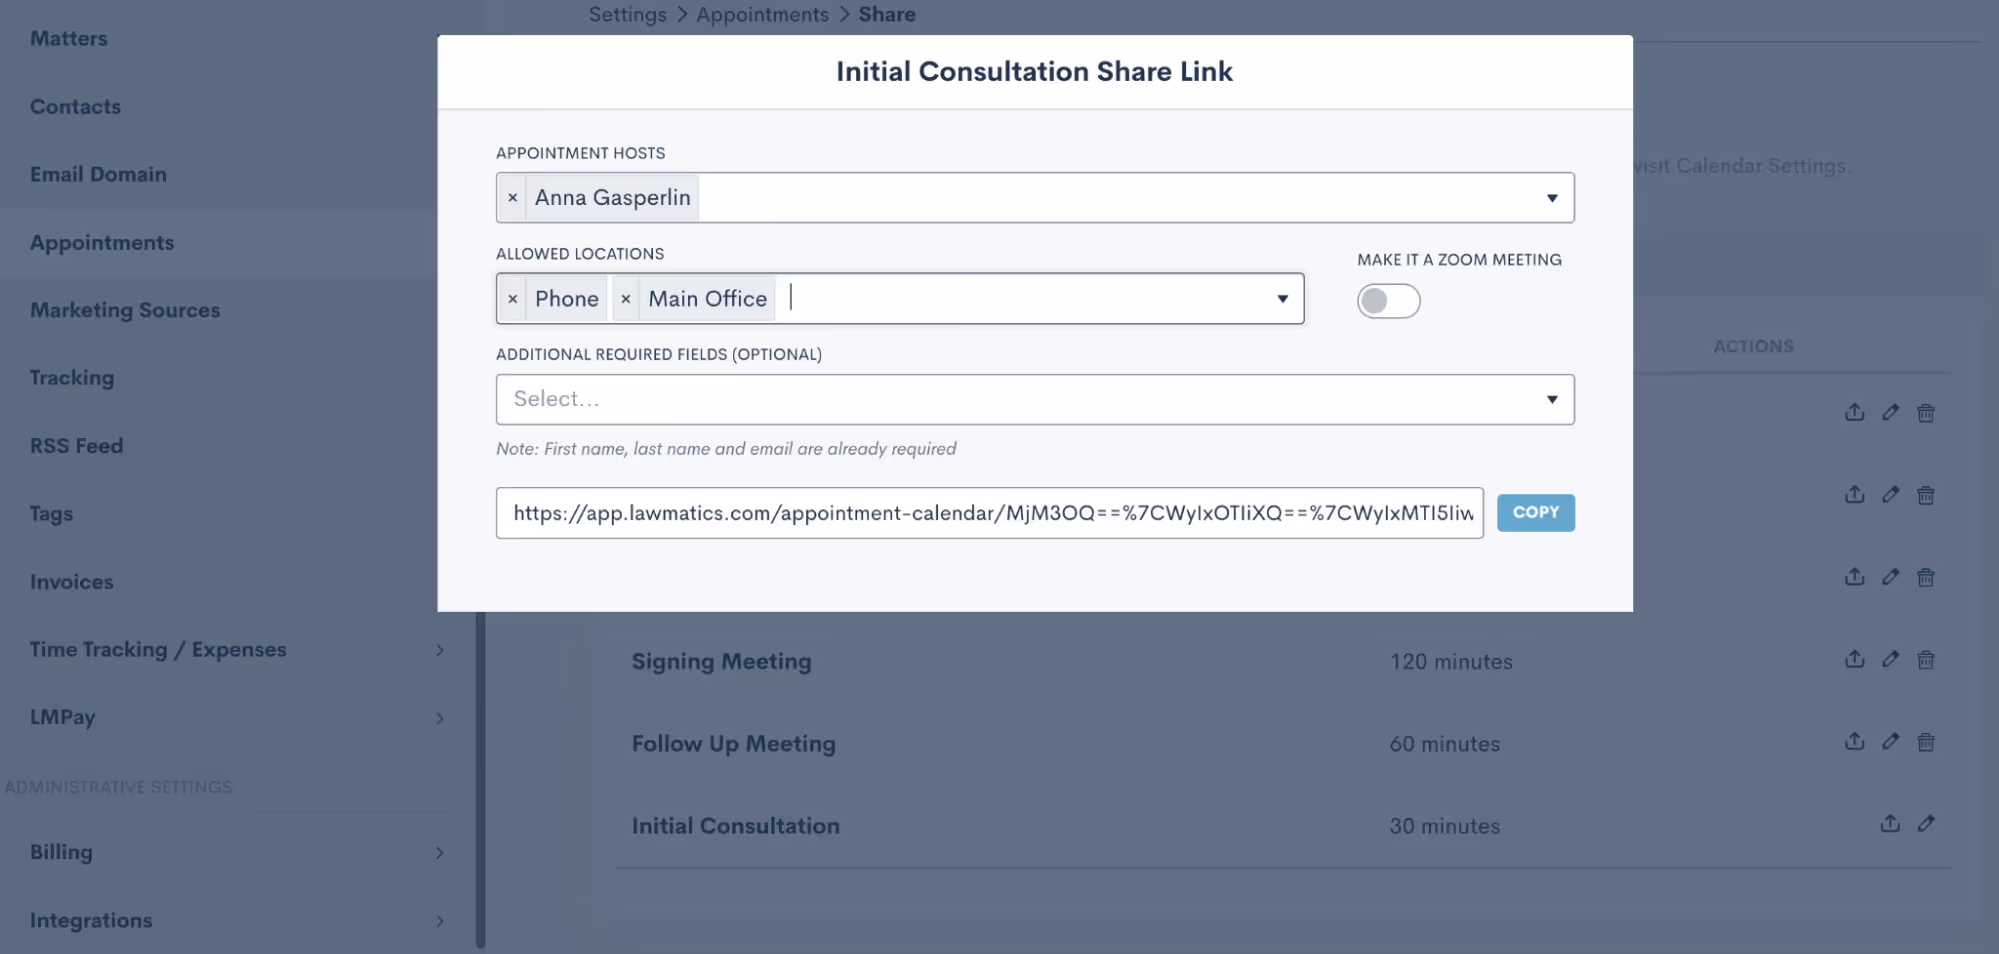
This link could be used in an email template, connected to a button on your website, or even used internally.
Confirming Appointments
Now that you know the ins and outs of booking appointments, it’s time to dive into the client experience side of things. Your leads and clients will absolutely love the experience of receiving an instant email or text message after they schedule letting them know that everything is confirmed and sharing any other pertinent details.While you may be accustomed to using an Appointment Automation to confirm appointments, we’ve made this even easier with our new default confirmation option — no need to build a dedicated Automation any more. When you navigate to the Appointments section of the Settings menu, you now have the option to create a Custom Email and/or SMS template for confirming each of your various appointment types. This confirmation will be sent automatically at the time the appointment is scheduled.
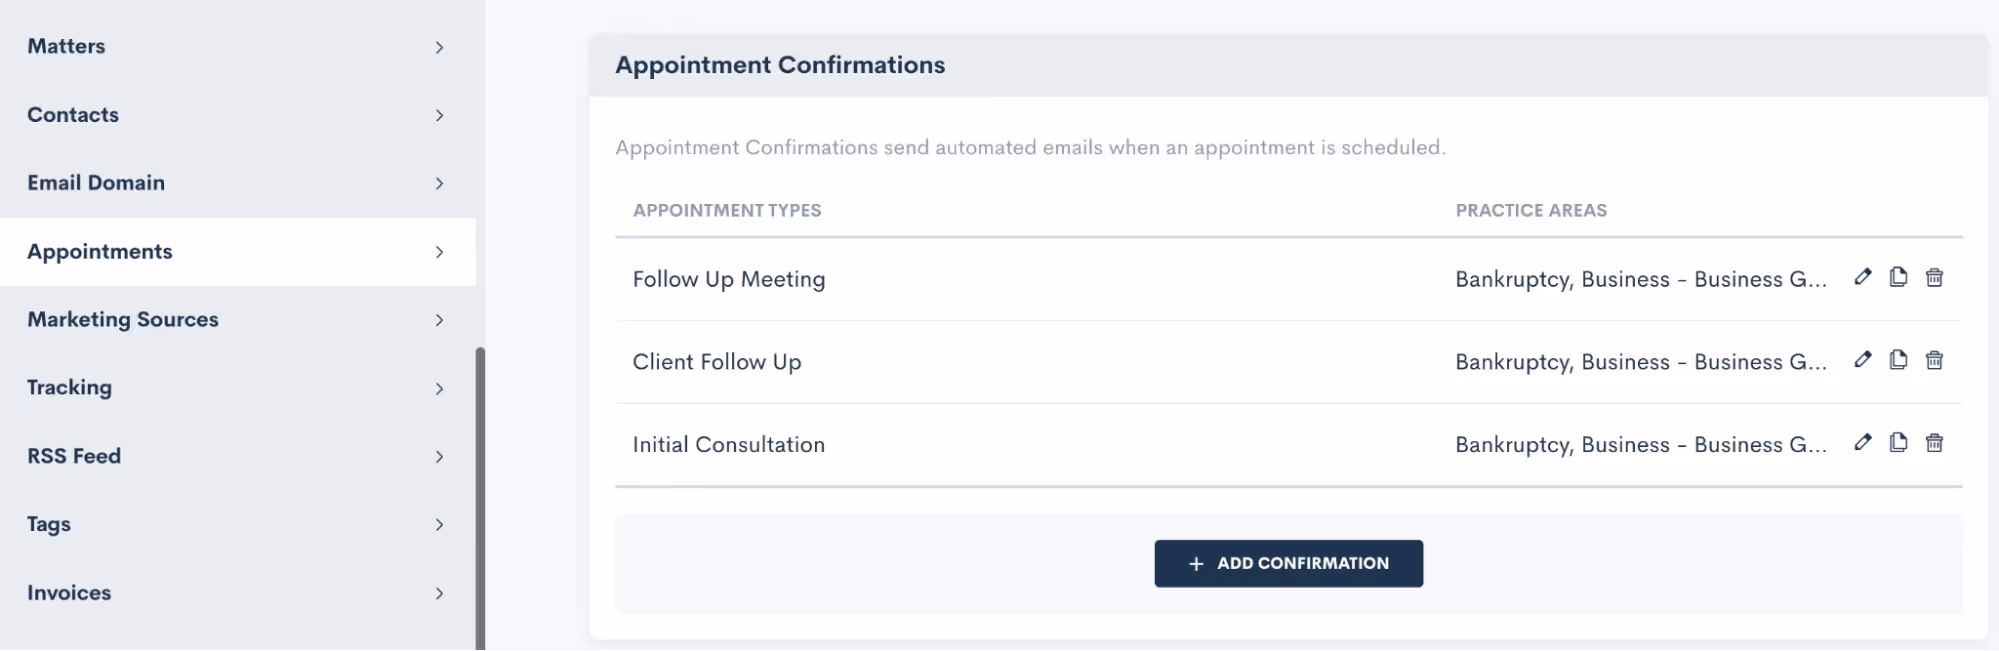
When setting up your Appointment Confirmations, you can create your own custom email template (along with any merge fields) and/or create a text message template as well.

Make sure to select which appointment type(s) your confirmation applies to, as well as any practice area limitations that should apply for this confirmation. This setting allows you to easily set up various confirmation messages for different appointment types, without needing to create a bunch of separate automations.
Appointment Reminders
Similar to Appointment Confirmations, Appointment Reminders are also now set up on the Appointments page within settings. While you still have the option to use appointment Automations for sending out your reminders, we have made it much easier with this new built-in setting.Much like with appointment confirmations, set up your appointment reminders for each appointment type.
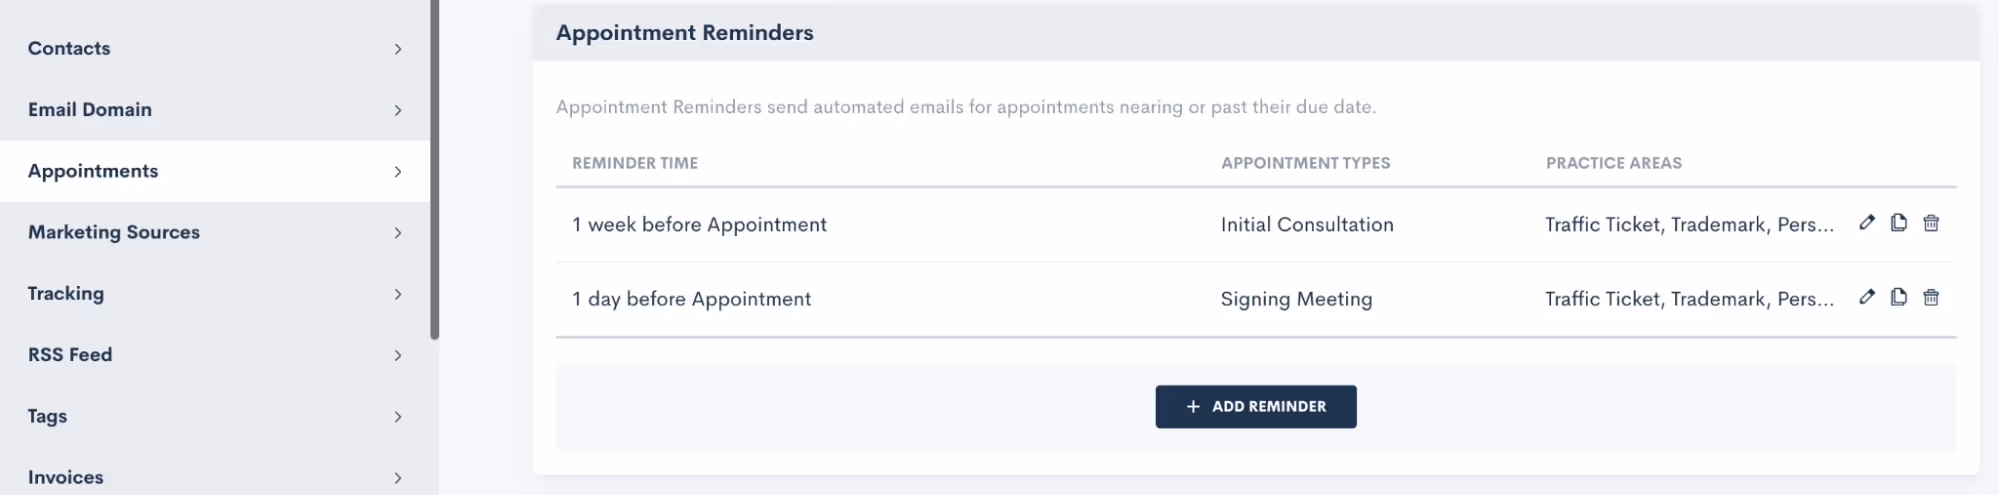
Additionally, you may also set up multiple reminders for a single appointment type if you wish to have reminders go out on multiple time frames, such as 1 week before, 1 day before, etc.Once again, you no longer need to build any Automations for confirming or reminding of your appointments. These simple settings will handle everything!
Rescheduling
In a perfect world, all clients would show for all of their appointments as scheduled. But unexpected conflicts do arise and thus rescheduling is often unavoidable. Thankfully, Lawmatics has simplified this as well.When you use Booking Forms or Appointment Requests, you will always have the option to include a Reschedule option right within the scheduling module. So let’s say someone is booking their appointment. Immediately after they have chosen a date and time, they can simply return to the initial request and select an alternate time slot, as opposed to booking a new appointment all together.

Above you see an example of the Reschedule Setting option within a Booking Form. Simply toggle that on to include the Reschedule Link.In addition to using the Reschedule Link on automated Appointments, you can also manually reschedule any appointment by simply editing that Appointment either from the Calendar or from the Matter Profile, shown below.
Note that when an Appointment is rescheduled in Lawmatics it will also automatically be rescheduled to the new time on your external synced calendar. Additionally, any Appointment Reminders that you have set up in your Settings as described above will also run as per the new time. Even if they had already been sent relative to the original appointment time, the reminders will resend based on the new date and time.
Conclusion
Lawmatics can tackle anything you throw at it when it comes to your appointments. A consultation with a new lead is often the first impression they have of your firm, so it is essential to make the scheduling process a smooth one.From automated booking links to customized confirmations and reminders to easy rescheduling, appointments are sure to be a breeze with the help of Lawmatics.


Register for upcoming Monthly Deep Dives here.
No matter the size of your team, Tasks have the power to transform your process flow from clunky and manual to streamlined and automated. In Lawmatics, a Task is exactly what it sounds like: it is a to-do item pertaining to a particular matter that can be assigned to yourself or any other user in your organization. Every Task is created with a status, a due date, and a priority level.Tasks are useful for your whole team to help keep matter priorities and action items organized at all times. When Tasks are well-implemented, they help ensure that nothing slips through the cracks and that all clients have a flawless experience with your firm. Not only will this lead to happier clients and more referrals, but your team will also be happier and more efficient.From Custom Task Statuses, to automated Task Templates, to Automation Triggers based on Tasks, Lawmatics has all of the tools to keep your whole team organized and in the loop.
Tasks Overview
Creating Tasks
There are multiple different ways to go about creating Tasks in Lawmatics. In the next section we will cover how to assign tasks automatically, but first let’s focus on the manual way to create Tasks.Navigate to the Tasks Dashboard by hovering over the CRM tab in the top left, and then select Tasks. Here you will see a clear overview of all of your firm’s Tasks along with filtering options to view Tasks by status, due date, user, etc. You can also toggle between the traditional list view and the Kanban view using the buttons highlighted in red below.
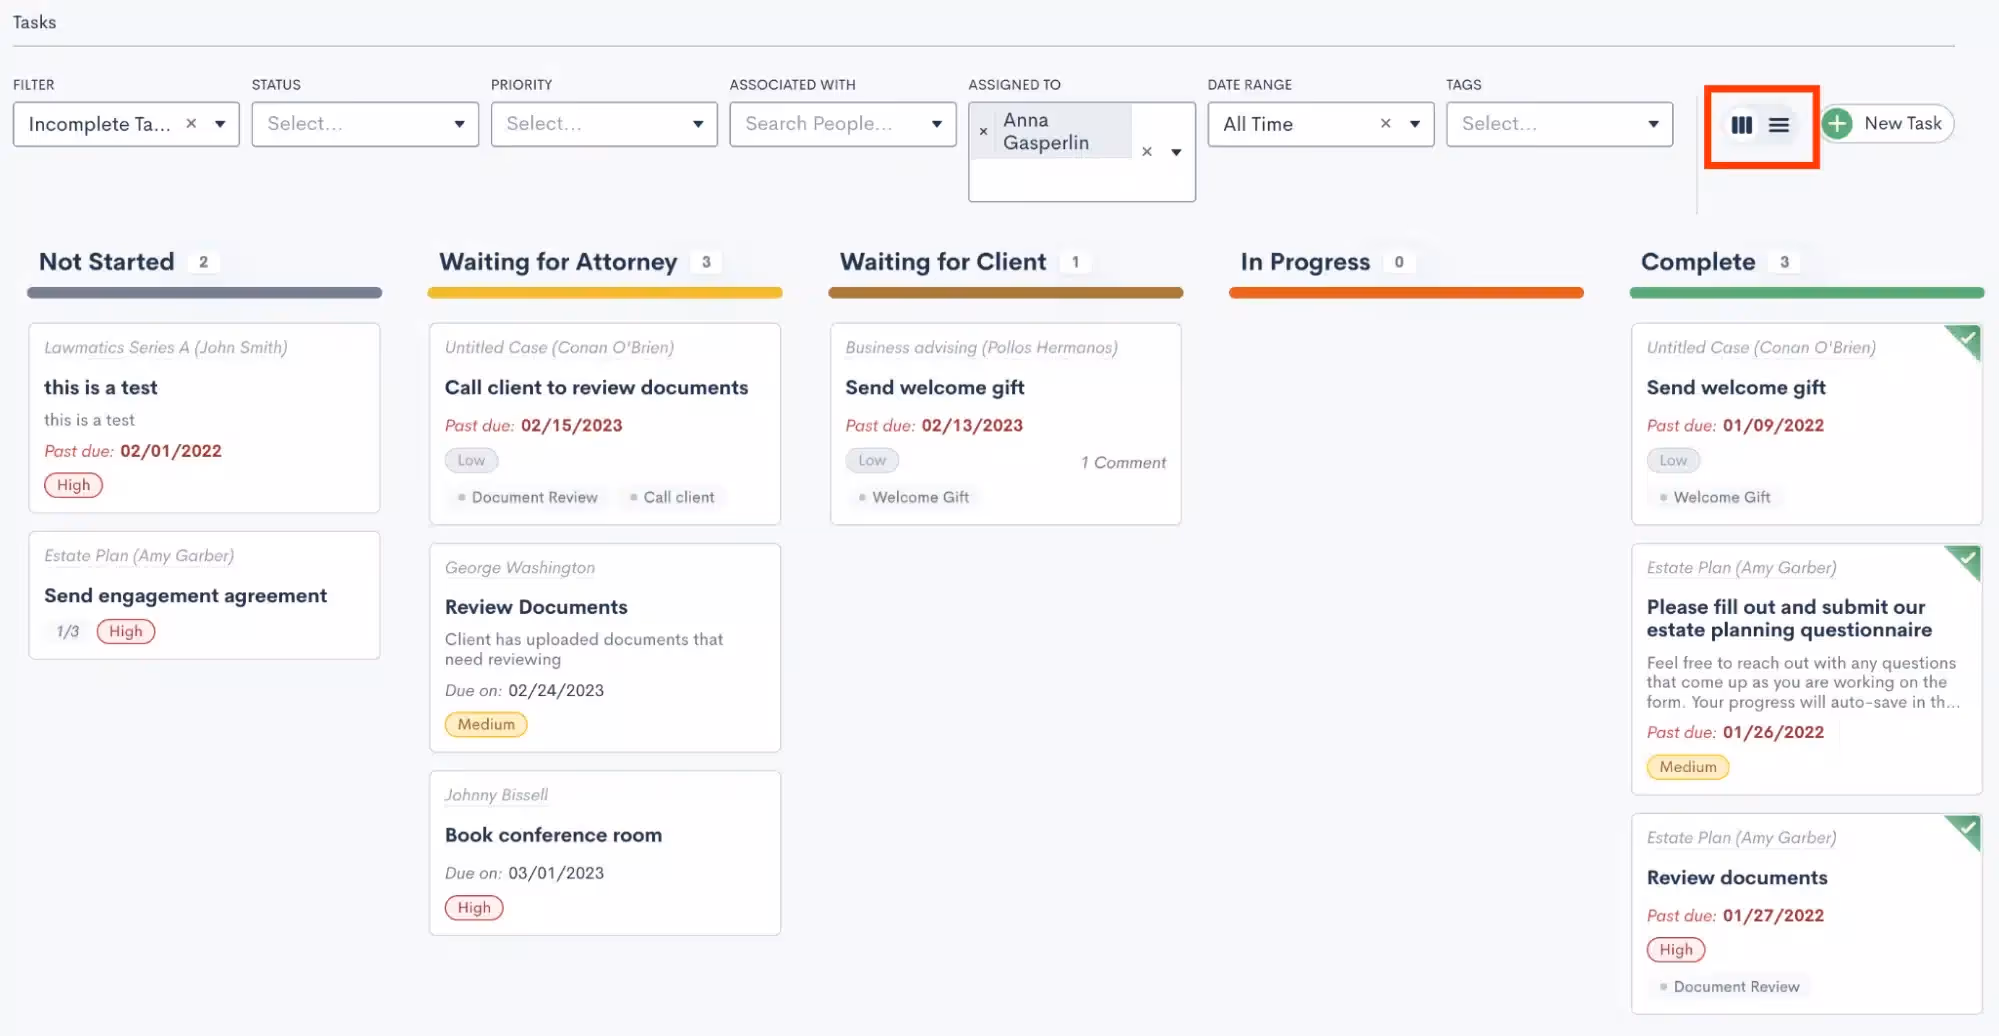
Of course in addition to viewing your Tasks, you can also create new Tasks here on this dashboard. To get started, click the New Task button in the top right corner. You will then see a new pop up that looks similar to the example shown below.
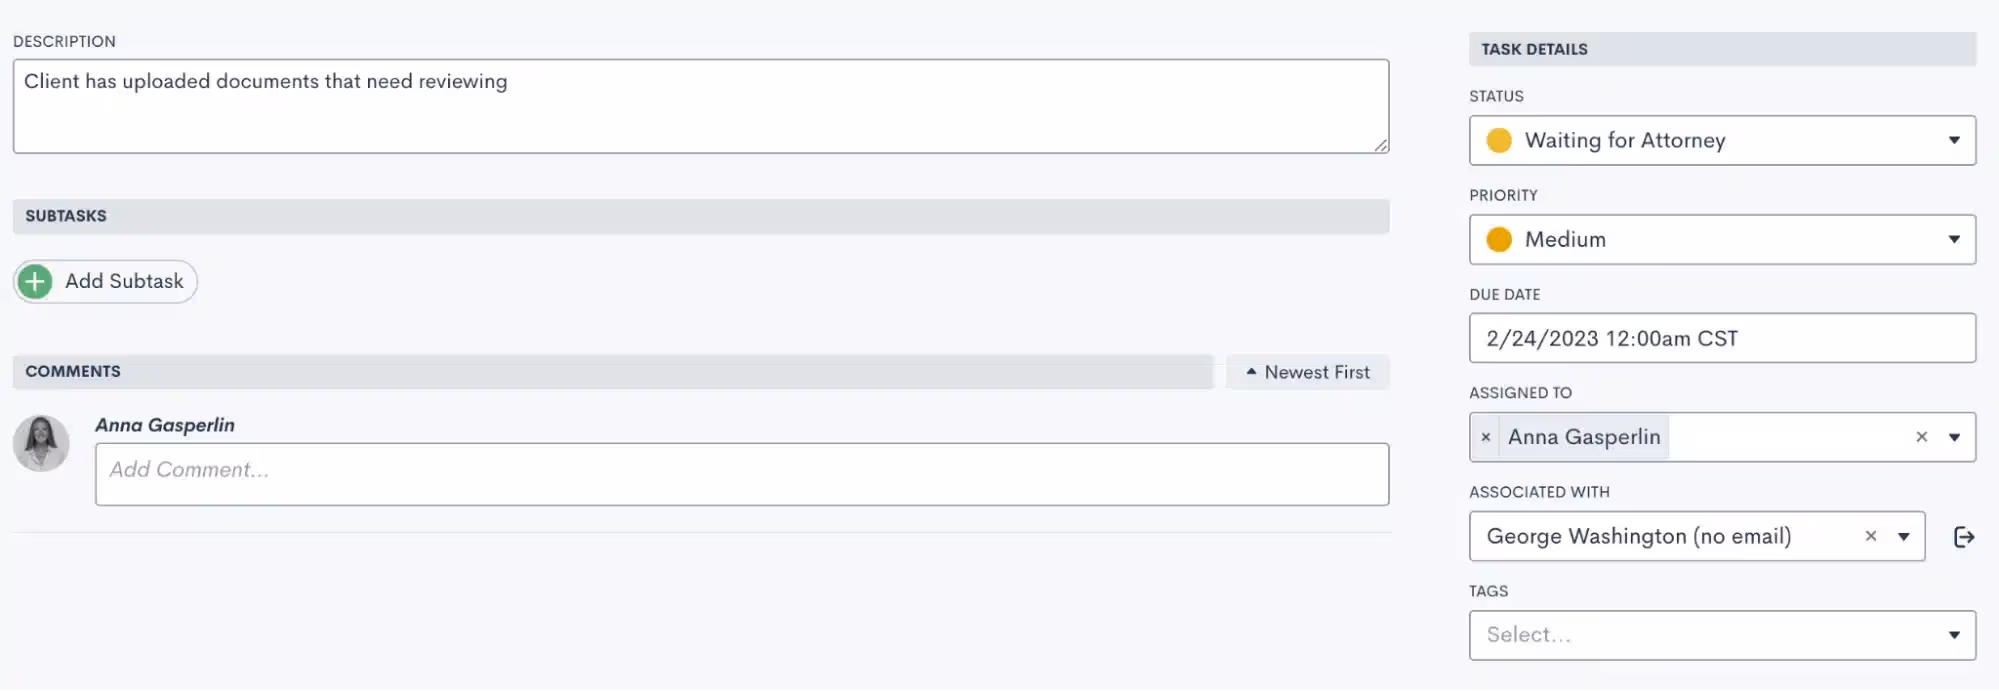
When creating the Task, make sure you give the task a name and a description, as well as the important Task details on the right sidebar menu. Also make sure to select which matter this Task is associated with when creating a task here from the dashboard.Another way to create Tasks is directly from a matter’s profile. When creating a Task this way, you will not need to select an associated matter since it will default to the current matter. Other than that, your steps for creating the Task will be the same as shown above.Simply select either the Tasks tab or the New Task button from the tasks sidebar on the matter’s profile.

Custom Task Statuses
Whether you are new to Lawmatics or just starting to dive into the Tasks feature, you’ll want to make sure you have your Custom Task Statuses set up. These are created in your settings page (gear icon near the top right), and then select Tasks on the left sidebar.Your Task statuses are custom to your firm, and are created by clicking the Add Task Status button shown at the bottom of the image below. You will also see below some sample Task Statuses that may be used for your firm. Once you have created Statuses, use the icons on the far right to edit or delete a Status as needed. Also drag and drop Statuses to rearrange their order.
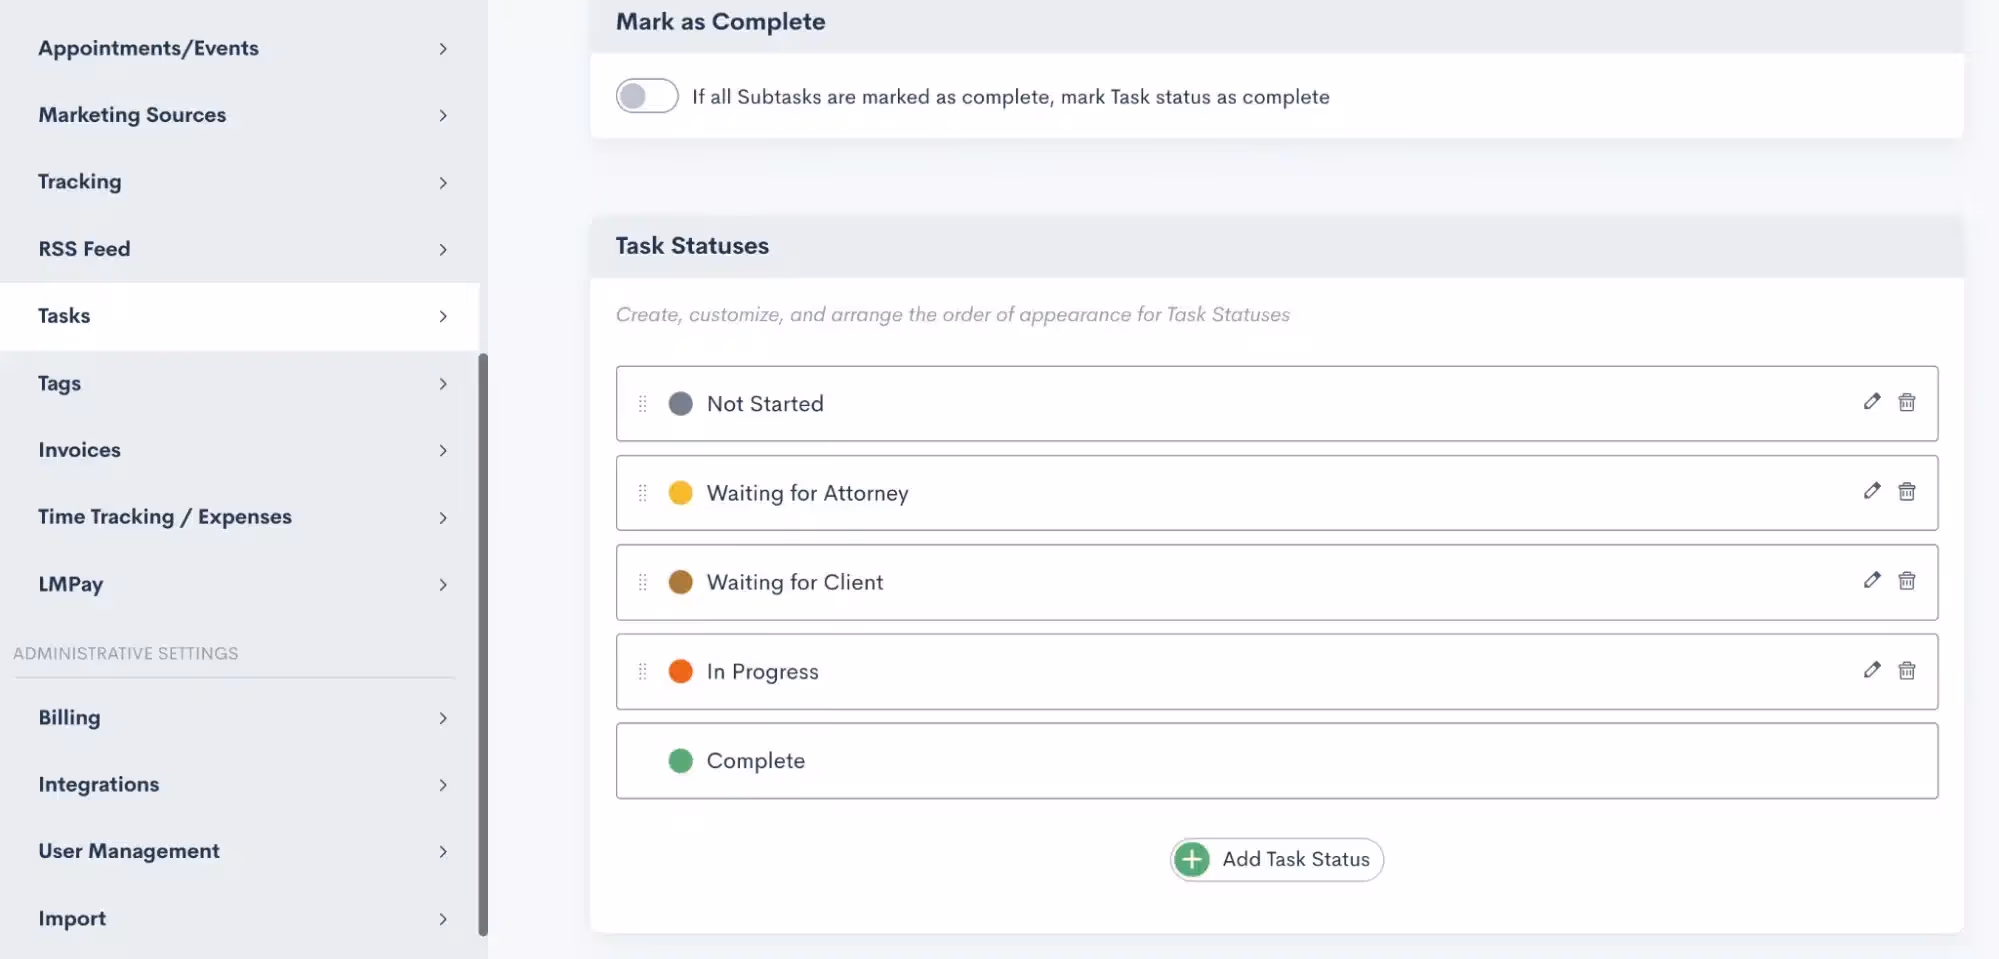
If viewing the tasks dashboard with the Kanban view, each of these statuses will be the column headers. The Kanban view allows you to easily drag and drop tasks between statuses. When creating a task, you will be prompted to select the current status of that task.
Task Tags
Task Tags are used purely for automation purposes; they allow you to trigger Automations when a particular Task is either created or completed. We’ll dive more into the automation piece in the following section, but for now we’ll discuss how to create your Task Tags.First, you can always create and edit or delete Tags by going to Settings, and then selecting Tags from the left sidebar. Note that you will also see your Contact and Matter Tags here too.You can also create a new task tag while creating a task itself. Simply start typing the Tag (as shown below) and then select to create the new Tag as an option.

Editing and Completing Tasks
Last but not least in our Task overview, note that you can make edits to your Tasks at any time either from the Tasks Dashboard or from the associated Matter’s profile. You can also delete a Task in either of these places or mark a Task as complete.

In the image above you’ll see that you can easily access a Matter’s Tasks from either the Tasks Tab, or the Tasks at a glance sidebar. Simply click on the task in the Tasks sidebar to edit, mark as complete, comment, etc.
Task Automation
Entry Conditions
The first way to use Tasks in Automations is to trigger one with a Task. Automations can be triggered based on Task Tags, discussed above. You also have the option to trigger the Automation based on a Task of a specific Tag being either created or completed.

Note that you can use this entry condition along with any of our other entry conditions to create either an AND or an OR conditional relationship with multiple entry conditions.It can often be powerful for your firm to trigger an Automation when a Task is completed. This may kick off another Task to be assigned automatically, or any other step that may come next in your process.
Tasks as an Action Item
Speaking of assigning Tasks automatically, this is easily accomplished by using the Add Task action item. When this item is selected in an Automation, you will make the same selections on the right sidebar that you would make when manually creating a Task.

This includes the Task name, due date, Task owner etc. While there may sometimes be a use-case for manually creating tasks as a one-off, we strongly recommend using Task automation whenever possible. This is a great way to reduce spent time on tedious Task creation, and streamline each step in your process as a template.Typically Tasks are used to assign action items to users within your firm, but Tasks can also be shared directly to a Client’s Portal via automation. We’ll dive into this deeper in our power features section below.
Examples
Now that you know the basics of Task automation, let’s discuss a few examples of how you may use this in your process.
- Trigger an Automation when a client submits a Form or uploads Documents, automatically assign a Task to review what has been submitted
- When a client is ready to receive a fee agreement, trigger a Task for the appropriate staff person to preview and send the document out for e-signature. For full automation, template your Document thoroughly and avoid the step of previewing the Document and simply send it directly from the Automation.
- Are there any manual steps in your process that must be done physically outside of your CRM? Use Lawmatics to trigger a templated sequence of Tasks helping to ensure that these items are all accomplished in a timely manner.
Task Power Features
Tasks are extremely useful to your practice no matter how you go about implementing them into Lawmatics. All of the elements of Tasks discussed so far are fantastic ways to use them in your process. Take things to the next level by adding in some (or all!) of these Task power features.
Comments
An exciting new feature, Lawmatics now gives users the ability to comment on Tasks. The system will automatically keep track of the date and time of the comment, along with which user left the comment.

To leave a comment, simply click on a Task (or click the edit button). Here you will also see the comment thread history of the Task.To level up your comments one step further, you can also use the @ sign to alert a particular user within your comment.
Task Notifications
To make sure you and your staff never miss any important Task comments or notifications, we encourage all Lawmatics users to turn on their Task notifications. We are also excited to share some new task notifications along with these new power features.To turn on notifications, each individual user will navigate to settings, and then select Notifications from the left side menu. Scroll down to locate the Tasks section.

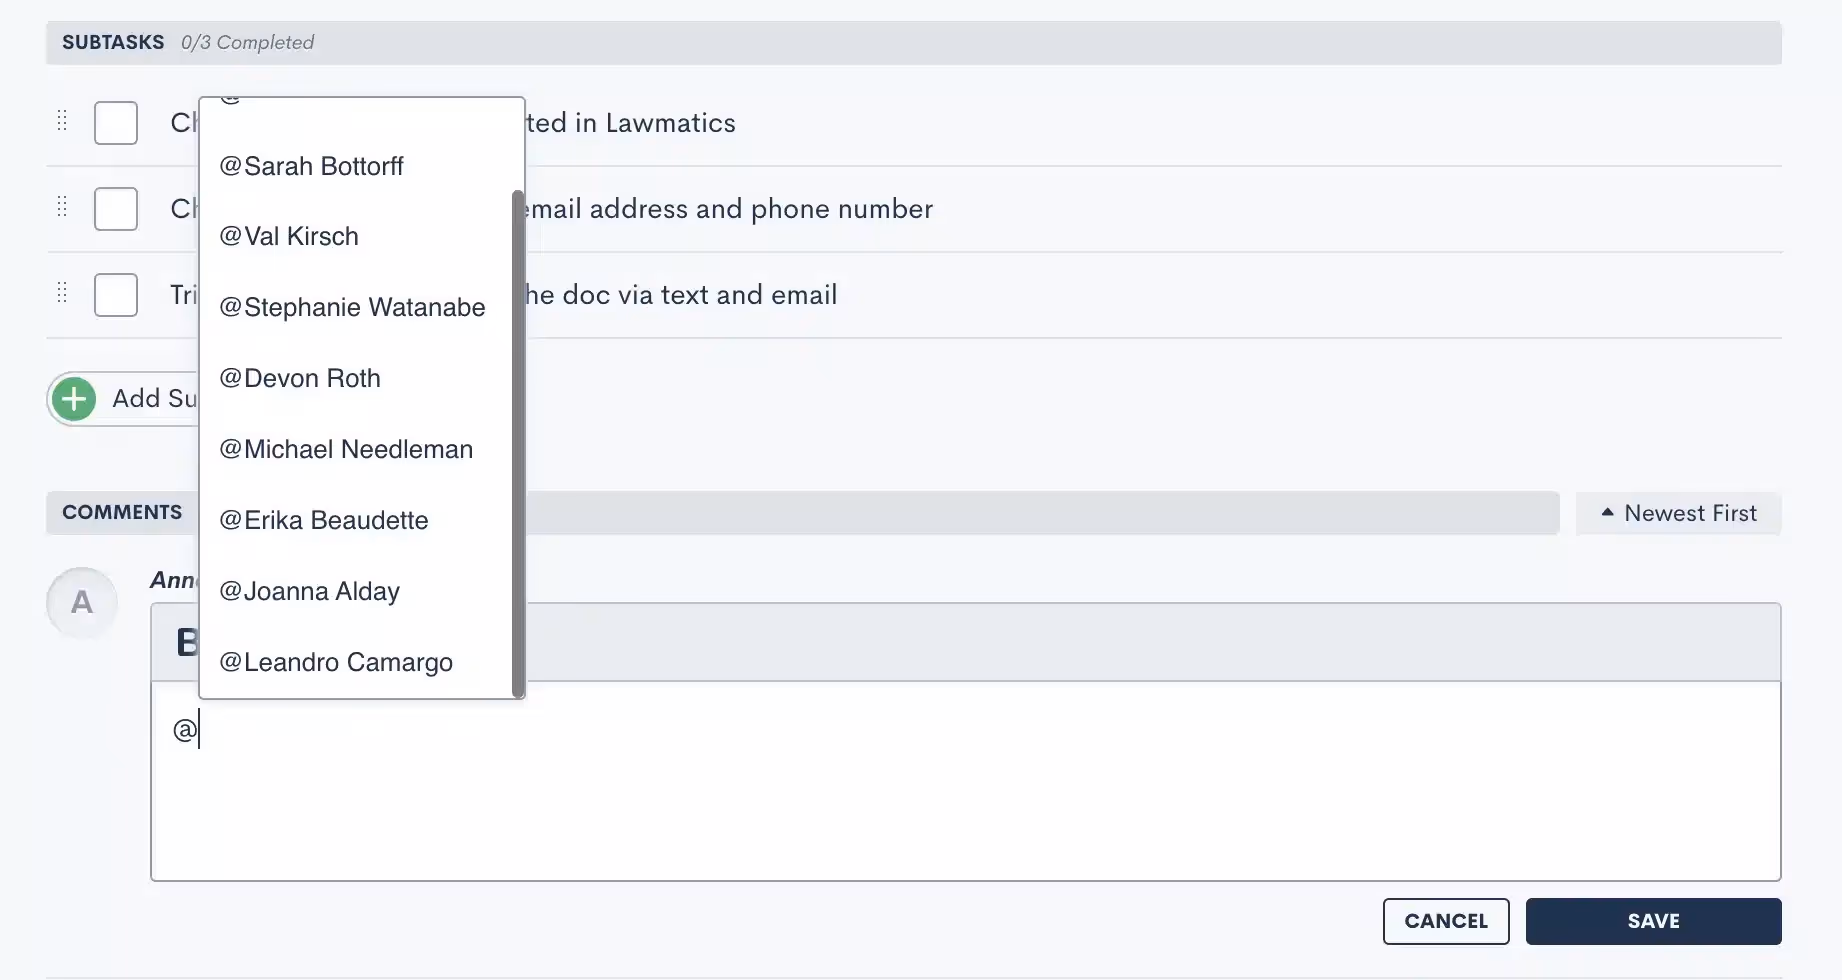
Sub Tasks
When creating a Task, Lawmatics now gives you the ability to create Sub Tasks within the Task. You will notice the Add Sub Task button any time you are adding a new task, either from the dashboard or a matter’s profile.

These Sub Tasks can be marked as completed independently of one another, as well as of the Task as a whole. Once all sub tasks have been marked as completed, then the Task will automatically be marked as completed as well.
Client Portal
The Client Portal is a powerful tool for sharing Forms, Documents, Appointments, and of course Tasks with your clients. For any Tasks that you wish to assign directly to the client themselves, or to another related matter contact, you can share Tasks via Client Portal.This can be done directly from a matter’s profile, as shown below, or when creating a task via automation. Make sure that the client has first been given portal access using the button highlighted in red near the top left before selecting to share a task with them.

When a client logs in to their Client Portal, they will see a similar page to the one shown below. They can easily view the Tasks you’ve shared with them right in their Client Portal dashboard.

Conclusion
Lawmatics gives you the power to streamline your entire client journey, so why shouldn’t that apply to your internal process as well? Tasks are the key to increased productivity, efficiency, and hopefully happiness within your organization.Lawmatics tasks allow your team to spend more time on their actual work, and less on the behind the scenes setup and organization of their process. They can simply create their task templates once, and then find them automatically assigned each time they need them.

Lawmatics Time Tracking and Billing consolidates essential case management features into the platform that you already know and love. With the introduction of LMPay, you can now seamlessly collect your consultation fees through Lawmatics as well. Whether you are looking to implement the full suite of Billing and Time Tracking into your process, or use LMPay for collecting consultation fees, Lawmatics has all the tools you need to make that happen.Each of the aforementioned billing features make it easy to get paid quickly and easily while facilitating an exceptional client experience.
Introducing LMPay
If you collect or intend to collect consultation fees from prospective clients, LMPay is your go-to payment solution. LMPay is quick to set up, easy to use, and accessible without any additional fees on your Lawmatics subscription. LMPay also boasts no fees (or hidden fees) for ACH and competitive industry rates for credit card payments.
Registration
To use LMPay, you will first need to register your firm and complete a brief application process. Begin by opening Lawmatics and navigating to the Settings menu. Once there, select LMPay and you will then see a screen similar to the one shown below.
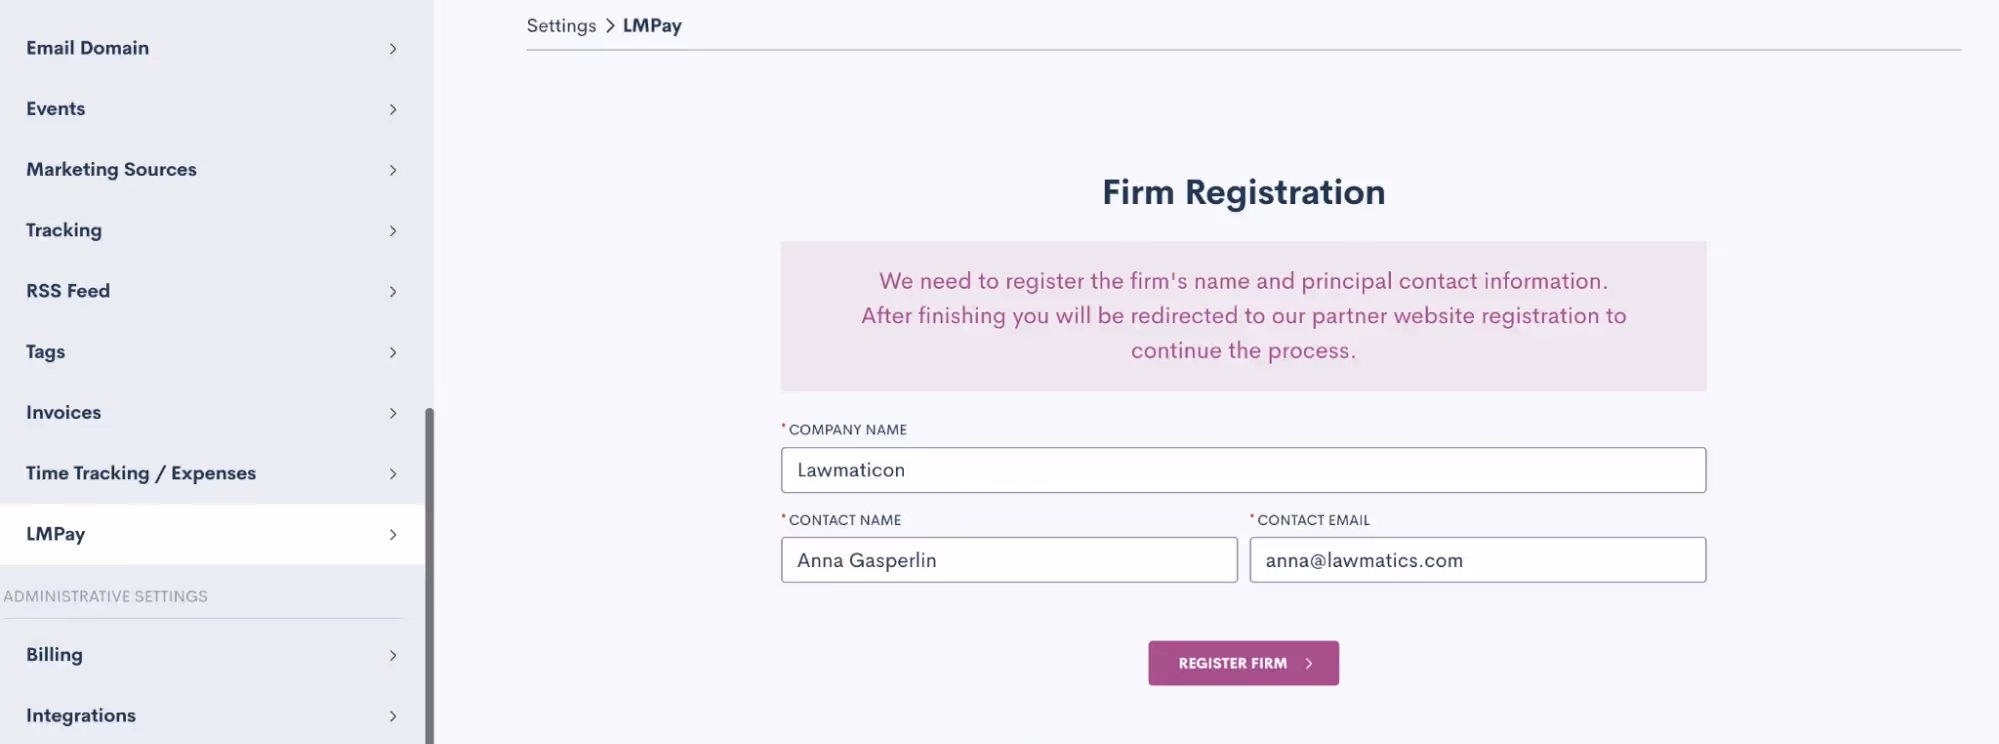
Upon initiating the registration process, the system will walk you through a sequence of steps to submit your application. The review process generally takes one to two days. Once approved, you’ll have complete access to LMPay.
Features
Payment Gateway
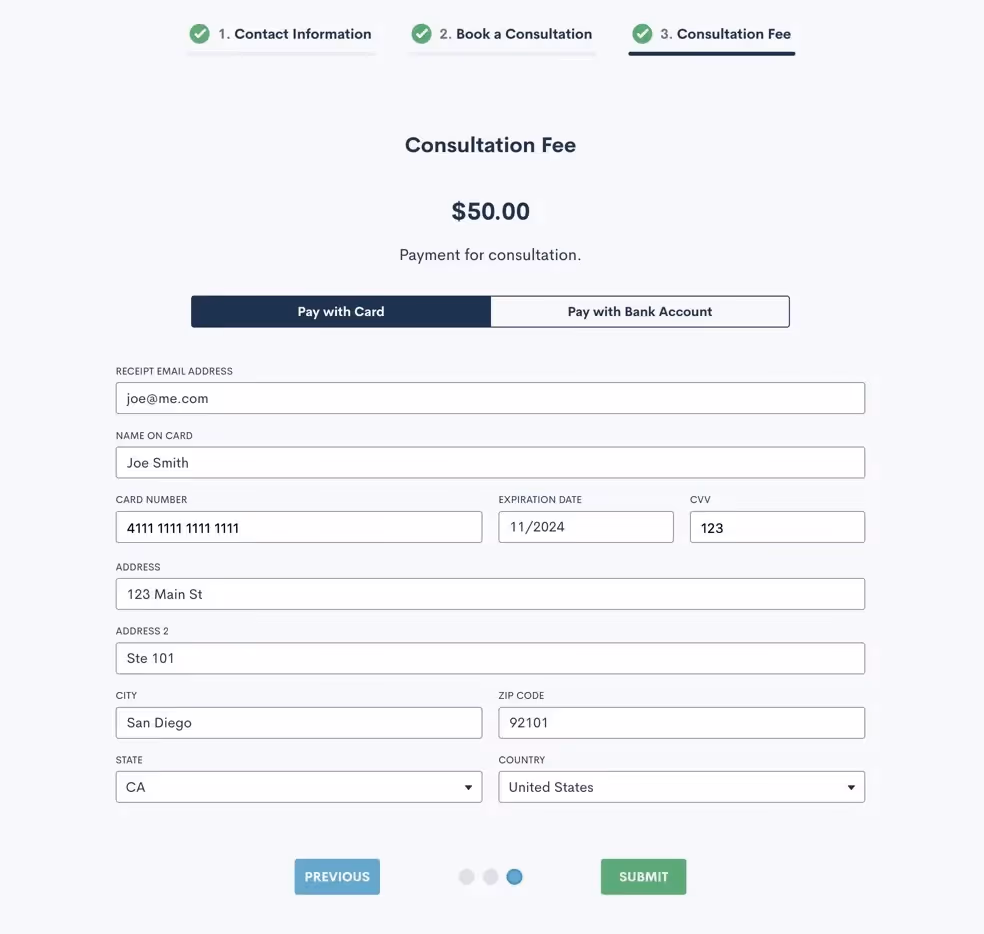
One of the key features of LMPay is the Payment Gateway, a tool to collect consultation fees. The Payment Gateway can be added to any Custom Form or Booking Form, of a seamless step in the consultation booking process.Drag and drop the Payment Gateway field from the Advanced section in the Form Editor, and then click on it to set your payment terms.
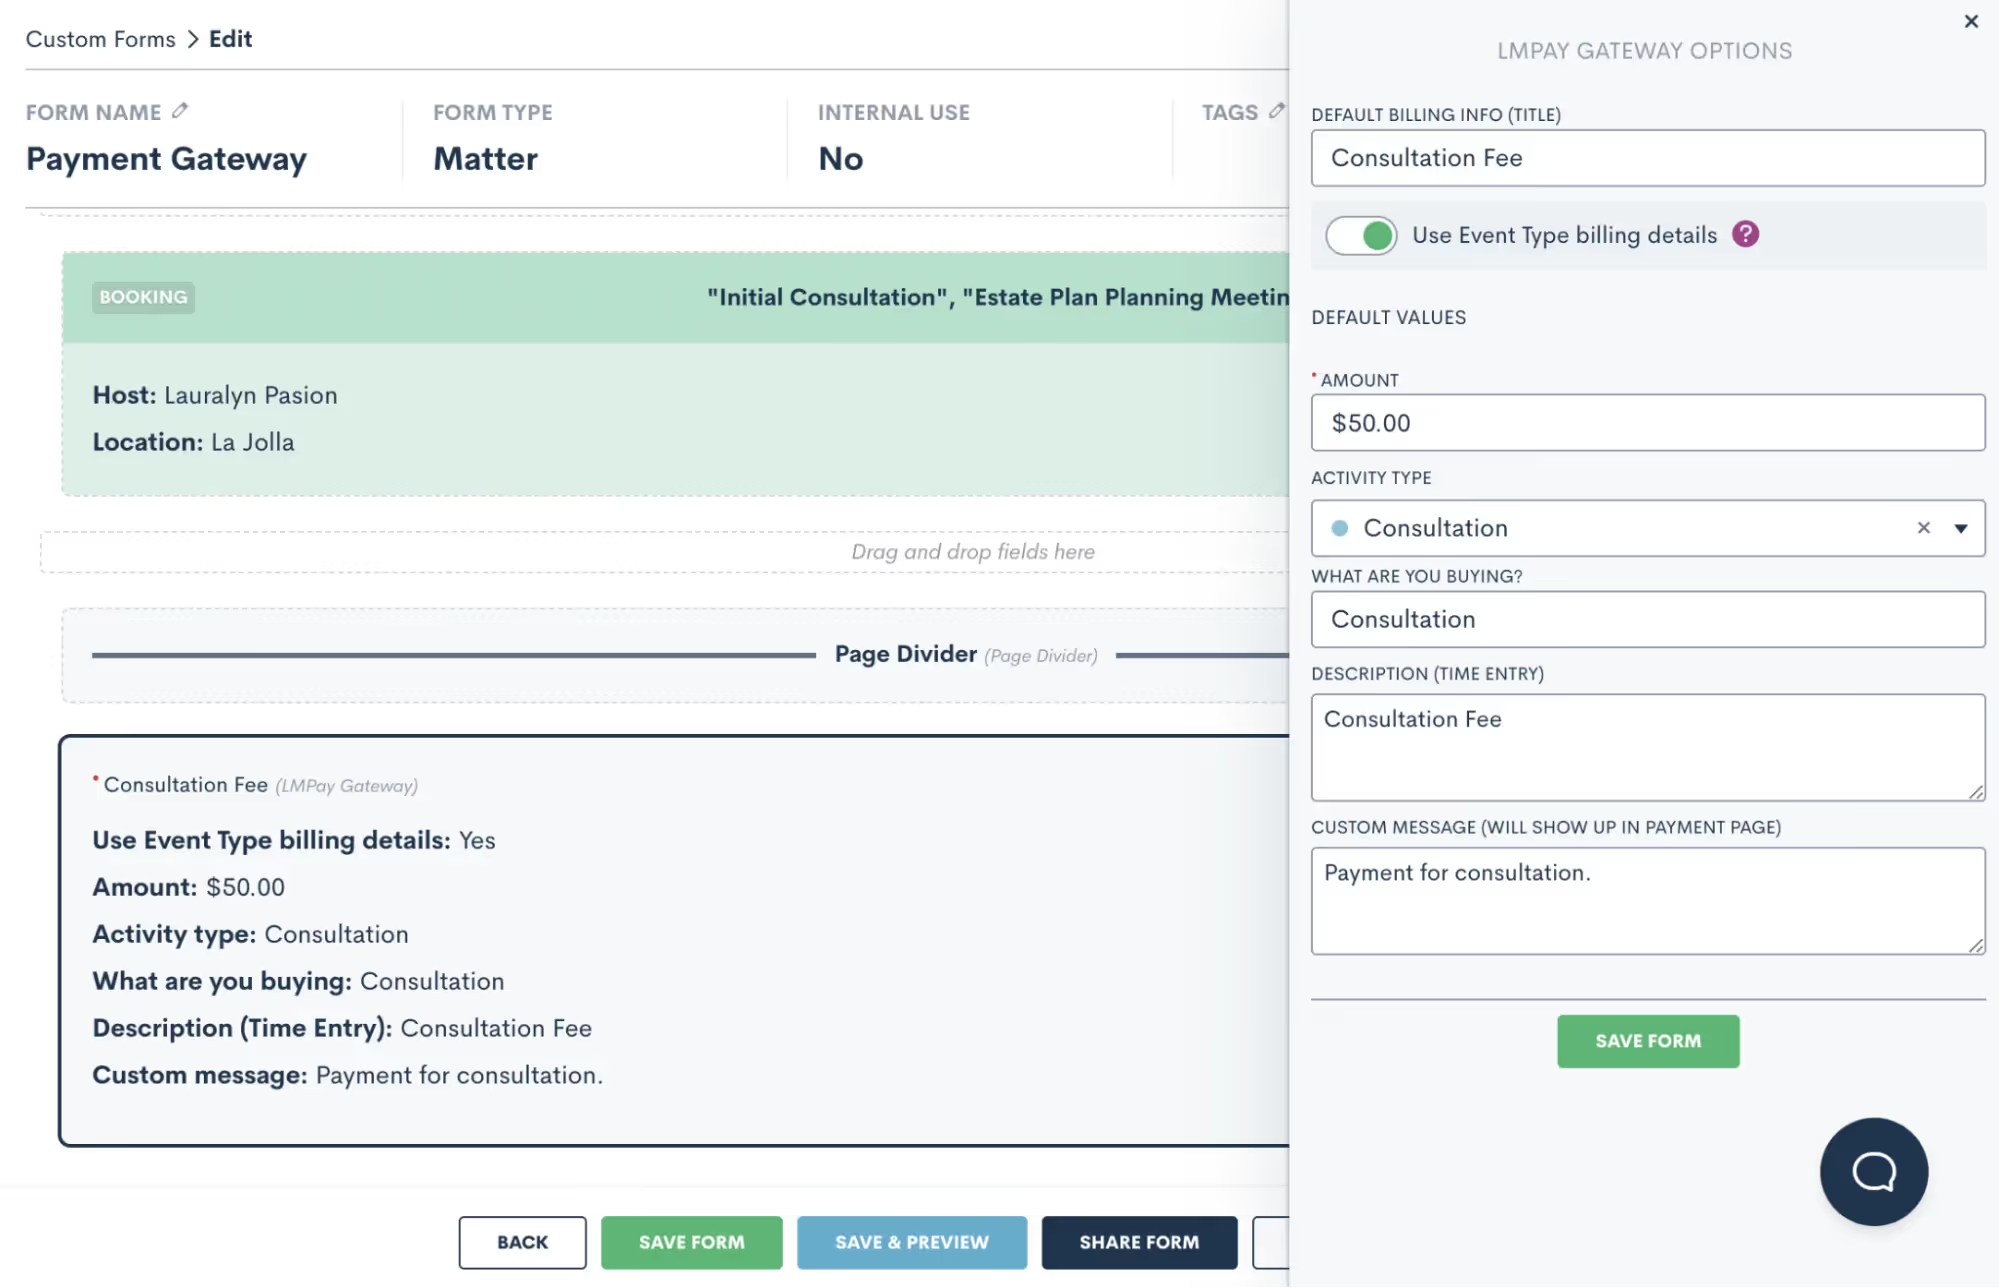
You can easily specify the amount, activity type, etc for this payment (pictured above). When the potential client fills out this form, they are able to select a time for their consultation and enter their payment details to pay your consult fee.
Any payments made via LMPay are tracked in Lawmatics and visible on the matter’s profile. Click on the Billing tab to view invoices as well as payment history for that particular matter.
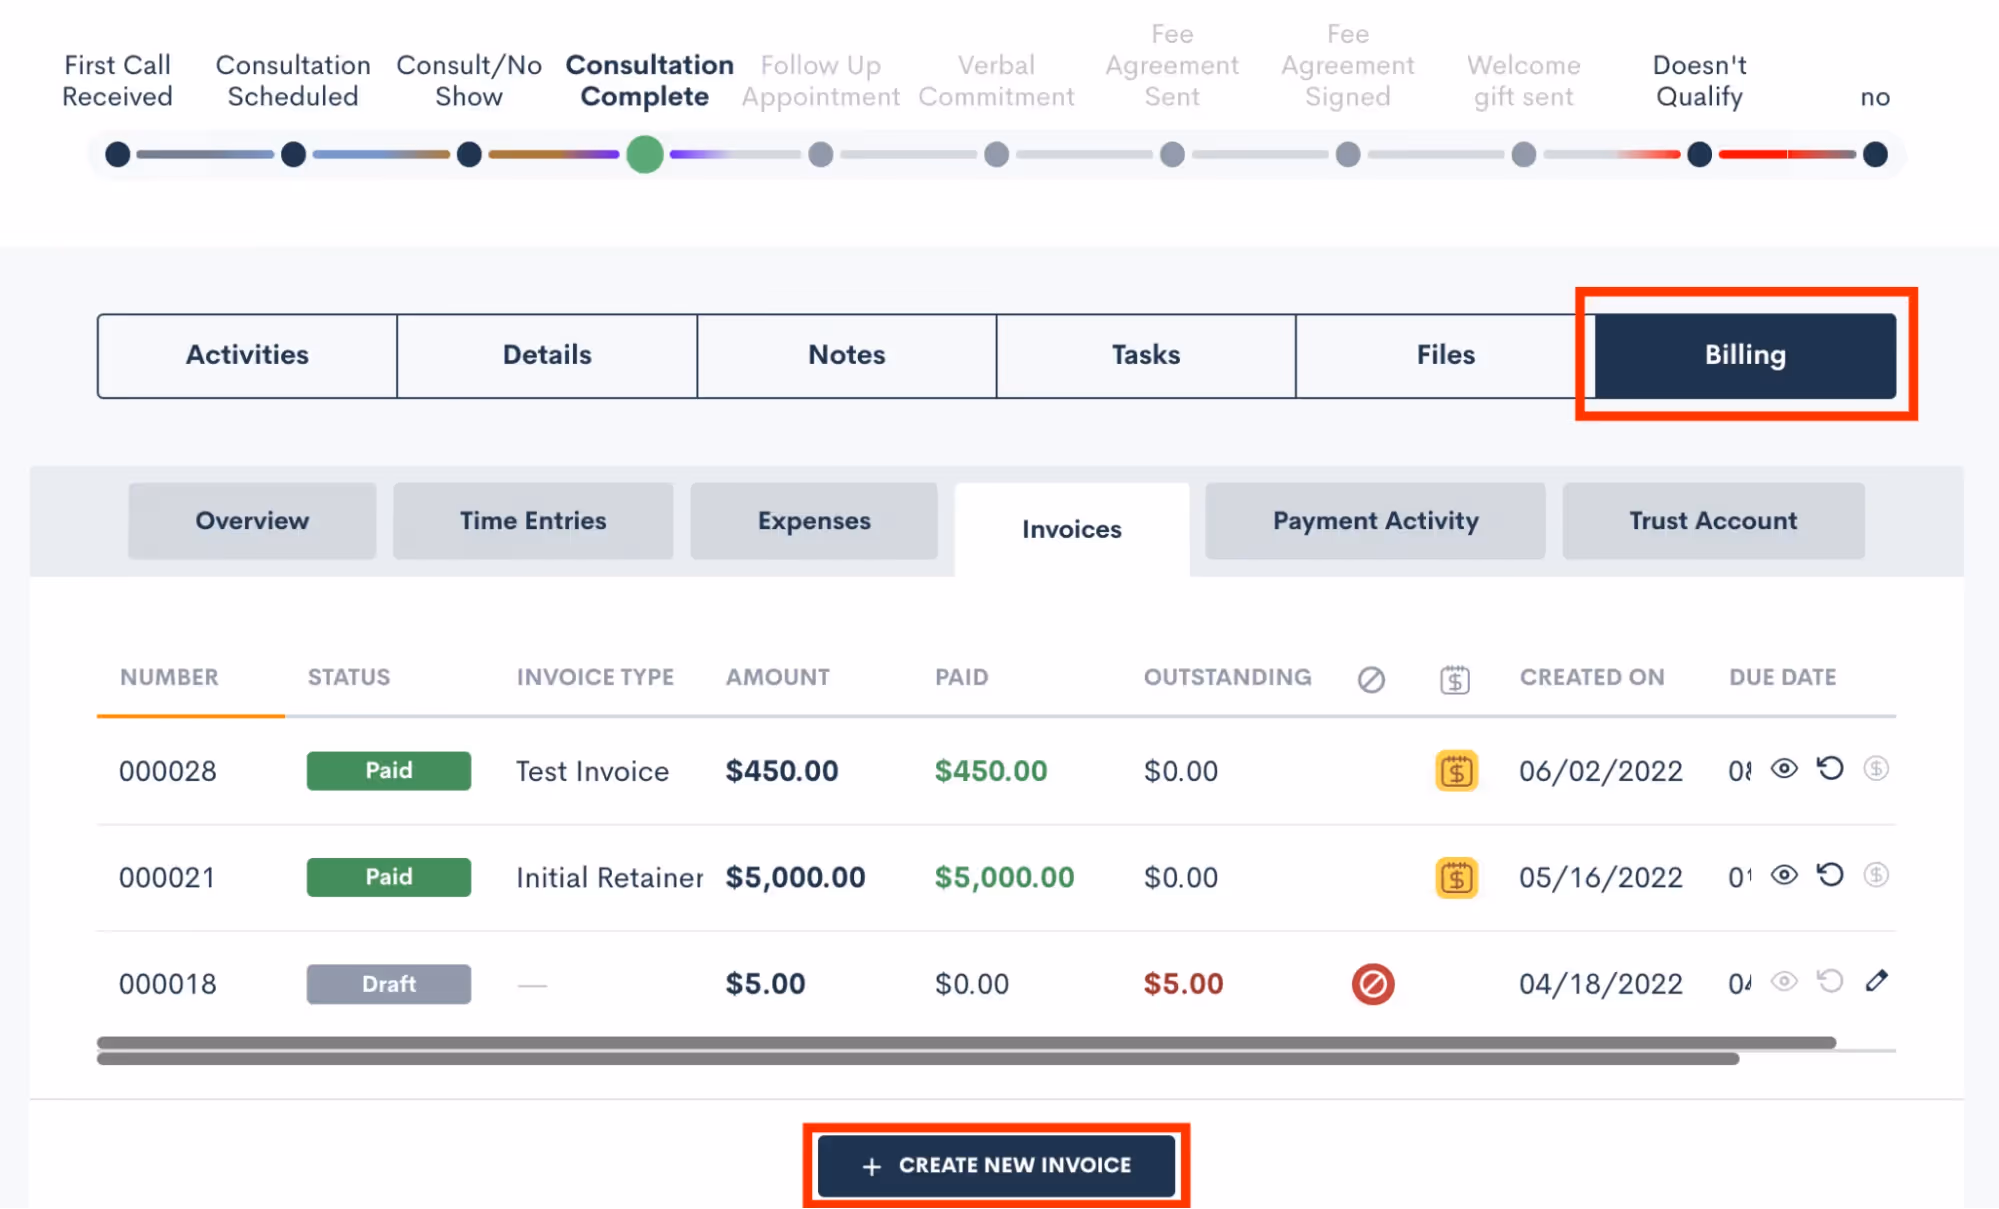
NEW Billing Tab
You will also have access to a separate Billing tab on the main menu of your Lawmatics window, located at the very top of any page. Here you will find an overview of all invoices and payments for the firm, as opposed to zeroing in on a specific matter.
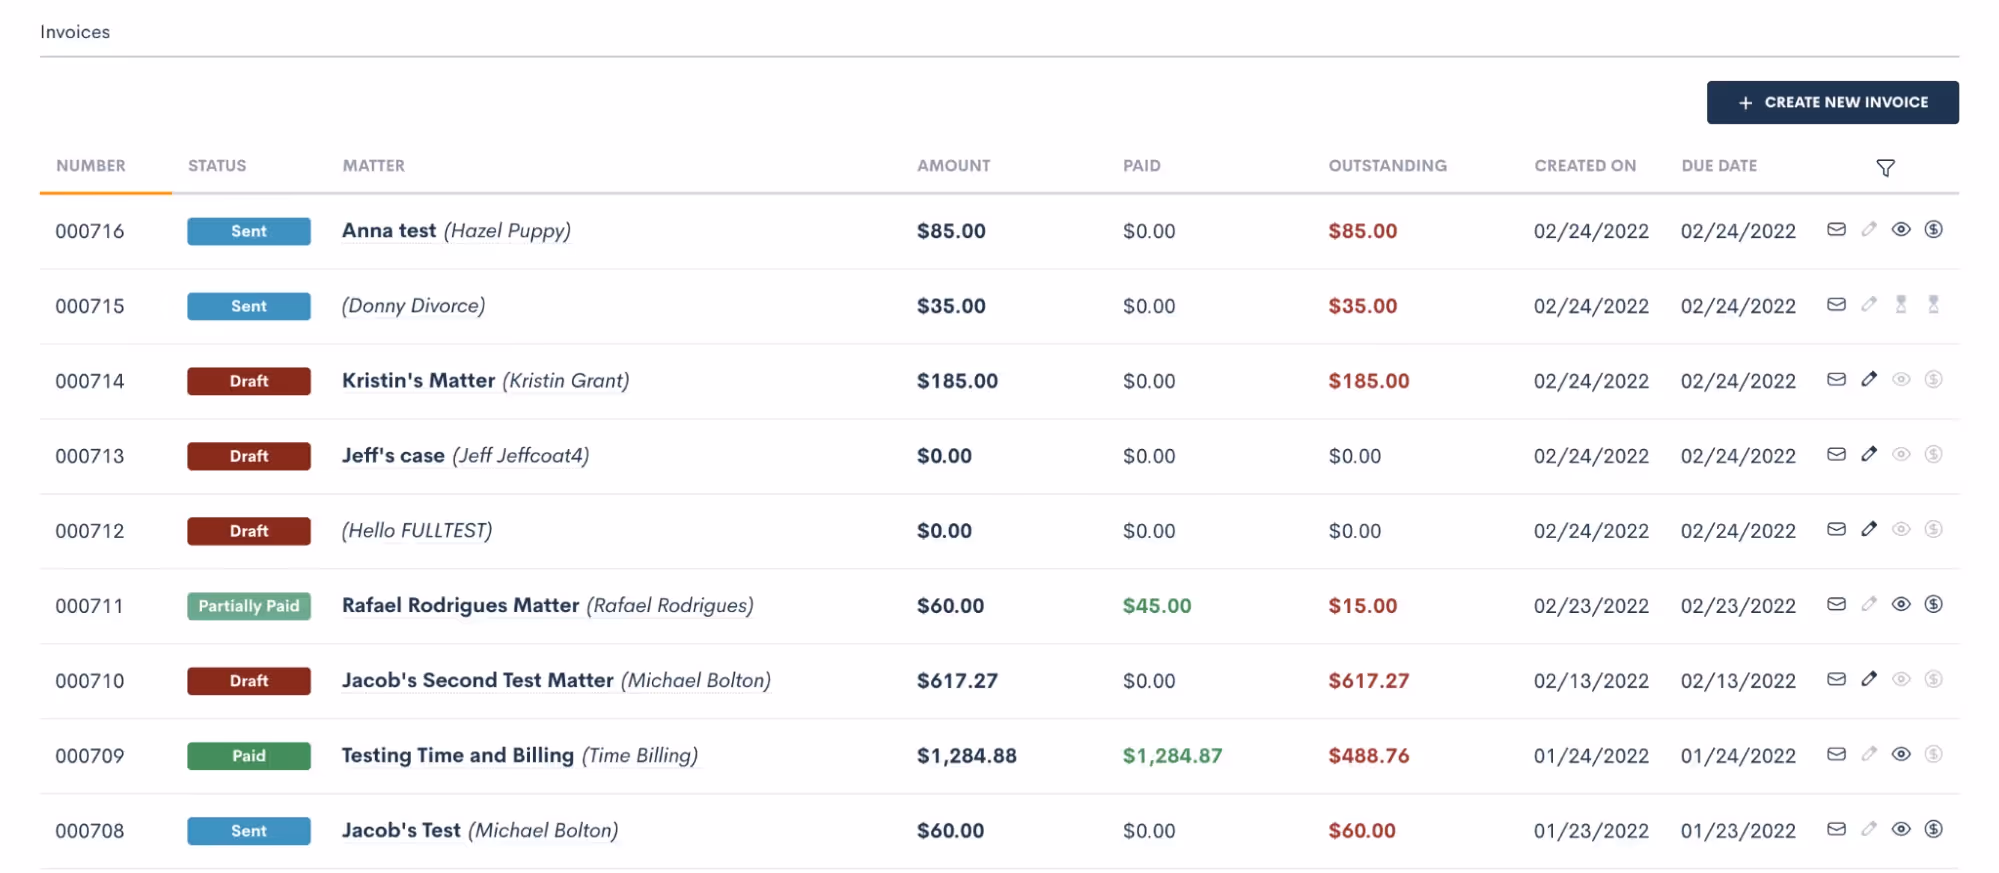
Easily view, sort, and filter your invoices or create a new invoice manually if needed.
Time & Billing
Whereas LMPay is geared towards collecting consultation fees, the Time & Billing add-on offers an entire suite of time and billing features. Even if you currently use a case management system for this functionality, you’ll find that Lawmatics has everything you need under one roof.
Getting Started
To begin using Time & Billing, you will need to do the following:
- Email support@lawmatics.com to notify our team that you would like to activate Time & Billing. Time & billing does come at an additional cost per user to your Lawmatics subscription.
- Let us know which of your Lawmatics users you would like to access. You are only charged the add-on rate for the users that need to access the feature.
- Once Time & Billing is activated, configure your settings. This includes setting up your expense types, default hourly rates, payment receipt email template, and more.
Time Tracking
Lawmatics makes it easier than ever to track your time spent on various billable and non-billable activities. Once you have activated the Time & Billing add-on, a Time Tracker will appear in the top menu of your Lawmatics account. Click the Time Tracker to select the matter you intend to track time for as well as the activity type for this session. Then click the Play button (shown below) to begin tracking your time.

All sessions will automatically log on the corresponding matter and can be invoiced when ready.
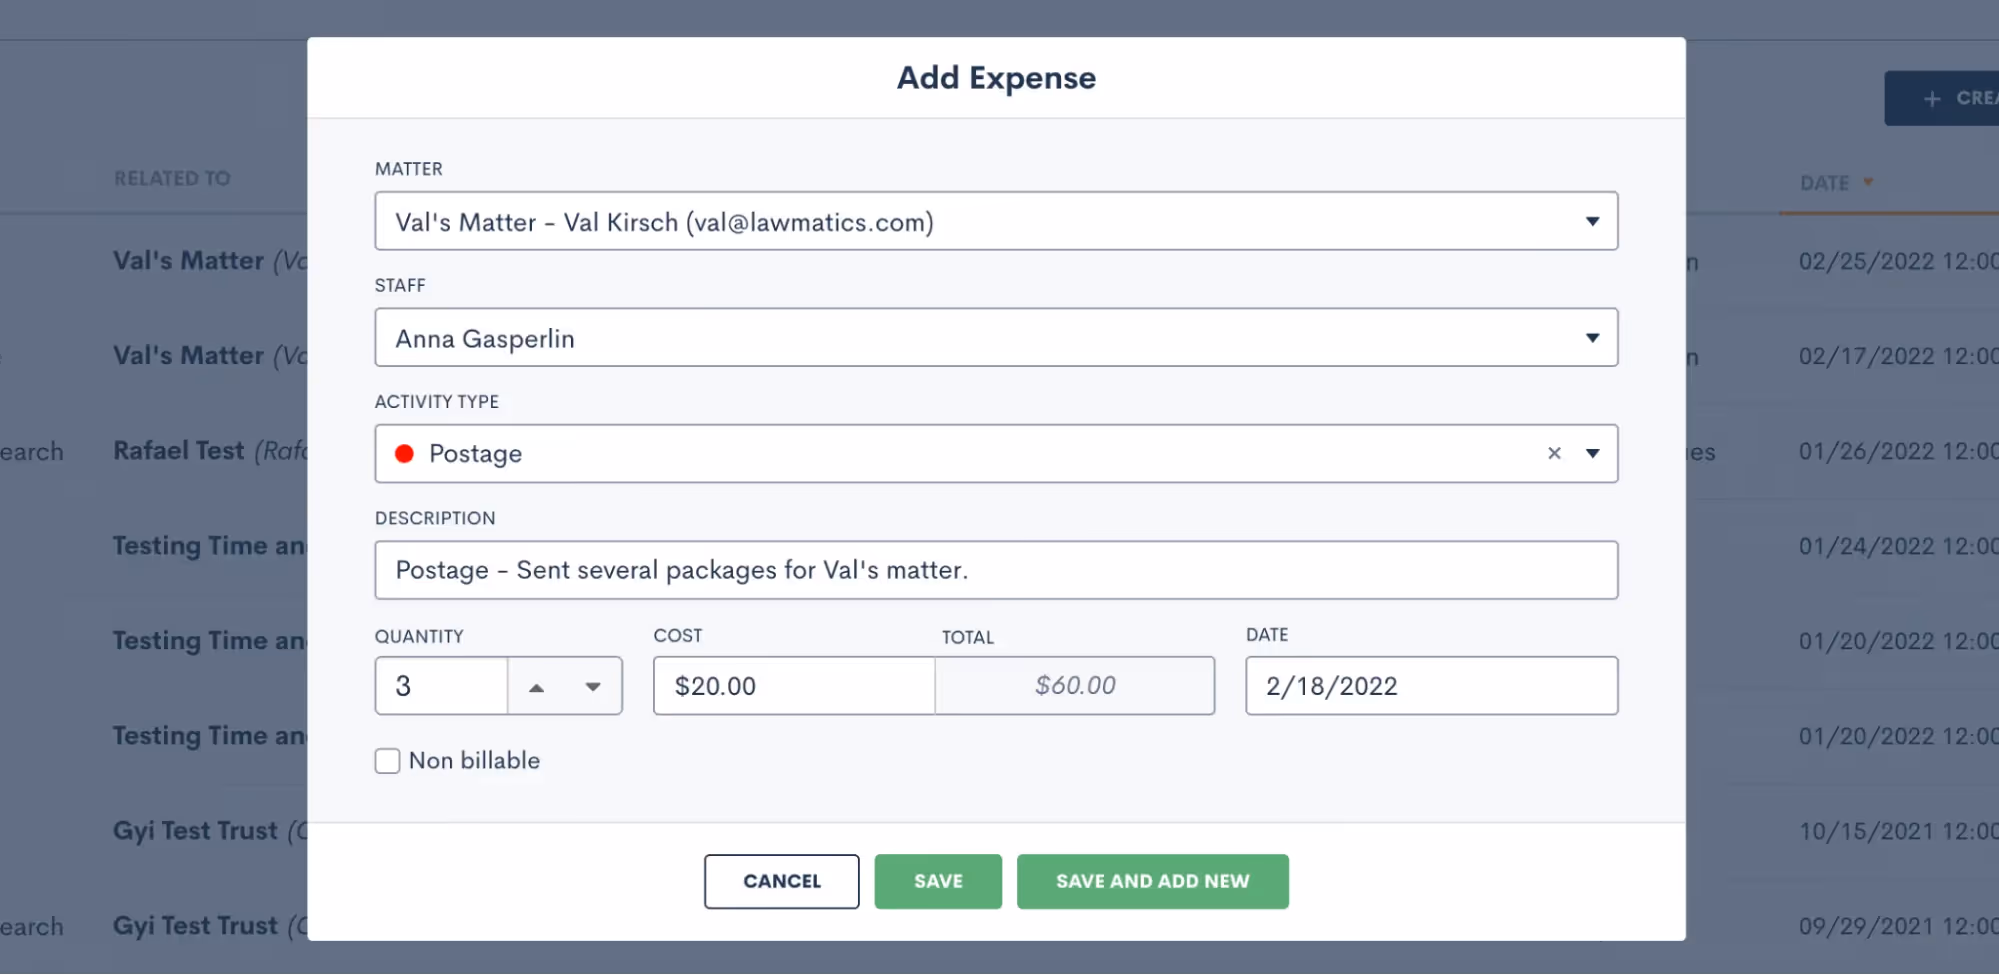
Expenses
There are two ways to log your expenses in Lawmatics. You can either go to the Expenses page under the main Billing tab or navigate directly to the matter to which the expense pertains. Upon creating an expense, you will be prompted to select the staff person from your list of users, the activity type, as well as the quantity (when applicable).
Invoices
As you begin tracking your time and expenses, the time will come to invoice a matter and receive your payment. Here’s how:
- Create the Invoice either from the main Invoices page or from the matter’s profile directly. If creating an invoice from the main page, you will first need to select which matter you are invoicing.
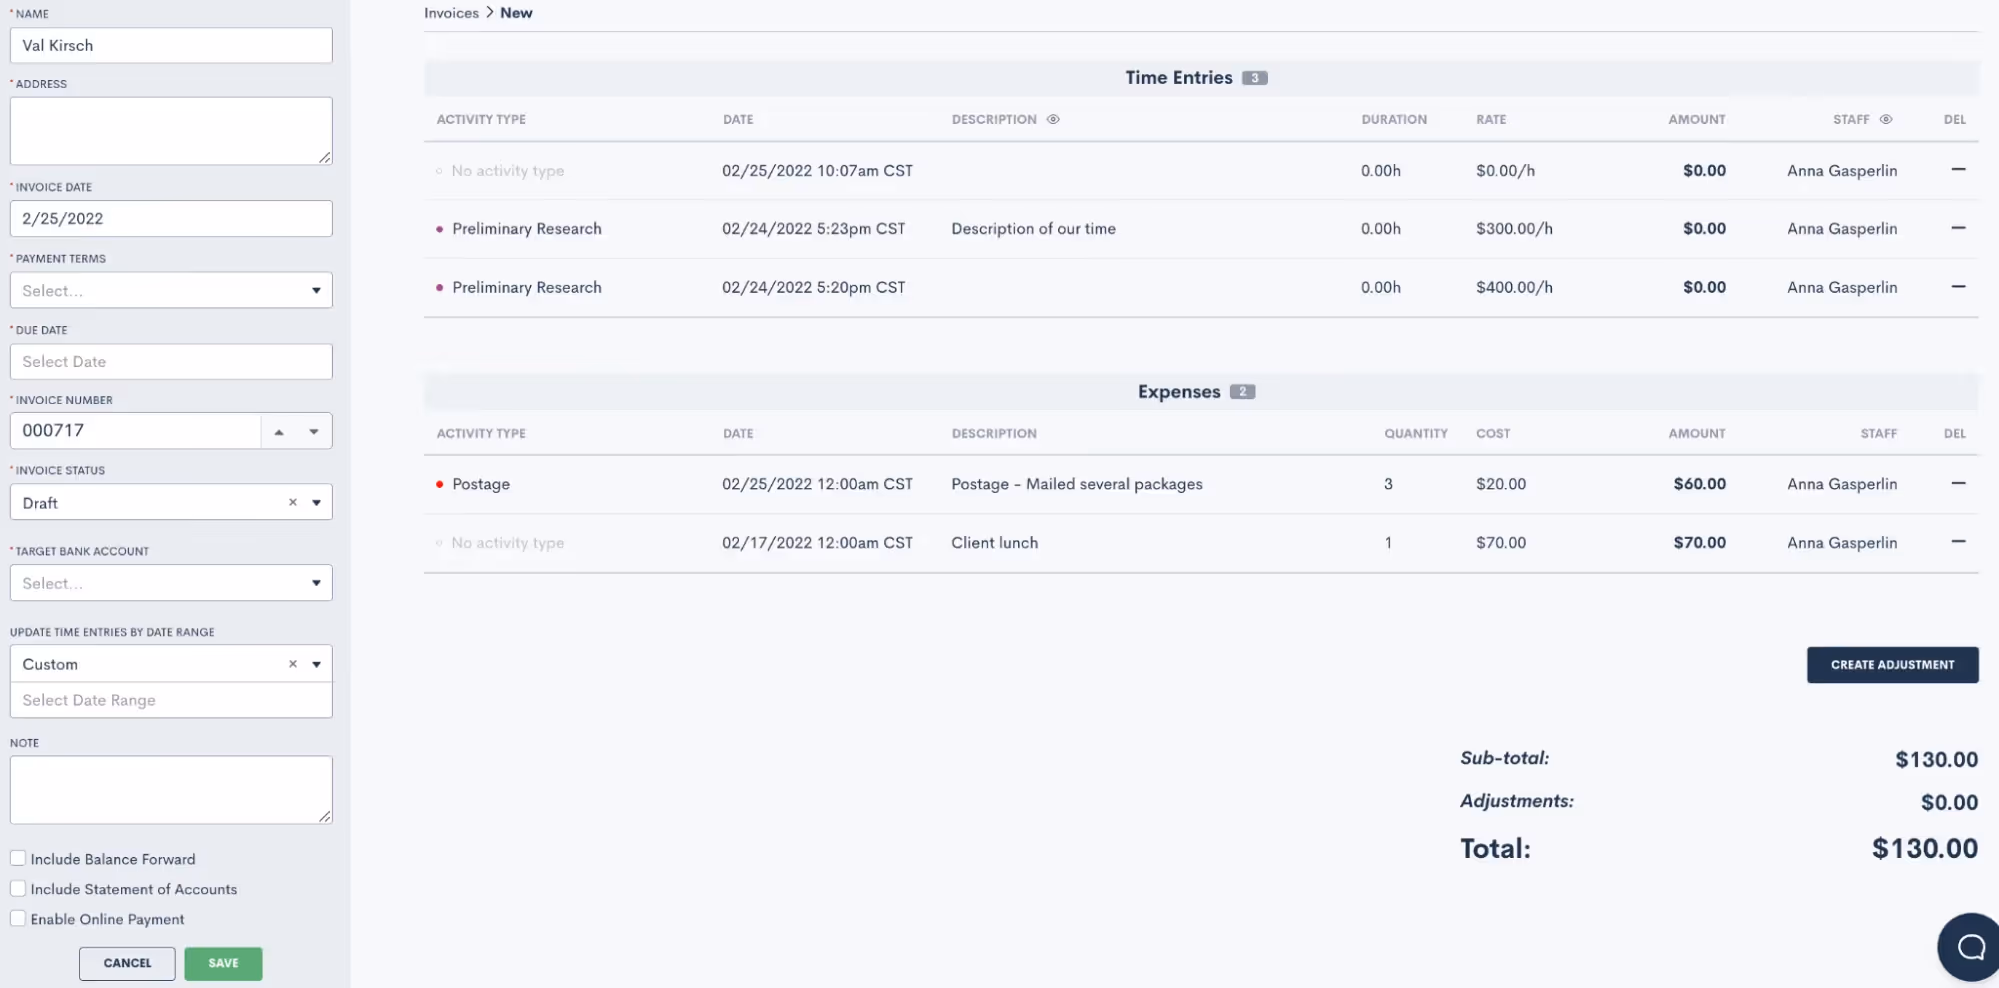
- Select which time entries and expenses to include, as well as all of your payment terms and options shown on the left sidebar above.
- Create the invoice as a draft and then send it from the invoices page or the matter’s profile once you are ready.
We suggest selecting the option to Enable Online Payment so that your clients can easily make their payment online via card if they would like.When you send the invoice, the client will receive an email with their invoice attached, similar to the sample invoice shown below.
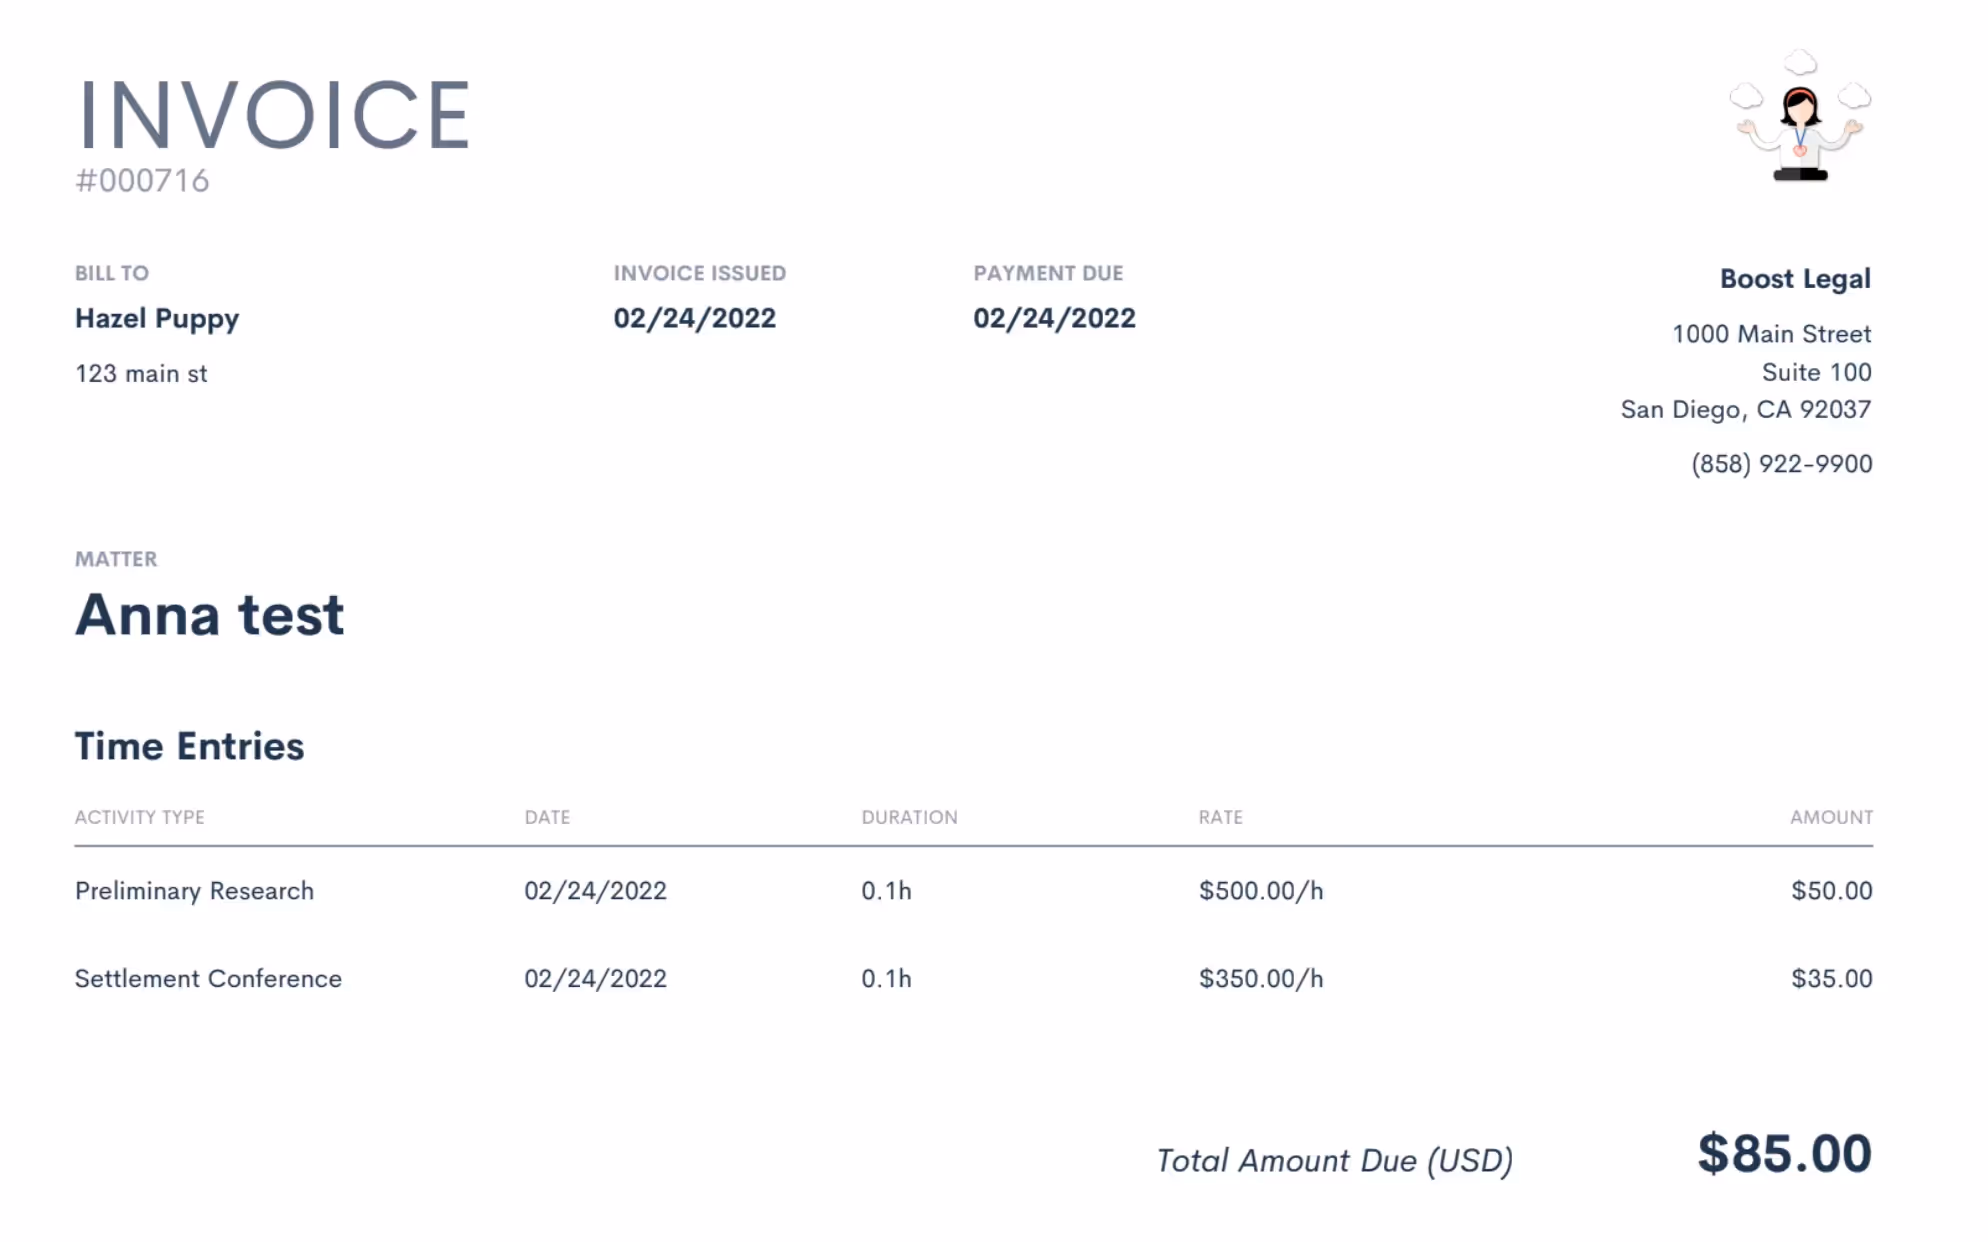
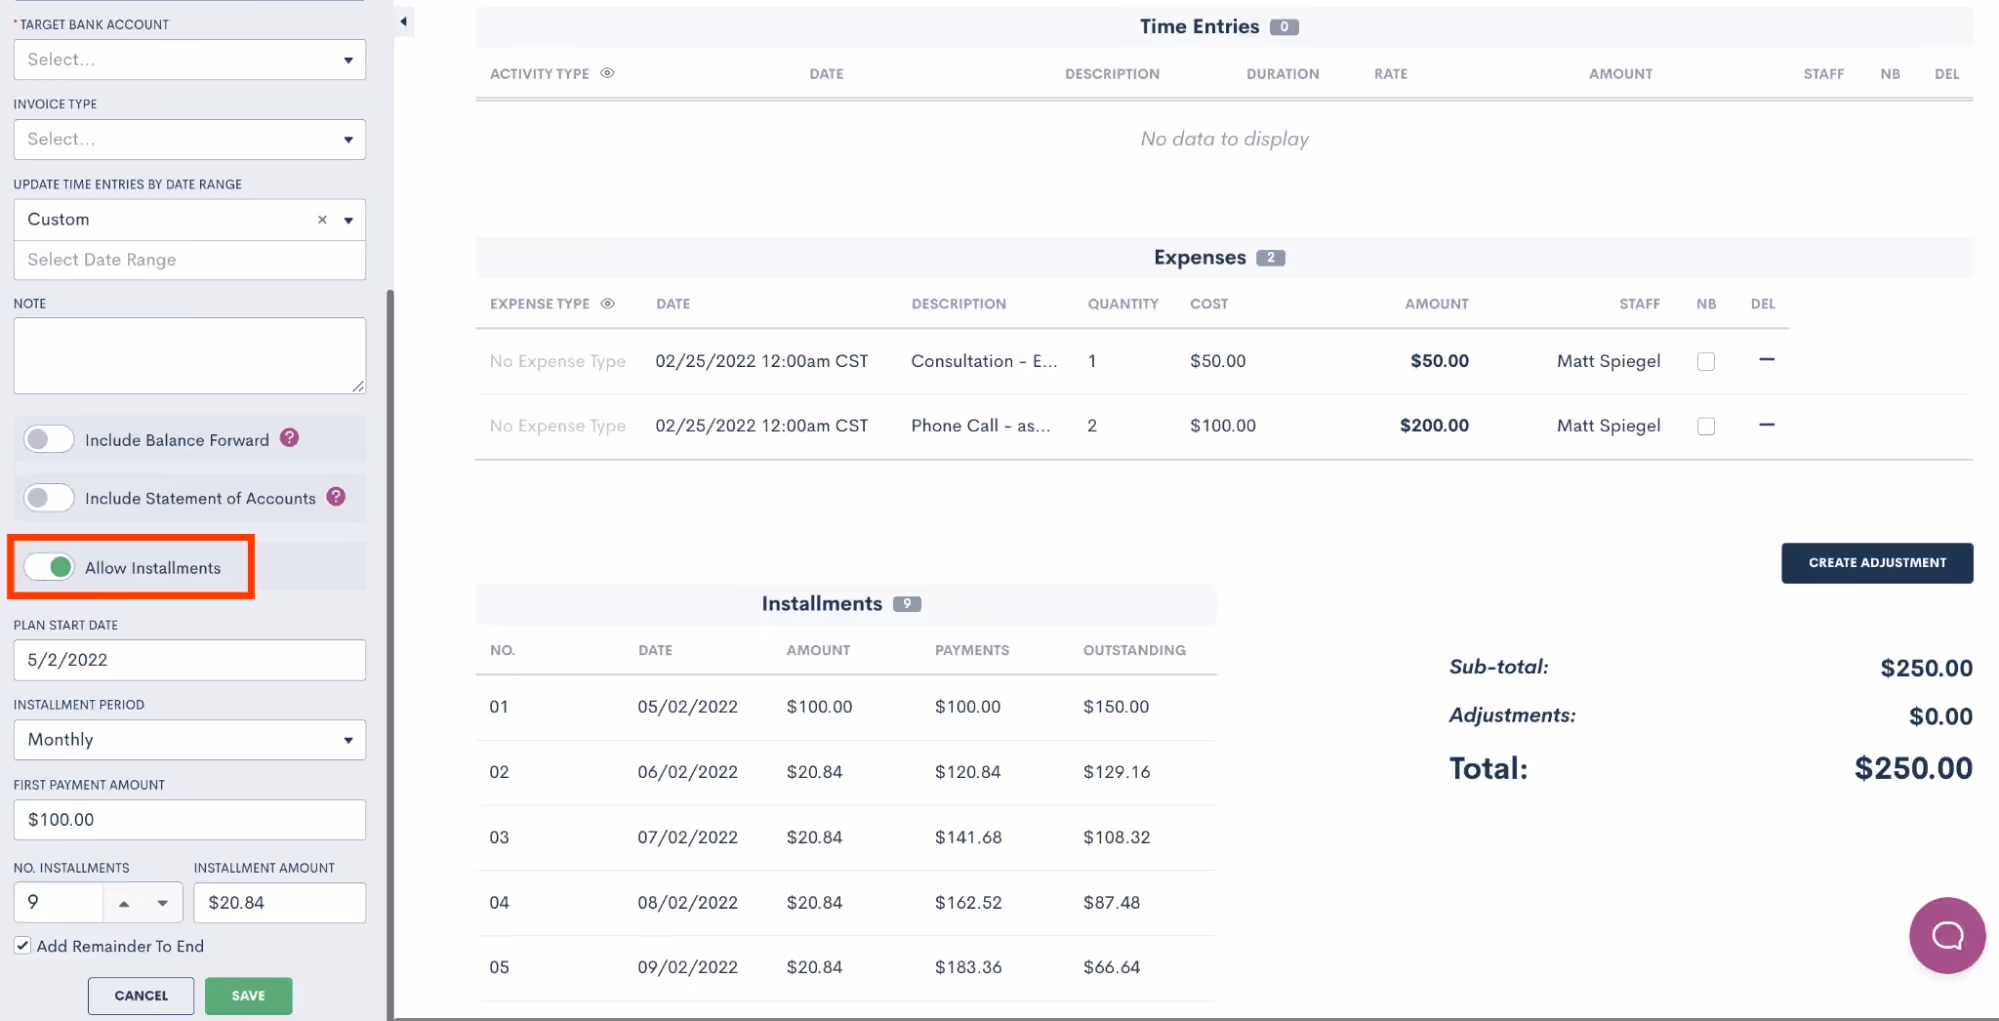
If a client opts to pay via online payment, then the invoice will automatically move from “Sent” to “Paid accordingly”. If payment is accepted offline, you can simply return to the invoices page or the matter profile to mark the invoice as paid when necessary.Lawmatics also give you the option to create a custom payment plan for an invoice as needed by selecting the option to allow installments.
Trust Accounting
Lawmatics also handles your trust account for each matter. You will find a summary of your firm’s trust accounting under the main Billing tab at the top of your account or within a matter’s profile, after which you will select the Trust Account section on their specific Billing tab.
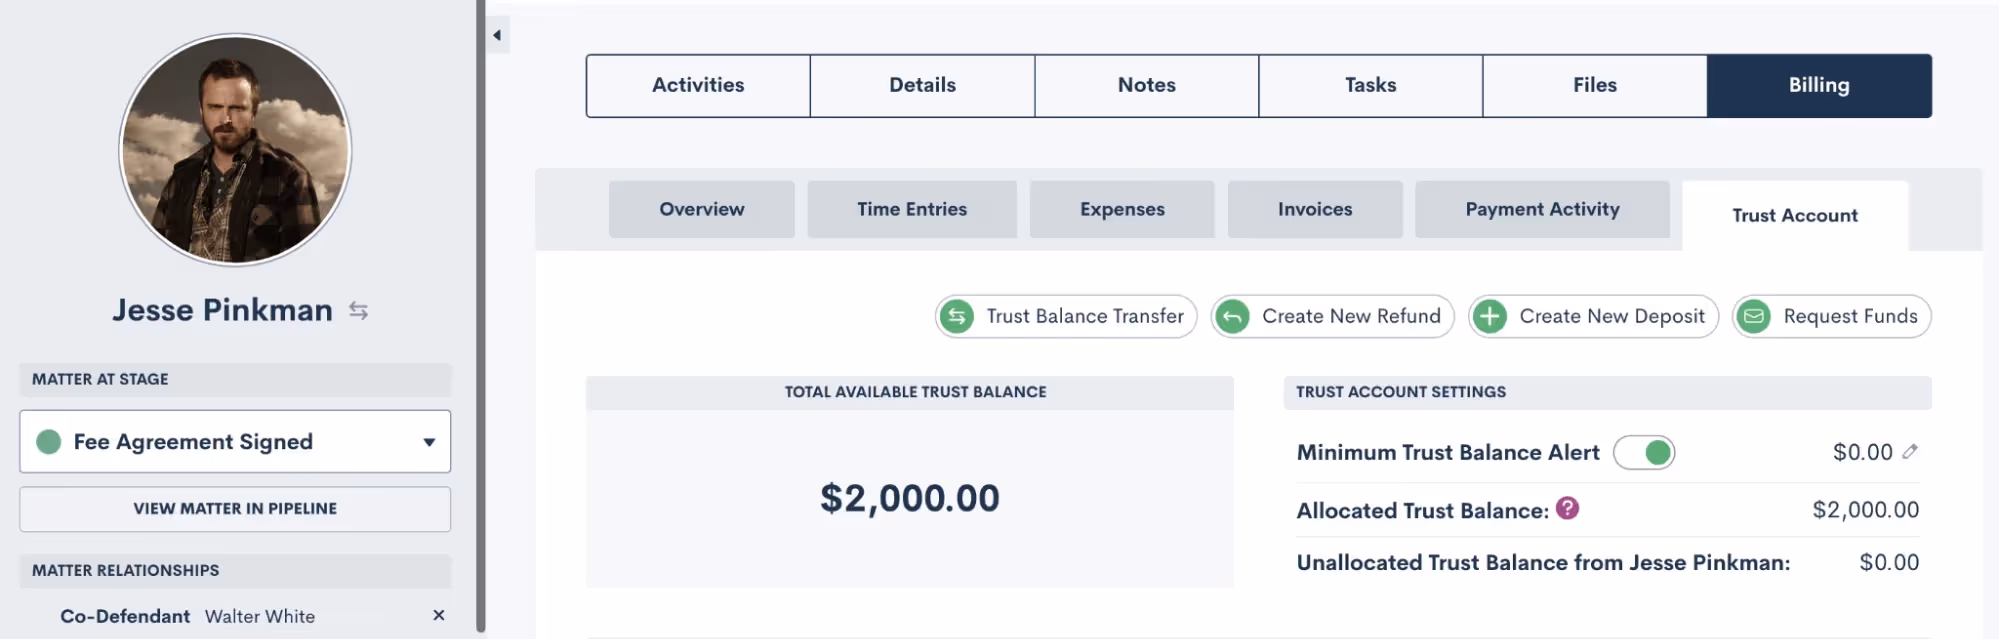
Here you can manage trust balance transfers, refunds, trust deposits, and set a minimum trust balance alert when needed. You will also find a summary log of all trust requests for this matter.
Reporting
When using Lawmatics Time & Billing, you have access to several reports for keeping tabs on your payments and history.
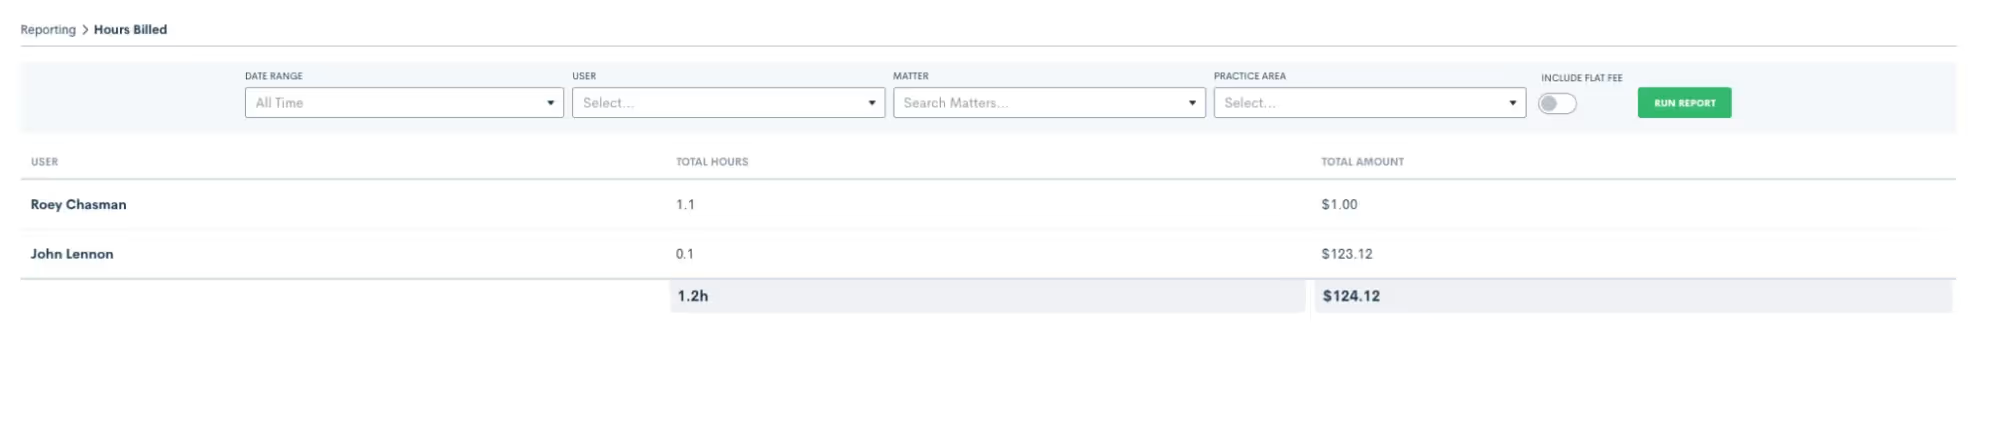
Hours Billed Report
The Hours Billed report keeps track of all hours logged for each user in your system.
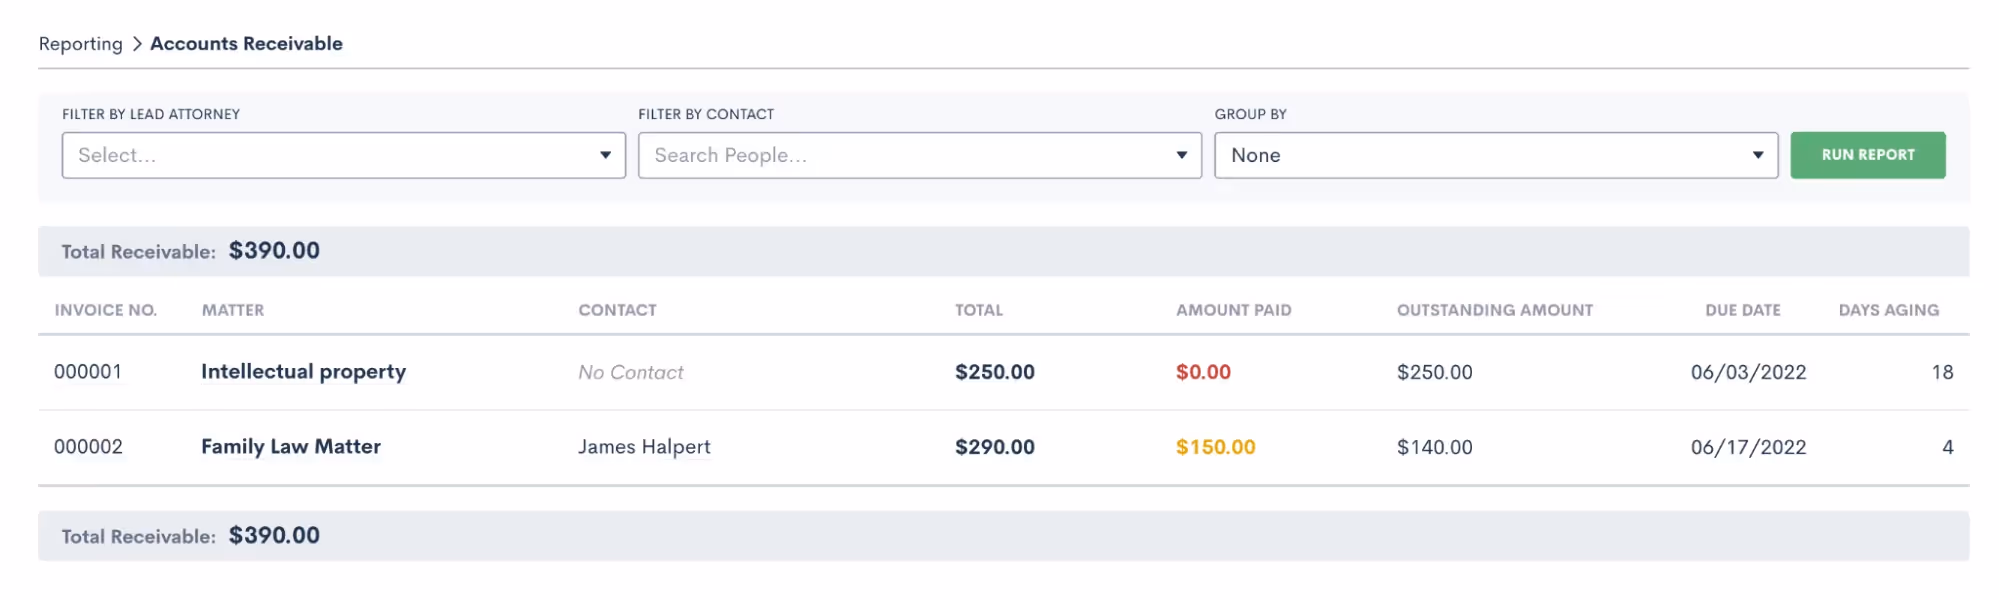
Accounts Receivable Report
The Accounts Receivable report displays outstanding balances to give you a sense of expected cash inflow.
Payment Activity Report
From consultation fees to retainer payments, view a log of all payment activity on your account.

Remember, these features are only available for users with the time & billing add-on. You won’t find the full gambit of billing capabilities with LMPay. Feel free to email support@lawmatics.com with any questions or to add time & billing to your account.
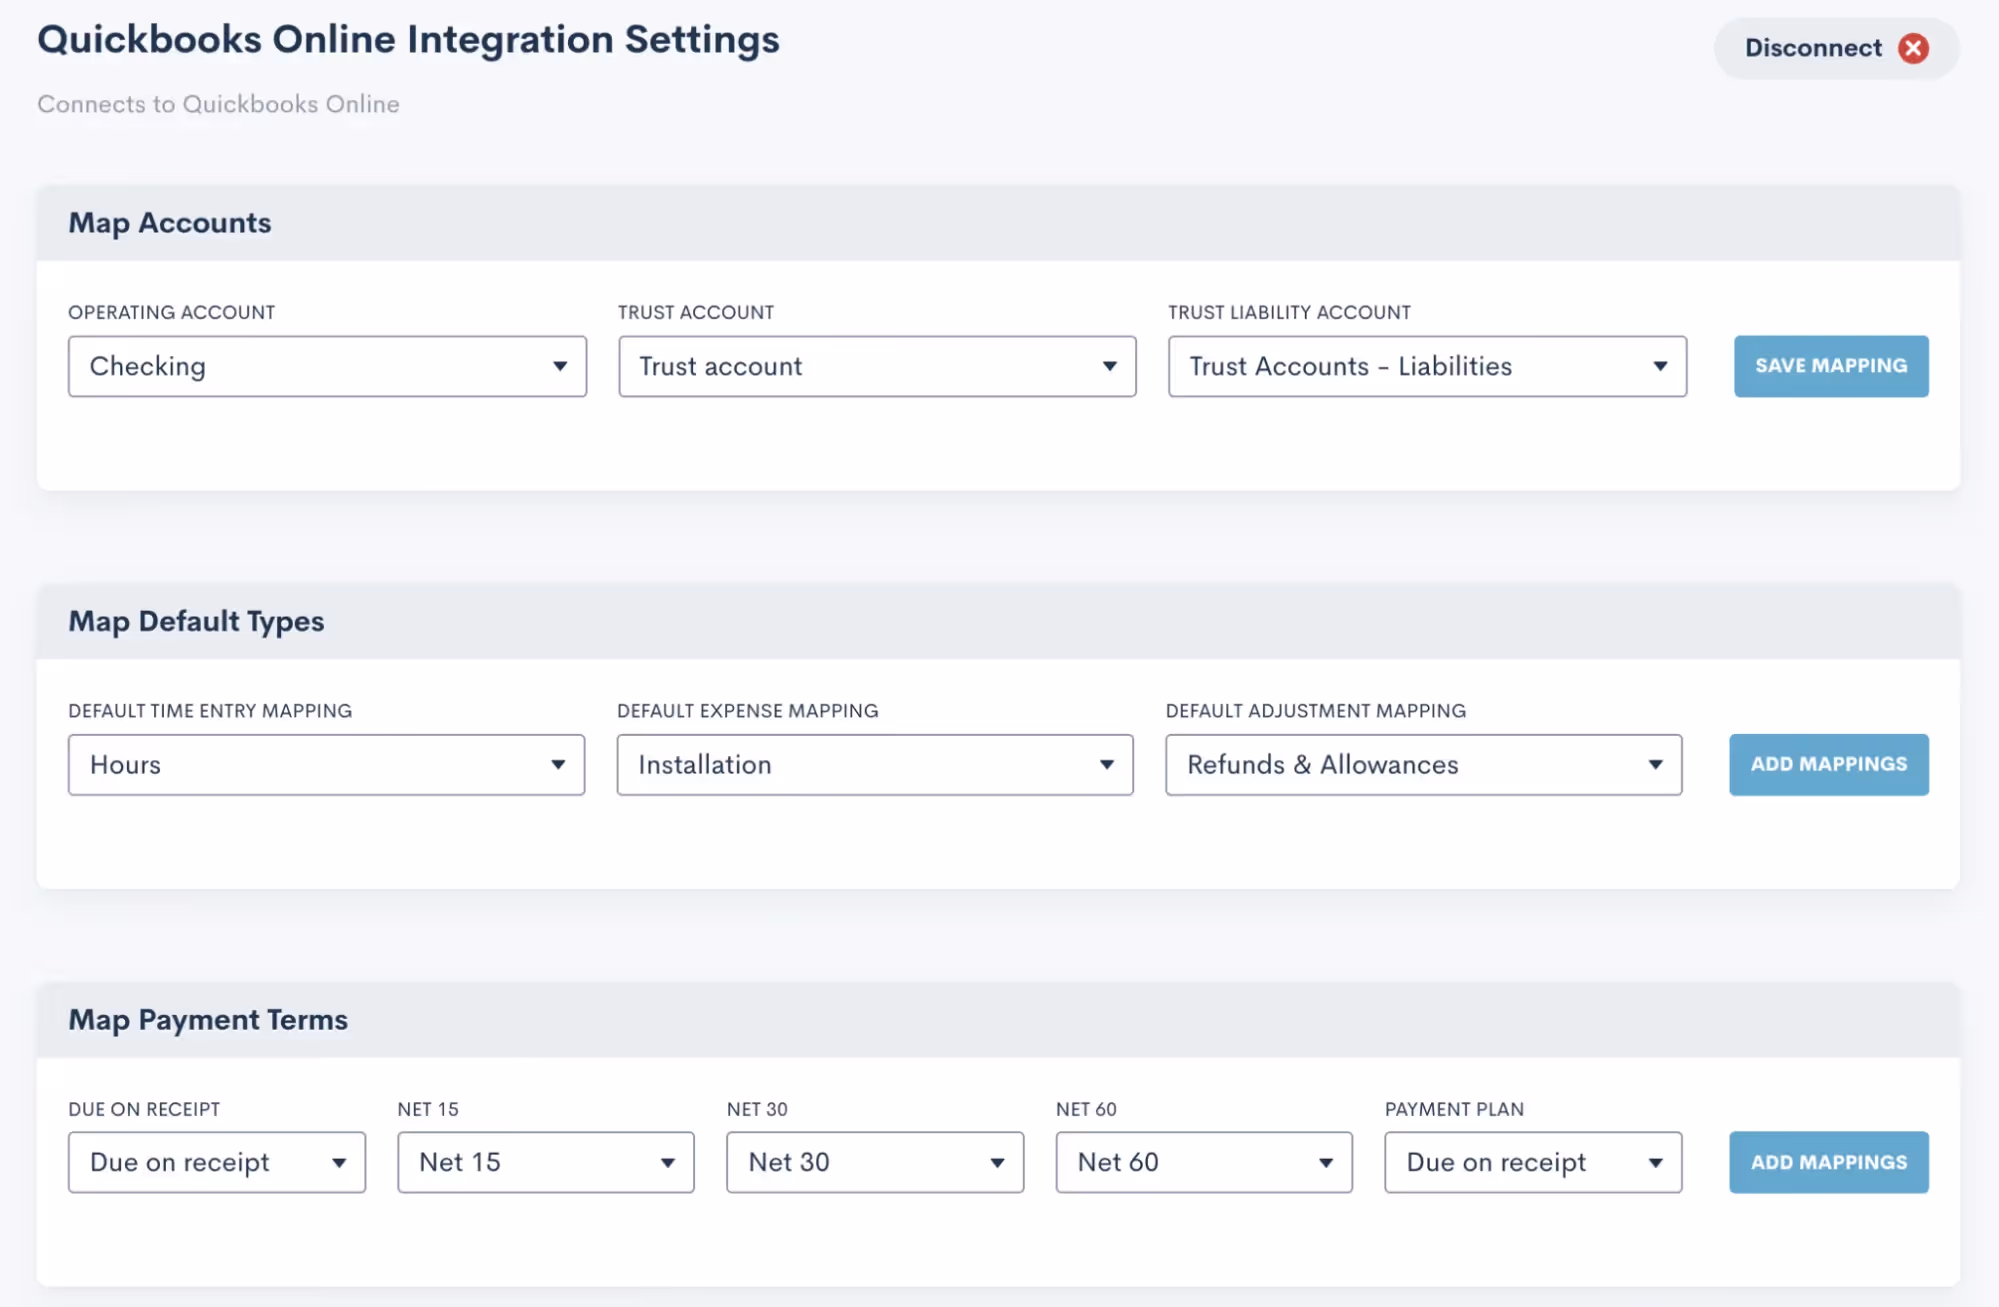
Quickbooks Integration
Lawmatics integrates your invoices directly with Quickbooks. Use this integration to automatically create a customer and invoice in Quickbooks when an invoice is sent to a matter via Lawmatics. Here’s how to begin using the Quickbooks integration with Lawmatics:
- Go to your firm's Settings and select Integrations from the left sidebar.
- Click on Quickbooks.
- Connect your account using the guided prompts.
- Once your account is connected, you will then need to map your accounts, default types, time entries, and expenses to ensure that pertinent matter data syncs from Lawmatics to Quickbooks. Make your selections accordingly.
- Click Save Mapping. Note that you can come back and adjust these any time.
To sync an invoice, simply send it to a matter through Lawmatics as you normally would, then click the Sync to Quickbooks option as shown below.
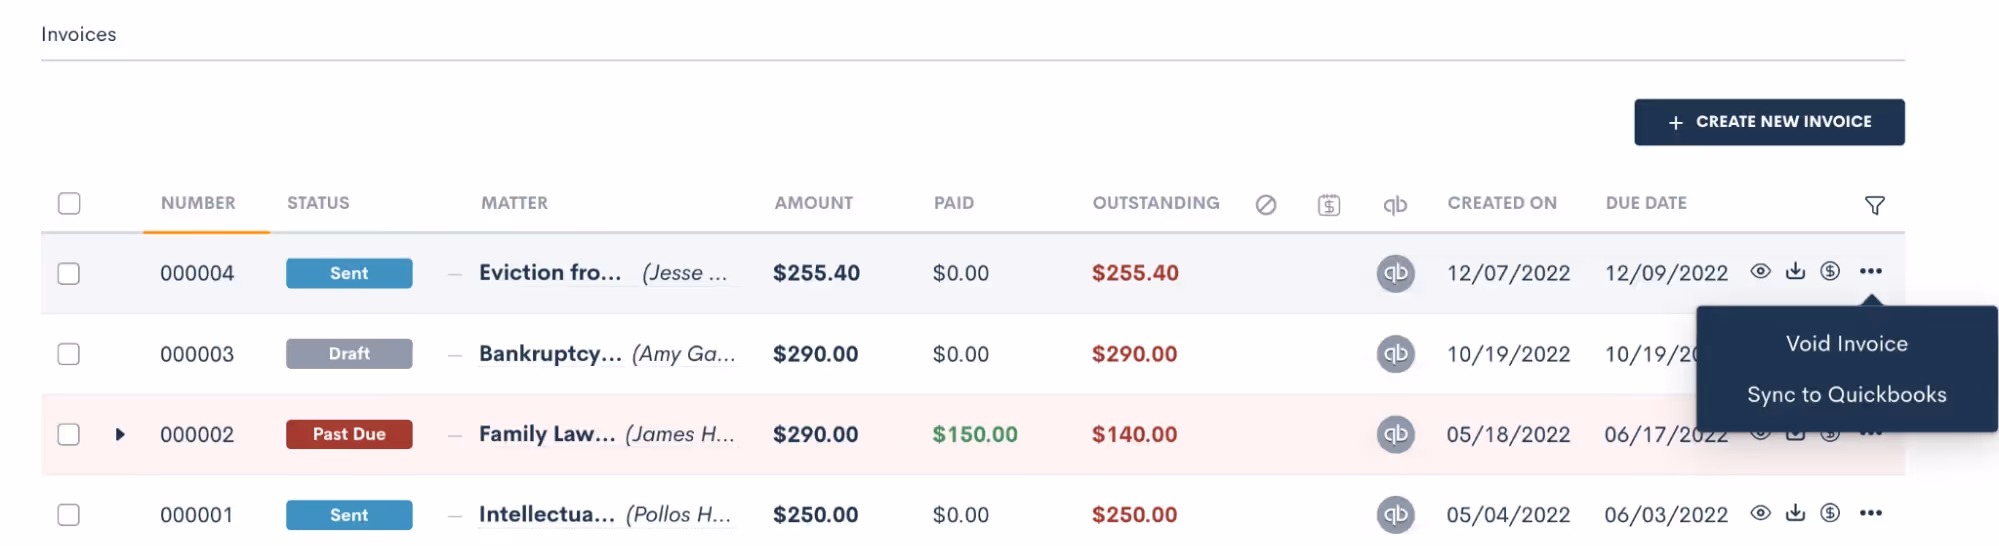
This integration is a one-way sync, pushing data from Lawmatics to Quickbooks. The customer and invoice will be created in Quickbooks, along with any other details you have mapped when you opt to sync the invoice. Additionally, when the customer is created in Quickbooks upon sync you will see "Lawmatics" along with the matter ID added to the last name
Automation
Create Invoices
Keeping in tune with the overall goal of Lawmatics, many of the features we have gone through so far can be used within your automations. First of all, you will find the Create Invoice action item which can be used for creating and sending a Lawmatics invoice automatically.
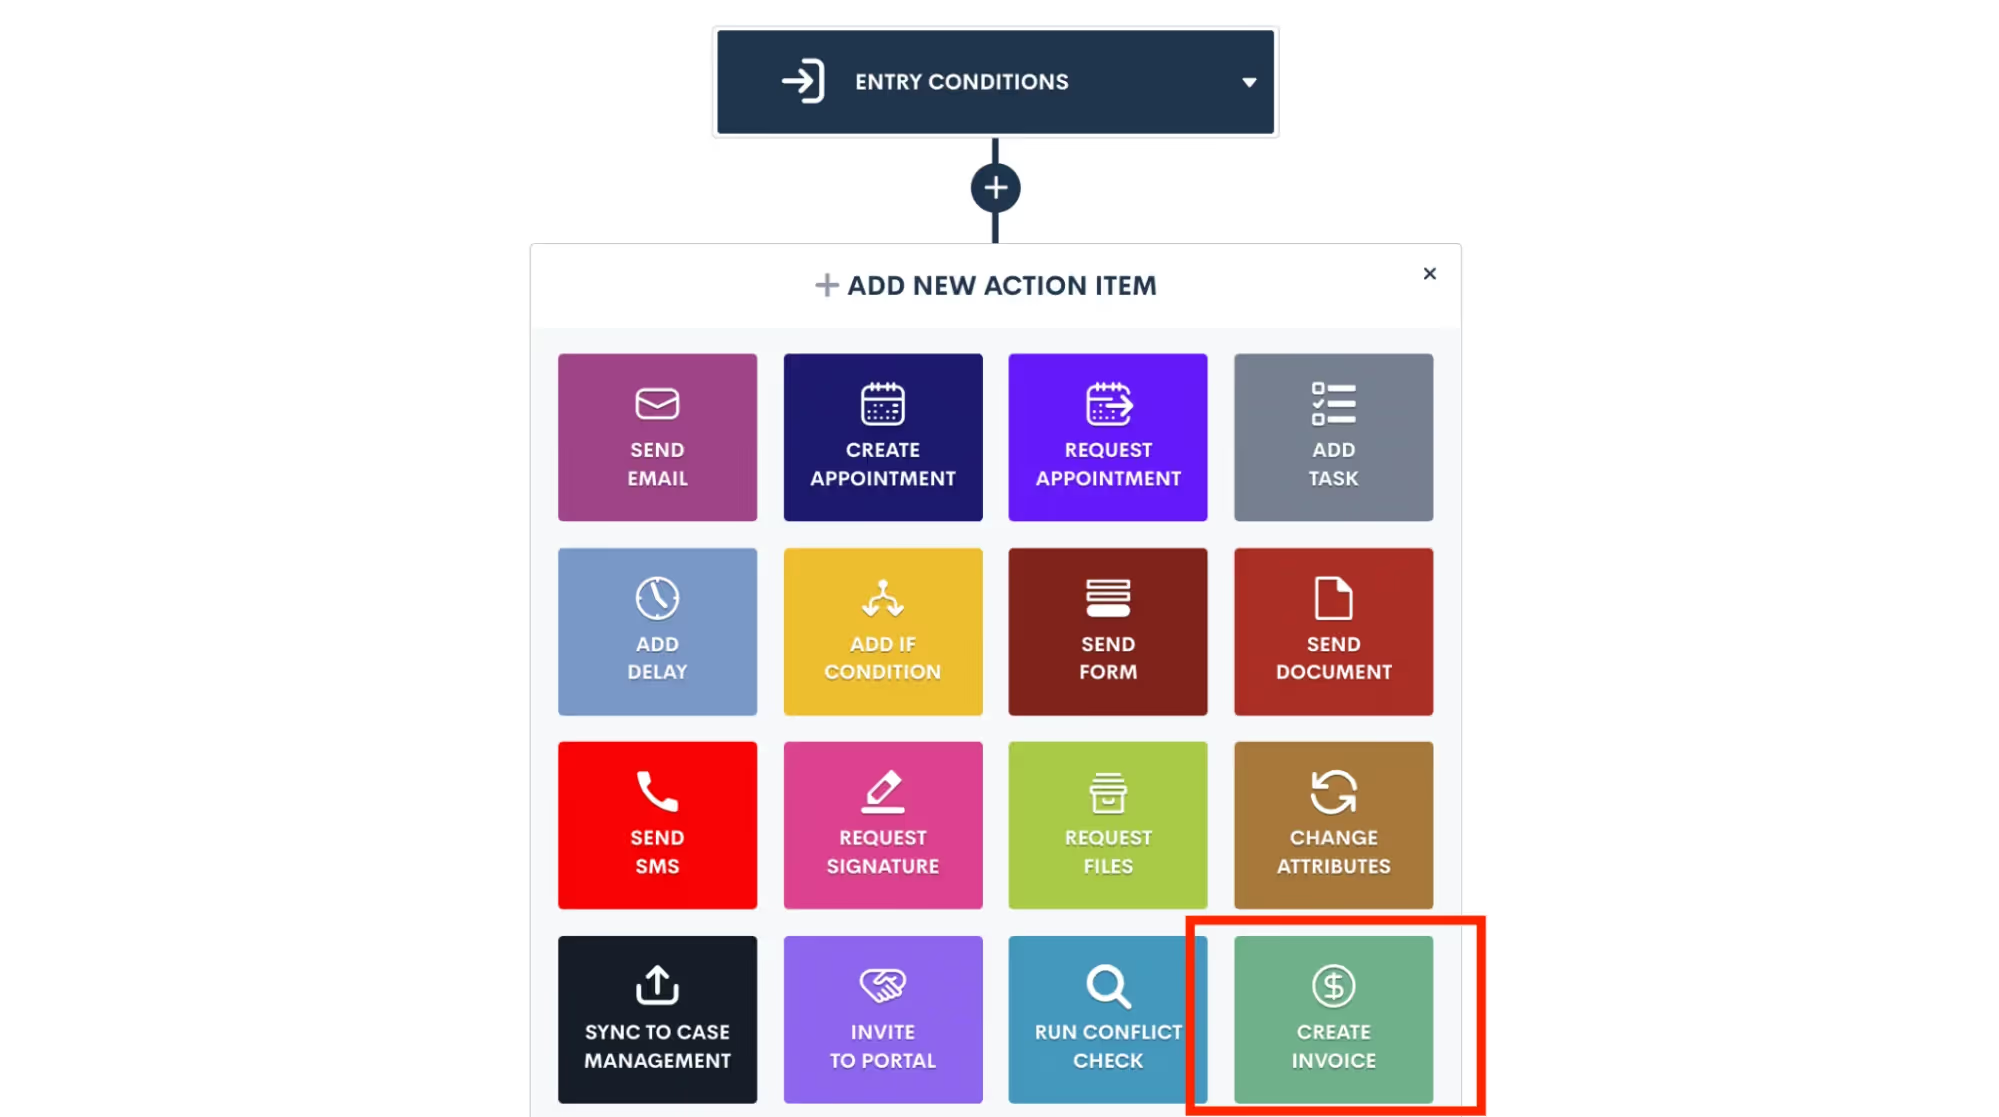
When using this action you will select your payment terms and other options as part of the automation template, just like you would do if you were sending an invoice as a one-off.
Trigger Actions Upon Payment
Additionally, you can trigger an automation when an invoice is paid. So for example, you may send out your retainer agreement for e-signature along with your retainer invoice for payment. You could then have an automation that triggers when both the document is signed and the invoice is paid for kicking off the next step in your process.
Invoice Payment Reminders
Another great way to add automation to your invoicing process is to set up invoice payment reminders. This option allows you to have an automatic email sent out, at the timing of your choosing, for any invoices that are not yet paid before their due date. Have the reminder sent the week before, the day before, or whatever other timeframe you would like.
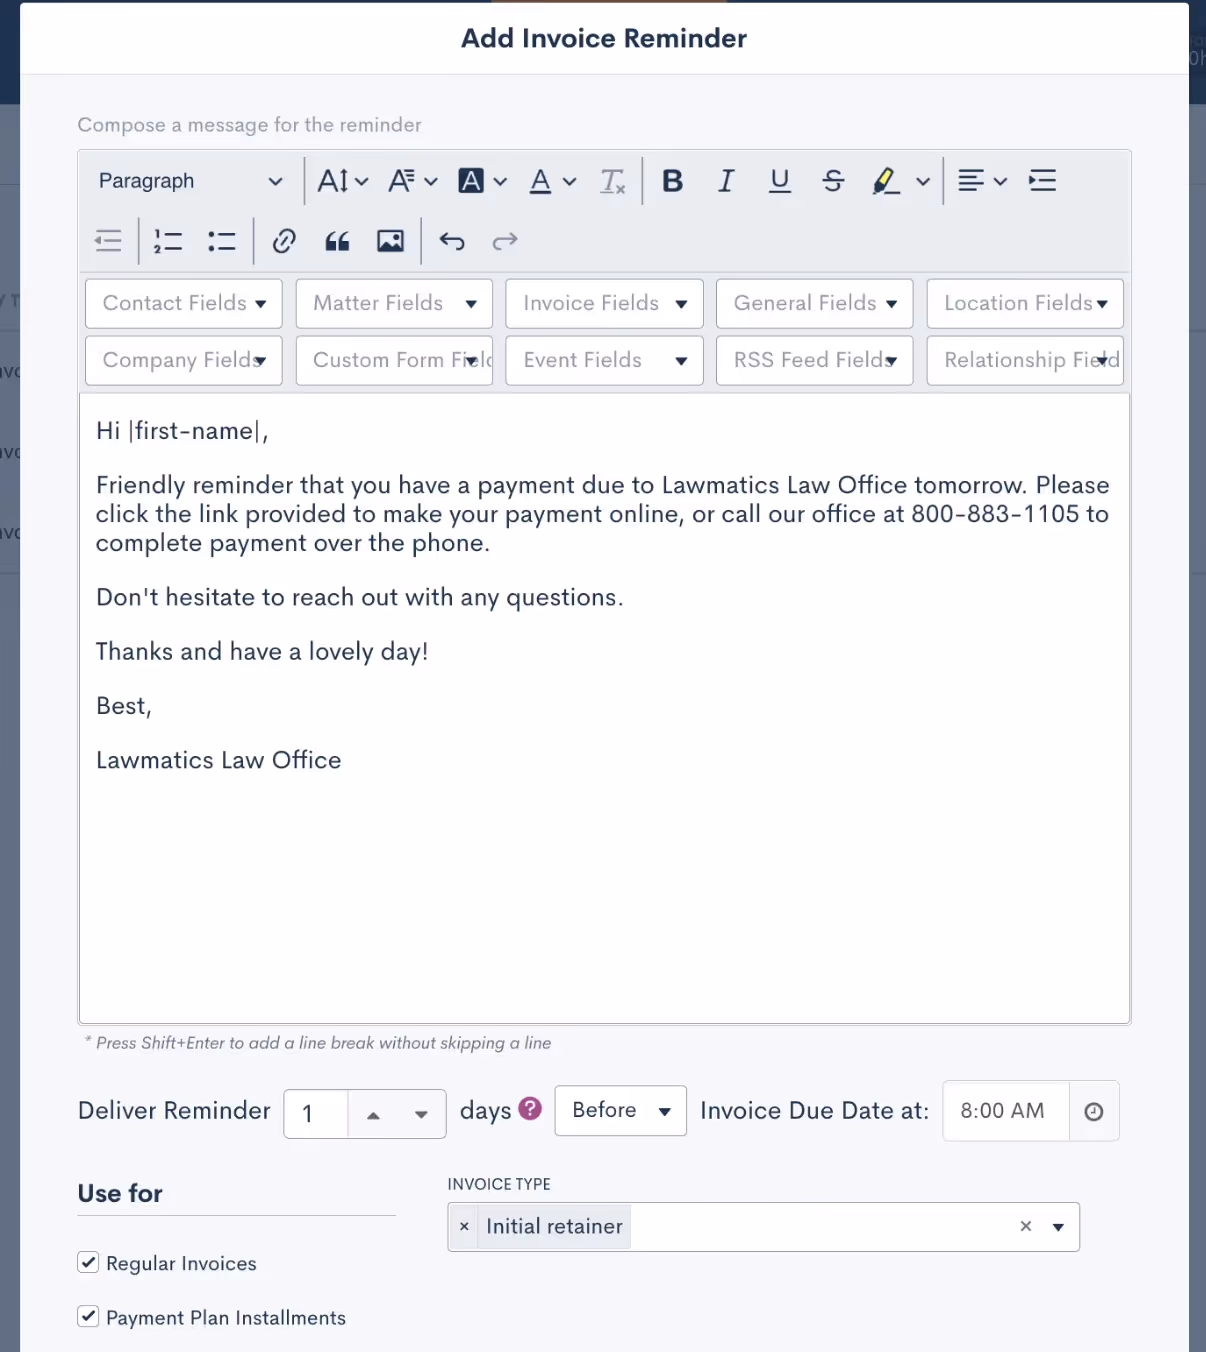
As shown above, you can also create your own custom email template for these reminders. No need to build an automation for this, simply set up the template on your Invoices page in settings and it will automatically go out at the timing of your choosing.
Conclusion
In summary, whether you are looking for the complete package of time & billing features or a simpler solution focusing on consultation payments, Lawmatics has what you need to access this functionality directly in your CRM.Most importantly, Lawmatics helps you collect your payments easily and quickly, creating a smooth experience for both you and your clients. These features work into your automations seamlessly, so you can set a workflow and forget it, knowing that it will run like a well-oiled machine.Unlike other platforms that only have one function, such as Calendly or Acuity for paid bookings or Lawpay to take payments, when you schedule paid consultations through Lawmatics you are keeping the entire process, from start to finish, in one platform.


We’ve had a momentous year here at Lawmatics when it comes to feature releases. From our new Time & Billing module to our MyCase Integration, you may have already implemented many of these into your practice.There may also be some enhancements and additions that you missed or have since forgotten about. This deep dive into the year’s features will give you a refresher on how you can utilize these to their fullest potential!Register for upcoming Lawmatics Monthly Deep Dives.
Matters & CRM
Client Portal Messaging
In lieu of flooding your inbox with client emails containing sensitive case information, 2-way messaging via the Client Portal conveniently centralizes all your client communications in one easily accessible place. All incoming and outgoing messages are stored in your account as part of a message thread, automatically generating a historical record of any interaction for future reference.Creating and replying to a message thread in Lawmatics is easy for both you and your clients. A new “Messages” menu item gives you a top-down view of all message threads wherein you can see all incoming and outgoing communications as well as the manner associated.On the client end, their unique Client Portal now features a “Messages” section to easily correspond with firm members assigned to their case. And to ensure no messages slip through the cracks, you can activate email or text notifications to be alerted of any incoming client messages.
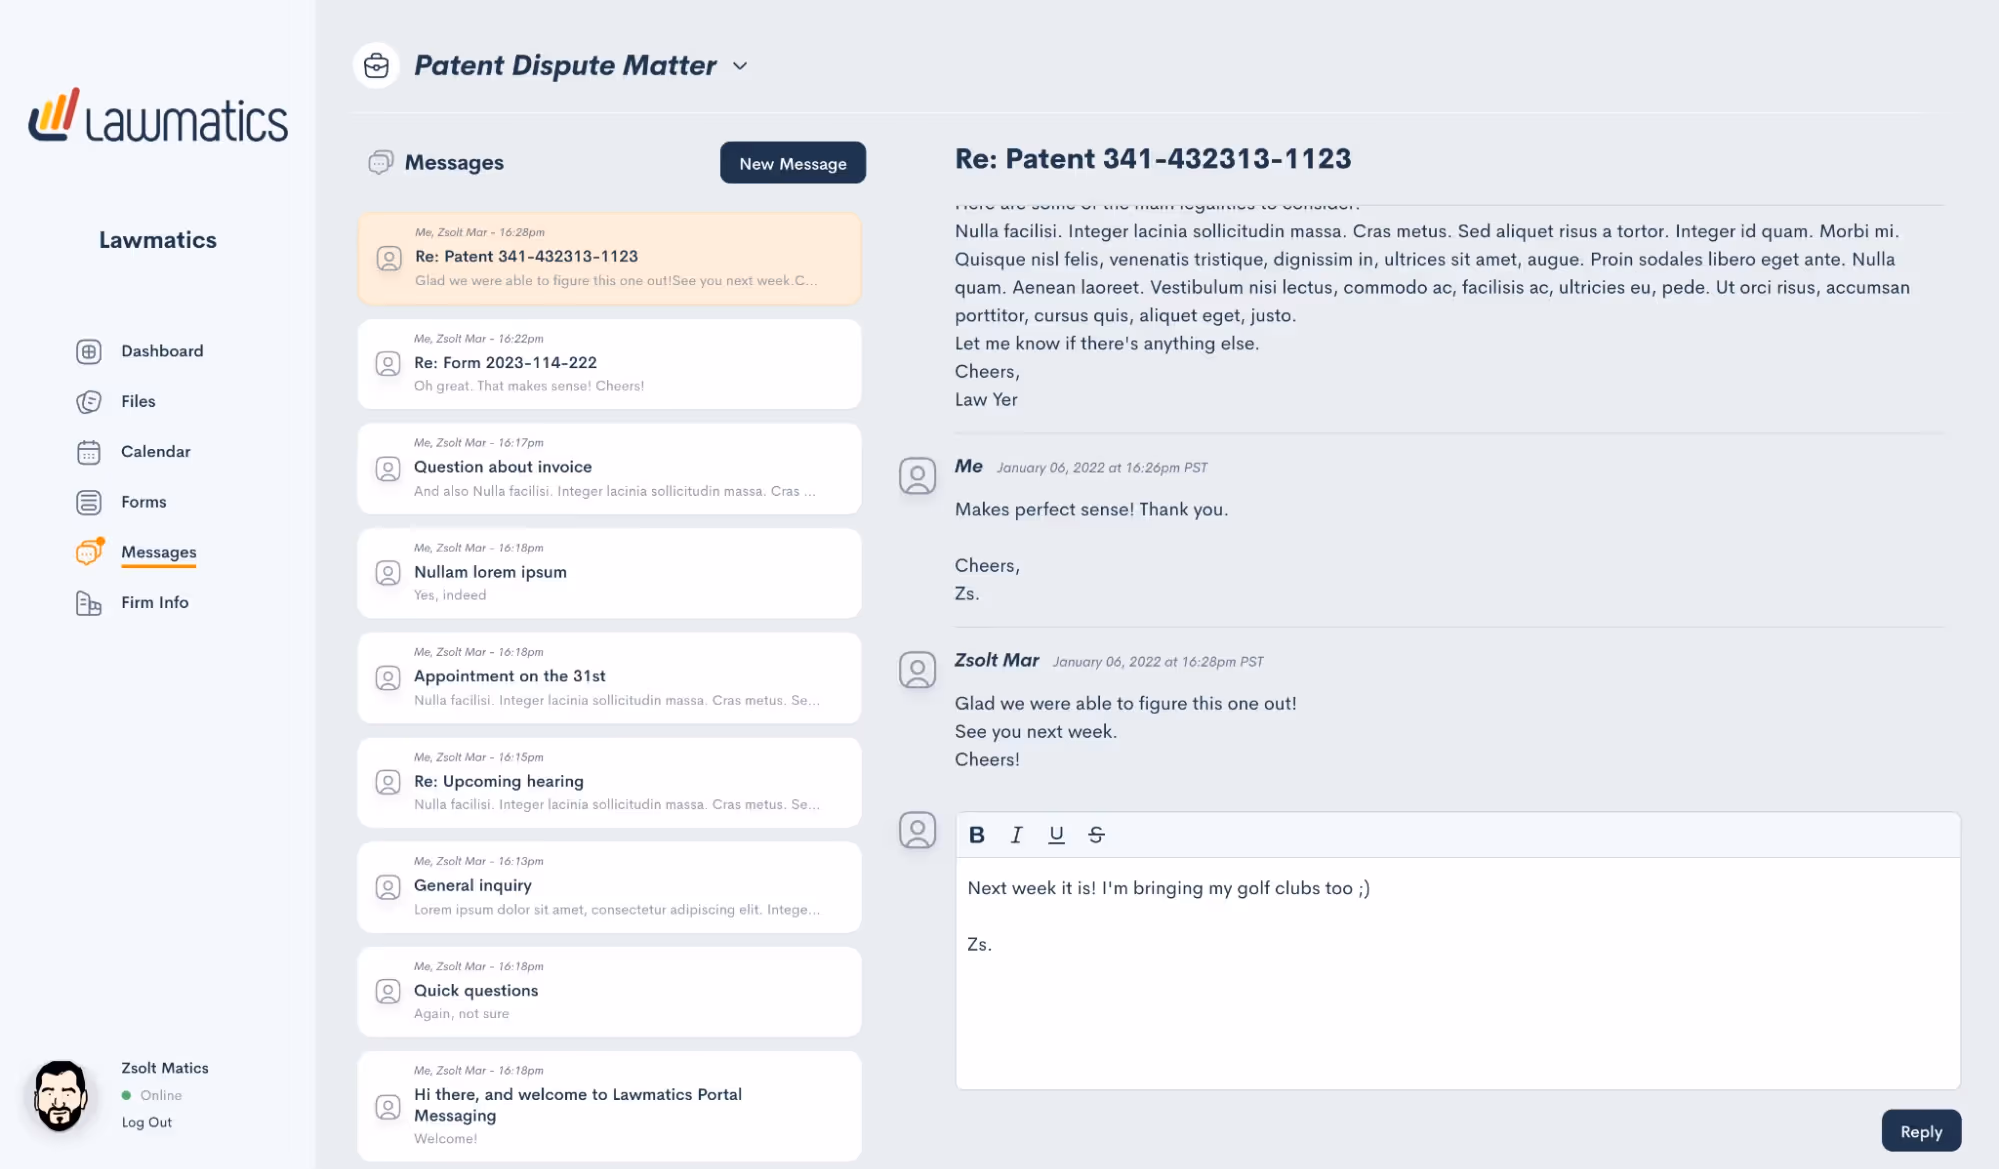
Conflict Checking
It is now easy to use Lawmatics to perform your firm’s conflict checks. Simply select the matter you wish to check a conflict for, enter your search terms, and Lawmatics will handle the rest. The system will search against all data entered into your law firm CRM, including fields and notes, and instantly alerts you if it finds a match.From there, you’re able to review any possible matches, and choose to approve, flag, or fail the conflict check.In addition to manual Conflict Checking, we’ve also added the ability to automate this process entirely and trigger further automation based on the outcome. Now you can be out enjoying time away from the office while Lawmatics handles this tedious task for you.
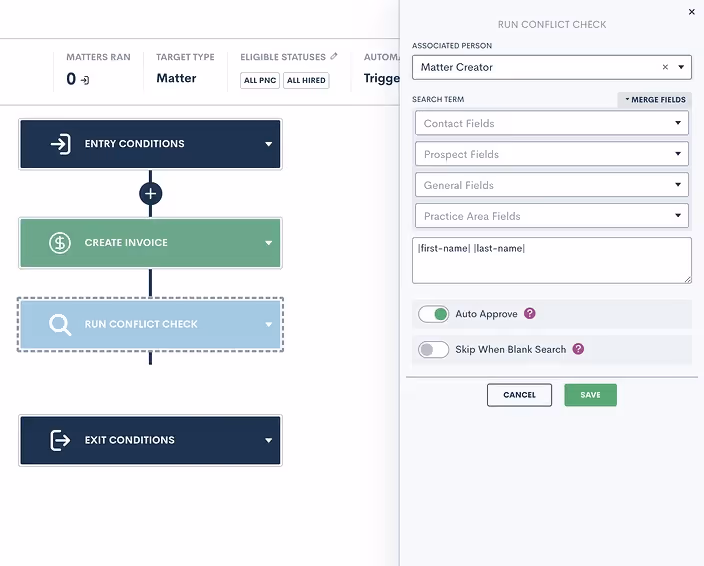
Adding to the conflict check capabilities in Lawmatics, users can now opt to receive notifications for approved, denied, and/or undecided conflict checks.
Change Main Contact/ Compact Matter
If your firm often works with matters that have more than one contact, such as a married couple, you may prefer one contact or the other to be listed as the primary name on the matter in your CRM. To that end, you can now easily swap the main contact on a matter from within Lawmatics. Simply click the arrow icon adjacent to a contact's name in their profile, and then select an alternate contact from within your CRM. The same functionality is applicable to company matters. This new feature helps you keep your CRM organized and accurate so that you can always find your matters with ease.
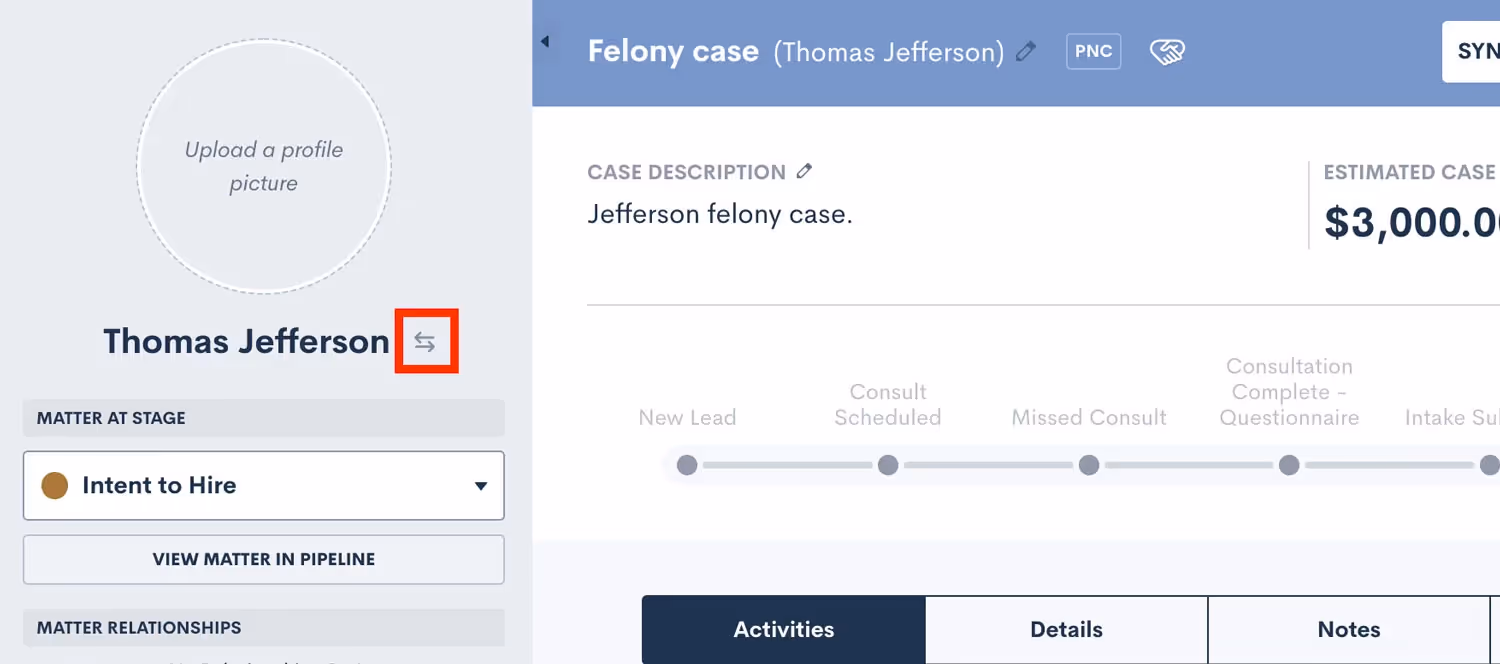
File Folders & Bulk Actions
Lawmatics is a great tool for securely storing important files and documents from your firm’s many matters. With this huge improvement to our file storage system you can now create custom folders within a matter’s files tab and move files between folders as needed.In addition to creating folders for your matter files, you can now bulk select files with the option to download or delete multiple files at once, saving you the time of managing files one by one. It’s easy. Simply select the box adjacent to the file name and click on the action of your choice.

Matter Auto-Numbering
To easily track down and reference cases in your docket, you can now auto-generate a case number and custom title into a matter’s title field as unique identifiers. Further refine your case numbering sequence by adding custom text or database fields such as practice area, lead attorney, client’s last name, etc.
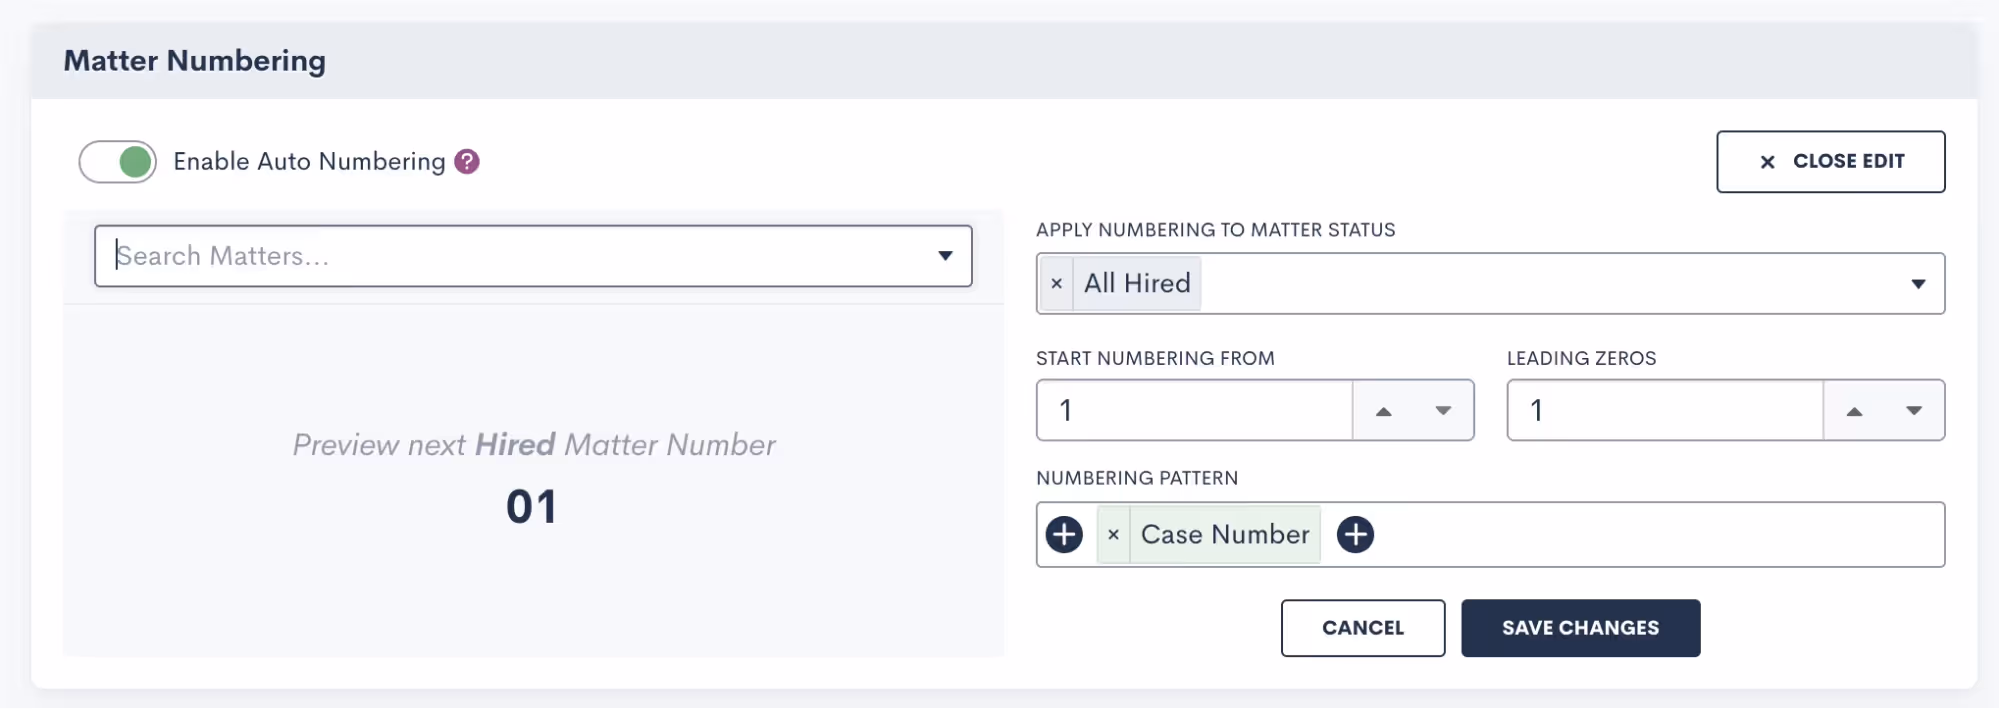
Once saved, the resulting case title format will automatically be applied to each of your matters moving forward. Begin auto-numbering your cases by navigating to the Matters page within settings, scrolling down on the page and toggling on “Enable Auto Numbering”.
Emails
Scheduled Email Sends
By popular demand, you now have the ability to control when your email messages are sent and arrive in your recipient’s inbox. In addition to sending automated and immediate one-off emails to matters, any email created either from a template or from scratch can now be scheduled to go out at a future date and time.

User Permission Options for Viewing Emails
Confidentiality and discretion are paramount when dealing with sensitive client information. While logging your external emails in Lawmatics can be helpful, you may not want the entirety of your staff to have view access to these emails on a matter’s timeline. With our new External Email Role Permission you can now easily limit any user’s access to view email communications, without limiting their access to the matter all together. To use this new permission, go to the User Management page in your Admin Settings, Click Manage Roles, edit the role you wish to apply this restriction to, and then uncheck the All Emails option, as shown below.
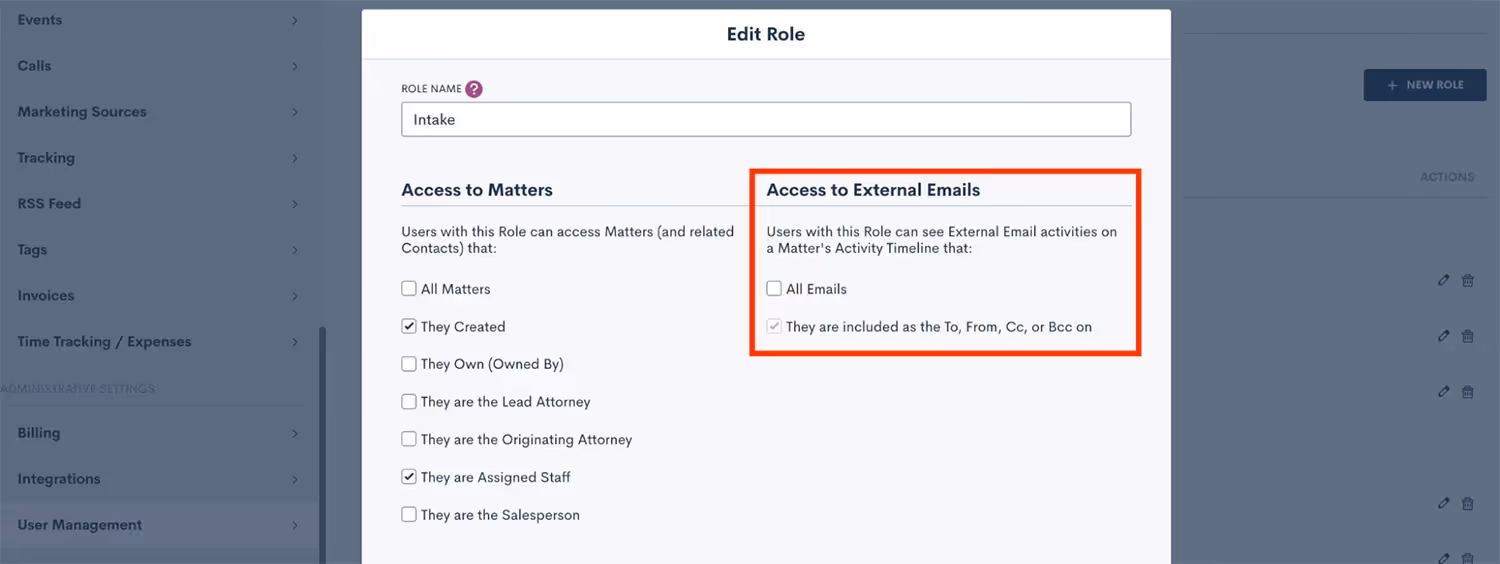
Send From Outbox
A highly anticipated feature among Lawmatics users, any emails sent via Lawmatics can now be set to appear in the outbox of your preferred email client. This update will help improve your firm’s email organization by storing all email correspondences in one central place — alongside your other communications.
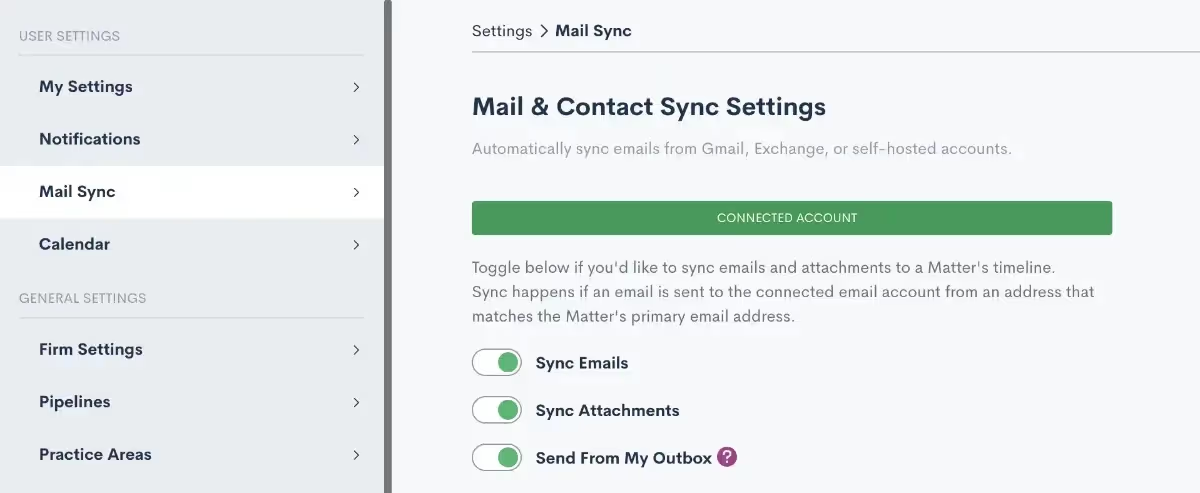
Once activated, any email sent to or received from an email address that is tied to a matter in Lawmatics is automatically logged in the timeline for that matter. And for quick reference, you can easily go to your outbox to see all emails sent from your address, including those sent via Lawmatics.
Documents
Resend Expired Signature Requests
Delays happen; it’s the nature of the business. What you don’t want is for those delays to translate into lost time for you or your staff. For that reason, we’ve rolled out a new shortcut in Lawmatics that allows you to resend any expired documents requiring e-signature.Any document with a status of “Expired” is eligible for a resend, with the added option to extend the e-signature link deadline. No need to send a new e-signature required document from scratch.
Add Page Breaks to Custom Docs
Custom Documents, with their conditional logic and dynamic e-signature capabilities, have long been a Lawmatics staple for fee agreements and other important firm documents. With the new addition of page breaks, we’ve made it much easier to maintain the look and layout of your new and existing document templates.To add a page break, simply edit the document, and drag over a page break from the Standard Blocks menu. Any text below the page break will automatically be placed at the start of a new page when the document is previewed and/or sent.
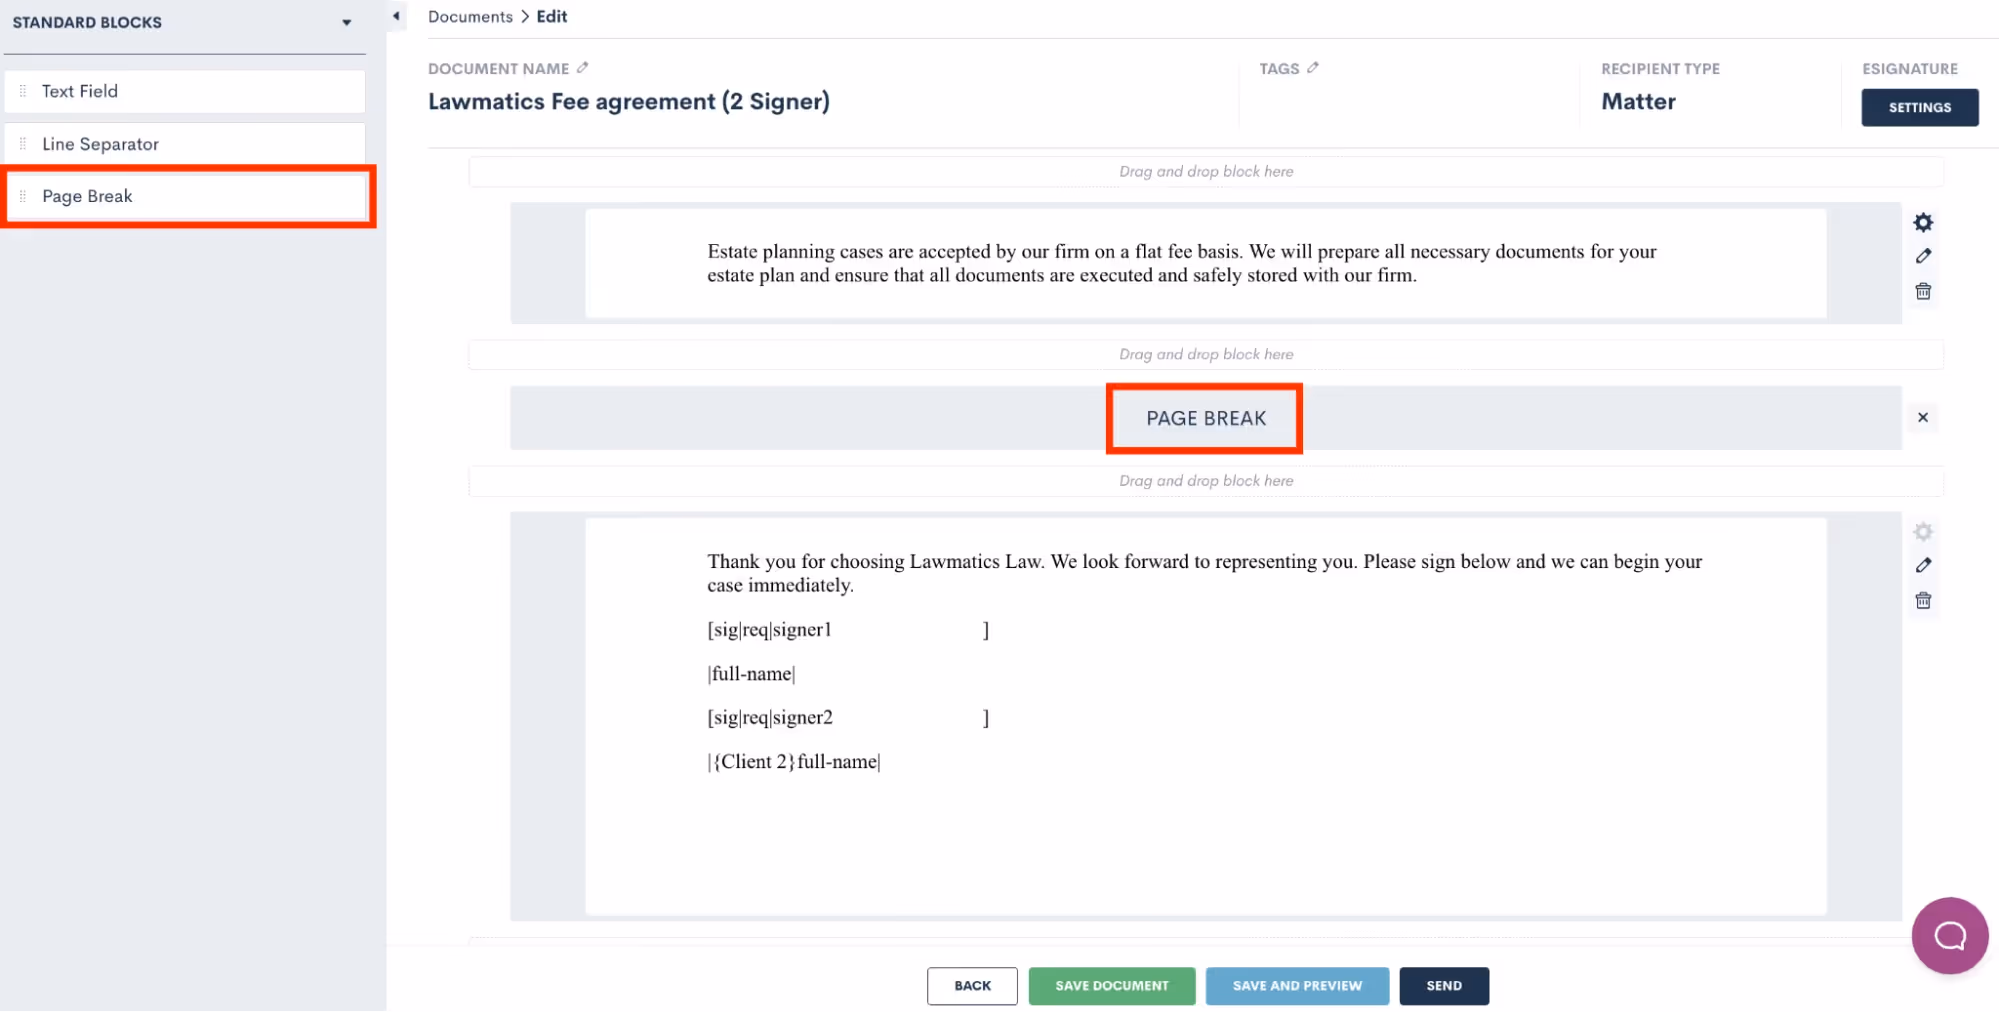
Forms
Set Conditional Logic Multiple Conditions
Onboarding should be a seamless process for all prospective clients, regardless of the circumstances of their inquiry. This update in Lawmatics allows you to add multiple conditional fields to your intake forms using AND or OR logic. These fields then only appear based on the responses entered into previous fields.
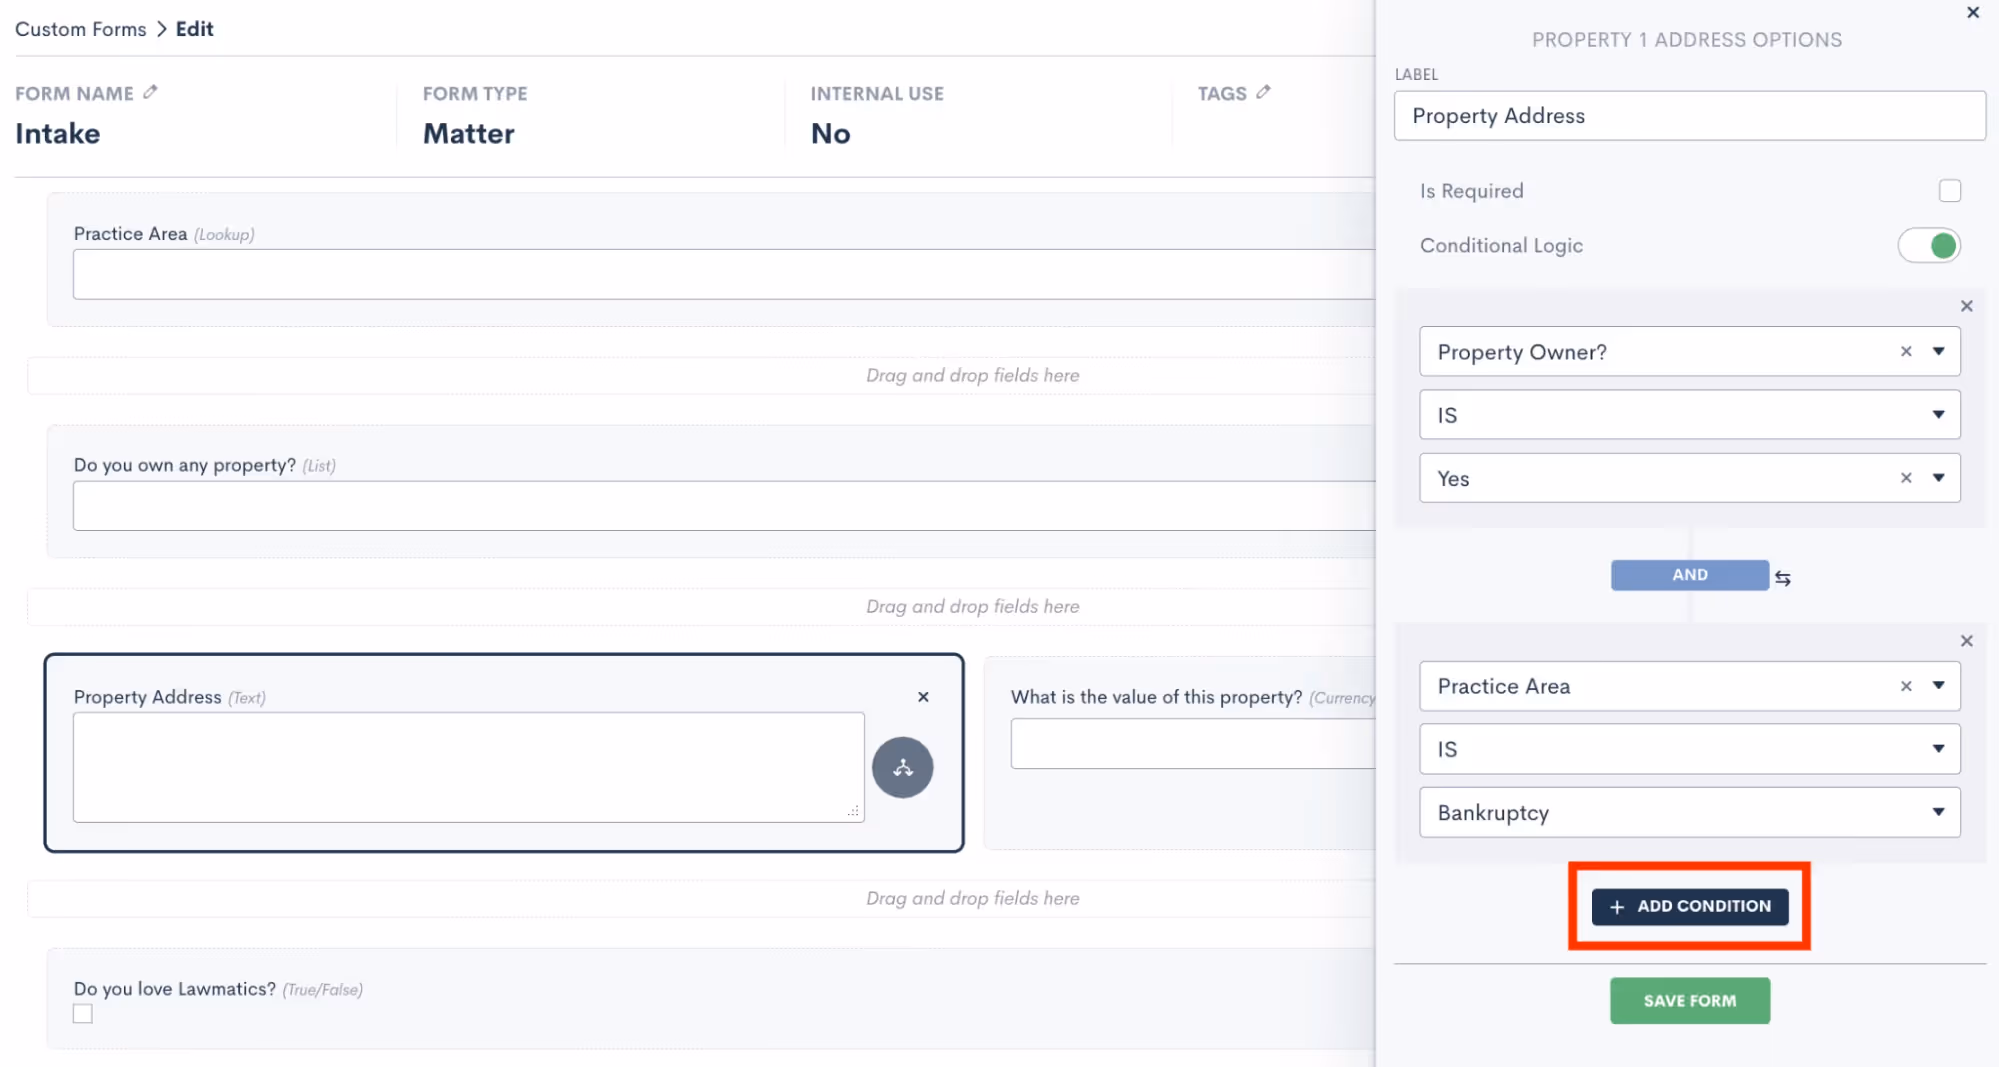
Hidden Form Fields & Default Value
Did you know that you can trigger automatic updates to a client’s contact information, matter information or even stage in your sales pipeline whenever they fill out a form? Hidden form fields do just that.This feature allows you to set form defaults by making any field on a custom form ‘hidden’. You will add the field to your form, select the “Is Hidden” option, and then enter your default value. Your lead or client will not see that field on their form, but when the form is submitted it will auto-submit the hidden value along with the rest of their information to trigger any actions or changes to their information in your Lawmatics account.
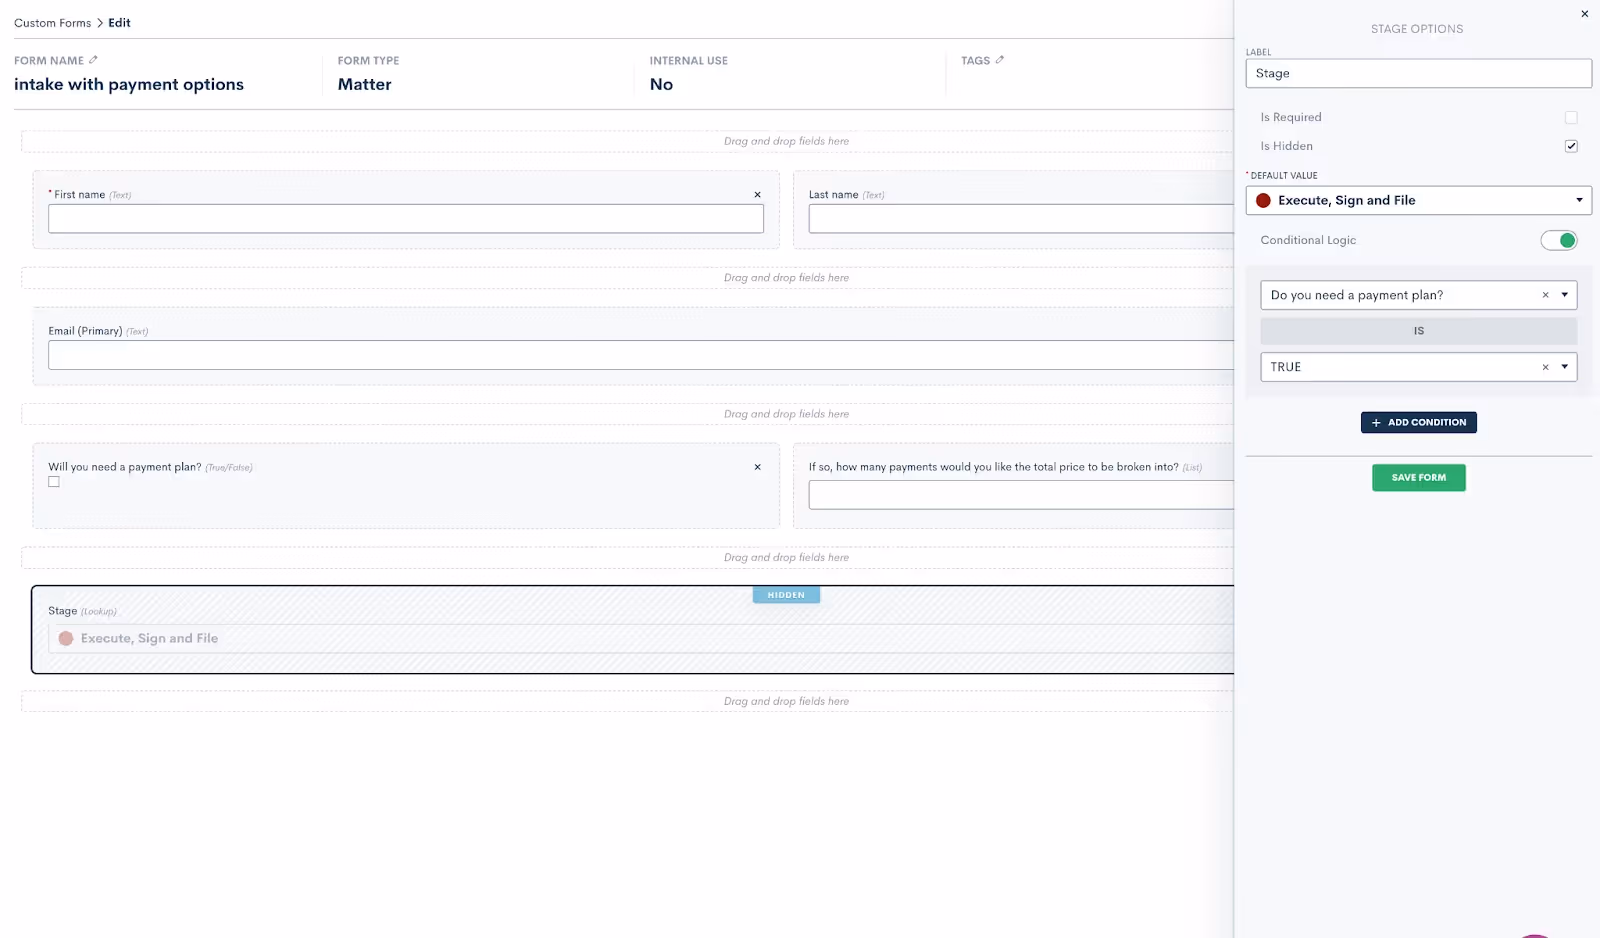
This helps you efficiently track your intake pipeline as simply as possible while eliminating the need for certain Automations previously set to update default values, the sales pipeline stage of a matter, their tag, practice area, etc.
reCaptcha on Embedded Forms
Lawmatics Custom Forms make it easy to capture new prospective client inquiries from your website, and we’ve now made this feature even better with the addition of reCaptcha. This technology prevents spam bots from entering your Lawmatics contact database via the ‘Contact Us’ form embedded on your website, ensuring that your account is protected against disruptive spam leads.reCaptcha can be added to any embedded form via the form Settings menu in the left sidebar. Simply toggle on the reCaptcha option the reCaptcha will be activated anywhere this form is embedded - no further steps need to be taken.

Access Existing Contact from Internal Form
Internal forms have long been a user-preferred way to create new matters for new contacts in Lawmatics. A new dropdown menu option in our internal forms feature now lets you create a new matter for an existing contact or company when filling out a form.
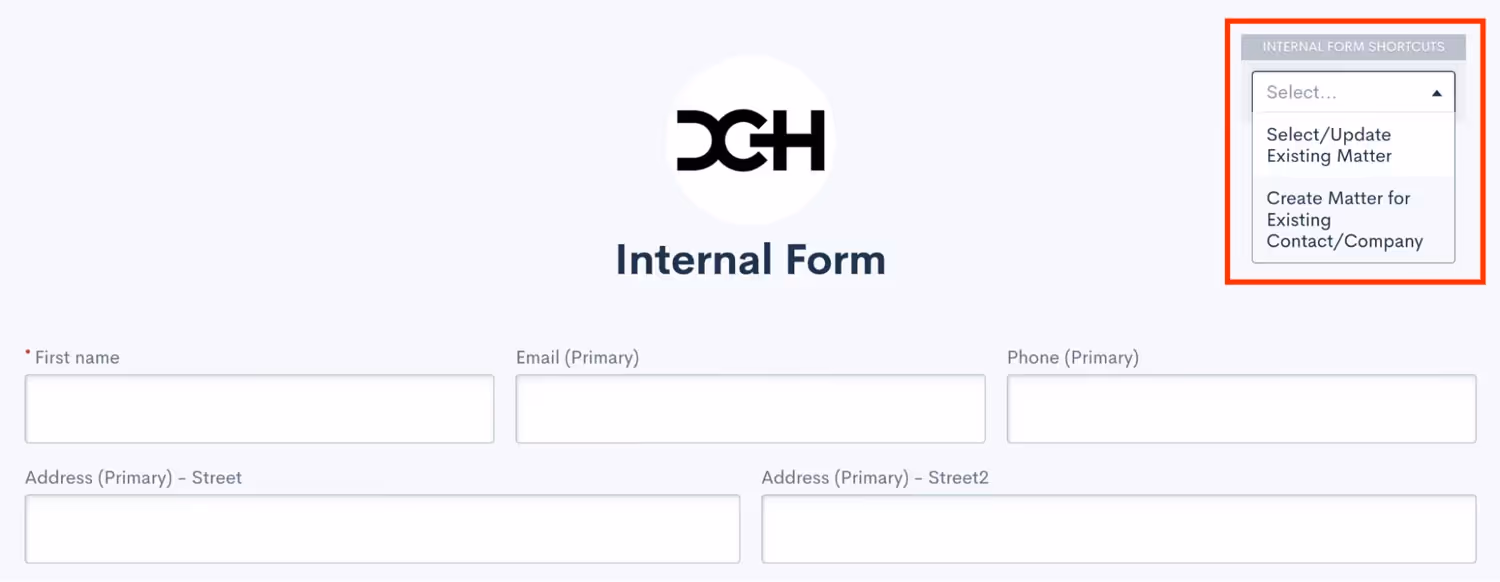
Simply select the contact for which you wish to create a new matter and Lawmatics will pre-fill the form with their existing contact information. Upon form submission, a new matter will be created for said contact.
Booking Form Updates
Automatic scheduling is a favorite feature of many Lawmatics users, and this year it got even better. To accommodate virtual meetings in addition to face-to-face meetings, you can now select Zoom as a meeting location option, along with any of your physical office locations on your Booking Forms. Furthermore, we added the ability to allow multiple attendees in one event. If any of your matters involve the representation of multiple clients, easily add them both to the meeting invite. With the growing popularity of virtual meetings, these upgrades grant your clients the flexibility to choose which option works for them, and have the zoom link added in automatically when needed.
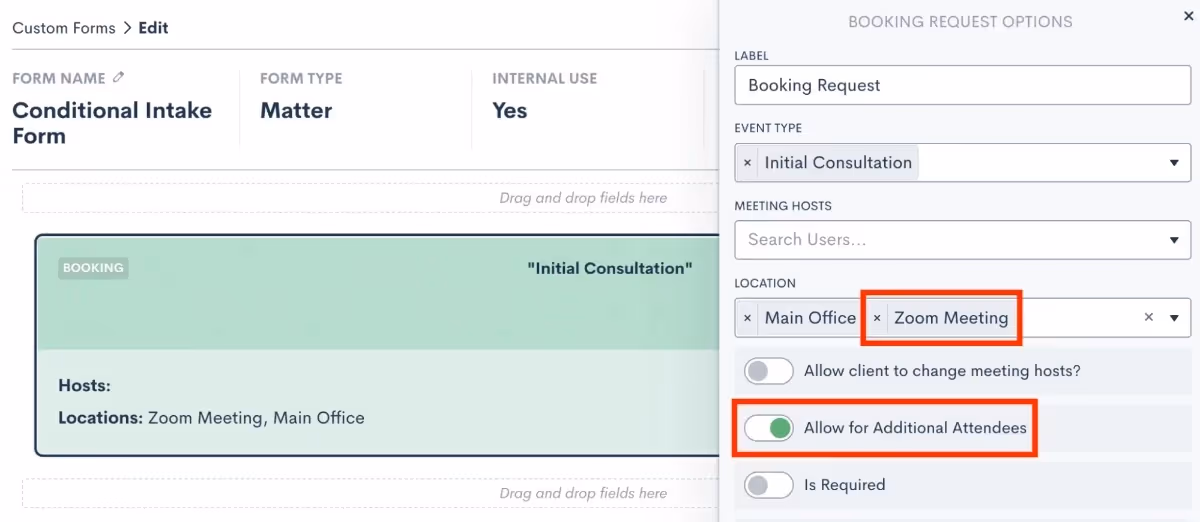
Automations
Set Multiple Entry Conditions with And/Or Relationship
You can now designate multiple entry conditions (or triggers) that add contacts to an Automation workflow, automatically. Using AND or OR logic, triggers such as form fills and eSignature completions can be paired or conditional.Entry conditions can be added easily within Automations in Lawmatics by clicking on and toggling the AND /OR labels, after which you can select your Workflow Entry Rules.
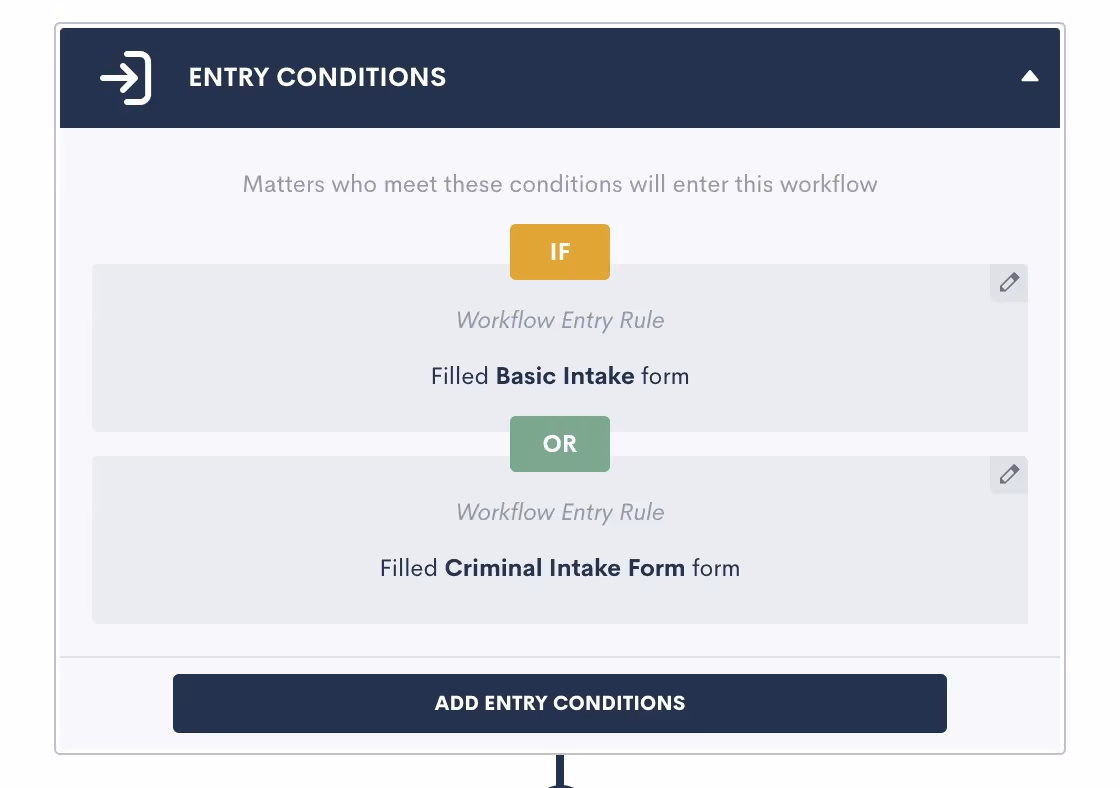
Date Field-Based Automations
You can now create time-relative automations (one hour before, two days after, etc.) for any date type field in Lawmatics. Our new Date Field-Based Automations take the existing concept of event-based automations and apply it to date fields. This new functionality allows you to trigger automated reminders or check-ins relative to a client’s court date, filing date, anniversary, or any other custom date field you may use in your practice — all from simply populating the date into a date type field.When creating a new automation you’ll select the Date Field option, then select from any of your firm’s date type fields as your target field to create a Date Field-Based Automation. You can then add your time-relative automations by clicking on the yellow label at the top of your page (highlighted below).
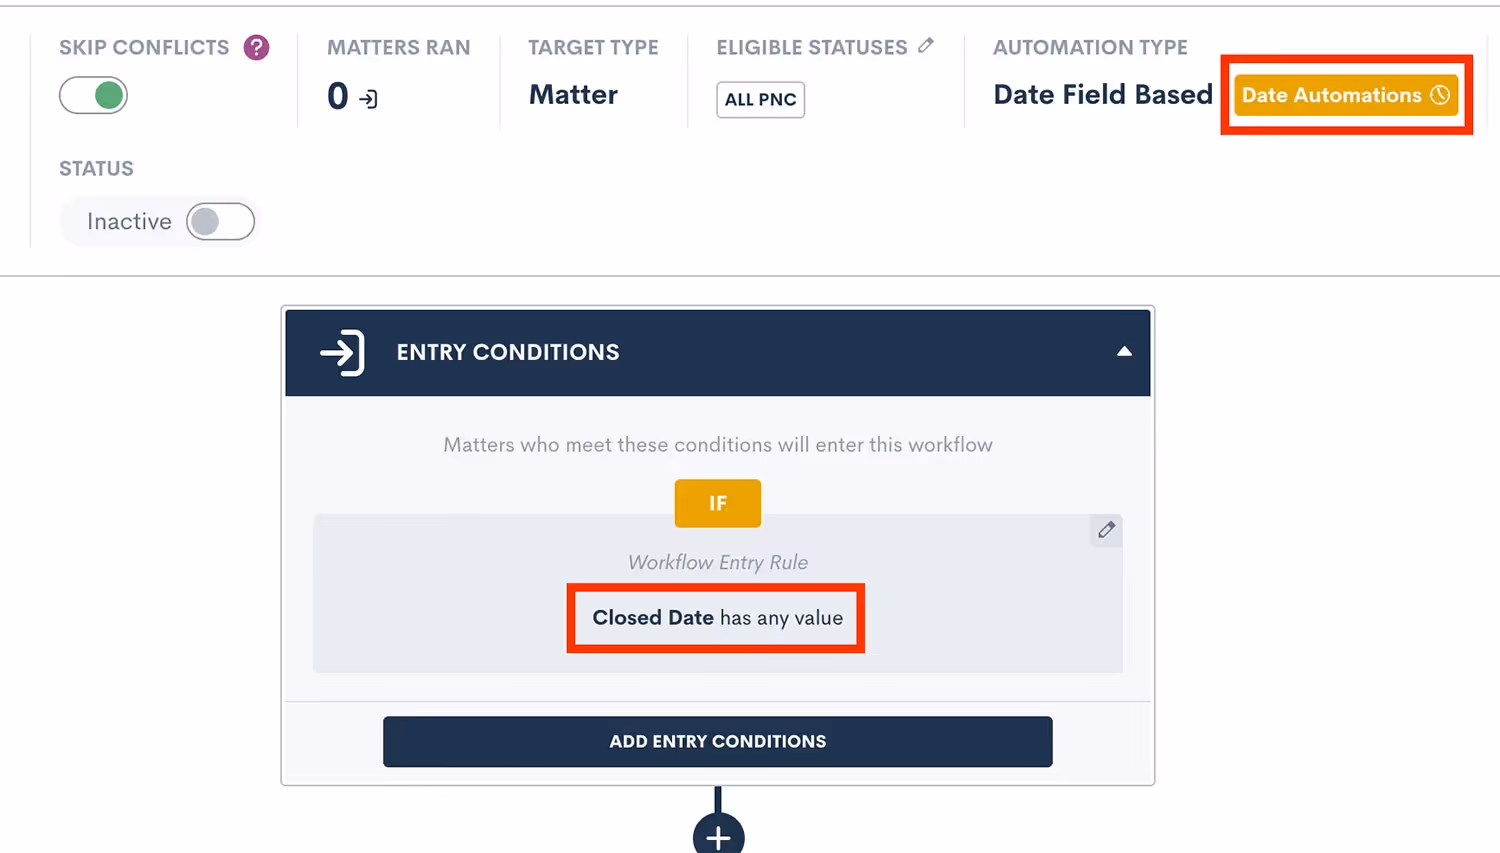
Time & Billing
Invoice Automation
You can now automate the delivery of your flat fee invoices! Automations in Lawmatics feature a new Create Invoice automation action that generates an invoice for any matter with a balance due that it runs on. Doing so enables you to accelerate your billing process in a manner that gets you paid faster while freeing up time to focus on other priorities needing your attention.
Payment Plans
For firms who want to offer their clients more flexibility of payment, use this new feature to set up invoice installments to be paid over time on a fixed cadence.
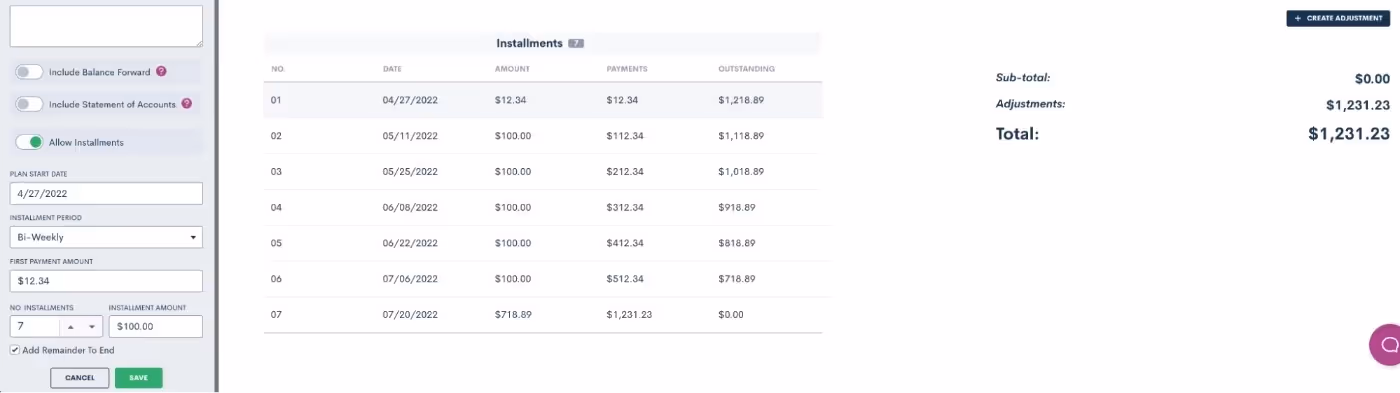
Of course we’ve made this feature highly customizable, allowing you to create unique terms for each individual payment plan as needed. This includes setting an initial payment amount, interval length, and the number of installments.
Custom Forms Payment Gateway
Collecting payment for consultation fees just got a whole lot easier with the addition of the LMPay Gateway in custom forms and booking forms. Add this advanced field to your consultation forms to make it easy for clients to schedule an appointment and pay for a consultation in one fell swoop.
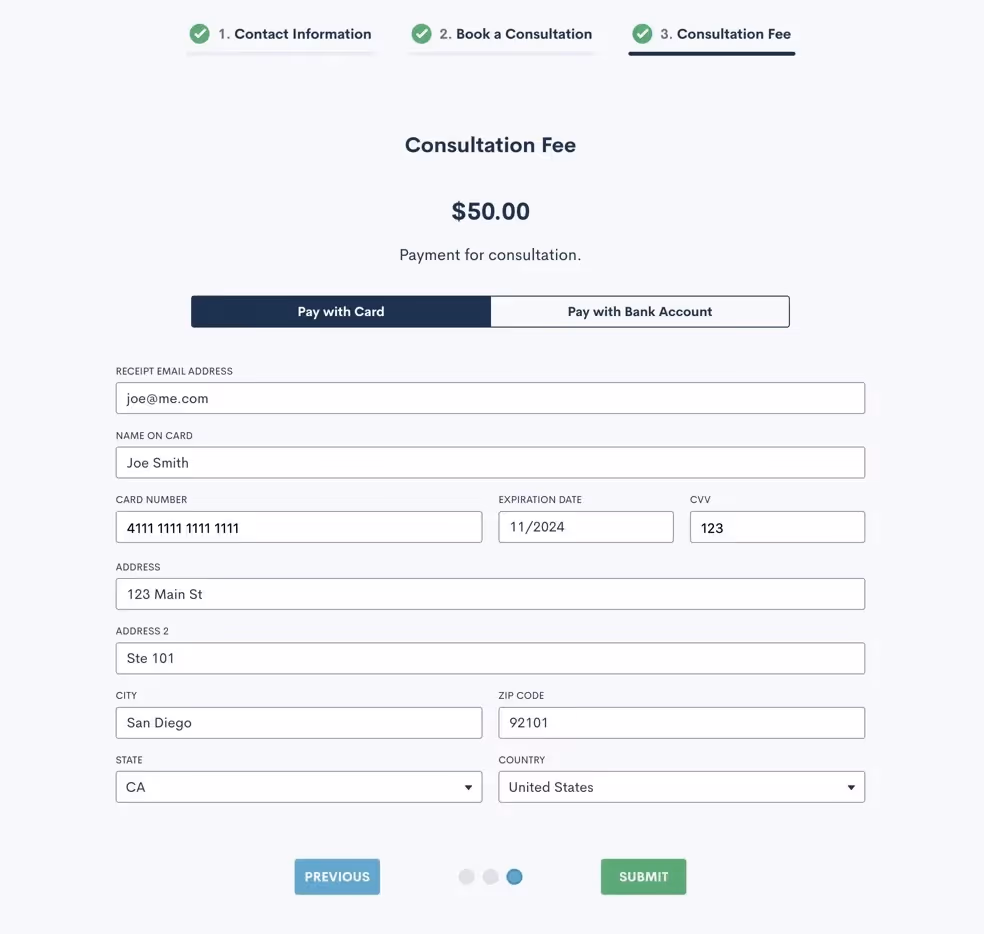
Hours Billed & Payment Activity Reports
Our new Hours Billed Report provides a real-time snapshot of billable hours based on criteria of your choice, so you can make business decisions accordingly. Get as granular as you need with your report by selecting one or more of the following search criteria: date range, user, and practice area.
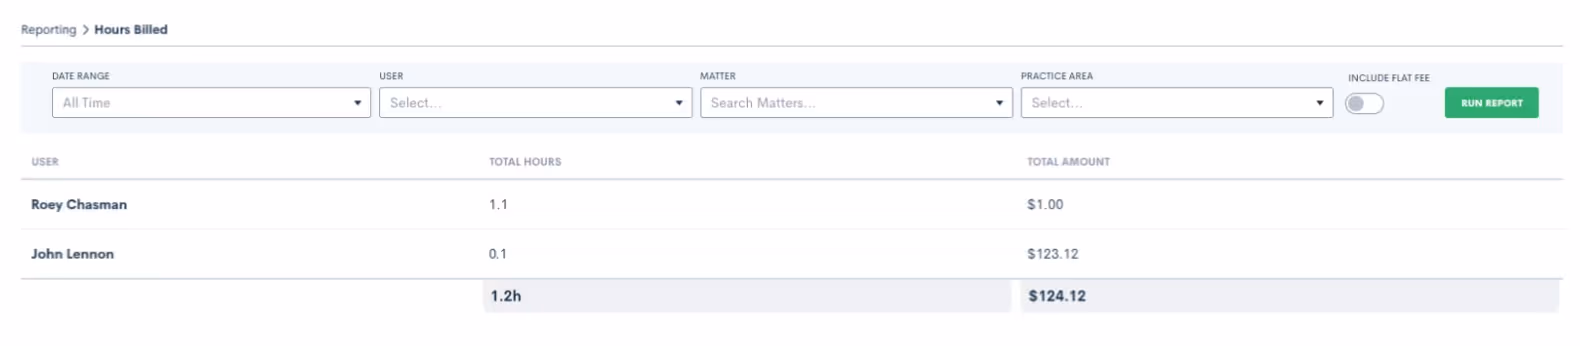
Use the Payment Activity report to set custom filters for the date, payment method, and/or contact. Run the report to see a snapshot view of the payments that meet your criteria, making it even easier to keep an eye on your firm’s incoming cash flows.
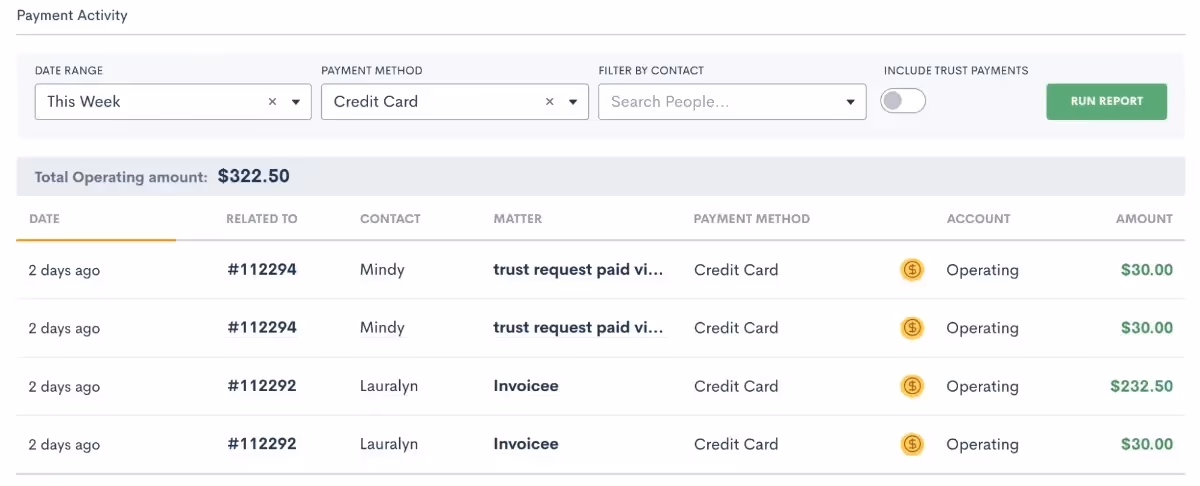
Evergreen Trust Alerts & Request Funds for Trust
Our new Evergreen Trust Alerts give you the option to set a minimum trust balance notification, making it easy to take action when a matter’s trust balance dips below the minimum you have specified.
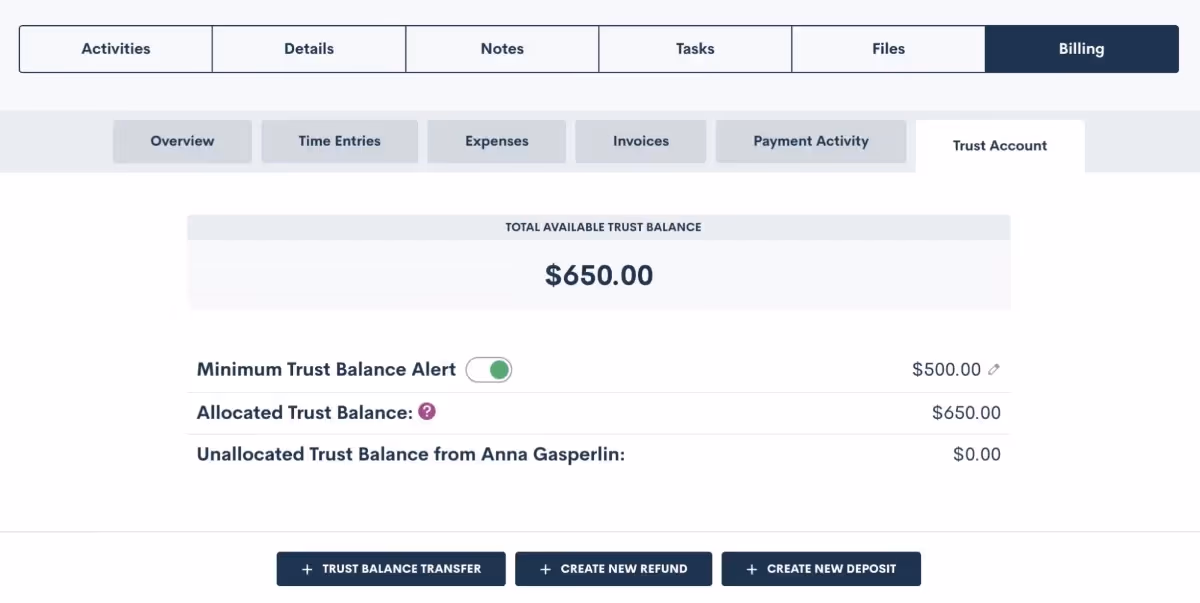
To use this feature, turn on the toggle on the ‘Minimum Trust Balance Alert’, as shown above, and then click the edit pencil on the far right to set the minimum balance for a particular matter.Another addition to our Time & Billing system allows you to request funds from a matter for their trust account with the option to let them pay via credit card. Paired with your minimum balance alerts, this will help ensure that a client’s trust balance stays above your designated minimum amount.
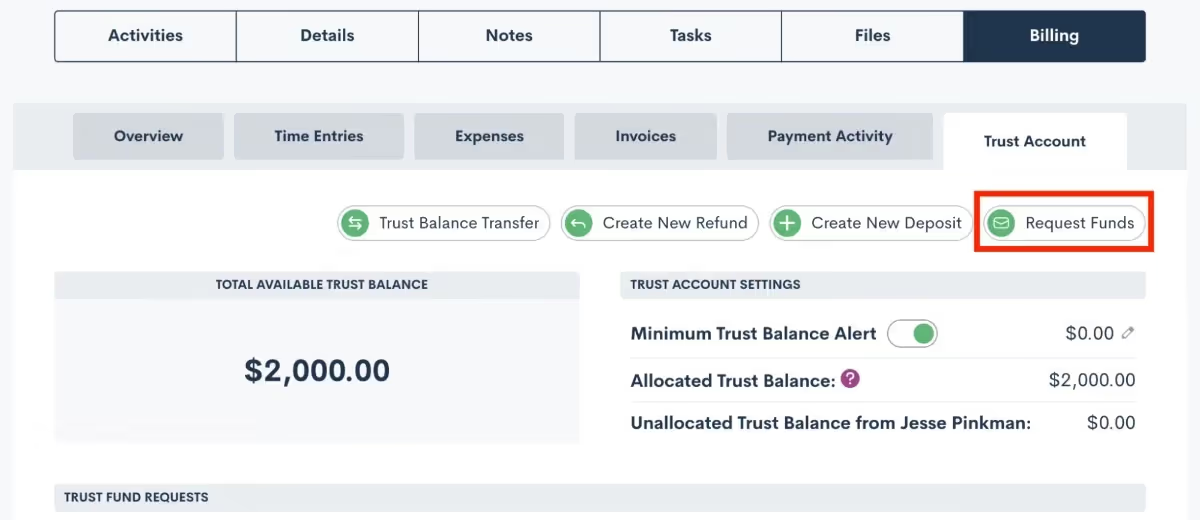
Custom Invoice Reminders
Avoid the frustration of seeing past due invoices go unpaid by notifying clients of an impending due date or past due balance. Reminders can be sent relative to the invoice due date, such as the week before or the day before, or anytime after. Customize each invoice reminder by using merge fields in your email reminder template and even create different templates for your different invoice types.
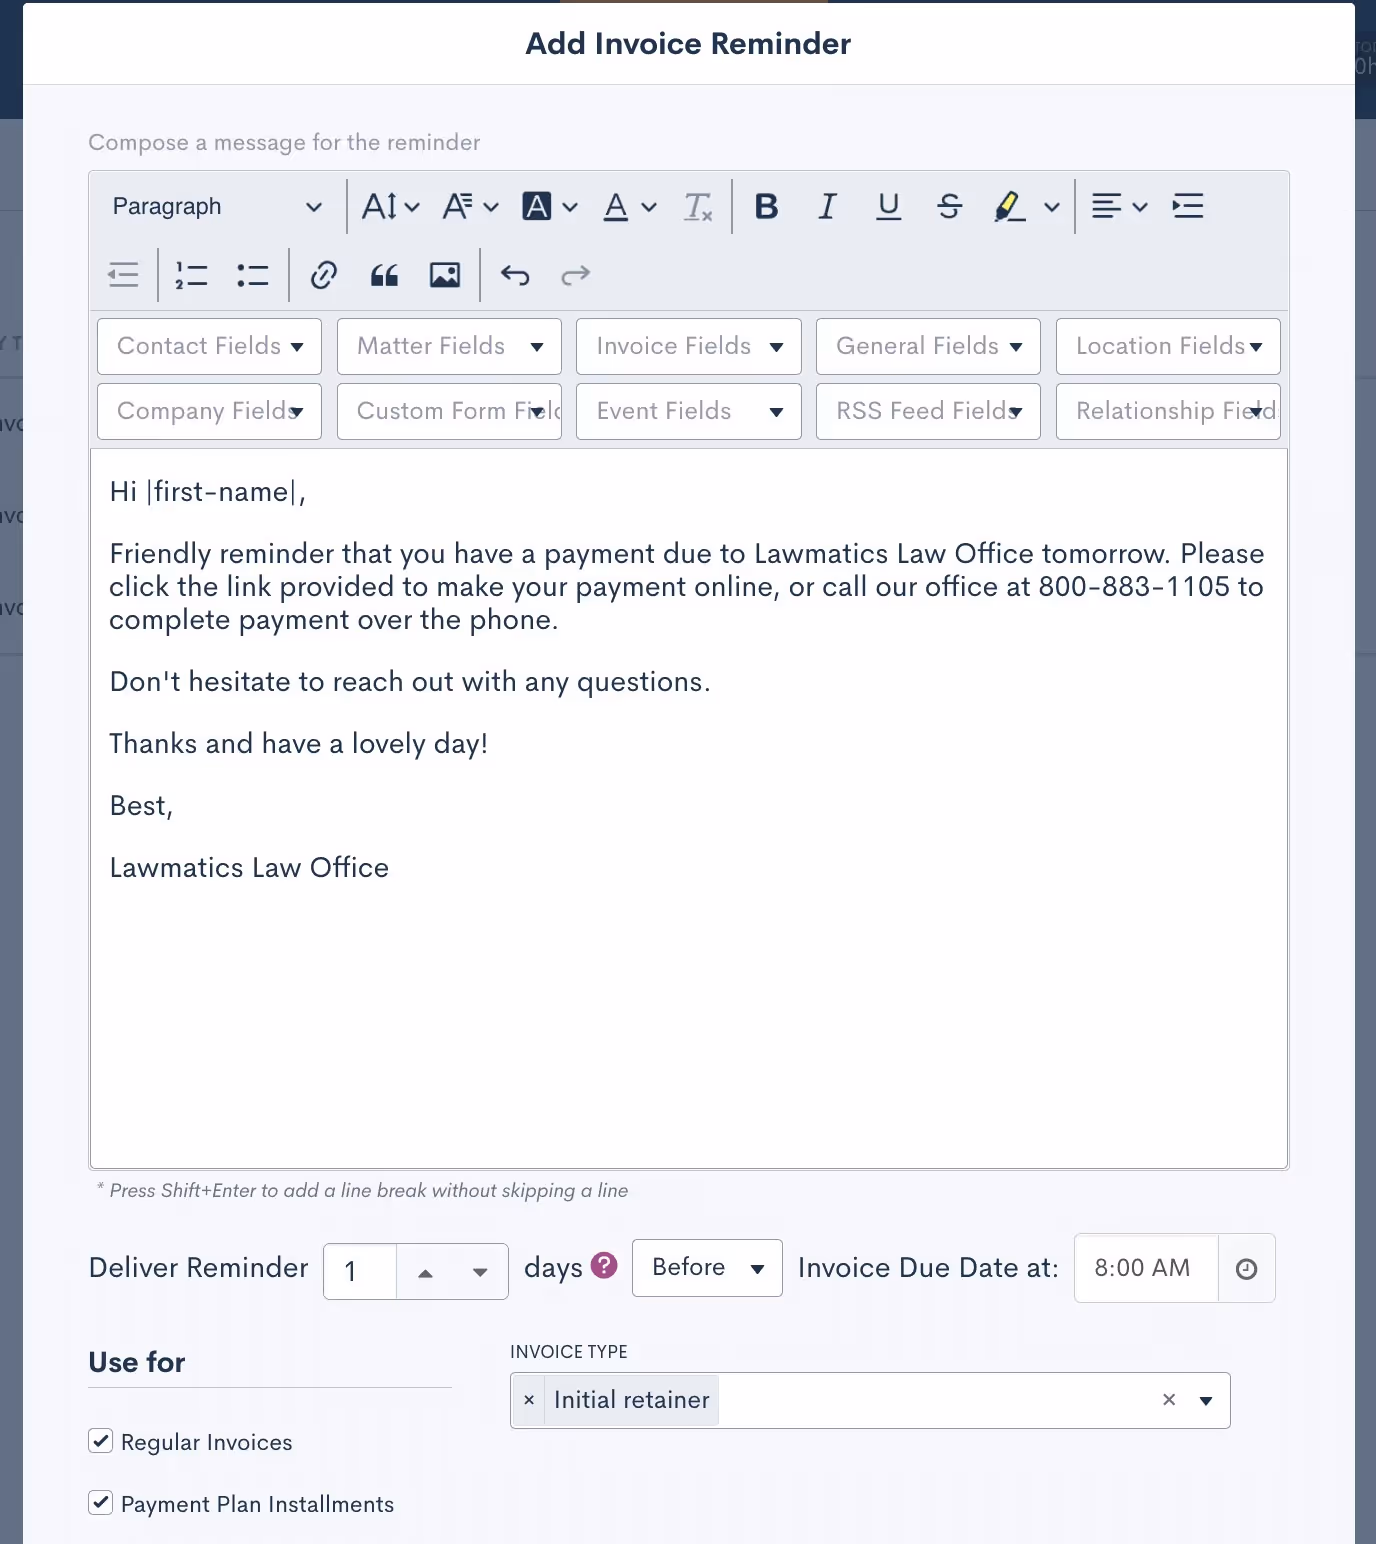
Settings
Update Contacts and Matters Via Import
In addition to importing contacts and clients into your Lawmatics database for the purpose of data migration, you can now use imports to update existing records in Lawmatics with new information. This is especially useful if you are migrating data from multiple software solutions or if you erroneously imported a contact list with missing information.When importing a list of contacts into Lawmatics, a new option appears to Update Existing Records in your database. Simply select .CSV file to upload, check the box, and all existing records with matching email addresses will be populated with any new field information.
Appointment Availability Settings Improvements
Several new upgrades to one of our most beloved time-saving features, Booking Links, help you further customize your calendar availability so that you can ensure you and your staff are booked automatically and appropriately for each of your firm's event types.First, specify at which intervals you’d like to be available for people to book a meeting with you. For instance, if you select 15-minute intervals, people are able to book you at 9:00, 9:15, 9:30, 9:45, etc, based on your availabilityYou can now also customize your “time before” as well as your “rolling period” for all custom event types. “Time Before” refers to how soon you can be booked by someone whereas your “rolling period” refers to how far in advance you can be booked, allowing you to specify an ideal booking window per lead or client.
Integrations
MyCase
Lawmatics users can now automatically or manually sync matters over to MyCase. Any records that have been created in Lawmatics as matters will be pushed into MyCase along with corresponding details like notes and files. The integration, which takes only moments to activate, saves users time by eliminating redundant tasks and matter creation.
QuickBooks

Automatically create a customer and invoice in Quickbooks when an invoice is sent to a matter via Lawmatics. Map your accounts, field types, time entries, and expenses to ensure that pertinent matter data syncs from Lawmatics to Quickbooks. Whether you or a fellow staff member manage your firm’s books, this integration is sure to make invoice generation a breeze.
New Zapier Trigger
For any software that Lawmatics doesn’t directly integrate with, there’s Zapier. This powerful third party tool enables you to connect the robust features of Lawmatics to any of the thousands of other applications available within the Zapier platform.While you may already know and love our popular Zapier triggers such as ‘Matter Converted’, ‘Filled Out a Form’, among many others; we are happy to add yet another trigger, ‘Appointment Created’.Here at Lawmatics, we couldn’t be more excited for all we have in store for 2023, but we are also thrilled at this retrospective of features that have been released this year. We are privileged to be working with so many wonderful firms who use Lawmatics and share new feature ideas and incredible feedback with us.Thanks for following along as we continue to develop and grow Lawmatics. Wishing happy holidays and a wonderful new year to all of you!

While Lawmatics has all the tools you need for collecting and inputting data, what good is all that data if you aren’t using it to gain insights on the performance of your firm? With the power of Lawmatics Custom Reporting and the Analytics Dashboard, you are able to make decisions from a business standpoint to grow and improve your firm.In addition to the KPIs you should be monitoring, Lawmatics gives you the ability to customize and export any of your reports. Meanwhile, the analytics dashboard grants you easy access to metrics like conversion rate, cost per lead, and custom growth goal settings.With all of these features at your fingertips, you’ll be able to grow your business without any guesswork or lack of insights into the trajectory of your business.
Custom Reporting
With custom reporting the possibilities are truly endless in Lawmatics. Slice and dice your data any way you want by essentially creating a table with any fields, filters, grouping, and date range. Furthermore, your reports automatically refresh in real time, meaning that each time you view one, you are seeing the most up-to-date information.
Columns
The first step in creating your custom report is to add fields to be used for your columns. Select from any of the built-in system fields, or any of your custom fields. Simply scroll though the complete list of fields, as shown below, or start typing the name of a field to easily access it.
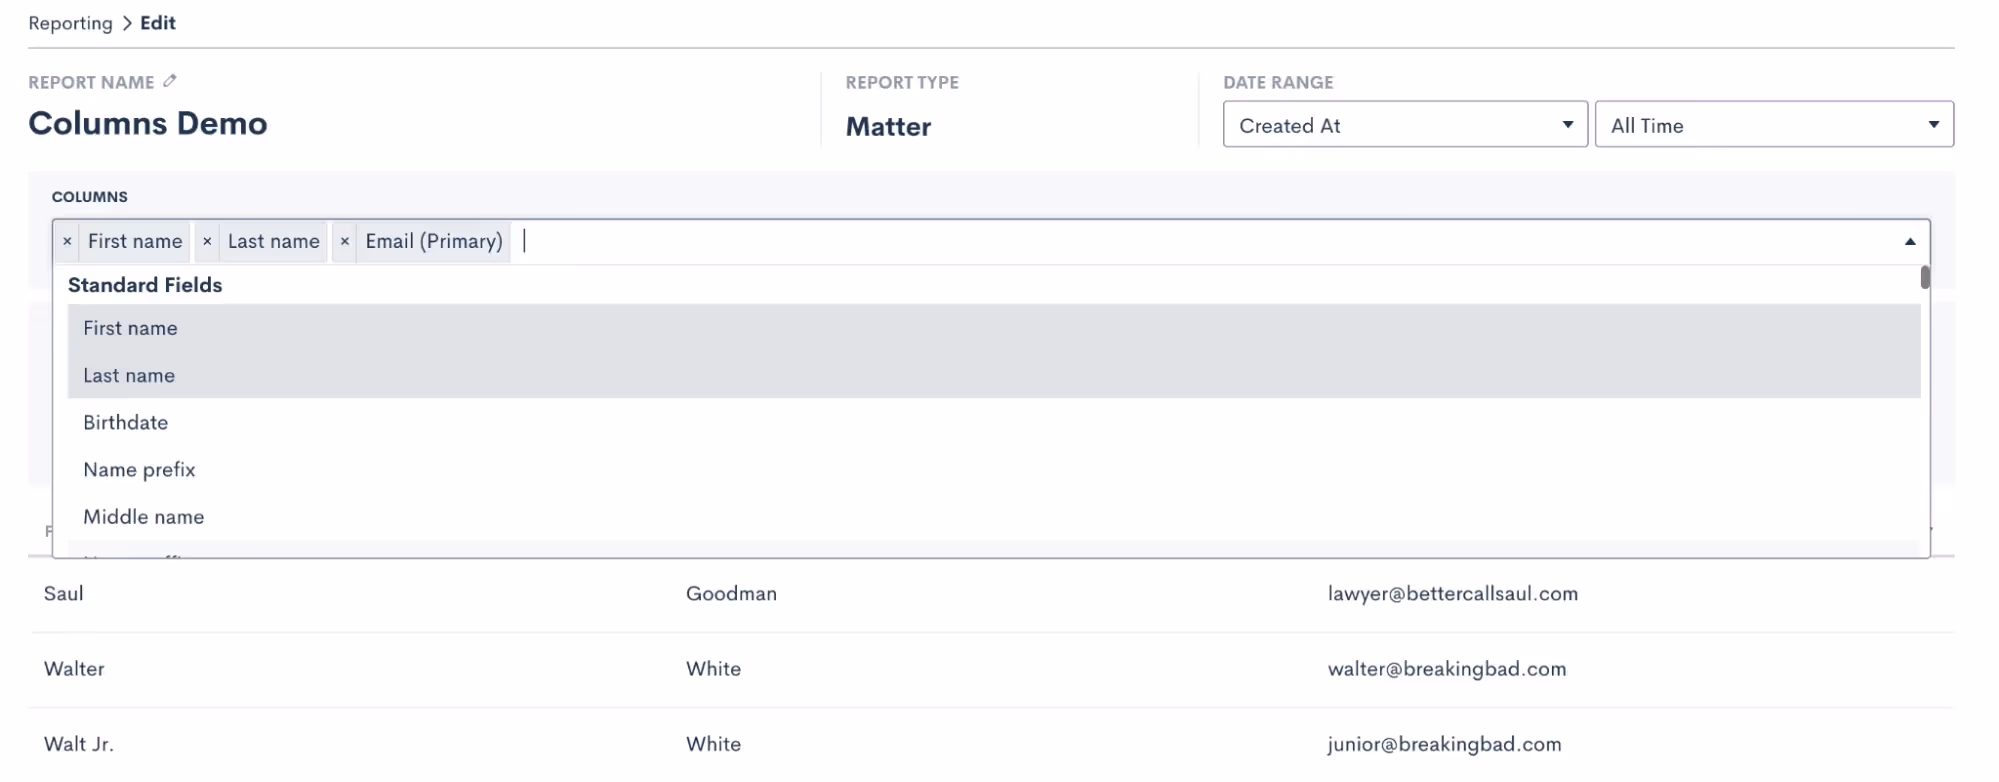
Any fields that you select will be added as a column into your report.
Filters
Depending on the goal of your particular report, filters can be your best friend. These let you keep the report relevant to the specific KPI, field, etc that you wish to report on. For example, you may create a custom report to only show hired clients. This can be useful if you are looking to narrow in on a data point relevant only to current or past clients, as opposed to leads or lost leads. To do this, simply add a filter. In the example below, we have filtered the report using the Source field, and have selected to only show the Hired matters.
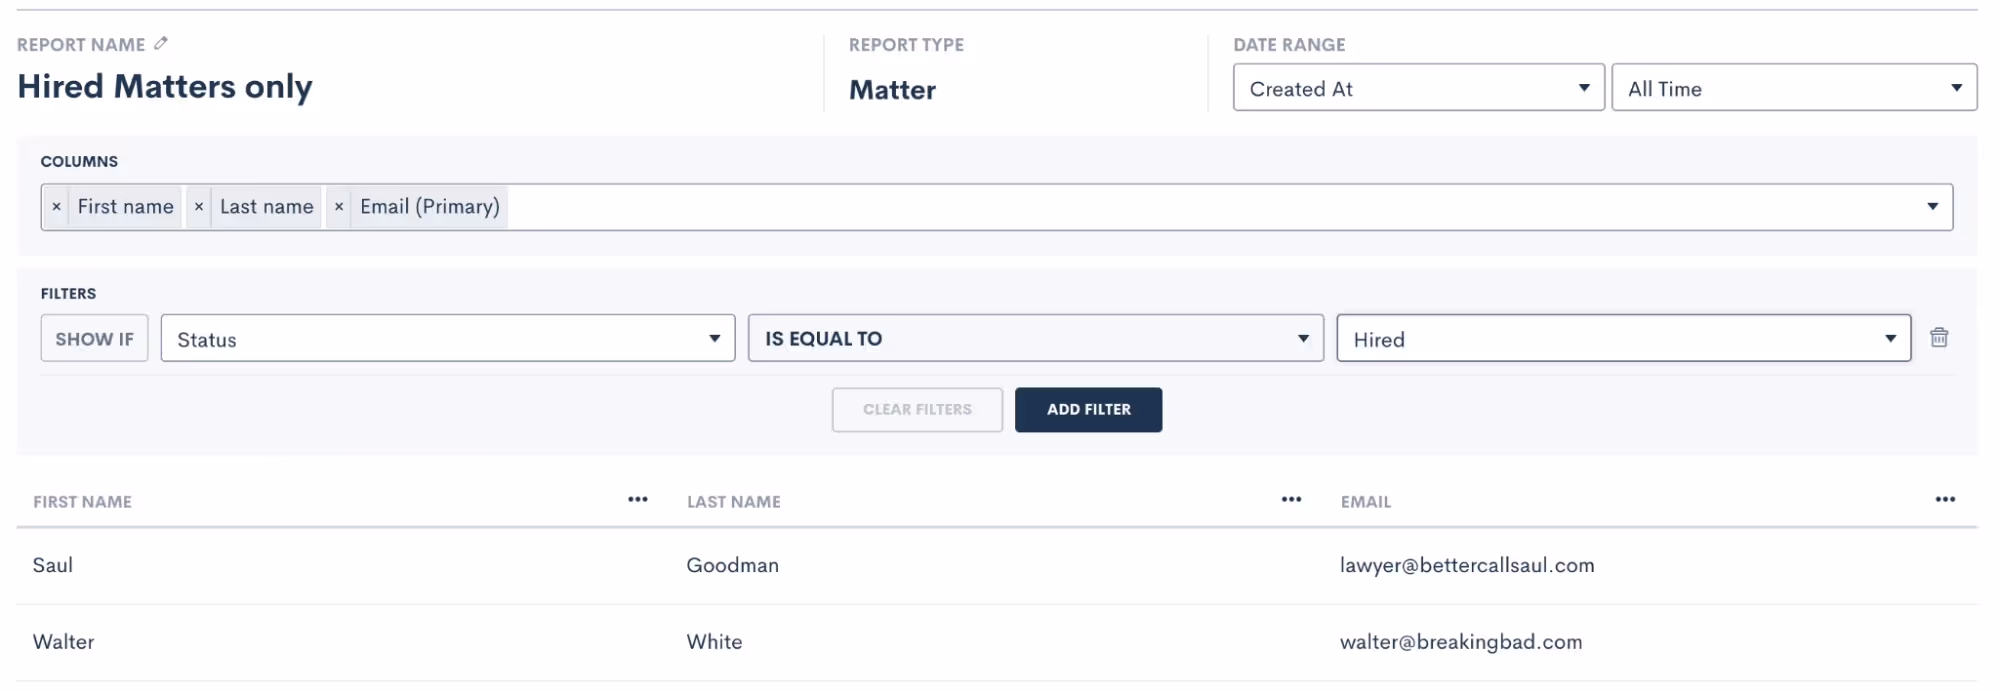
Once you make this selection, the report preview will update to show only results specified by your filters.
Date Range
Similar to adding field filters, you may also filter your report by date. Create a report that shows only the current week or month at a glance, and each time you view it it will be up-to-date for the current date match. Use the drop down in the top left to first select which date field you want to filter on. For instance, the date the matter was created, converted, or any other custom date field.
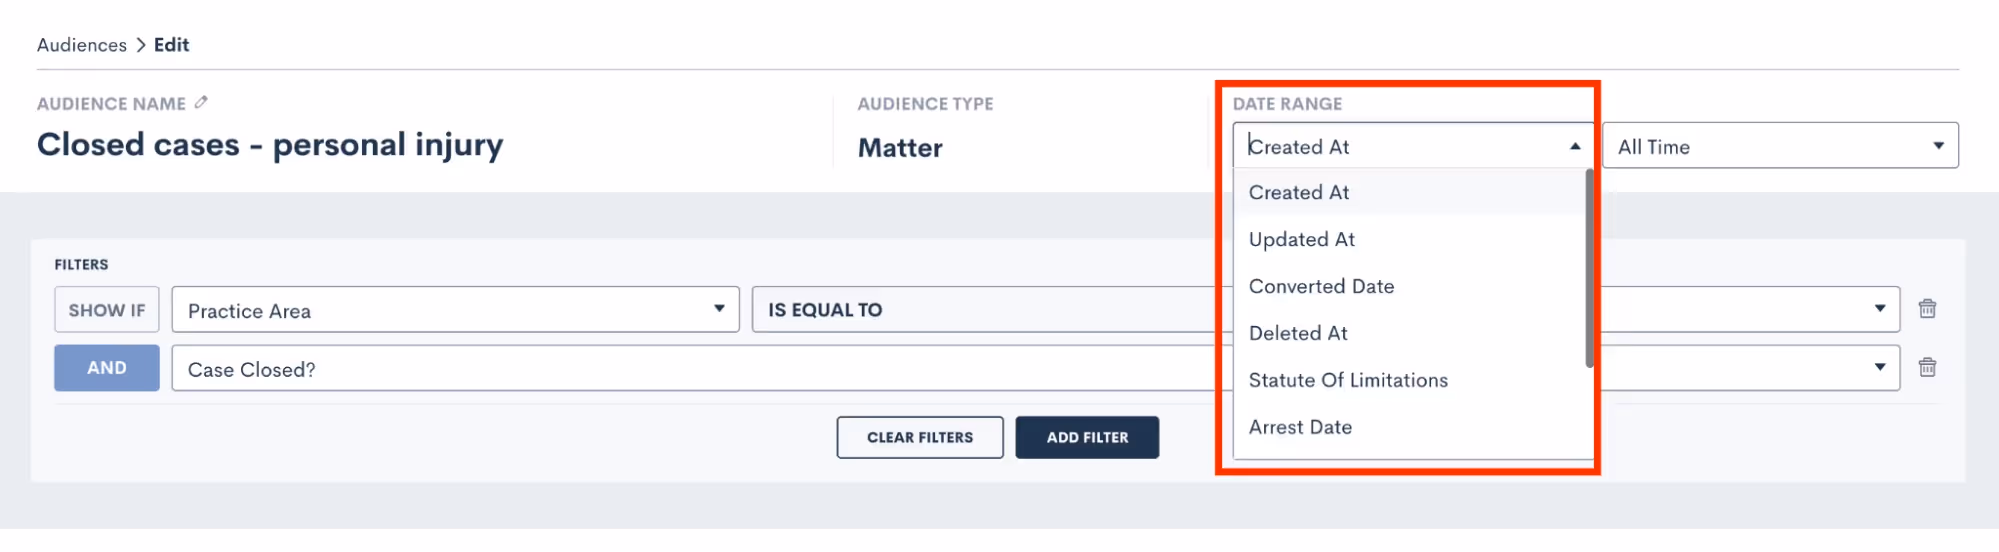
Then select the date range, using one of the preset options, or create a static custom range for this report.
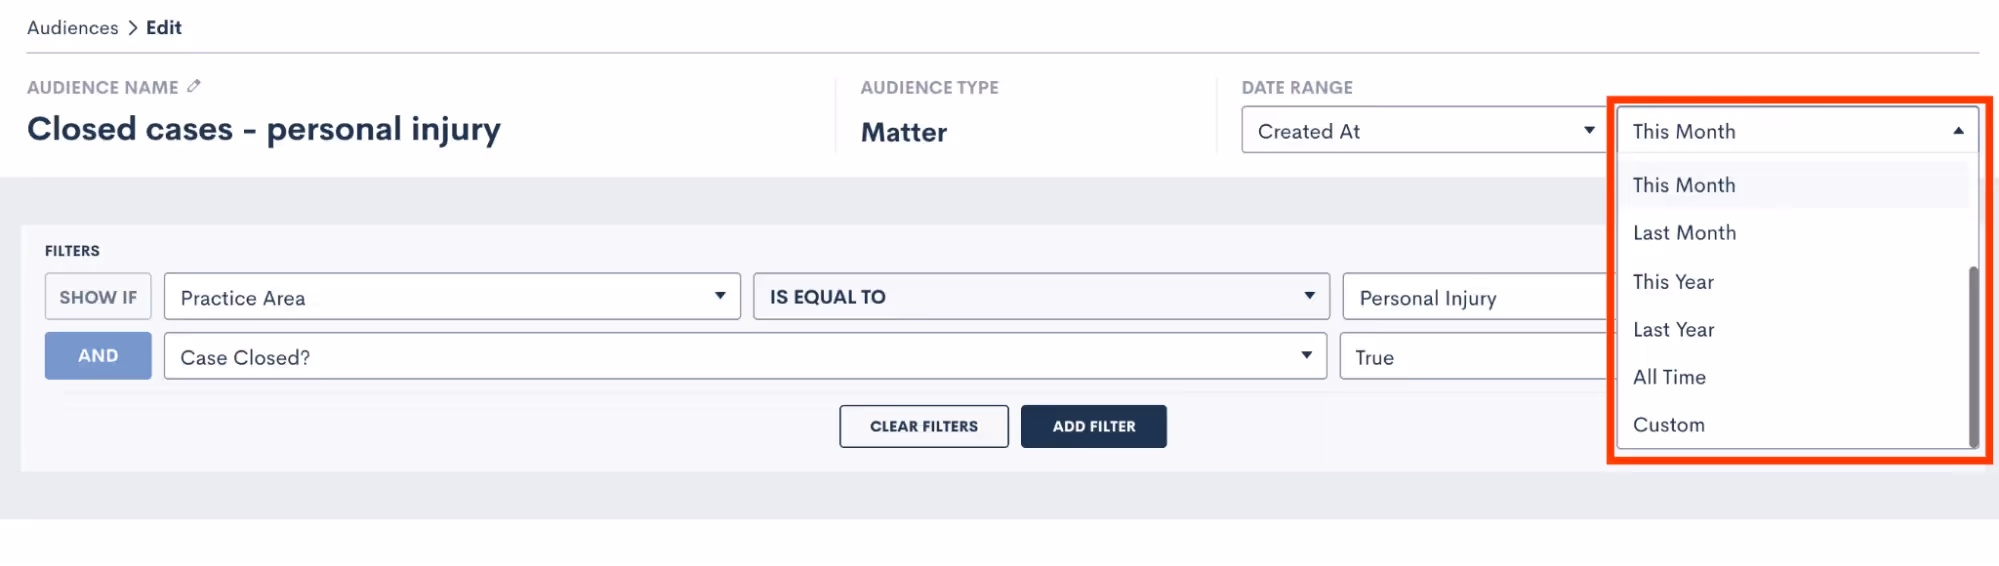
Grouping
You may have plenty of reports where simply adding columns and filters gets you the data you need. Grouping is a power feature that can add even more insights to your report. When you group by a particular column you will be able to easily see the total number of results in each group, which can help determine performance.For example, you may wish to see how many leads came in for each of your practice areas in a particular month. Grouping would be very useful in this situation. Click the column header, and then select Group by this column.
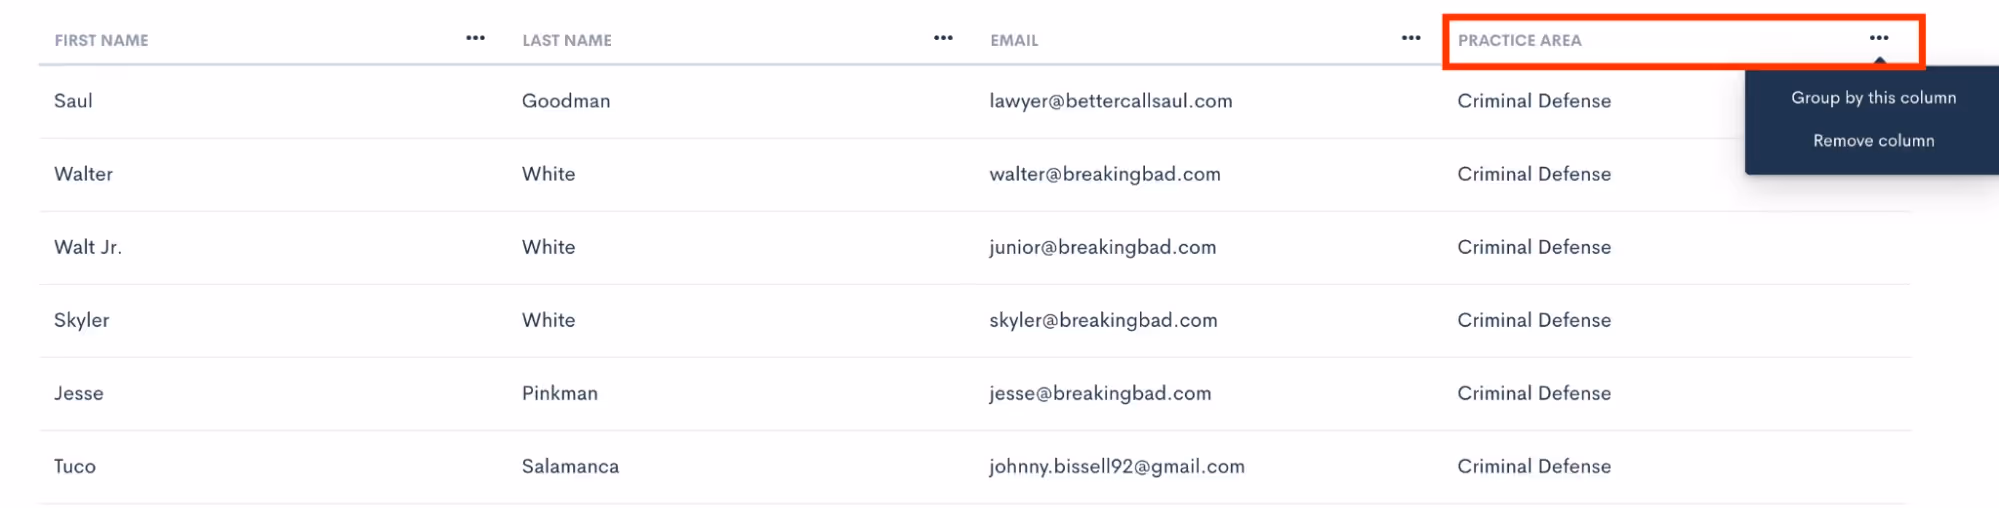
The report will then look as follows:
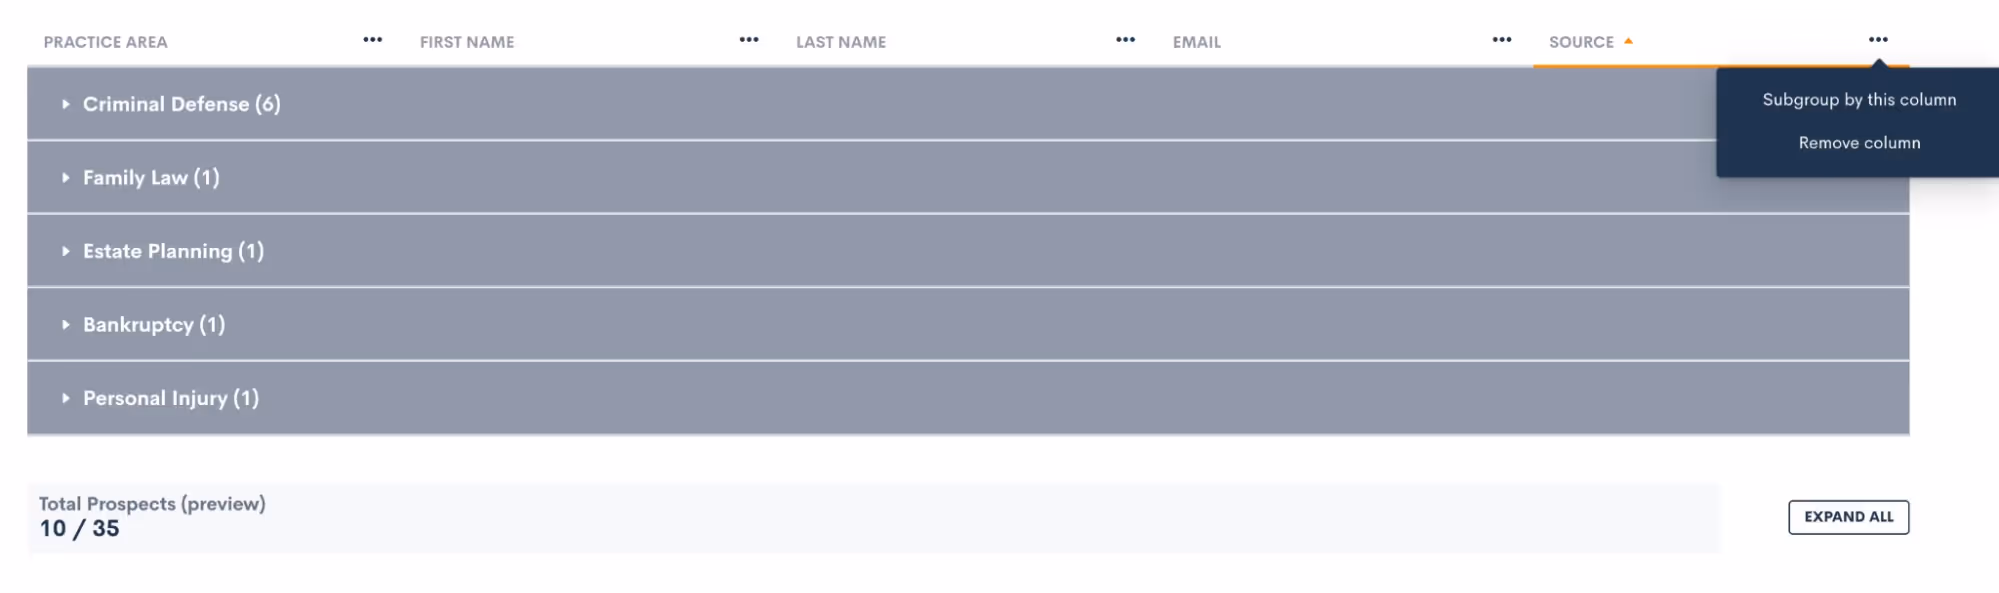
We can easily see that Criminal Defense was the most used practice area in the graph above. Also notice how you have the option to subgroup, as shown in the top right corner in the image above. This will add a second grouping by that field within each main group.
Sample Reports
Let’s walk through a few sample reports that may be useful for your firm. Keep in mind that the sky’s the limit when it comes to custom reporting, so these are merely suggestions to get you started.First, you may find it useful to create a report showing the marketing source of each matter in your CRM. When you select your columns for this report, make sure to include both the “source” and “campaign” fields, in addition to whatever fields you may wish to see like practice area, converted date, phone number, etc.You will find grouping on the “source” field helpful for this report, so that you can easily see how many matters came from each source. Then, we suggest adding a sub group by “campaign”, so you can also see insights on each campaign within your sources. Your report will end up looking something like this:
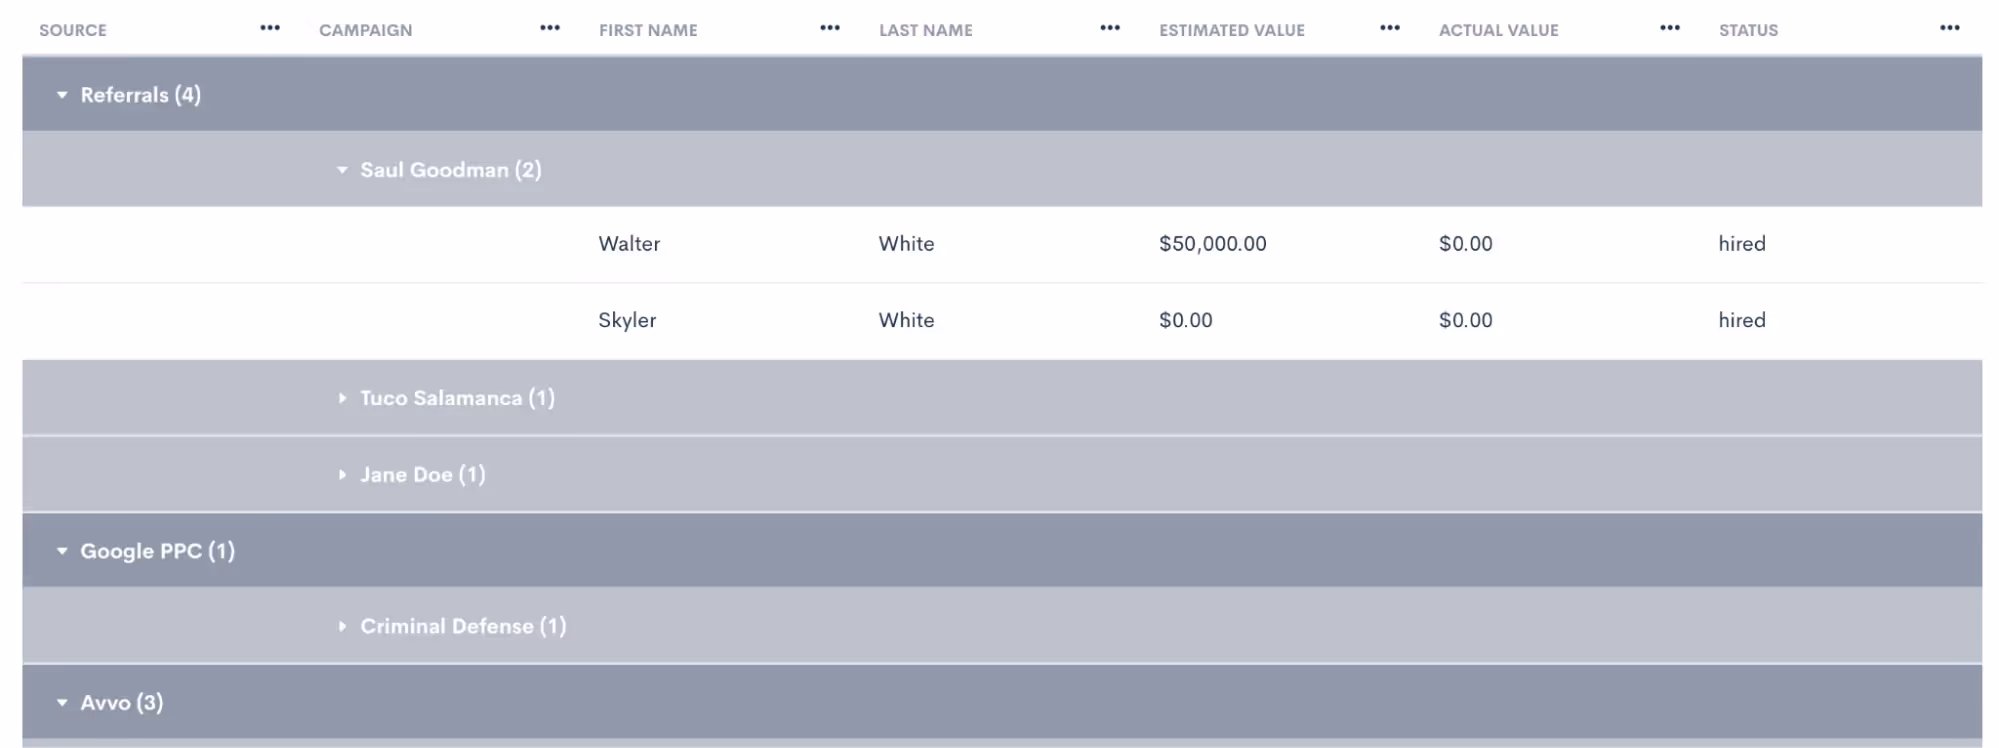
Example KPIs pictured above:
- Matters per marketing source
- Campaign breakdown within each source
Another way you can use a custom report is to track the estimated and actual values of your cases. When you add either, or both, of these fields to your report you will have the option to sum or average each of these columns. Of course with this report it is important to make sure that you are populating these values on each of your matters accurately and timely in order to get best results.When you use any currency or number type field on a report you will have the option to add a sum or average calculation, as shown below.
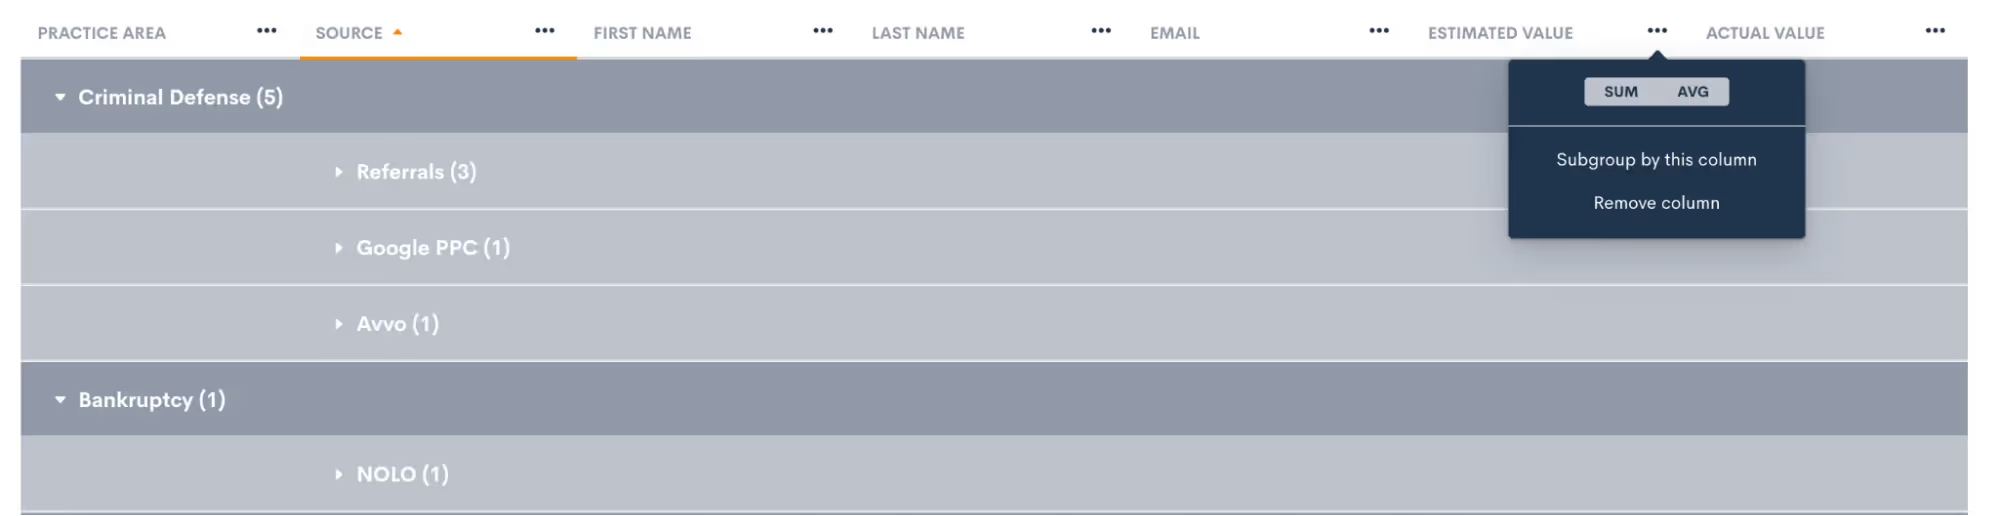
In this example, we have opted to sum the estimated value, but average the actual value.

Example KPIs pictured above:
- Matters per practice area
- Total value in pipeline per practice area and per source
- Average revenue per practice area and per source
Remember that any of these custom reports can also be exported to excel, where you can apply more advanced calculations and formulas as needed.
Analytics Page
In addition to building your own custom reports, Lawmatics also provides you with a built-in analytics dashboard for basic firm KPIs and other statistics. You’ll find this page by hovering your mouse on the Insights tab, and then select Analytics.
Dashboard
When you first arrive on the Analytics page you will first see the Leads at a Glance section of the dashboard. Before diving into these stats, first note that you can adjust the date range of this page as a whole. You’ll find this in the top right corner, it defaults to All Time, but you can make a custom date selection accordingly.
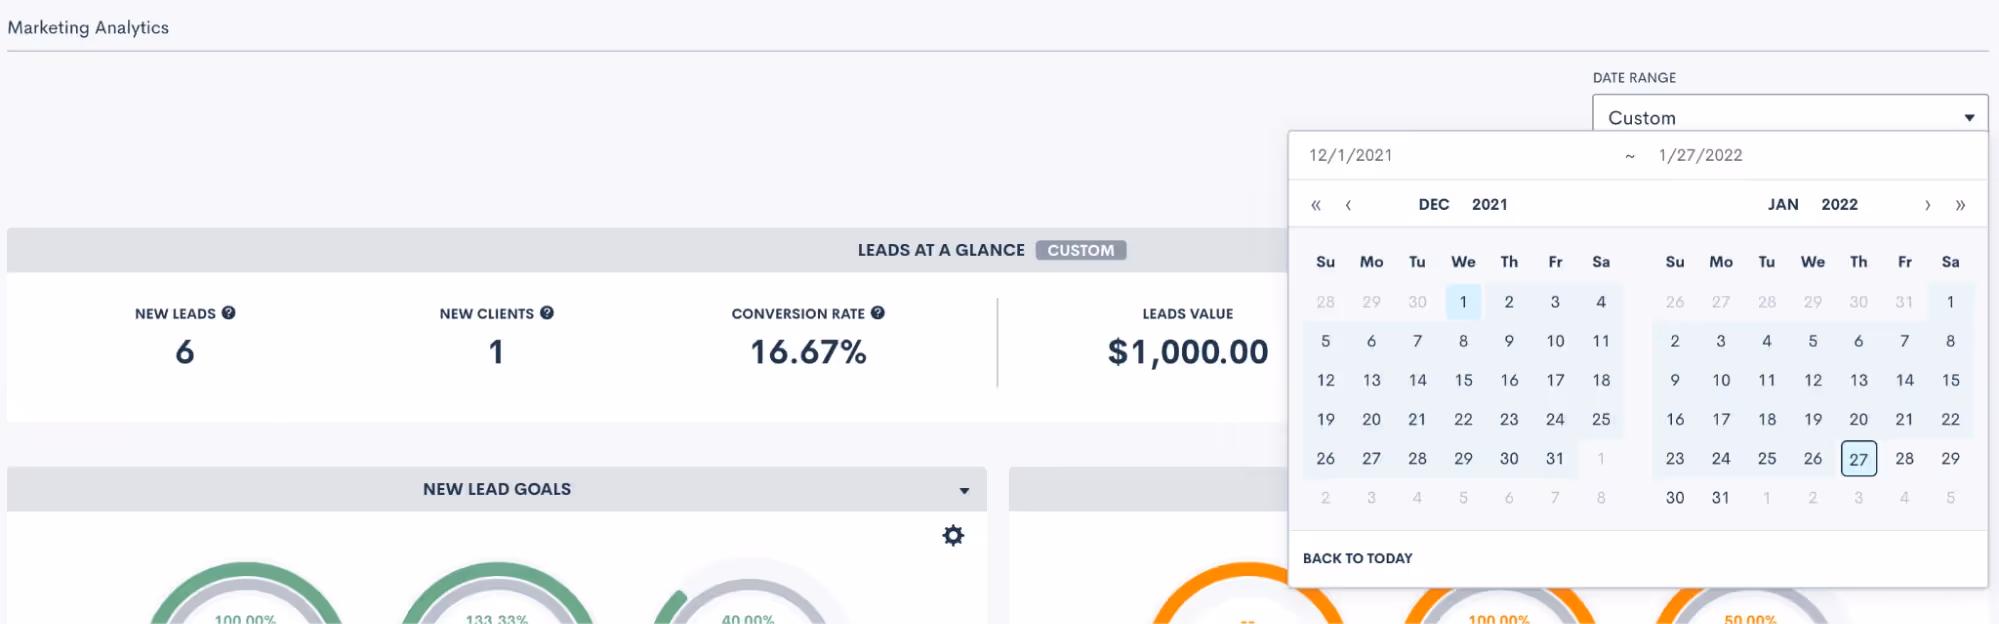
Once you have selected your desired date range, all data on the page will update automatically. First, in the Leads at a Glance section you’ll see a quick breakdown of some key statistics for lead intake and conversion.As you scroll down the Analytics page, you will see a number of different graphs and charts for nearly every aspect of your firm. We’ll walk through a few of them here.First, set customized growth goals for new leads and converted clients by clicking the icon highlighted below.

While you can also use custom reporting for reporting on things like leads per practice area or source, the Analytics page gives you a visual breakdown of the same information. This can be great for getting a snapshot view.
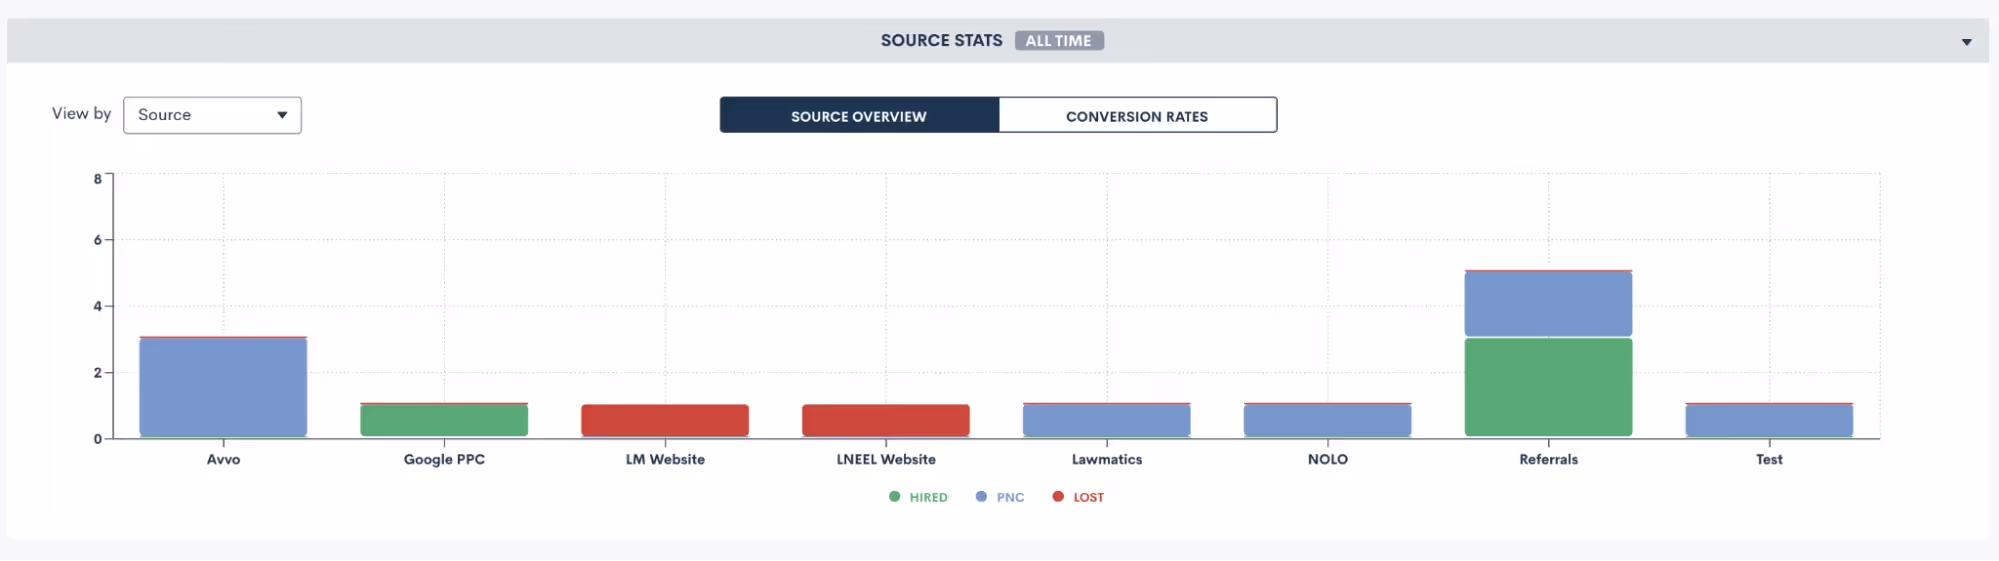
Additionally, you’ll find a built-in graph for tracking your appointment show rate by event type. This may provide great insights on performance of different types of meetings you hold with leads and/or clients that you would have never thought to look into before.
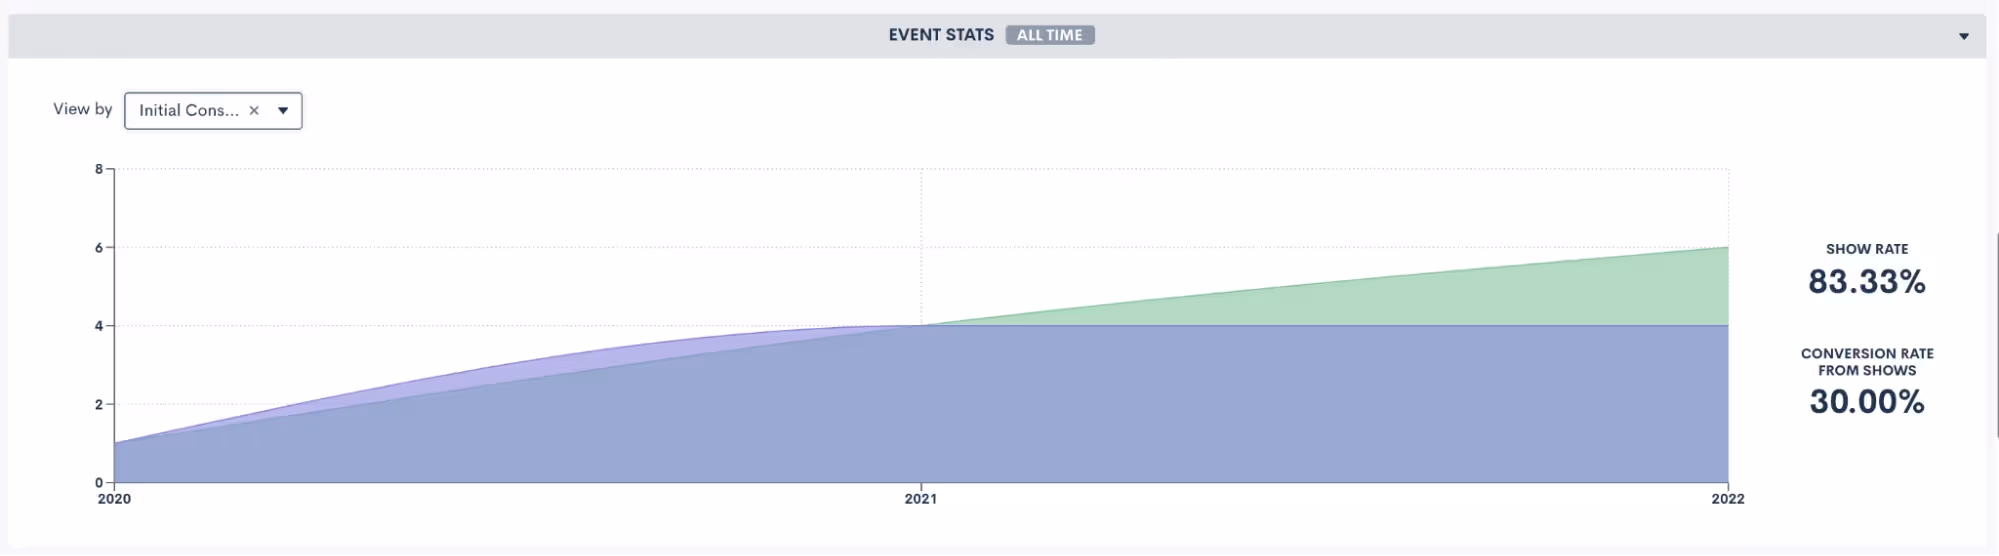
Some firms have designated sales people as opposed to (or in addition to) intake staff and paralegals. As with any sales team, it is crucial to be able to track each individual’s conversion rate in order to compensate and incentivize the team. Use the Sales Stats graph to do just that, by viewing a breakdown of conversion stats by sales person.
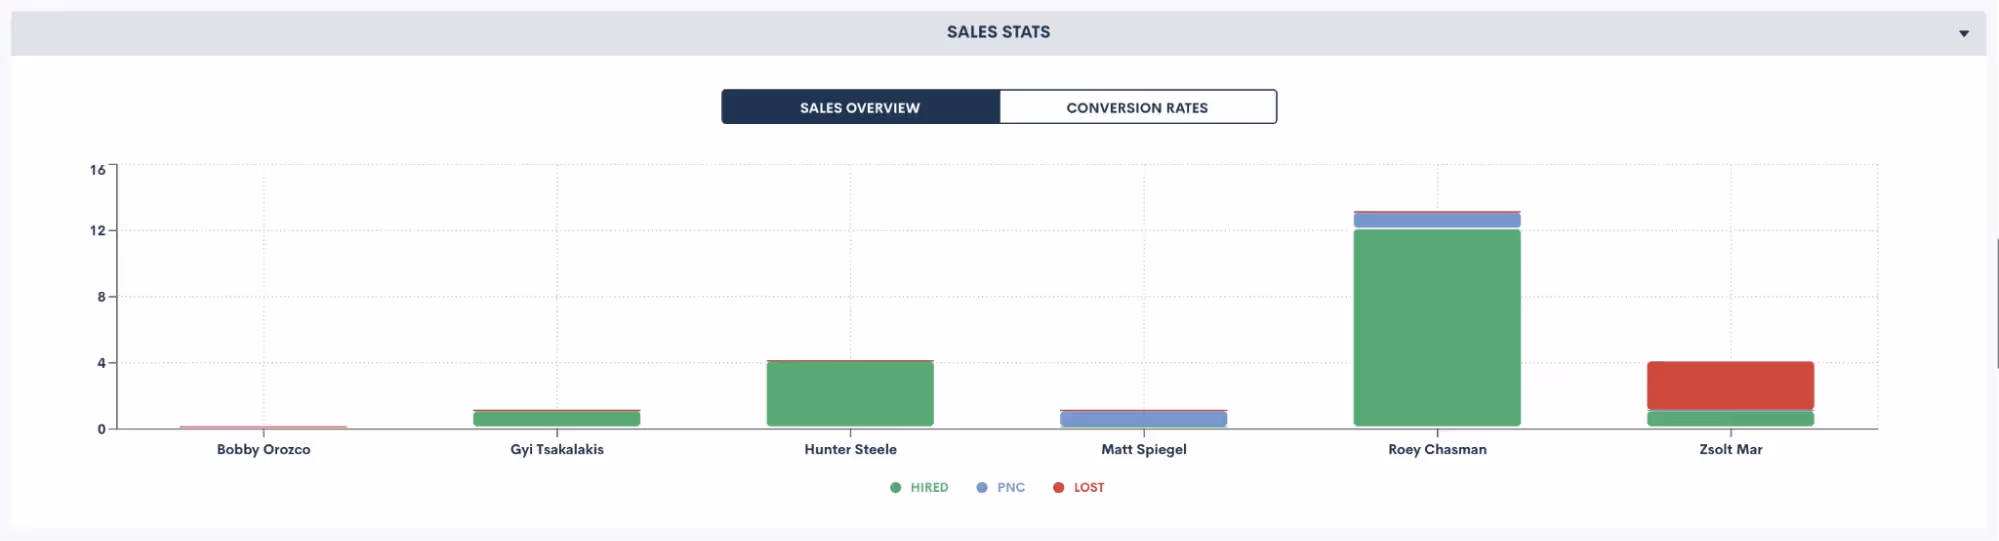
Stats By Source
Lastly, on the Analytics page you will find the Stats by Source section. This gives you a comprehensive breakdown of key KPI calculations for each of your marketing sources.

In this section you will be able to clearly see an apples to apples comparison of each source, taking into account how much you spent on that source, how many leads came in, the conversion rate, and a breakdown of cost per lead and client.Example KPIs pictured above:
- Total new leads and converted clients by source
- Total revenue and total spend on each source
- Breakdown of cost per lead and cost per client
ROI Tracker
When used in conjunction with the Stats by Source analytics, the ROI Tracker helps complete the full picture of the marketing performance for each of your sources. The tracker takes into account the number of new leads, the conversion rate, and the revenue and spend from each source to give you an ROI calculation.
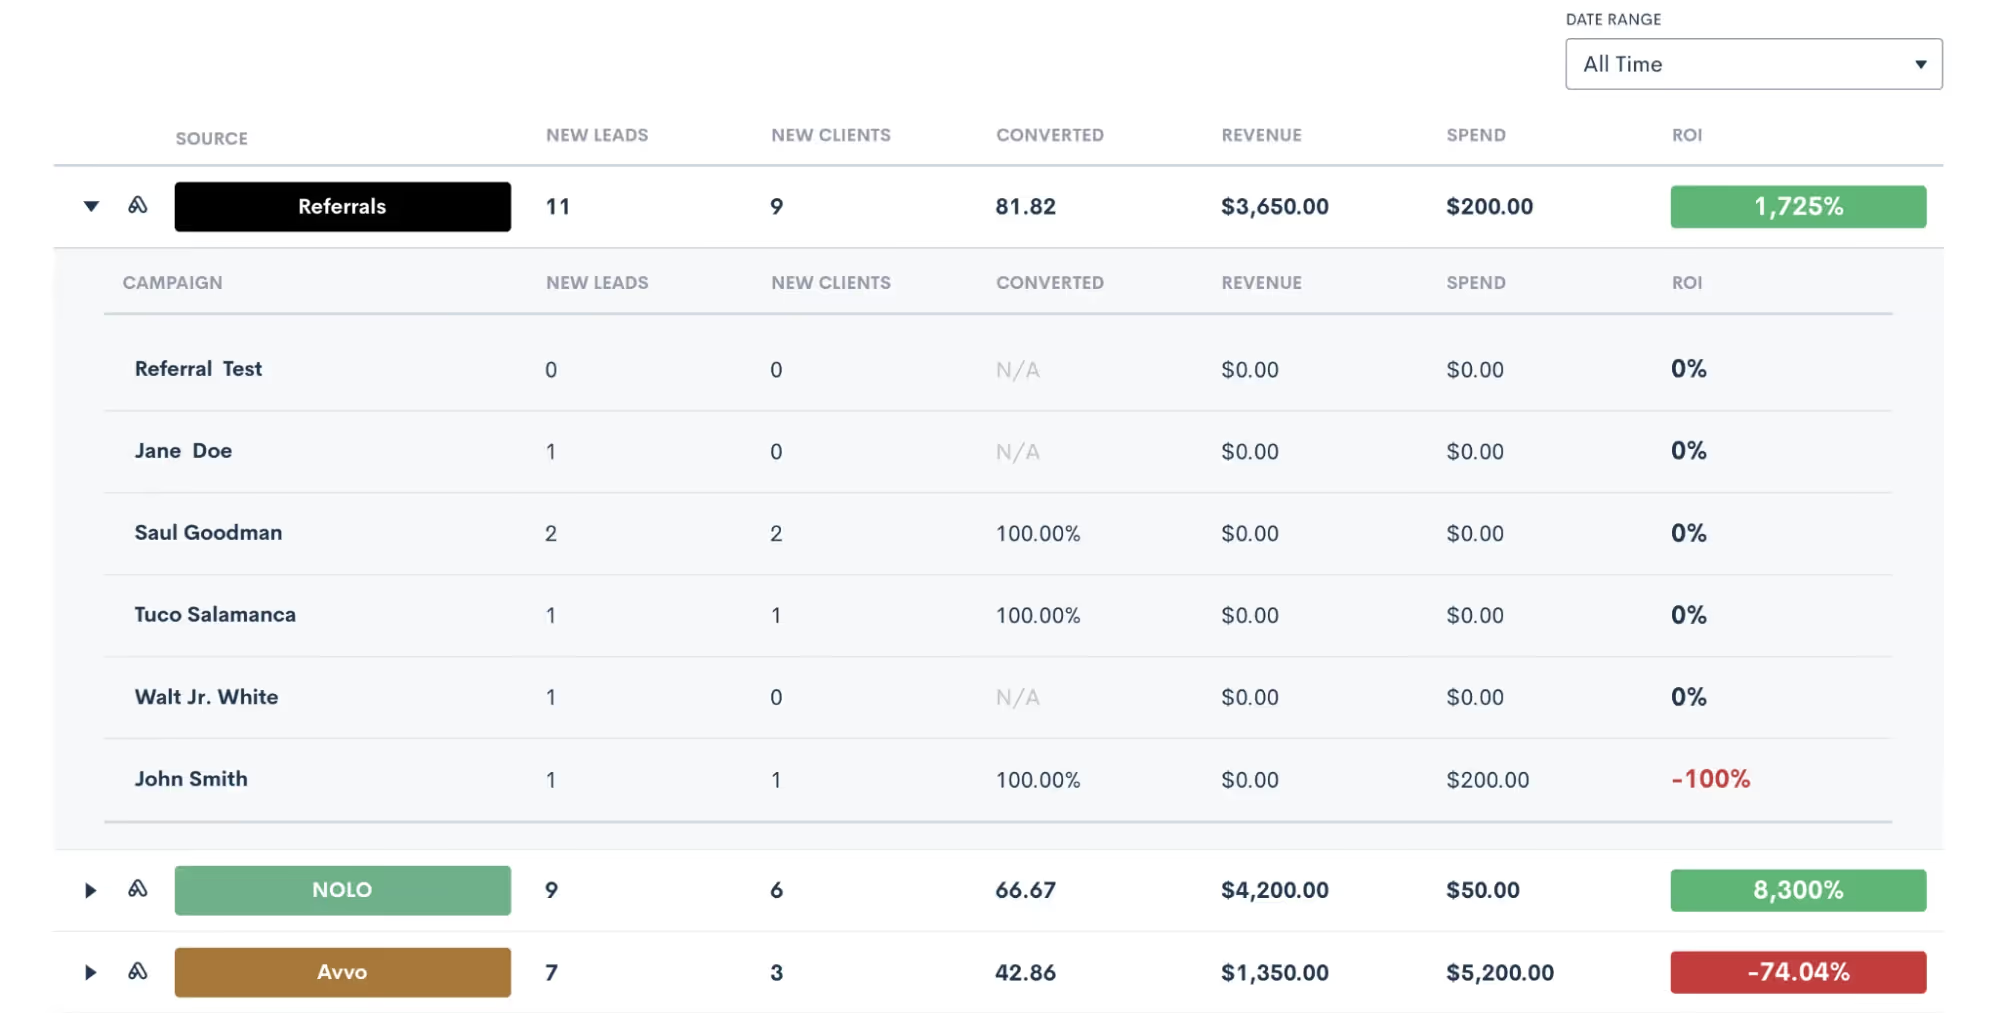
Marketing Source Spend
Before using the tracker, it is crucial to make sure that you are entering your marketing spend accurately on the marketing settings page. Once you navigate to that page in settings, you can make sure that you have all of your sources entered, along with any relevant campaigns under each source.The marketing spend is logged at a campaign level. Once you have added your campaigns, click the dollar sign icon for each one to enter the spend for that particular campaign.
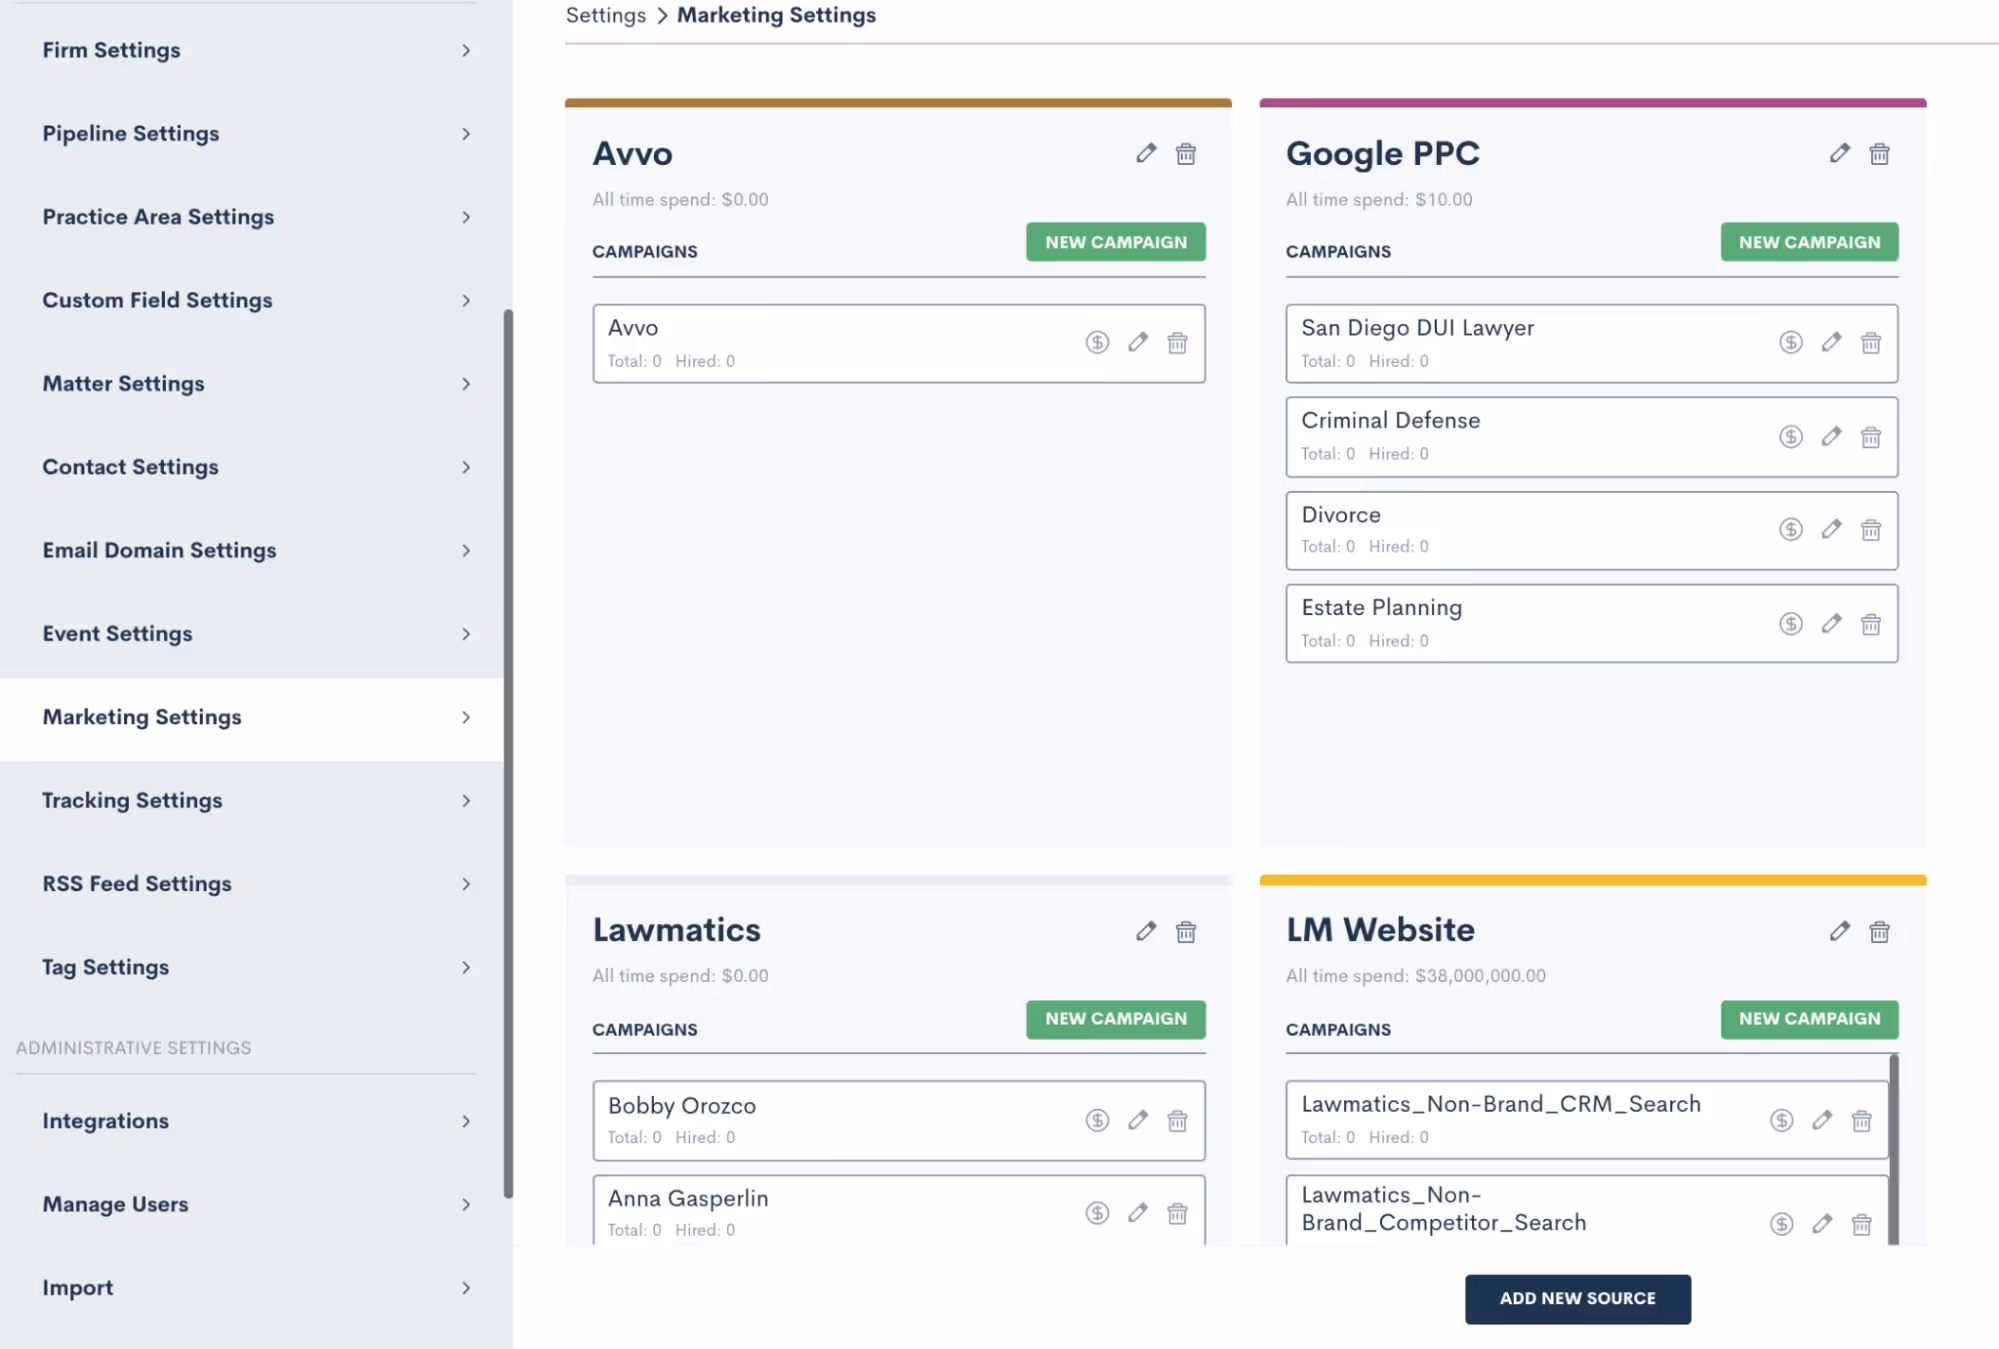
This spend will be used for calculations not only on the ROI Tracker, but also for the Stats by Source section of the Analytics page.
Matter Values
In order to get insightful ROI results you will also need to make sure you populate the revenue on each matter into the built-in Actual Value field. This step is crucial for making sure you get an accurate return on investment calculation.Remember, you’ll populate both the estimated value and actual value in the details page on any matter.
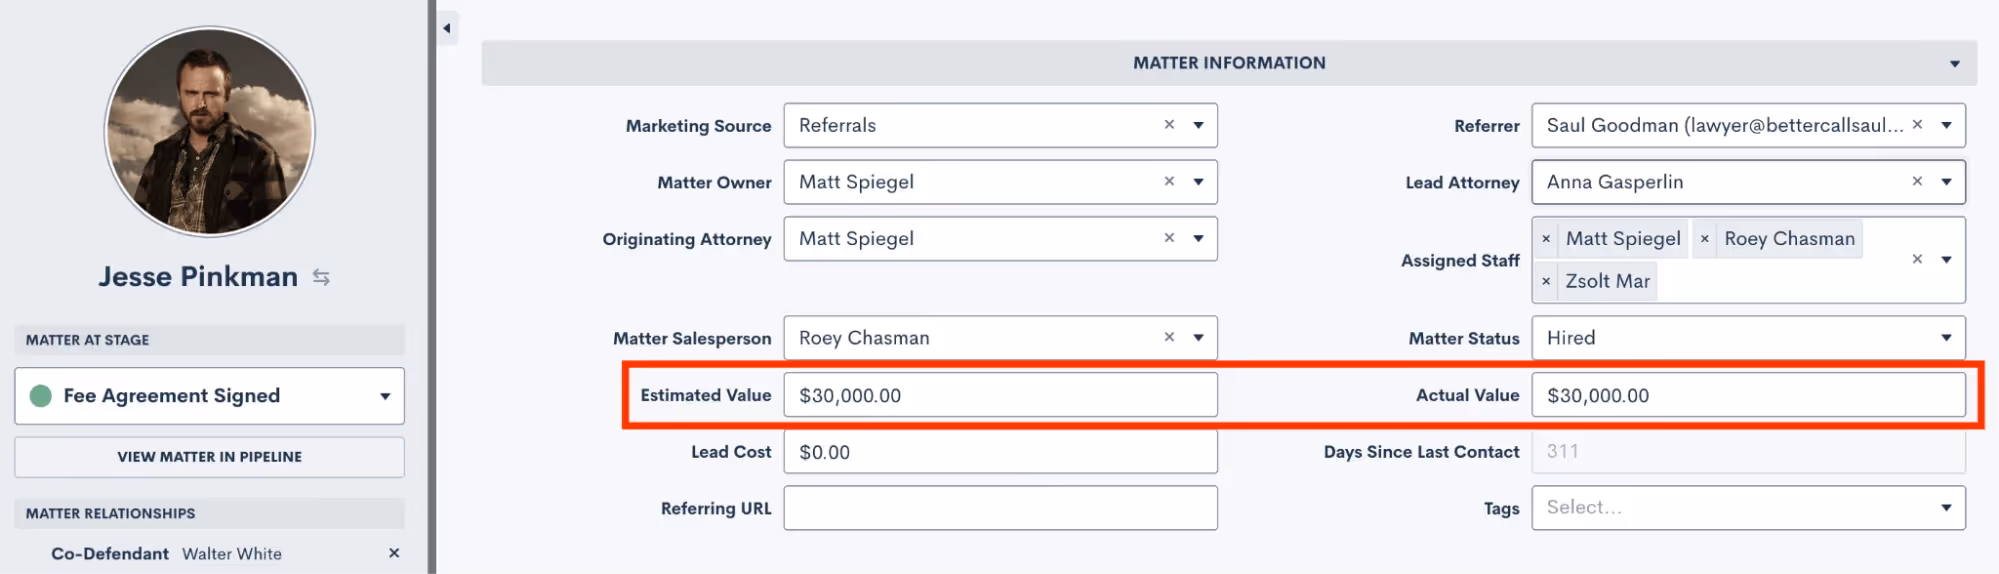
Put Your Data to Use
While all this data collection and reporting potential is great, the crucial next step to growing your firm is interpreting your KPIs and reports to make insightful decisions about the future of your firm. Instead of just being aware of a marketing source that has low to zero ROI, you now have the insight with Lawmatics to reduce your spend accordingly so you’re not investing in a poorly performing source. Maybe you have always had an idea of which of your practice areas was the most profitable, but now that you have the ability to actually track the exact performance, you may realize that it makes sense to invest more in a different practice area.All of these insights are right at your fingertips with the power of Lawmatics reporting and analytics.

No matter the size of your firm or the practice areas you serve, professional networking is an important aspect of growing your business. While growing your professional network is important, we know that you are accustomed to dealing with competing priorities and this one may sometimes take a back seat to other more pressing items.Lawmatics is just the tool to aid you in not only tracking referrals, but also interpreting insights into your network and making informed business decisions based on them. With the help of automations, you are able to “set and forget” an all-encompassing process for building and strengthening your referral relationships.In order to make the most of your referral tracking efforts in Lawmatics there are several things you first need to account for. You’ve probably heard the phrase “garbage in, garbage out” when it comes to entering and interpreting data. This phrase certainly applies here: without clean data going into the system, you will not reap the benefits of the helpful insights that can come out. When all of these elements of referral tracking come together, you will wind up with the key pieces of data you need to determine where and how to best invest in your referral network. Lawmatics not only makes these results easy to produce, but also simple to interpret and take action upon. By the end of this tutorial you will be able to provide a better experience for both new referral clients and referral partners, leading to more conversions, more referrals, and more bottom line.
Setting Up Marketing Sources
Your first step in tracking referrals is to familiarize yourself with and make any adjustments to the marketing settings in Lawmatics. To get started, click on the “Settings” gear icon near the top right corner and then select “Marketing Sources” from the left sidebar. If you are brand new to Lawmatics, you will only see one source here, and that is Referrals. Take the time to add any other sources from which your firm may get leads.Let’s focus on that built-in Referrals source. This source is different from any of the other custom sources you may create in that it will allow you to track individual referrers under this source rather than tracking a subset of campaigns.

Notice how in the image above, you see a list of names under the Referral source. To make the most of this feature, we suggest importing a list of all your firm’s referral partners using our mass import feature.It’s recommended to use a tag to label these contacts as referral partners, so before you import your list, format your spreadsheet as shown in the image below:

Feel free to include any additional fields such as phone number, company name, birthdate, etc. Then go to the “Import” page found on the left sidebar in settings to run your import. We’ll dive deeper into how you go about actually using and populating this data in your CRM in the section of this tutorial.You may have noticed that the built-in Referrals field does not necessarily differentiate between attorney referrals, client referrals, and any other type that may come into your firm. If this is something you would like to track, we suggest making a custom field for this data. Try to avoid creating additional custom marketing sources for these different types of referrals as they won’t follow the same format as the built-in Referrals field.Your custom field for tracking referral type may look something like this:
Now you’ll be able to select not only who referred the new PNC, but also which of these categories they fall into.Last but not least, if you also would like to track other attorneys that you may refer matters OUT to, we suggest setting up a custom field for this as well. This is completely optional, but is something that we recommend if you would like to view any statistics on this data down the road. That custom field will look something like this:
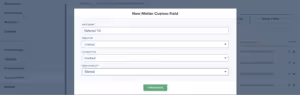
By making it a lookup type field, you will be able to select from any of those contacts that you have imported in from the spreadsheet example above (or any other contact in your CRM).All of these steps are setting you up to avoid the “garbage in, garbage out” debacle that can happen so often with CRMs. Take this a step further by reading onto the next section.
Populating Data in Your CRM
With referral tracking setup taken care of, refer to the following best practices when populating actual referral data into the CRM. There are several methods by which data can be entered, the first of which is the matter profile.
Matter Profile
Remember that Source and Campaign are both built-in fields in Lawmatics designed for data entry and we do not recommend making custom fields for tracking referrals except for the “type” and “referred TO” fields explained above. When you go to a matter’s profile, click on the “Details” tab to view all data fields for this matter, and then click “Edit” at the bottom right to populate or change any data. You will find both the Source and Campaign fields under the “Matter Information” section on the page. Note that once you select “Referrals” as the Marketing Source, the Campaign field label will update to display “Referrer” instead, as shown below.
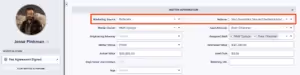
In the “Referrer” field, you will be able to select from any contacts in your CRM. Simply begin typing their name or email address and the contact will appear in the drop down. Remember the import we discussed earlier? Any of those referral partners that you imported in will be available to search for in this drop down list.The reason for populating this data via drop down list rather than having you type in the name is to normalize the data for future reporting purposes, avoiding any misspellings or name variations. You’ll be able to easily generate lists of which referrers brought in which matters along with any other data points, covered in the reporting section of this tutorial still to come.
Custom Forms
In addition to populating data directly in the matter profile, you can also capture this information in a custom form. This can be very useful if you use an internal intake form for leads calling in, a staff notes form, or really any other variation of an intake form for collecting initial information.The main thing to keep in mind when collecting this data via form is to once again make sure you are using the proper built-in fields. You will find the fields for Source and Campaign (remember, this field changes to Referrer when Referrals is selected as the source but it is still technically called Campaign) in the Standard Fields section in the form builder. Drag and drop the fields onto the form, as shown below.
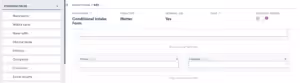
If you are using an internal form for the intake process you may also wish to include the “Referred TO” or “Referral Type” custom fields that you created in the first section above. However, remember that lookup fields can only be used on internal forms, which applies to your “Referred TO” contact lookup field.
Automate the Referral Process
You now have everything in place to effectively track your referral data. Take your setup to the next level by adding automation to the process. There are many different ways that automation can be implemented into your referral tracking, here we will discuss a few suggestions from the Lawmaticians.
Thank the Referrer
One of the best and most simple ways to strengthen your referral relationship is to thank someone for sending a referral your way. Without Lawmatics it may seem tedious and labor-intensive to keep tabs on who referred each lead and to actually go about thanking the correct referral once the lead hires your firm. An automation can make this a quick and easy step in your process.In the example below you will see that we have created an automation that triggers when a lead changes to the Hired status, only if their source is Referral and a Referrer (Campaign) has been populated. We are then assigning a task to call and thank that referrer.
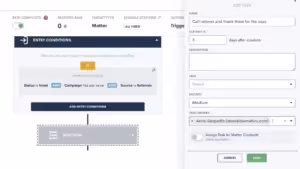
Depending on your process, you may find a different automation trigger or action item works better for you. Feel free to customize this so that it best suits your firm. However you decide to set it up, the small step of thanking this referral partner can greatly strengthen and solidify your relationship to that person.
Refer a Matter Out
If you commonly refer matters out to other law firms, you may like to set up an email template for sending the matter’s information to this partner. Begin by going to the Emails page under the Assets tab and create a new email.When creating this email template you will need to keep something in mind regarding field merge. This email template will either merge in the matter’s information or the recipient’s information, but it will not merge in both. Most commonly, you wish to have the matter’s name, phone number, email address, and any other pertinent information merged in as opposed to the referral partner’s information.To accomplish this, note how we have addressed the email Dear Friend as opposed to using the referral partner’s name, since the name merged in will be the matter’s name.
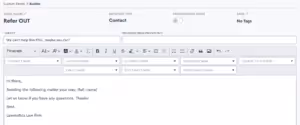
When you build this email template into an automation, it is crucial to make sure you select the email recipient, as well as the merge data from option accordingly. This is demonstrated in the example below.
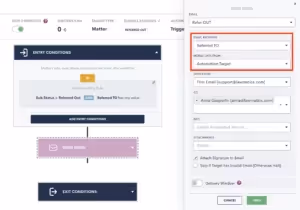
This tells the system to send the email to the contact selected in the Referred TO field, but any merge fields in the email will display the automation target (the matter)’s information.You will see that we have implemented a custom sub-status of Referred Out as the trigger for this automation. This is a great way to set up future reporting on how many leads were referred out of your firm and to whom they were referred.
Referral Reporting and Analytics
Lawmatics custom reporting puts you in the driver seat to slice and dice your data any way that will prove insightful for your firm. While there are infinite ways to customize a referral report, here we’ll walk through some of the basic steps.
Create a Custom Report
You’ll find the reporting feature under the Insights tab at the top of your page. Once you create your report, you will begin by adding columns and filters. Below you will find a sample report showing some columns and a filter that we would recommend for tracking marketing sources. Feel free to add any additional columns or remove any of these on your report as you see fit.
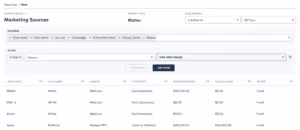
Filter the Report
Note that we have filtered this report if Source Has Any Value. This will show us our referrals in comparison to other marketing sources as well, if you wish to only see referrals on this report, simply select Source Is Equal To Referrals.
Add Grouping
If you do keep the filter that we have demonstrated in the image above, then we recommend grouping the report based on the source field. This will blanket your Referrals together, and show you the total number versus your other marketing sources.

Now we are seeing valuable information on our referral performance. First, we see that four matters came from referrals versus less for the other two sources shown. We also see the referrer Saul Goodman brought us two leads, where our other referrers only referred one each. Looks like it might be time to take Saul out to lunch and build that relationship.
Analytics Page
In addition to custom reporting, you can also utilize the Analytics page, also found under the insights tab, to gain insights into your referral performance. First, use the provided source stats graph to visually see where Referrals stack up against your other marketing sources.
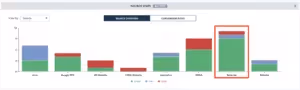
When you scroll to the bottom of the Analytics page, you will also notice the Stats by Source section. Expand the campaigns on the Referrals source, as shown below, to see an abundance of data on each referral partner, including any money you have spent on that person as well as how much revenue they have brought in to your firm.
Whether you are customizing a report or taking advantage of our built-in graphs and calculations, Lawmatics has all the tools you need to make informed decisions on how to best manage and strengthen your referral partnerships.
Conclusion
While you may or may not enjoy networking, there is no doubt that it is an essential part of running a successful law firm. With these referral tracking tips Lawmatics helps you streamline this once-tedious and time consuming element of your practice.One key takeaway from this tutorial is the importance of creating a strong foundational setup for your referral tracking. If you aren’t populating data into the system correctly then you won’t end up reaping all the benefits. When you put good data into your CRM, you will come out with good insightful reporting on that data. Use these insights to determine where to invest further in your referral network.Like everything in Lawmatics, once you add automation to the referral process you will up your game to the next level by removing any need for manual labor. Not only will you save time, but you will also create stronger relationships with referral partners than you ever have before through the use of automated thank you’s and check-ins.Worry less about managing the business side of things, and create more space to think about your clients and practicing law. We’d love to hear how you use Lawmatics to track referrals and how it has helped build your relationships, email us at support@lawmatics.com to share!

Automation can transform your intake process from one filled with tedious, manual tasks to a well-oiled machine that requires little to no human intervention. What could be better than creating a templated workflow once, knowing that it will run on autopilot and facilitate the same experience for every new lead?Lawmatics has simplified the automation process by creating an easy to use, plug and play Automation builder. Simply select a trigger, add in an assortment of action items, give it an exit condition when needed, and you’re off to the races. While the Lawmatics Automation builder is intuitive, there are a number of tricks and tips that can help you optimize your Automations for maximum efficiency.Though the benefits of Automation are plentiful, if set up improperly there can be pitfalls. You want to make a good impression with all incoming leads and clients, and an Automation misfire sending out an incorrect message is absolutely not the way to do that. The good news is that these kinds of misfires are one hundred percent avoidable. With the following tips you’ll become an Automation pro in time. Read on to learn the secrets of making your Automations work for you, instead of the other way around!
Entry Conditions
When creating a new Automation in Lawmatics, you will be prompted to make several selections right off the bat.
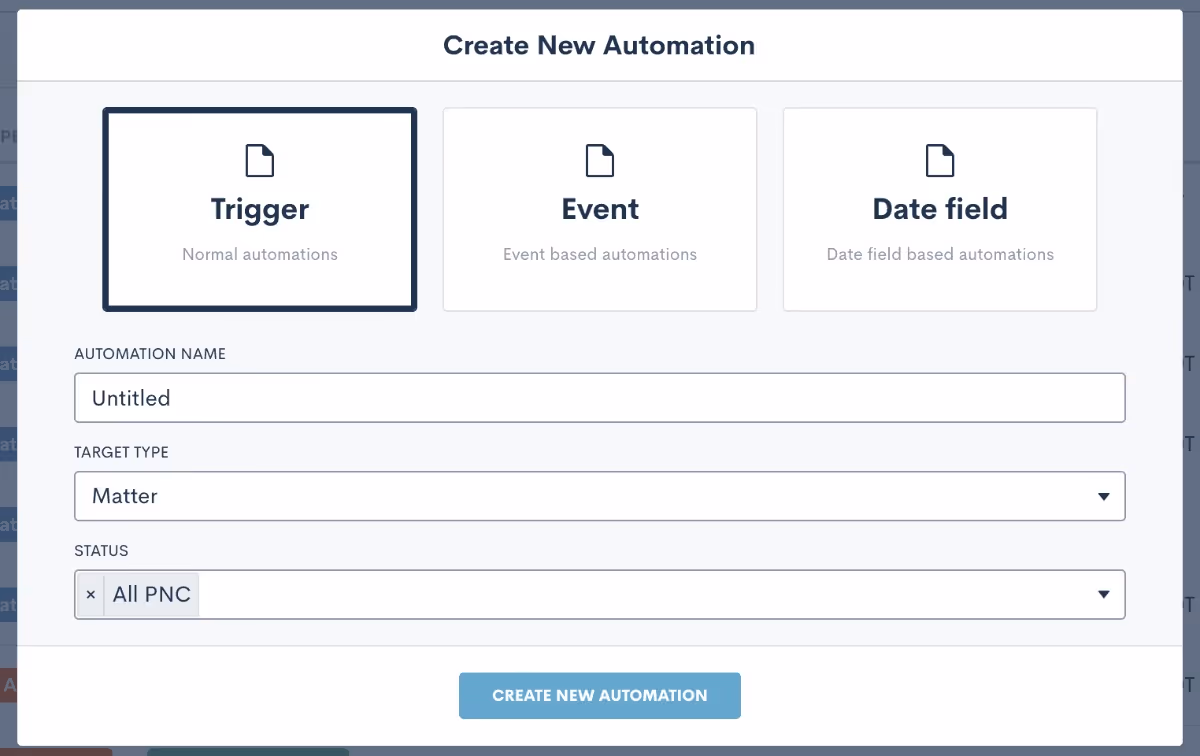
First, select the type of Automation from the options of Trigger, Event, or Date Field. The majority of Automations are trigger-based, meaning that they begin when a specified action occurs. The other two types of Automations are both triggered around the date of either an event on the calendar or populated into a custom date field.Next, you will also need to select the type of your Automation. Most often, the type will be Matter, meaning that the Automation applies to any potential clients or clients. You may sometimes create Automations that are contact type, meaning they could run on plain old contacts like friends, family, colleagues, etc as opposed to only for matters.Last but not least, when the Automation is matter type, you must also select the status that is viable to run in this workflow. If the Automation is purely intake-related, the status will be PNC. Select Hired, Lost, or some combination of the three accordingly.
Pro Tip: Making improper selections at this point can throw your Automation off course, so be sure to pick the proper options or email the Lawmatics support team if you get stuck.
Once you have created your Automation and are in the Automation builder, you will then select your specific entry condition(s). This will be the kickoff or initiator of the workflow. Some of the most common triggers used for intake-related Automations are ‘filled a form’, ‘event created’, ‘match on fields’, and ‘signed a document’.You can also create Automations with more than one entry condition, and choose to give the conditions an “and” or an “or” relationship. In the example below, you see that this Automation will trigger either if the intake form is filled out, or the consultation event is created.
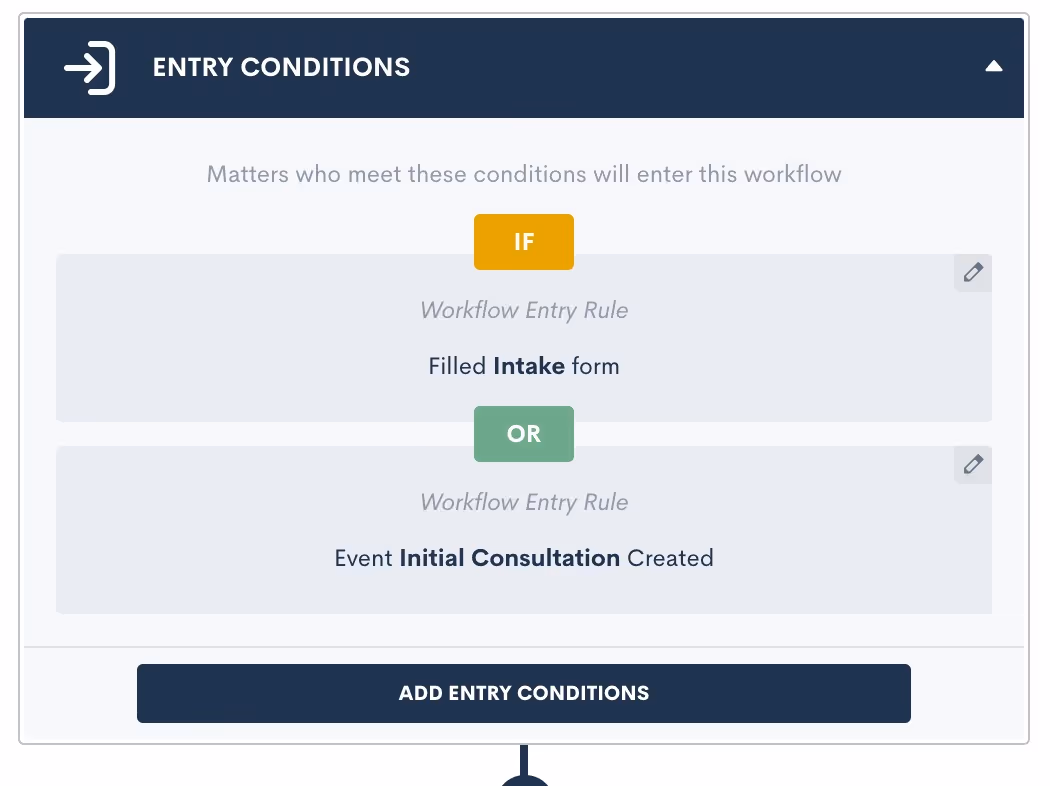
Pro Tip: There are certain entry conditions where it would not make sense to use an “and” relationship, so paying extra attention to the entry condition relationship will help make sure to avoid Automation mishaps. For example, a matter can never be multiple practice areas simultaneously or in different pipeline stages at the same time. For that reason, having an Automation triggered if “practice area = X” AND “practice area = Y” would not be a logical entry condition.
The match on fields entry condition option is a very powerful one, and also one that can cause some confusion and errors when not used properly. This trigger refers to the value of any data field being populated, so the Automation triggers when the specified value is matched.

For example, this Automation (above) will trigger when a matter enters the Missed Consult stage (AKA the stage field is populated as Missed Consult). Remember, Automations that use the match on fields entry condition will trigger as soon as the data is matched.
Pro Tip: Know your triggers! A common cause for Automation misfire is populating a field internally without realizing that this field is in use as an Automation trigger. If you are not familiar with your triggers then you may think you are just populating a field and unbeknownst to you have triggered an Automation. This problem can be easily avoided by keeping tabs on (or documenting) which fields you have selected as triggers throughout your workflow, and by being intentional when populating those fields knowing that they are an Automation trigger.
Action Items
Once you have selected an entry condition for your Automation you are ready to begin adding action items. While this step is overall a straightforward one, with the plug and play colorful interface, there are still several best practices to be aware of that can level up your Automation.One action item that you will undoubtedly use in plenty of your Automations is the time delay. As you may guess, this action creates a pause in your workflow for the duration of your choosing. This is particularly useful for drip campaigns, reminders, etc.
Pro Tip: When using multiple delay action items in an Automation, such as for a drip campaign, the time delays add on from the previous step. In the example below, the second email is sent after a one day time delay, and is then followed by a two day delay. When the next action occurs after that two day delay, it will be three days from the start of the Automation, since it stacks on to that initial one-day delay.
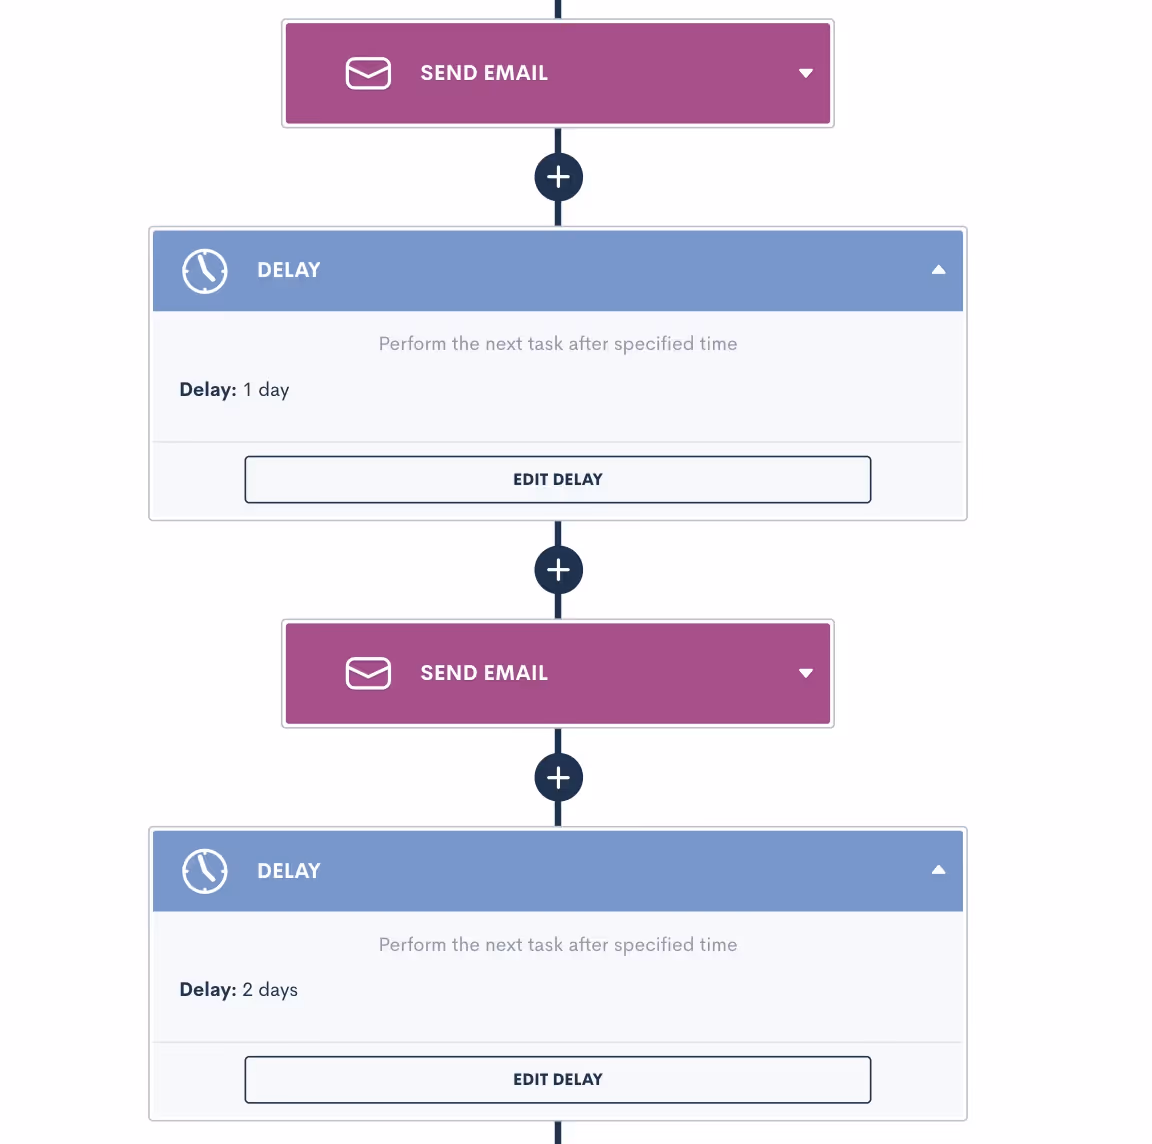
When it comes to the other options for automated actions, most are self explanatory but a few could cause you to slip up. Let’s review some other common mistakes and misconceptions when adding action items.
Create Appointment vs. Request Appointment
These two options may seem the same or similar at a glance, but they are actually very different. The Create Appointment action will book an event on your calendar with the target matter. This action is typically used for webinars or other events, since the event will be scheduled for a static date and time. This action books the appointment for the date that you have selected in the Automation, with no input from the client. Request Appointment on the other hand will send a link to the target and allow them to select their own appointment based on the host’s availability. This is a more commonly used action item in Automations.
Send Documents vs. Request Signature
E-signatures are collected from documents, so the send document action item may seem tempting as the correct one to use, but in actuality it is not the action you would use for e-signature. The Send Document action simply merges the target’s information into the document and sends it as an email attachment, with no e-signature involved. The Request Signature action is what you will use to send a document to someone for collecting an e-signature.
Sending Email to Recipient (Other Than the Automation Target)
By default, an email used in an Automation will be sent to the Automation target (AKA whichever matter is running through the Automation). If you select a recipient other than the target, such as a related contact or internal user, then you must specify whose data fields should be merged into the email, the Automation target or the recipient.
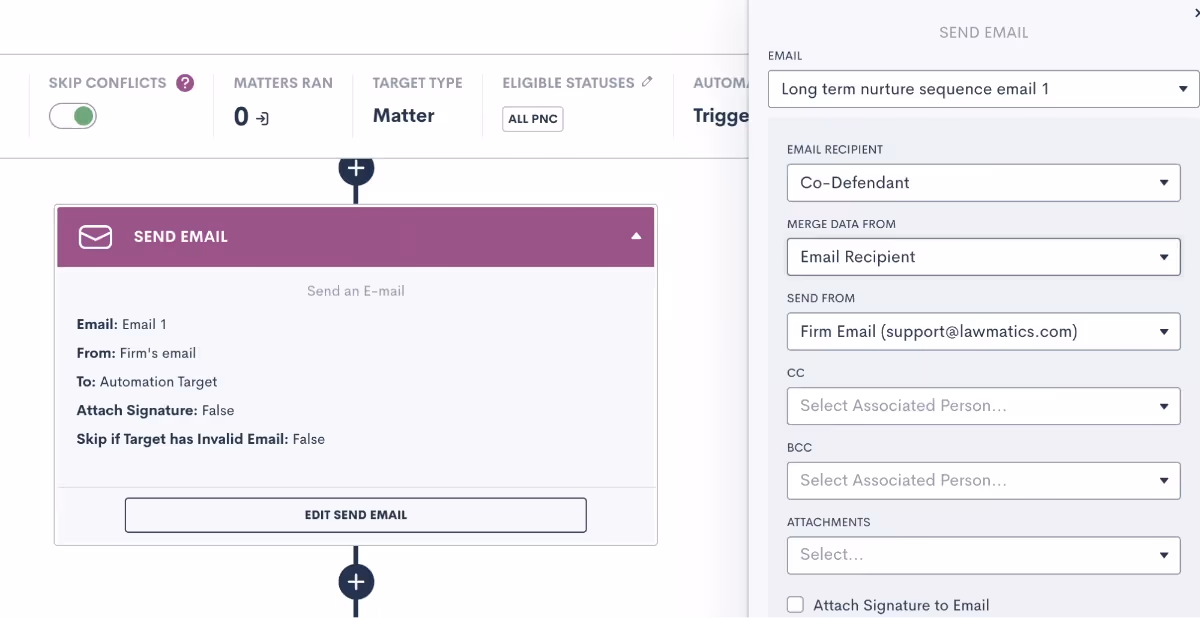
Pro Tip: Make sure you select appropriately so that any fields, such as first name, display the proper values. If you are addressing the email “Dear [first-name]”, then make sure you select the email recipient in the Merge Data From box, so that the recipient’s name will be merged in as opposed to the matter running through the Automation. If you need to reference the matter’s name in the email, for example if you are sending their info to another attorney as a referral, then you would select the Automation Target option for merge data from.
You cannot have some fields in the email template show the target’s info, and others display the recipient’s, so make sure you keep that in mind when building fields into an email template.
Matter Conversion
Use this action item to change a matter’s status from PNC to Hired once they have completed your intake process and hired the firm.
Pro Tip: This action item can only be used at the very end of an Automation, so you will only see it available to select when there are no steps following.
Sharing Items via Portal
The client portal is a useful tool for keeping clients engaged with their forms, documents, and other deliverables. Use an Automation to share any of these items to the client portal.
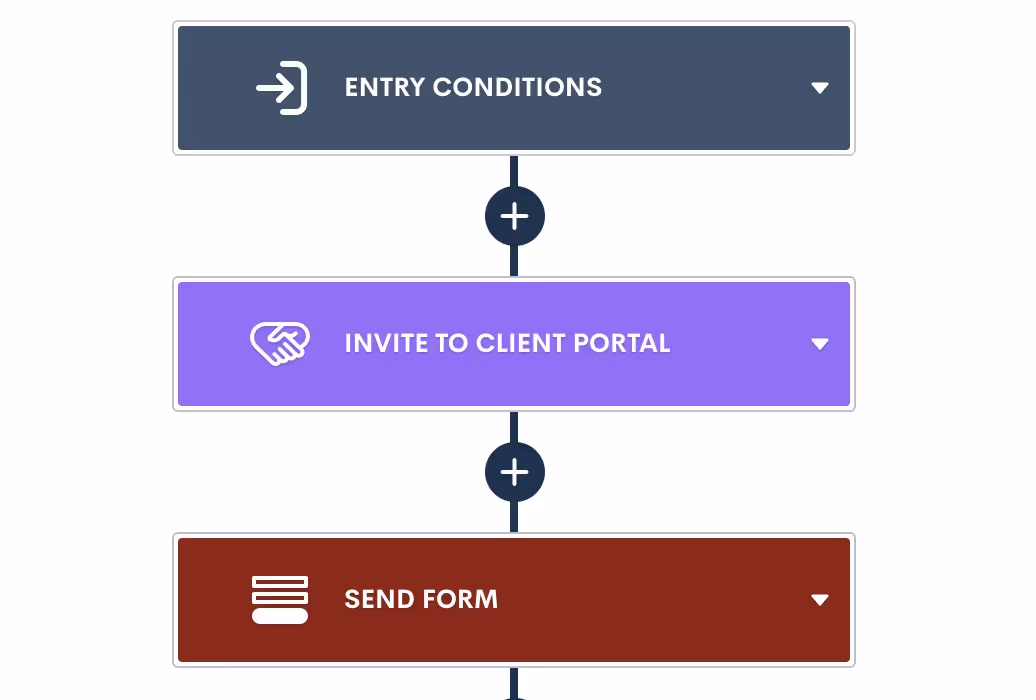
Pro Tip: You must first invite the matter or related contact to have access to the portal before any items, such as forms, can be shared. This can be done via Automation as well, just make sure to use the Invite.
Delivery Windows
As an Automation best practice, we recommend setting delivery windows on most, if not all, of your automated deliverables. Especially if you frequently find yourself burning the midnight oil, delivery windows make sure that your Automations don’t send something out at an off time.It's great to send emails, forms, and documents via Automation, but sending them during business hours can be even more useful to help increase your open rates. This is especially important for documents or other items that require prompt attention from the client or prospect.Delivery windows can be selected for any automated action items that are sent to a target, either via email or SMS. To set up a delivery window, click on the action item, and then select the window as shown below.
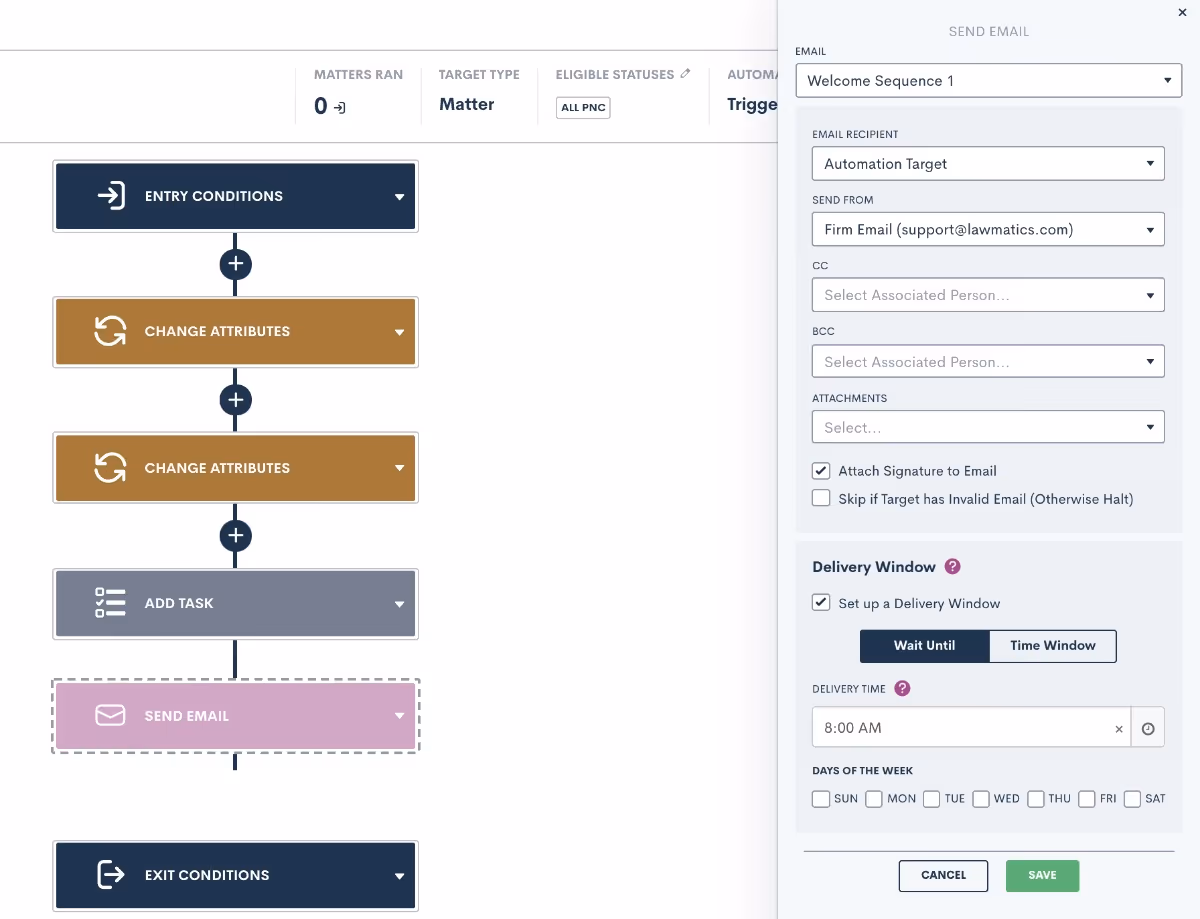
Pro Tip: You may choose the Wait Until option, to make sure the deliverable gets sent at a specific time, or the Time Window, which will allow it to send any time during the window of your choosing.
Conditional Logic
One of the biggest power features within Automations is conditional logic. This feature also has the potential to cause problems when not set up properly. When adding action items to an Automation, you will see the option to Add If Condition.If conditions work similarly to entry conditions in that they check if a particular condition is met, and trigger the appropriate action (side of the branch) when met or not met. When you select the If Condition action, you will see a menu on the right side of the screen to select which conditions should be checked for this branch.
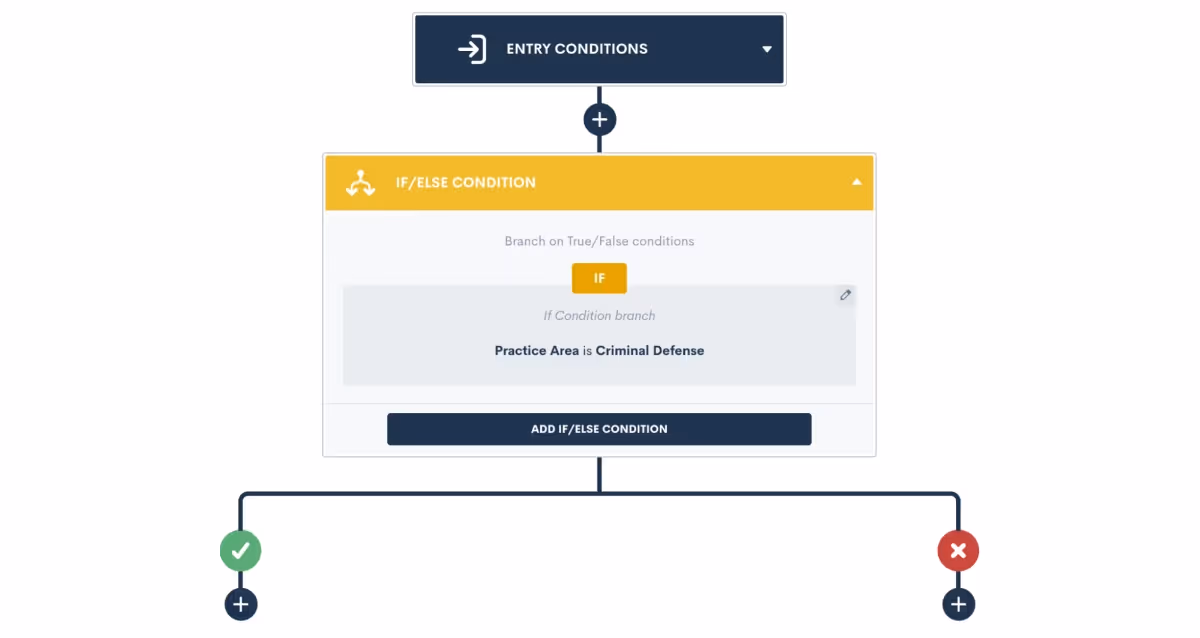
Once you select your condition and click save, you will see a branch created in your Automation. When the condition is met on a target in the Automation, they will flow down the "yes" (green check mark) side of the branch. When the condition is not met, they will head down the "no" side.
Pro Tip: It is very important to note that branches should only be used for conditions that are already determined at the time the Automation triggers, such as practice area, pipeline stage, marital status, etc. You should not use if conditions for sending reminders to fill a form/sign a document/book an appointment etc.
Once the condition is checked at the branch, the matter will flow down one of the two sides. At that point, the condition will never be re-checked (unless you have another if condition further on in the Automation). In other words, once a matter flows down one side of the branch, it will never go back to the other side.
Pro Tip: When editing an Automation, if you delete the if condition then all action items underneath it will also be deleted. For that reason, take caution when deleting a branch!
Exit Conditions
Exit conditions, although sometimes easily overlooked, are a surefire way to level up your Automations. Adding proper exit conditions to a workflow is the best way to ensure that matters only stay in a workflow that is still relevant to them.Let’s say you have an Automation that sends out a series of reminders for a potential client to reschedule their consultation after a no-show. This Automation would likely span over days, weeks, or even months, and would include a cadence of emails and/or text messages prompting them to reschedule. Now at any point if that PNC does in fact reschedule their consultation, you do NOT want them to continue receiving reminders from this workflow. Cue exit conditions.In this example, an exit condition of Event Created would be necessary to make sure that they exit once that appointment is booked. When you add exit conditions into an Automation, these conditions will be checked at each action item, and if the conditions are met, the matter will immediately exit the Automation and no future action items will run on them from that workflow.
Pro Tip: Exit conditions are not continuously checked 24/7, rather they are checked each time a matter hits the next action item. So let’s say you have a 3 day time delay in your Automation, and the matter meets the exit condition on the 2nd day of that time delay, they will not actually exit until the full time delay has run and the next action item is hit.
For that reason, it is crucial to think through your exit conditions carefully. Many users want to use a pipeline stage as an exit condition, but this can sometimes be problematic because the matter may already progress past that stage before the exit conditions are checked.With that in mind, the best exit conditions are ones that are “permanent”, meaning not a temporary status or a pipeline stage. Picklist fields or true/false fields make great exit conditions, since you will typically make a selection for those fields, and it will not change frequently like a pipeline stage would.
Conclusion
When done right, Automations are one of the best tools for saving time while also providing optimum communication with your clients. The best practices laid out here help you avoid any pesky issues that can cause your Automations to become troublesome.While building your Automations, keep in mind all of the various components, from entry conditions to action items to conditional logic to exit conditions, this will allow your Automations to work for you, instead of the other way around.Add these tips to your toolbox for creating your next Automation, and see how Automation can make your life much easier.

An effective legal intake software both accelerates and simplifies the intake process for you and your prospective clients, ultimately leading to a higher close rate. You may be asking yourself how to go about building an approachable yet all-encompassing intake form for all practice areas and matter types in Lawmatics. In this product deep-dive we will examine all the various elements of custom forms that will allow you to accomplish this goal.As you begin to create your one-stop-shop intake form, it is first important to understand the basics of the Lawmatics Custom Form Builder. You will then be able to progress to more advanced options such as relationships and appointments, as well as using conditional logic within the form for branching pathways. Take your process to the next level by using this form to trigger helpful automations based on intake form responses, and finally weave the data collected from the form into your entire intake process like documents and email templates.Here we will walk through each of these elements of creating an intake form to handle every possible intake scenario within your firm.
Form Basics
There are several key aspects of forms that you must be familiar with as you begin creating your intake form. Let’s start with fields. Fields are used to capture the written response to each question on your intake form; the data populated into each field is stored within your CRM.

View all available fields and other form elements on the left sidebar of the form.
There are three different types of fields that can be added to a form:
- Standard fields
- Custom fields
- General fields
Standard Fields
When adding a new question to your form, always check the standard fields section first to see if the field already exists as a default; these are the built-in fields that come standard with your Lawmatics account. In the standard fields section you will find common contact information such as first name, last name, phone, email, address, birthdate, etc.
Custom Fields
As you are building your form you will also need to add fields that are more specific to your firm and/or to your practice areas. These fields will be created as custom fields. When creating a custom field, give your field a name, select the type of field, and select the field visibility.
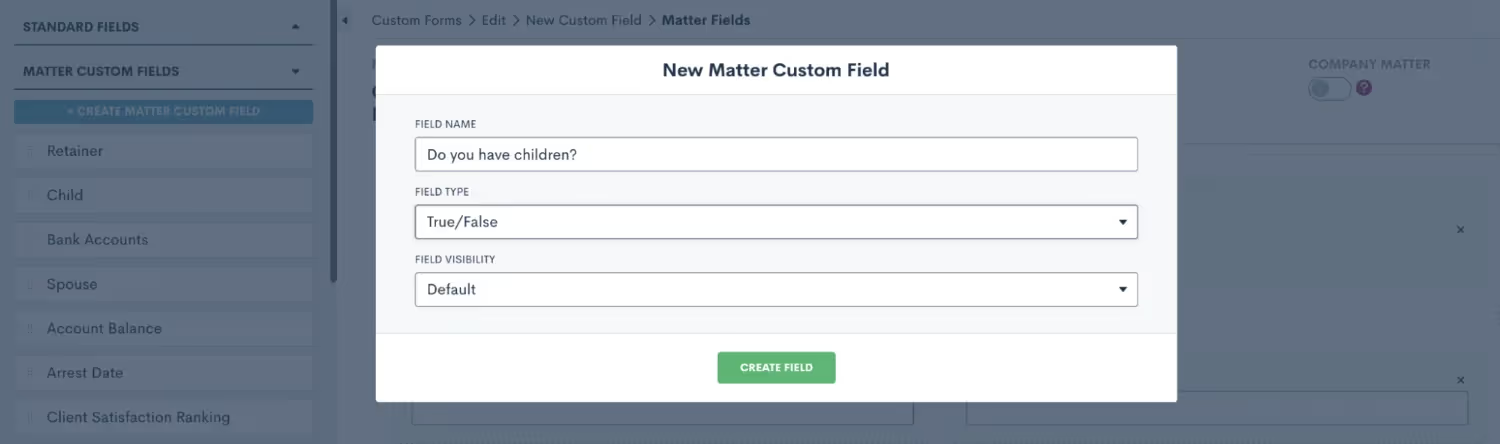
You will see these options when creating a new custom field within your form.
Once you have created your custom field, simply drag and drop it into the form canvas wherever you would like to place that question in the form.
General Fields
General fields are unique in that they do not save data into your CRM, they are only populated within the context of the form itself. Do not use this type of field for any data that you will need to save and use later in the matter, such as merging into a document, triggering an automation, or using in a report. For the purpose of creating your master conditional intake form, you likely will choose not to use any general fields on that form.When creating a new custom form, you have the option to make it internal or external. If you plan to use this form only internally, meaning that it will never be shared with a PNC directly, only an internal staff member will be filling it out, then feel free to make your form internal.
Relationship Blocks
You may want to utilize relationship blocks in your form, especially if you commonly work with married couples or matters concerning multiple clients. A relationship block allows you to create a separate contact related to the matter. This is a great tool for keeping all contacts in your CRM organized. These blocks can also be made repeatable, which is useful in the instance of more than one contact in a particular relationship, such as children or siblings.

Create custom relationship blocks for your various relationship types, and drag them into the form.
Once you have added fields and blocks to your form, remember that you can click on the field to view additional options in the right side menu. Here you have the option to make fields required or not, as well as add conditional logic (discussed further below). You will also see the option to make a field hidden.

Click on a field to view additional options on the right side, including the option to make a field hidden.
There are several scenarios in which to hide a field:
- You may wish to have a default value populated into a certain field, and you don't want the lead/client to have the opportunity to enter something other than the field default
- You may be triggering something an automation internally with a hidden field, such as assigning a certain practice area or moving the lead to a certain stage on your pipeline
- You may want certain client data to appear in the form submission PDF for your reference, but you don't need the client to re-enter or view that information on multiple forms
Advanced Options
When you expand the Advanced section on the left sidebar of the form builder you will find a number of additional components that can be useful to customize and streamline your intake form. For starters, you can use the Instructions field to add headings, script dialogue, or even insert images into your form. Simply drag over the instructions field and then click on it to add your content.

Drag and drop an instructions block, then click in it to add a section header such as “Case Information” or other instructions.
Another advanced element that you will likely find useful in your intake form is the Note field. This note field is different from a custom or standard field, as opposed to populated data in your CRM the note field will save a note item to the matter’s profile.
Consultation Booking
Since this intake form is often used when a new lead initially calls into your firm, you may wish to book a consultation directly from the form. There are two ways to easily accomplish this:
- Method 1: Drag and drop an Appointment field into your form. This will allow you to book an appointment on the calendar of any of your firm’s Lawmatics users, selecting any date and time that you wish. With this option, you will want to reference the host’s calendar before selecting and booking a time on the calendar widget in the form.
- Method 2: Alternatively, you can use the Booking Request advanced option to add a scheduling widget - this will only reveal time slots that correspond with the host’s availability. This is a great tool for high volume firms, where time is of the essence to get leads booked in your system ASAP without taking the time to reference the consulting attorney’s calendar.
After adding a booking request field into the form, click on it to open the options for this request. Make sure to select the booking options, as shown below, to determine what type of event this will be, who will be the host(s), and what the location of the event will be.

Use a booking request field to allow easy scheduling based on the host’s availability.
It is also important to make sure that all Lawmatics users have synced their calendar in their user settings, so that the system can pull their availability accurately. When an appointment is booked via the scheduling widget, it will automatically appear on that user’s synced calendar.
Conditional Logic
Before you start diving into conditional logic and its many uses, it is first important to understand the mechanics behind it. In its simplest form, conditional logic is simply an “if, then” statement. If a certain condition holds true, then the desired outcome will take place.While conditional logic looks a little different in each different area where it can be used in Lawmatics, the basic concept is the same. Let’s consider the example shown below from an automation.
Rule #1 - Conditional Fields
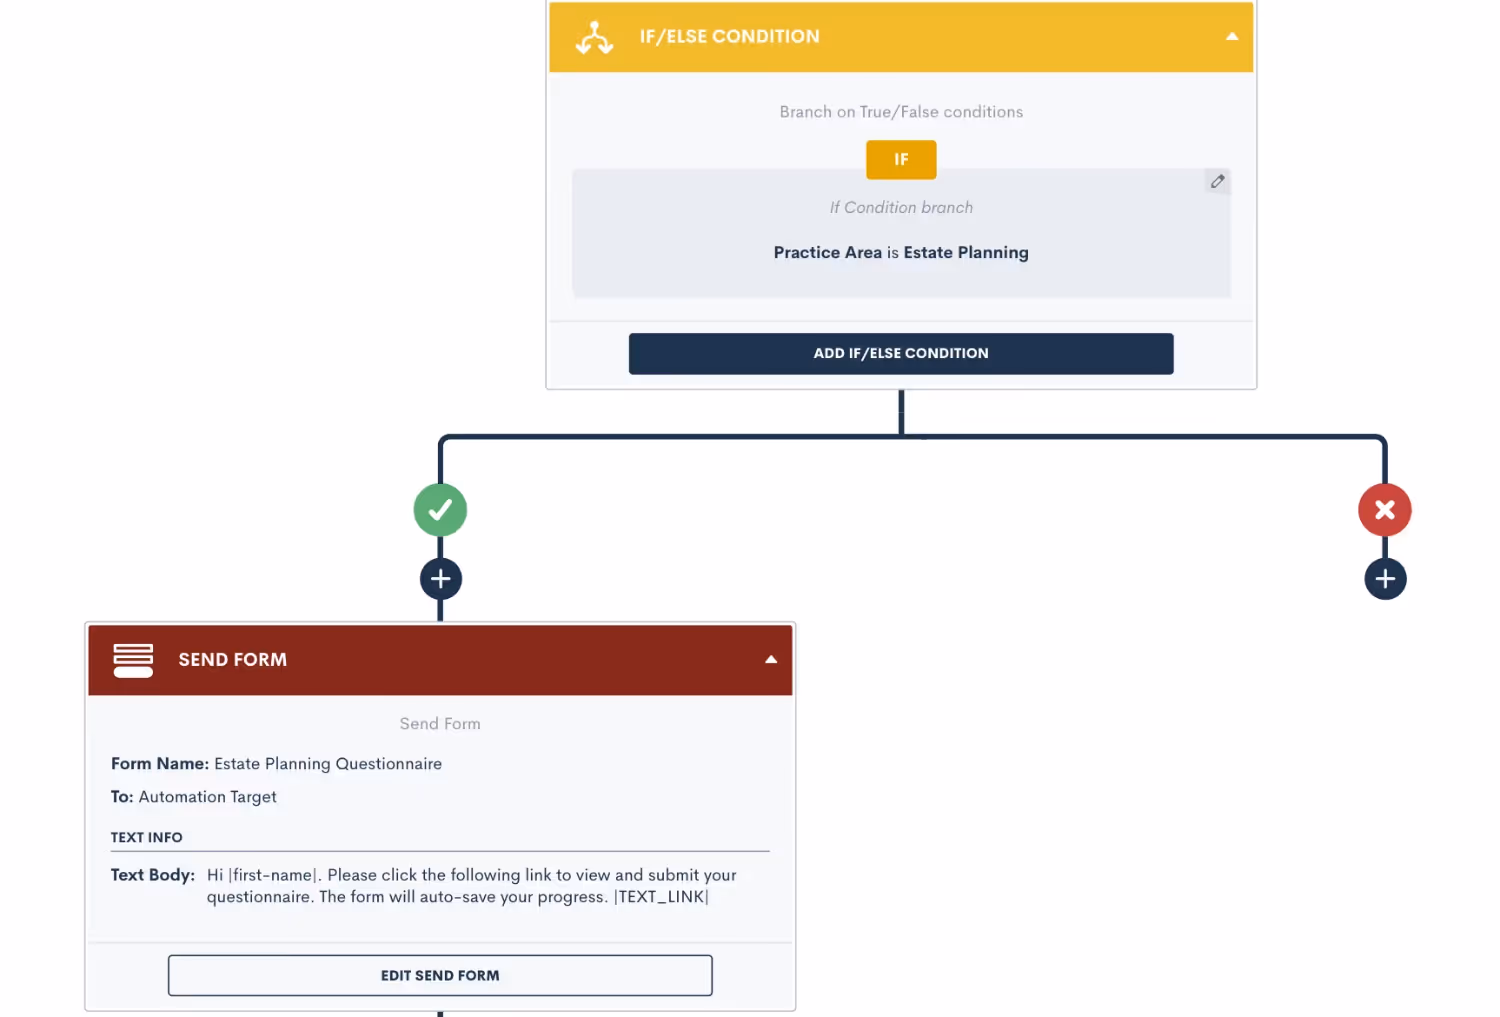
Above you will see that our “if” statement is “if the Practice Area is Estate Planning”. When this condition is found to be true, then the outcome will be that of the affirmative side of the branch. If the if statement is not found to be true, then the outcome will be that of the negative branch.In this particular example, the affirmative outcome is to deliver the Estate Planning Questionnaire to the target matter whereas on the negative side of the branch, nothing will occur — the automation simply ends there.There are also certain instances where multiple conditions can be used as your “if” statement. When this is the case, it is important to give those conditions an “AND” or OR” relationship accordingly.Notice in the image below how we have not added a second condition to our “if” statement but rather have given it an “OR” relationship to our initial condition.
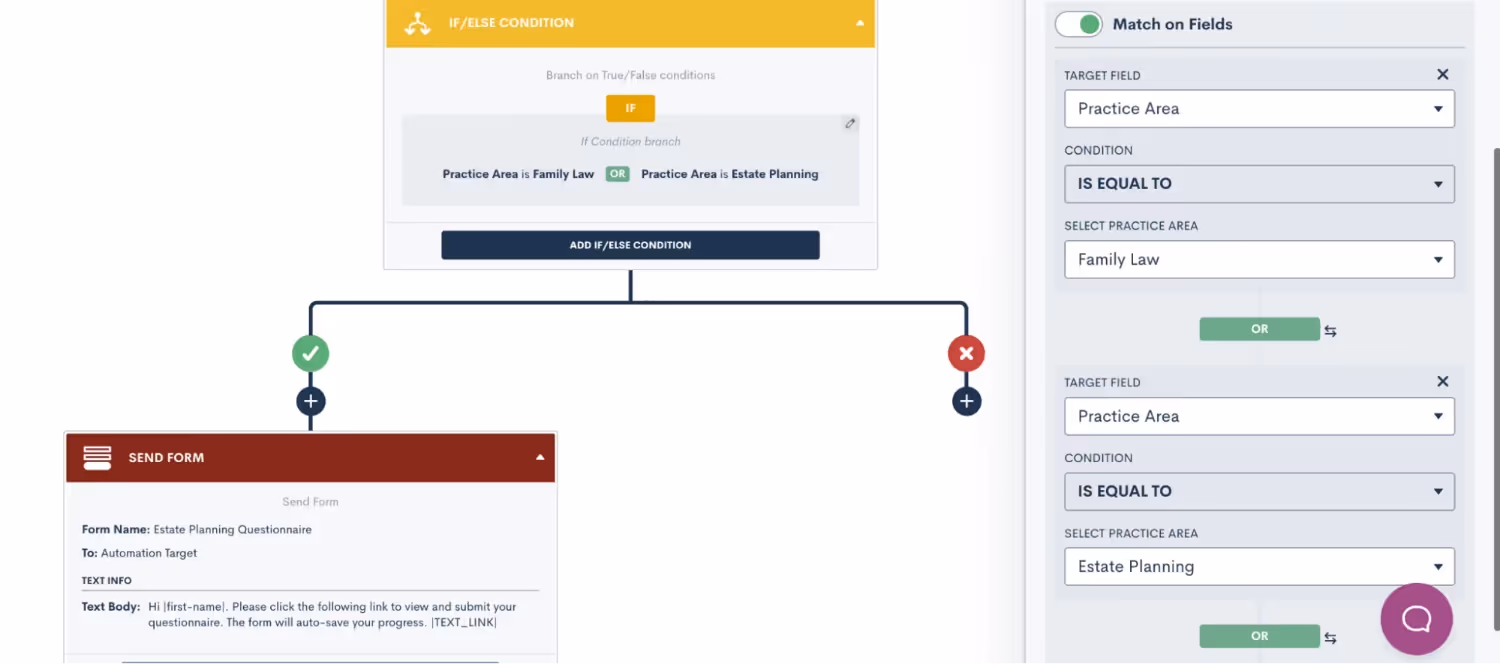
The same concept applies to using conditional logic in your intake form. When setting conditional logic in custom forms, remember that you will set the logic on the field that is conditional, as opposed to the field that sets the condition.Let’s break down how you can go about using this on your intake form. When discussing next steps with the PNC, you may ask the question “Would you like to schedule a consultation?”. This will likely be a boolean (true/false) field or a picklist field with options of Yes and No. If the answer is Yes, then you may want to have a field appear to enter in the consultation fee for that matter.To set up conditional logic in this example, click on the second field, the consultation fee, and turn on conditional logic there. You will then select which field sets the logic for this field, which in this case is the field “Schedule consultation?” being TRUE.
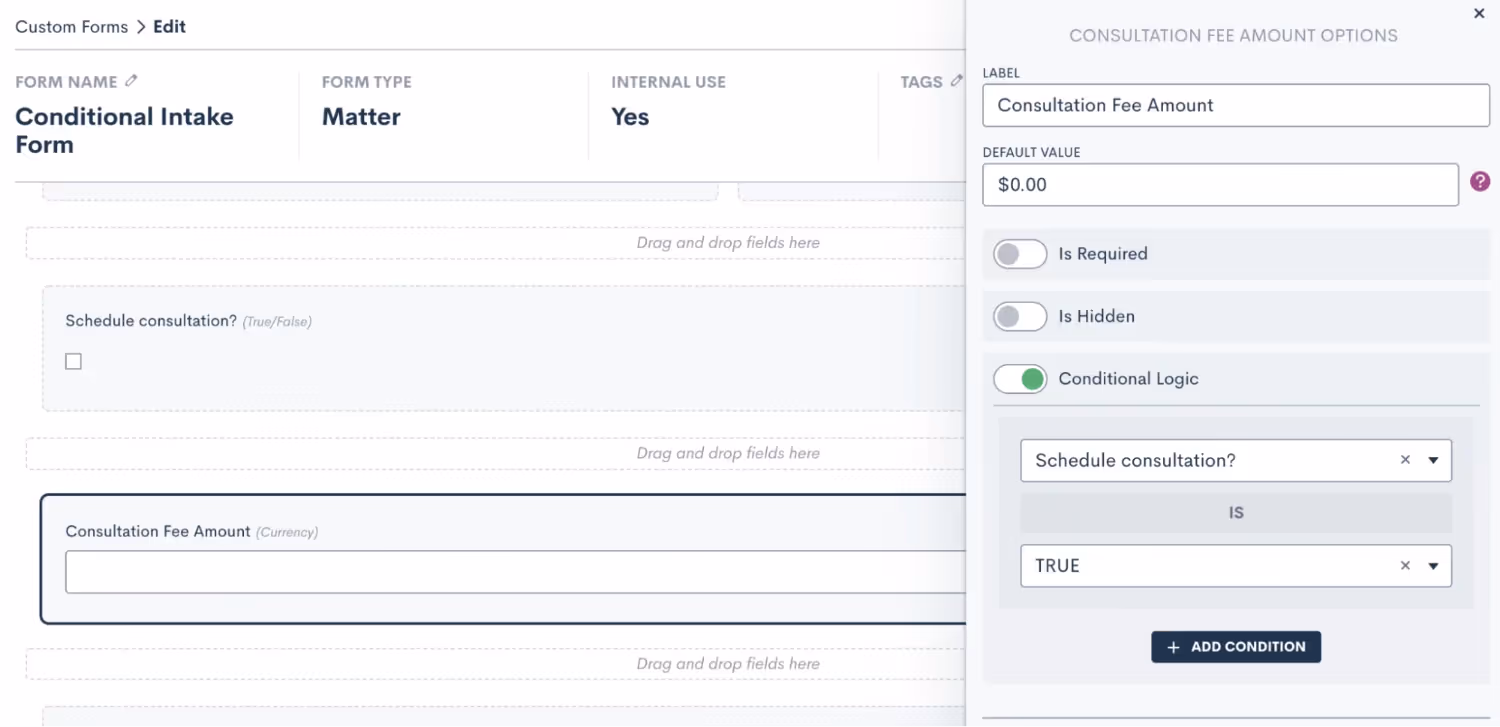
In short, rule number one of using conditional logic in custom forms is to set the logic on the field that is conditional.
Rule #2 - Defined Value Fields
That brings us to rule number two. Conditional logic can only be set using fields that have defined values, such as true/false fields, picklist, or multi picklist fields. You cannot set conditional logic using fields that are open text fields, since these are open-ended and do not have defined responses.To clarify further, this rule pertains to the field that is setting the condition, not the field that is conditional. Returning to our example from earlier, you’ll notice that the conditional field “Consultation Fee Amount” is a currency type field, allowing the user to enter any dollar amount. This is perfectly acceptable, since this is not the field that is setting the condition. The field setting the condition is “Schedule consultation?”, which was created as a true/false field. A picklist field would also suffice in this example.As long as you keep these two rules in mind for using conditional logic in your custom forms, you are sure to create a better customer experience for clients filling out your forms.
What to Include in Your Form
With the baseline knowledge of the various intake form components you’ve acquired, you are ready to start building. Please note that we are merely suggesting what you may wish to include in your form; some of these items may or may not be needed for your practice, and you may also have other elements not mentioned here that make sense for you to include. Use these suggestions as you see fit.
Standard Fields
Begin by determining what standard fields you need to capture initially during your intake. This is typically the person’s first and last name, email address, and phone number. Depending on the type of law you practice, you may also need to know their marital status, citizenship, etc.Locate these fields in the standard fields section, and drag and drop them over to your form. You may also want to use an instructions block to make a section heading, as shown below.
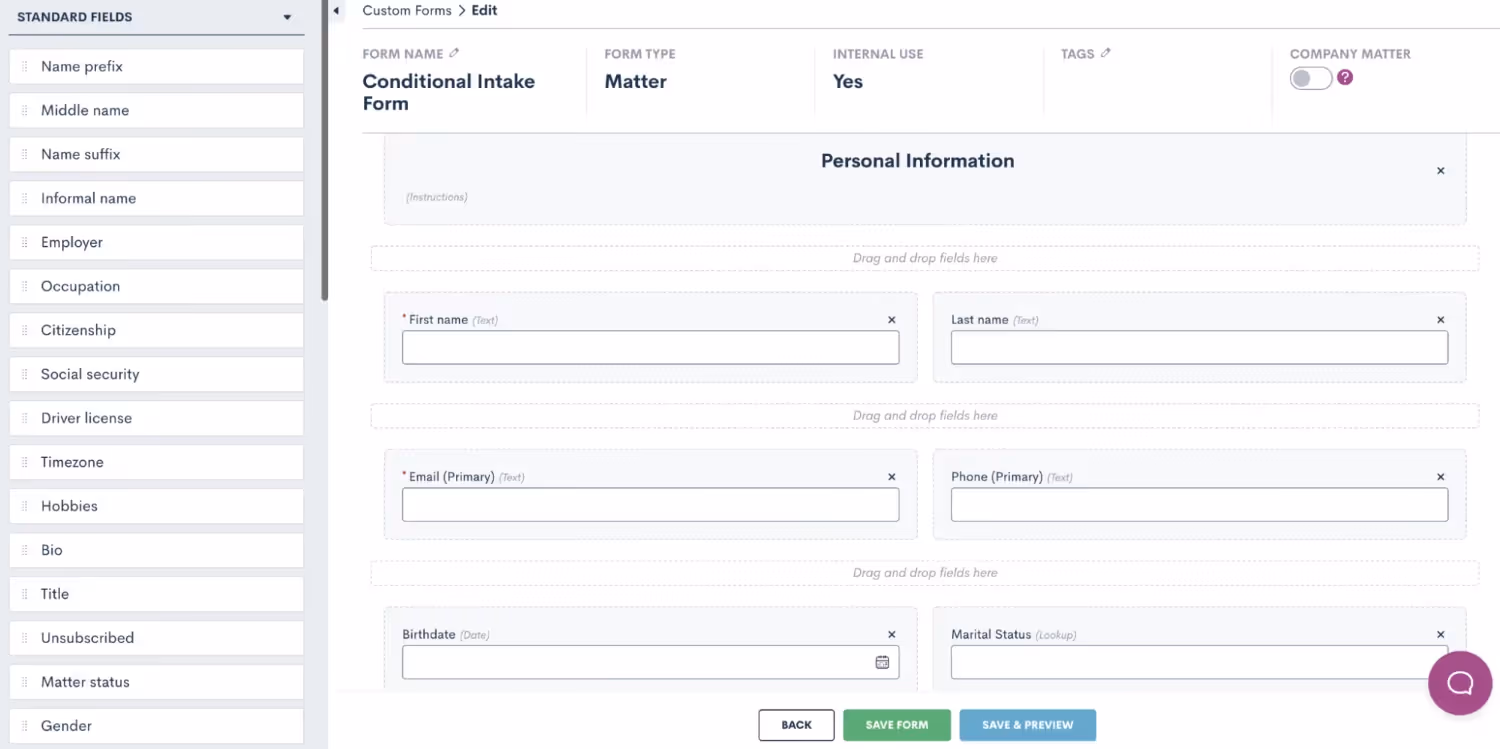
Use an instructions block to make a heading for your basic contact information section.
Relationship Blocks
This is also a good place to include a relationship block in your form. Notice the field Marital Status in the bottom right of the image above. Here we have a great opportunity to implement some conditional logic in your form. Create a relationship block for your Spouse relationship, containing whatever fields you wish to capture for the spouse, and then set that block to only appear if the marital status is married.

Create and drag over a Spouse relationship block, then add conditional logic so it only appears when marital status is married.
Dividers & More
As you move on to the next section of your form, you may find it helpful to add dividers or another instructions field to help with the organization and structure of your form. Additionally, we suggest including the Source and Campaign fields, both found in the standard fields section. These fields allow you to save data on how each lead found your firm, which is critical for capturing valuable marketing data. Additionally, a Note field comes in handy here to collect any other information shared by the PNC that should be saved to their matter.

Use dividers or instructions to separate sections of your form.
Case-specific Fields
Next, you’ll want to start getting into some case-specific information for this PNC. Make sure to include the practice area field to label which type of case this is right off the bat. In our form we have also included our pipeline stage field which allows you to select exactly which stage of your intake pipeline this lead should land in.
Conditional Logic
Conditional logic will come in handy here to pose questions that align with the type of practice area that is selected. In our example, we added a follow up question asking about witnesses which will only appear when “criminal defense” is selected as the practice area. We also added a field to ask the lead how many children they have, and this field is conditional on the practice area being family law.
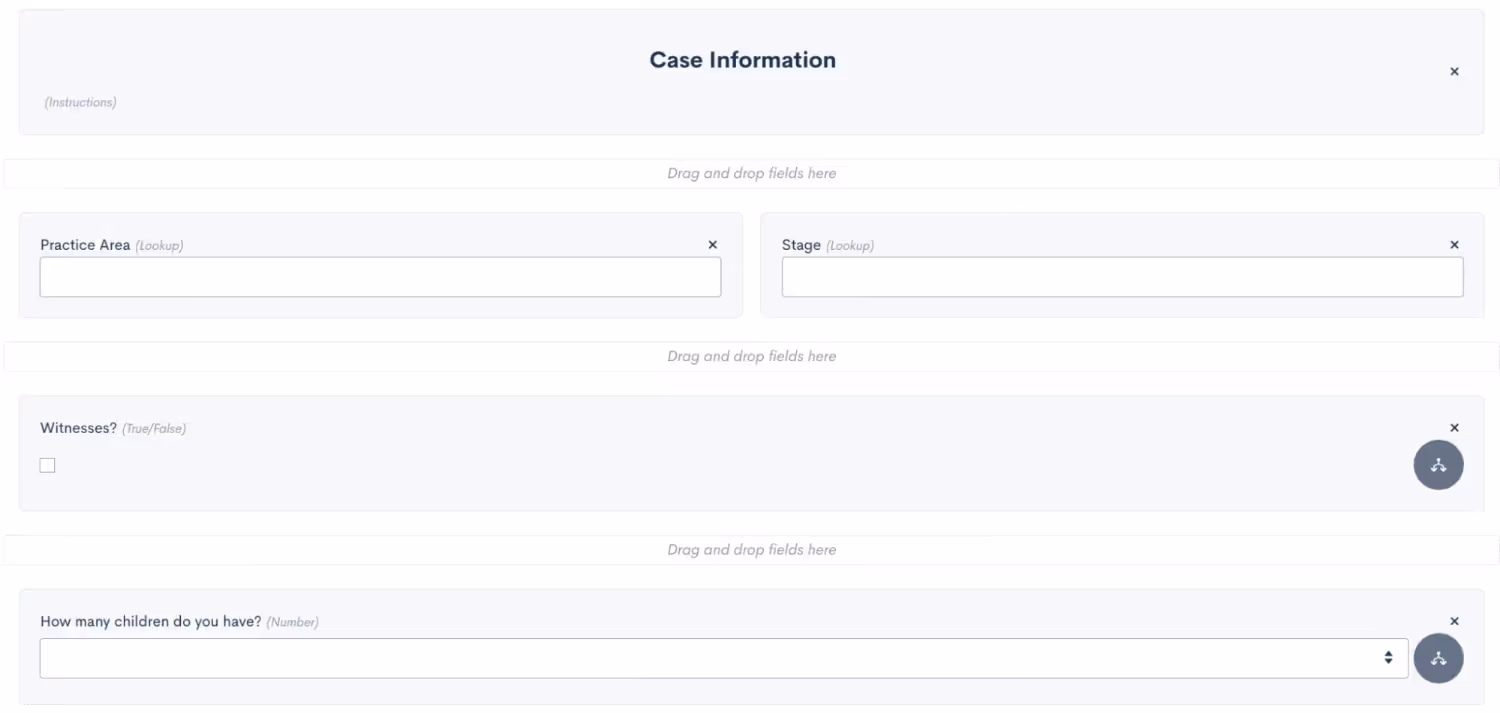
Add practice area specific follow up questions with conditional logic.
The ultimate goal of this form is to automate all possible intake scenarios, the best way to accomplish this is by adding a Next Steps section to your form. This tells the system whether or not this lead is qualified, which automation(s) to trigger, which conditions apply for this particular lead, and anything else that is needed for your process. While there are many different ways to use custom fields to capture this data, you’ll see some suggestions from our team in the image below.

The first question we ask here is whether or not to disqualify the lead. Our additional follow-up questions are conditional on that field being False, meaning that if the lead is disqualified, none of the other questions are relevant so they will not appear in the form.We have also added a possible option for nurturing this lead. This can be useful to trigger an automated nurture sequence spanning over weeks, months, or even years to keep working that lead. Typically, you would select this option if a lead is interested, but not ready to move forward with next steps right at that moment.We have also included the standard Sub Status field in our form. In the scenario of a lost/disqualified lead, this field is particularly useful to capture the reason the lead was lost. As opposed to just labeling a lead as Lost, this field allows you to select a custom reason, such as disqualified, which is useful for future reporting.Last but not least, at the bottom of the image above, you will also see three conditional fields. Depending on your process, these may be slightly different at your firm, but these fields show an example of what some potential next steps for a qualified lead may be. Each of these options will be used to trigger an automation taking the appropriate action, as explained in the following section.
Utilize Data from Your Form in the Rest of Your Process
Now that you have automated your intake form, it’s time to automate the next steps of each possible scenario. Again, these examples may differ from your firm’s actual process, but they are meant to be used as a guideline for creating your own automations.
New Lead Automation
Let’s break down our three possible outcomes for a qualified lead as described in the section above. First, we have the option to Run on New Lead Automation. As you may guess, when this option is selected in the intake form we will use it to trigger our new lead automation. Depending on your clientele and your sales cycle, this automation may vary slightly for you, but for ours we have decided to include an alternating sequence of emails and text messages, with the call to action for the lead being to book their consultation.
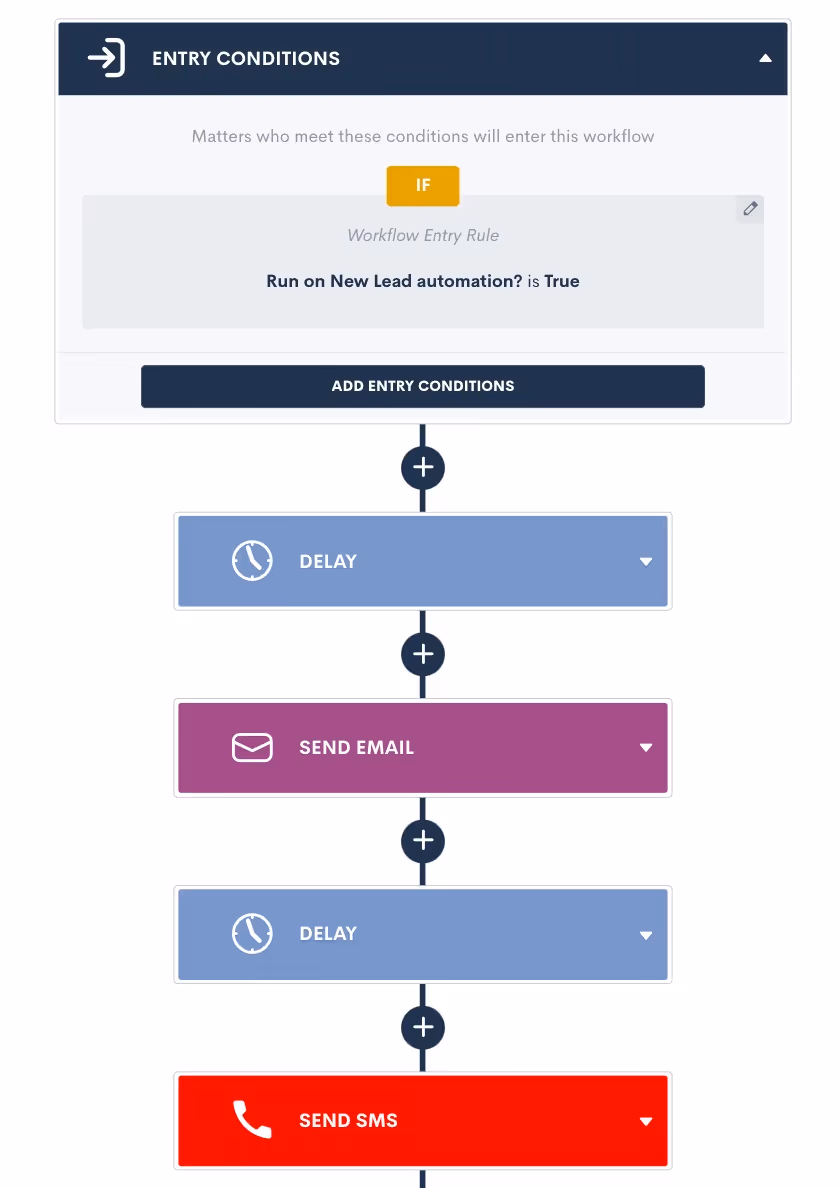
Trigger your new lead automation when the corresponding field is True, and then build out a sequence of automated actions.
Feel free to continue this sequence for as long as you would like, there is no limit to how many action items you can add or how much time this workflow can span. We have also included exit conditions in this automation so that once they book their consultation, they will no longer continue getting outreach from this automation. This is a key step to make sure all communication is relevant to where they are at in the process.
Send Engagement Agreement Automation
When filling out the intake for a new PNC, you may have someone who is ready to sign up on the spot and sign their engagement agreement immediately. When this is the case, you will select the Send EA option in your intake form. We now have an automation that triggers when that field is selected, and we have implemented conditional logic in the automation to check the matter’s practice area, and send the appropriate engagement agreement for e-signature accordingly.
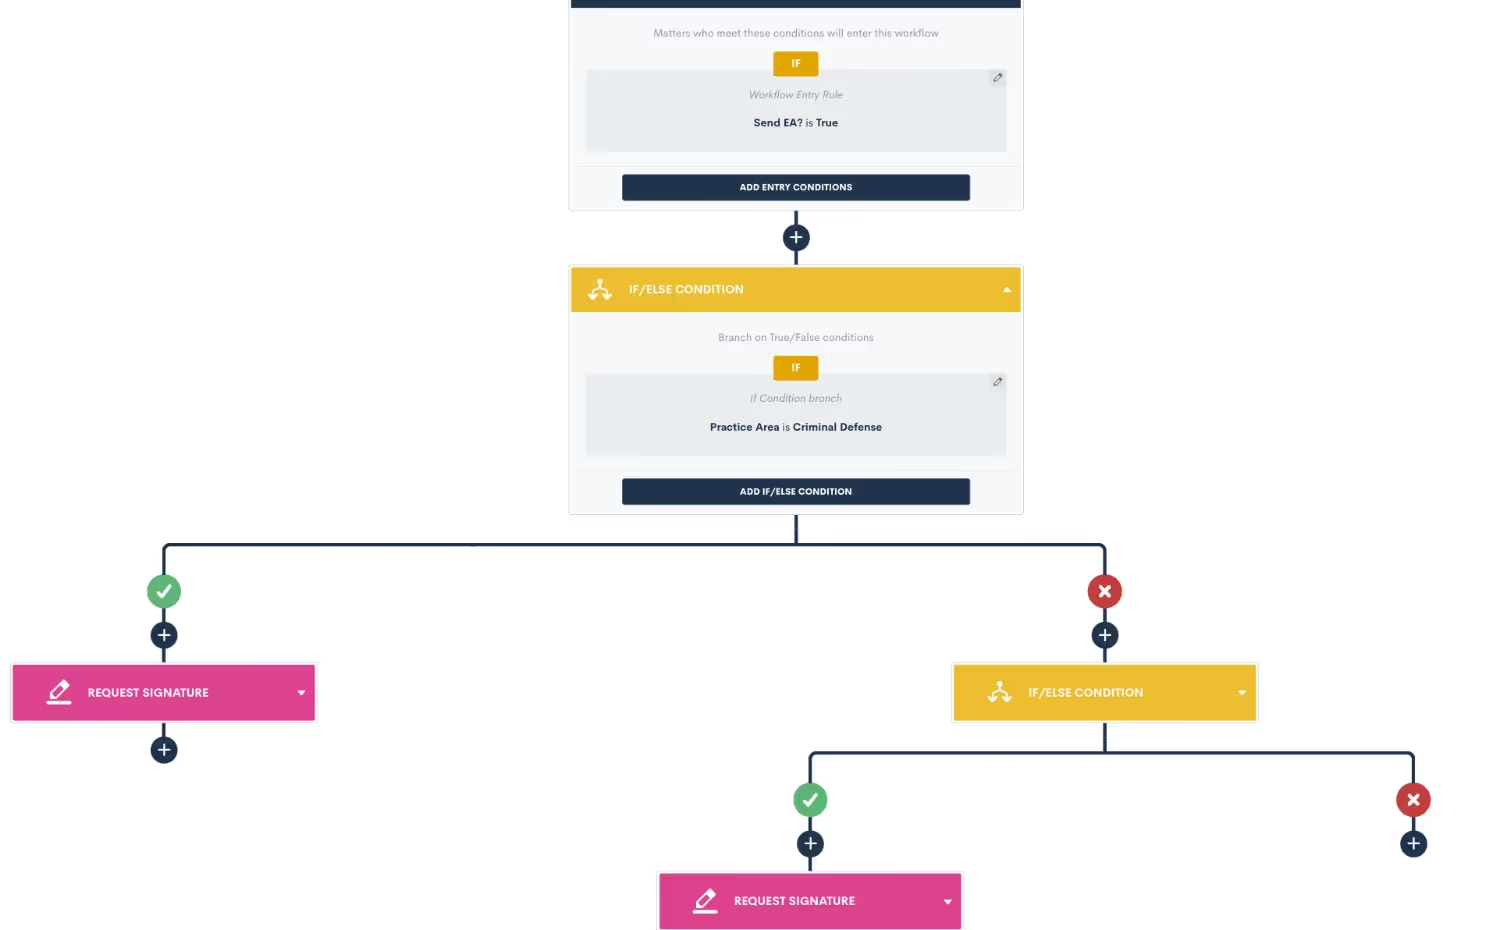
Use if/else condition branches to send the appropriate document for signature depending on the practice area.
In the example above you see just two if branch statements, but feel free to continue adding as many as you need to account for all of your firm’s different practice areas or engagement agreement variations.
Scheduling Consultation Automation
In our intake form we have also built in an option for leads who want to move forward with your intake process, but still need to schedule their consultation. This is a very straightforward scenario to automate using our booking request feature. Simply trigger the automation when the needs to schedule option is selected in your form, and then send out an appointment request action item, making sure to select the appropriate firm user as the host.
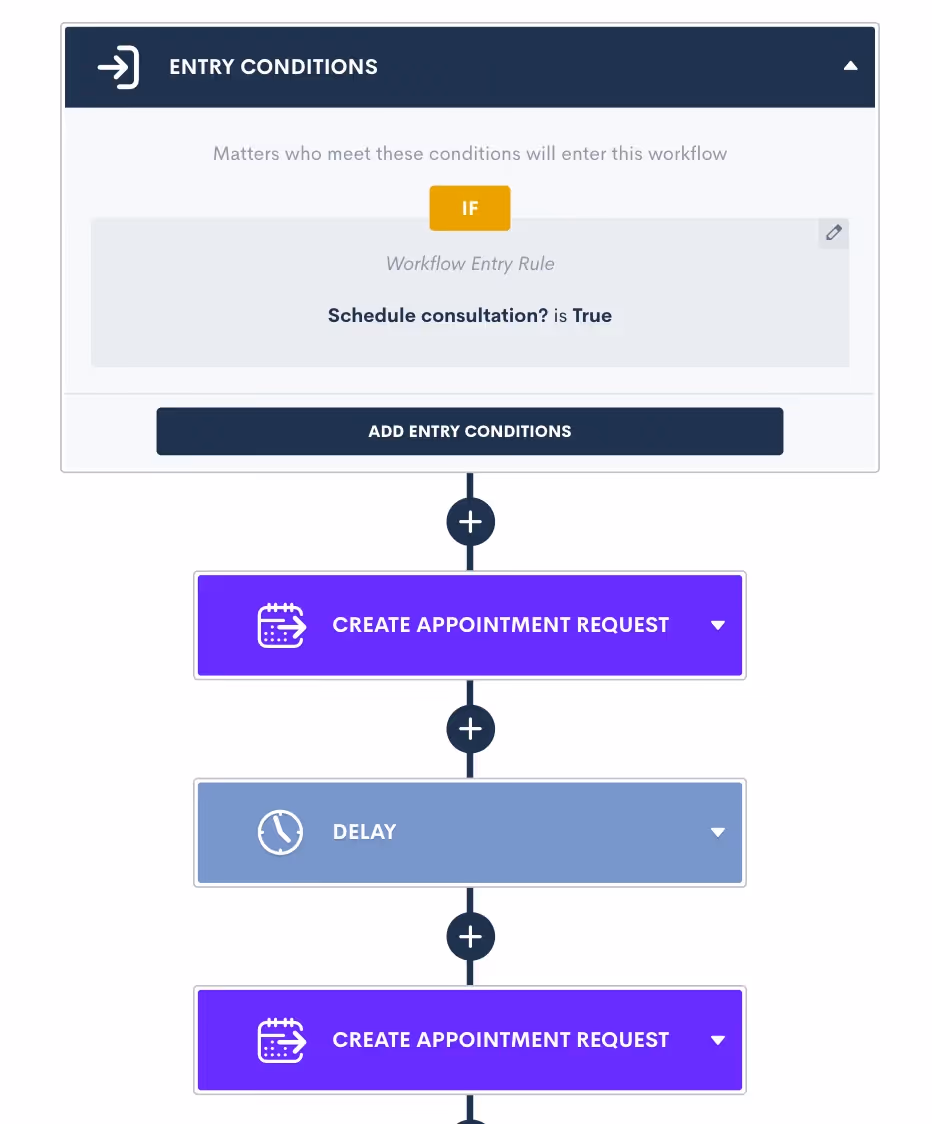
Alternate appointment request action items with time delays to create a cadence of reminders to book their consultation.
Just as mentioned earlier, feel free to include as many reminders to schedule as you would like, sending them at a cadence that makes sense for your clientele. Once again, make sure to include exit conditions so that once the lead books their consultation using the appointment request, they will not continue getting the automated reminders.While these are just a few examples of scenarios that can be automated in Lawmatics based on the intake possibilities from your form, keep in mind that the possibilities are absolutely endless. With the use of conditional logic and our powerful trigger options, you have the ability to create automations for every possibility.
Reporting
In addition to automating your process, the intake form is also useful to capture data that can be tracked in a custom report. For example, in the intake form we have added the option to mark a lead as disqualified, and apply the appropriate sub status. You may find it useful to create a report of all disqualified leads, along with the marketing source they came from, so that you can hopefully work to eliminate getting an influx of unqualified leads from that source.
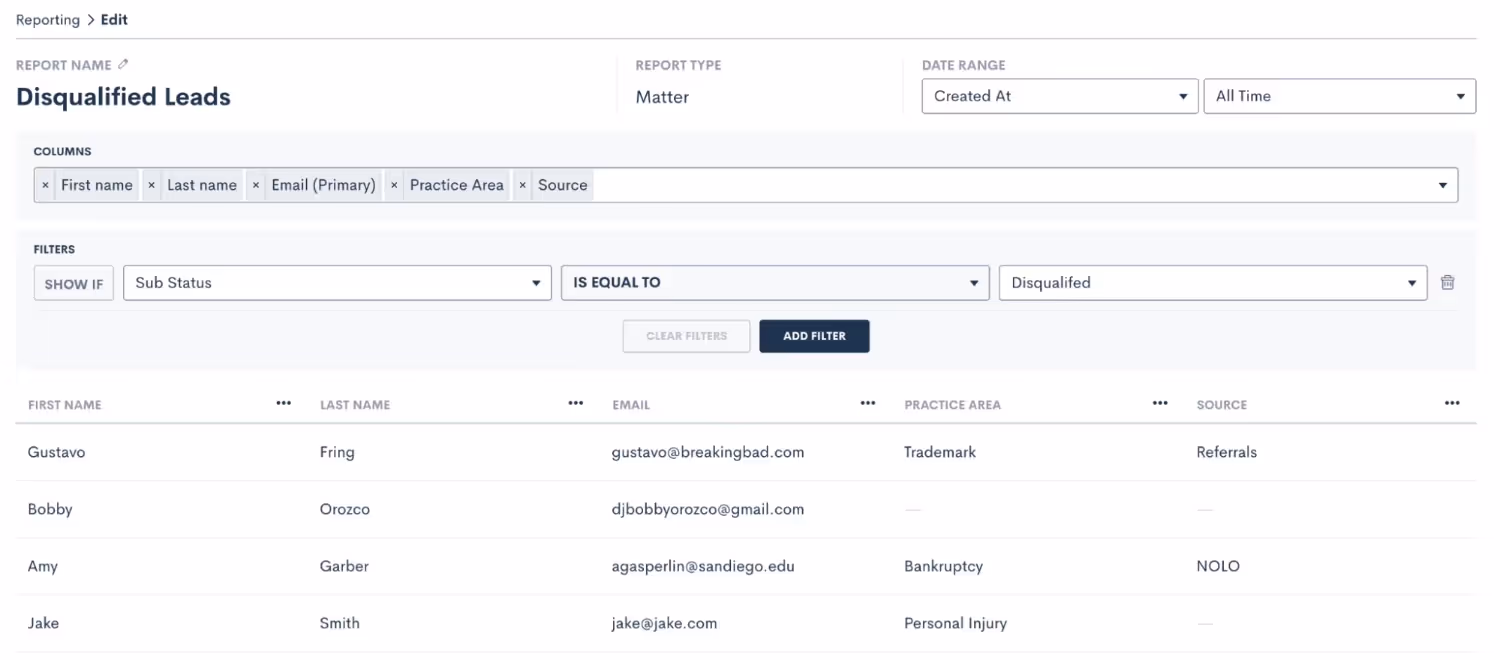
Create a custom report filtered by sub status to easily view disqualified leads from a given time period.
Remember that you will create a report under the Insights tab in Lawmatics. Once you have created it once, by setting your filters and columns as shown above, you can simply save the report and come back to view it any time. You could also set a custom date range so that you can easily check the report weekly or monthly and see only relevant data from that time period.All of this will lead to better insight into your firm’s performance, and help guide you on which marketing sources to invest more highly in.
Conclusion
In summary, there are many benefits to using a conditional intake form to automate your process. Accounting for all of your firm’s potential intake scenarios in a single form will save valuable time for you and your team. It also creates a much smoother experience for both your staff, as well as for your clients. At the end of the day, improving the client journey will always help improve your firm overall.Keeping the future of your firm in mind, your conditional intake form will also help set you up for insightful reporting and analytics down the road. Unlock statistics that you never had access to before, such as rate of leads lost before vs. after a consult, conversion rates by practice area, and of course marketing source performance. Once you have access to all of this data you will be able to easily adapt and adjust your processes to maximize profitability as your firm grows and changes over time.Finally, your all-encompassing intake form, in conjunction with automations, reports, etc. will enable your firm to convert more leads into clients. Use the form to bring in more business while spending less time and effort on your intake process.Ready to unlock the full potential of your firm's client intake process? Learn how Lawmatics legal intake software can revolutionize your firm's efficiency and client experience today!