Deep Dive Recap: Automate Efficiently with Entry and Exit Conditions
Automate your law firm’s workflows more efficiently than ever before by utilizing Lawmatics’ entry and exit conditions.


Table of contents
Automations are key to building a powerful workflow that doesn’t exhaust your human resources – but how does an Automation know when to start and when to end? How does it know which actions should be taken on which items?Welcome to the world of Automation entry and exit conditions. These conditions create Automations tailored to your firm’s unique clientele and sales cycle.In this Deep Dive, you’ll learn how to harness an array of entry conditions to trigger automated workflows, and we’ll explore best practices for utilizing exit conditions effectively. By the end of this read, you'll be armed with the knowledge and tools to craft highly efficient, precise Automations that both save time and increase your firm's productivity.But first, let’s delve into essential background on how entry and exit conditions function in Lawmatics.
Automation entry and exit - the basics
Understanding each component of an Automation is key to building one that truly serves to save you time. Here’s what you need to know about each component and its function.
Automation types
When creating a new Automation, you will be prompted to select the Automation Type. The three options are as follows:
- Trigger: These Automations trigger when the entry condition is met, and will run all the way through unless exit conditions are met.
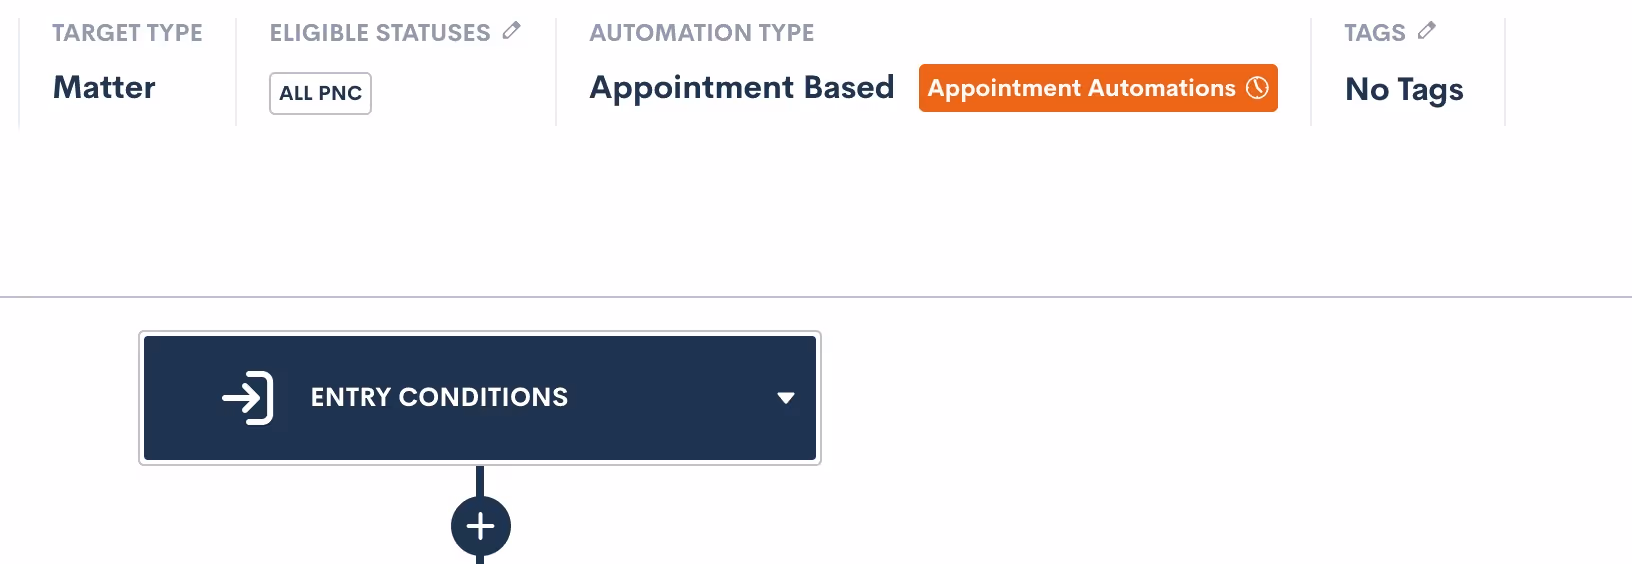
- Appointment: This type of Automation triggers when an appointment is scheduled, and allows you to create time-relative triggers within the Automation (done by clicking the orange button below).
- Date Field: Will trigger when the selected date field is populated for a given matter, and allows you to create time-relative Date Automations, much like Appointment Automations shown above.
These three Automation types determine the manner in which your Automation entry conditions function at the very start of your Automation. We’ll dive further into each of these as we break down all entry conditions later in this article.
Target Type and Statuses
In addition to selecting your Automation Type, you must define whether your Automation will act on Contacts or Matters by selecting a Target Type. If you choose Matter as the Target Type, you must also choose Target Statuses.

For any Automations that are intake or client related, your Target Type will be Matter. Use Contact type for Automations that could run on any contact, such as referral partners, other attorneys, etc.When the type is Matter, you also must select which status(es) can run through this Automation. This is essentially an entry condition in itself, since only Matters of the selected status(es) can trigger the Automation.
The eligible statuses can also be edited later after you create the Automation. Note: you can select more than one eligible status.
Activating and deactivating
In order to edit an Automation, it must be set to inactive. If you have already activated an Automation and wish to make further edits, simply deactivate it and make your edits. Any targets currently running in the Automation will stay exactly where they are in the workflow while the Automation is inactive, and only resume once it’s reactivated.Deactivating and reactivating an Automation will not cause targets to be re-run through that Automation from the start.When reactivating an Automation, you’ll receive a warning if any Matters who now meet the updated entry conditions will immediately run through the Automation upon activation.

Proceed with caution if you see this message — especially for Automations that you only want applied to new matches moving forward. To skip any current matches, simply click the Future Matches Only options.All Matters will only trigger into a given Automation once, with the exception of our Form Filled trigger (discussed later). While you can manually re-run a target through an Automation, that target will not trigger through the same Automation more than once.
Entry conditions
Entry conditions are arguably the most important part of your Automations, since they determine what will set the workflow in motion. Let’s walk through each available option for entry conditions.
Using multiple entry conditions
As we explore the various entry conditions, note that Automations can be further refined by combining multiple entry conditions with either an AND or an OR relationship.To use multiple entry conditions, first select your first entry rule. Then click the button labeled Add Entry Conditions, to add your second entry condition.
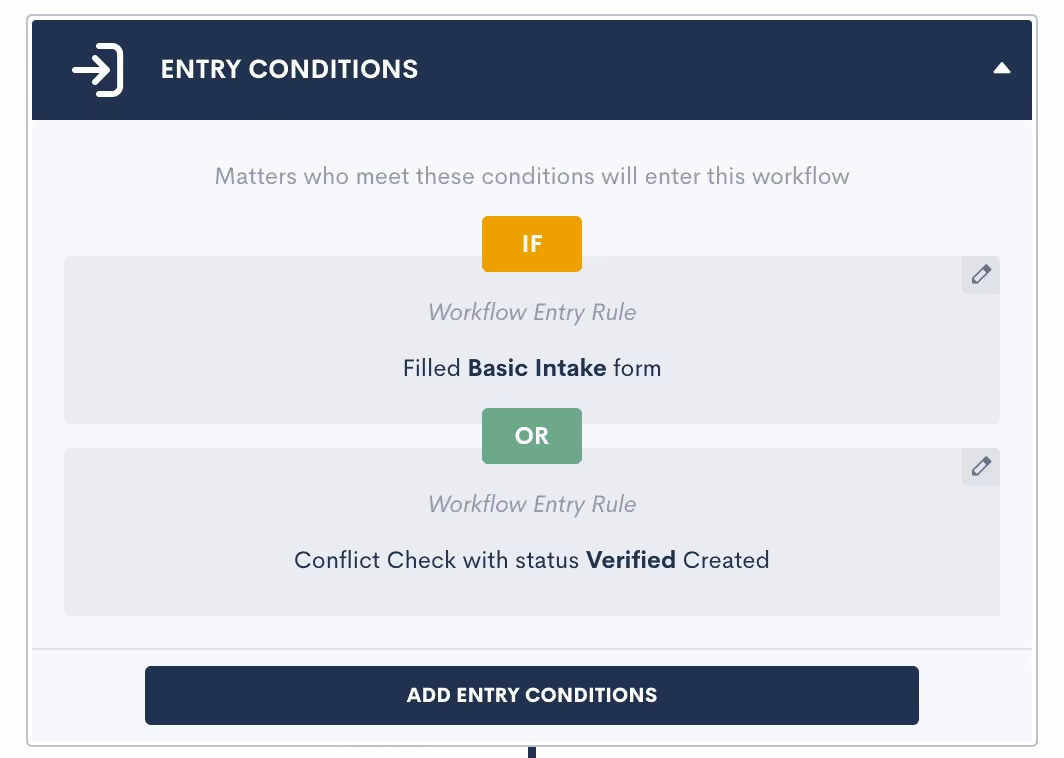
Once you have both (or all) entry conditions entered, simply click where it says OR in the image above to change to an AND relationship if desired.These entry conditions will be honored as they are selected. AND relationships require all the selected entry conditions to be fulfilled, whereas OR requires just one such condition to be fulfilled.OR ExampleA firm has multiple intake forms, one for each of their different practice areas. Once any one of these forms is submitted, an Automation should trigger to confirm the submission and follow-up with that prospect until they schedule a consultation. This Automation should be built with an entry condition for each form linked with an OR relationship.AND ExampleA firm requires a client to both fill out a form and submit a requested file in order to trigger the next action in the Automation. This Automation should be built with two entry conditions – one for the form and one for the file upload – linked with an AND relationship.
Match all
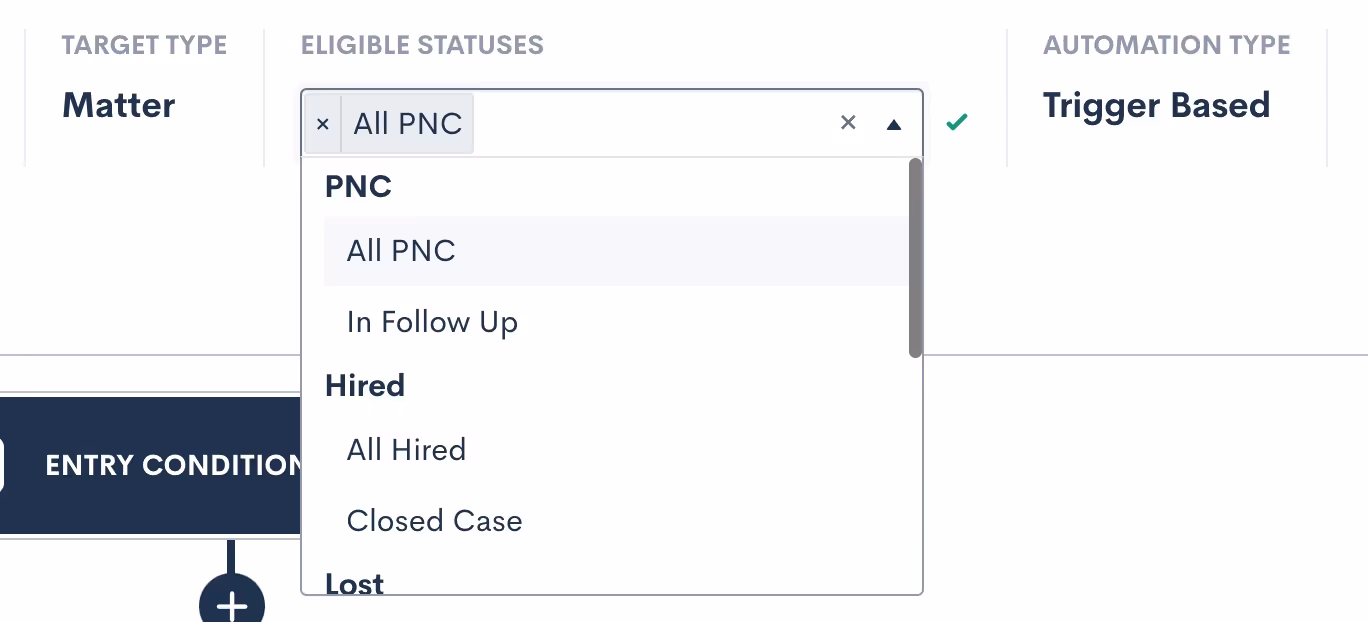
The first option you’ll see for setting an entry condition is also the most encompassing. Since your selected statuses also work as an entry condition, using the Match All entry condition will simply run the Automation on every possible target within the selected type and status.

In the example above, you’ll see that PNC was selected as the only eligible status. This means the Match All option will only match all Matters with the PNC status, and not ones with other statuses like Lost or Converted.While this entry condition can be useful, the most effective Automations are much more targeted.
Registered for event
Lawmatics has everything you need to manage mass events such as seminars, luncheons, and more. This includes the ability to trigger an Automation when someone registers for one of your events.
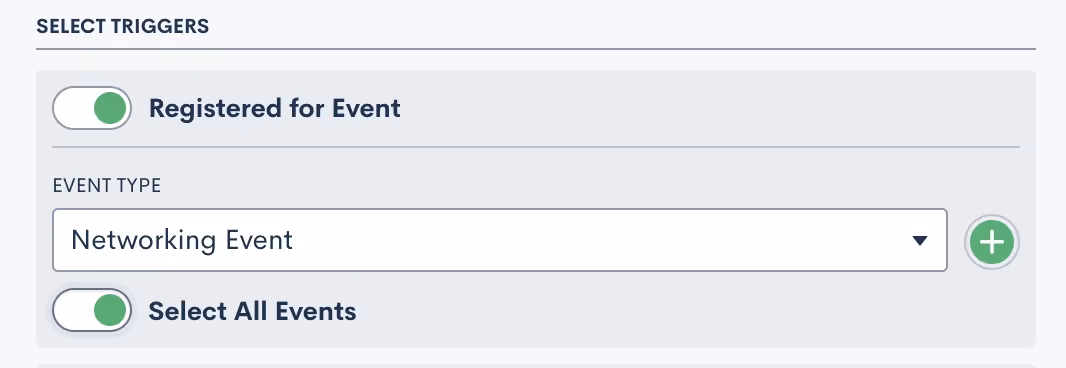
To automate different actions for different event types:
- Choose which event type should be the catalyst for each Automation
- Select a specific event within that type, or toggle Select All Events so that this Automation runs on any events of that type.
Custom email activity
Custom email appointment triggers in Automations are one of the most critical components of email marketing and automation. This trigger allows you to fire an Automation based on whether a specific email has been opened or clicked on (assuming there is a clickable link in the email).

- Select the email that you would like to base this Automation trigger on
- Select whether you want the Automation to trigger on the specific email being opened or clicked on by the recipient
Filled a form
This trigger allows you to select a specific form that, when submitted, will automatically trigger the Automation. If you wish to trigger an Automation on one of two or more forms, this can be accomplished by setting multiple entry conditions with an OR relationship.

As mentioned above, Lawmatics Automations only run once, meaning that if the condition is met multiple times the Automation will only run the first time the condition is met. The Filled a Form entry condition, however, gives you the option to have the Automation run every time the selected form is filled out.

If the latter is selected, then any given Matter will run through the Automation each and every time the selected form is submitted.
Requested files
Lawmatics file requests are a valuable tool, allowing you to easily send out templated file requests to your Matters. Use this entry condition to trigger an Automation based on the status of a particular File Request.

- Select a File Request template to base this Automation trigger on
- Select whether you want the status of the File Requested to be (IS) or not to be (IS NOT)
Note the following three status options:
- Pending: the File Request has been sent but no files have been submitted
- Submitted: some files have been submitted but not all the requested files.
- Completed: all requested files have been uploaded
Most commonly you will trigger an Automation when the status of a file request is Completed.
Signed a document
Lawmatics allows you to create an Automation trigger based on the signing of any particular e-signature document. A great example of this is fee agreements or retainers. Simply send one to a new client for signature, and then have an Automation that would only trigger once all parties have signed that fee agreement.

Select the document type, and then the specific document. Remember that you can always use multiple entry conditions to create an OR relationship with multiple documents.
Appointment created
When you use this trigger the Automation will become an Appointment Automation, discussed earlier in our Automation types. You can select this Automation type when you are first creating an Automation, or simply select this entry condition when choosing your trigger and it will change to that type automatically.

Appointment Automations allow you to create time relative Automations based on the date and time of your appointment. For example, you can trigger an Automation "one day before" or "two hours after" the appointment.The parent Automation (the part shown above) will trigger at the time the appointment is scheduled, whereas the Appointment Automations (shown below) will trigger based on their relative time selection.

Note that the Appointment Automations are activated and deactivated independently of the parent automation. If an appointment is rescheduled or canceled, the Appointment Automations will update accordingly.
Invoice paid
This entry condition is only available if you are using LMPay, Gravity Legal, or if you have a LawPay integration connected. This entry condition allows you to trigger an Automation when an invoice has been paid.

Task activity
While you can of course assign Tasks as an automated action, you can also trigger an Automation when a particular type of Task is either created or completed.

Select whether the creation or the completion of the Task should trigger your automation, and then select from your Task tags to determine which tag should trigger this specific automation.
Conflict check
Conflict checks are often a crucial part of your intake, so you may consider triggering an Automation based on the status of one of these checks.

Choose to create this entry condition when a conflict check is either Denied (conflict detected), Undecided (needs manual check), or Approved (no conflict). You may even end up creating a complete workflow where one Automation performs the conflict check, and another triggers upon the passed or failed check.
Match on fields
Last but not least, the Match on Fields trigger is one of the most powerful triggers, allowing you to create an entry condition based on the value of any fields in your CRM database.
- Select the target field. It’s common to use fields like Practice Area, pipeline stage (Stage), or Status with this trigger.
- Choose which condition should be evaluated
- Pick the value you are seeking a match on
The condition options will change depending on the type of the field that you select as your target. For example, a list type field will have Equals or Not Equals as condition options, whereas a number field will have Greater Than, Less Than, and other such options.
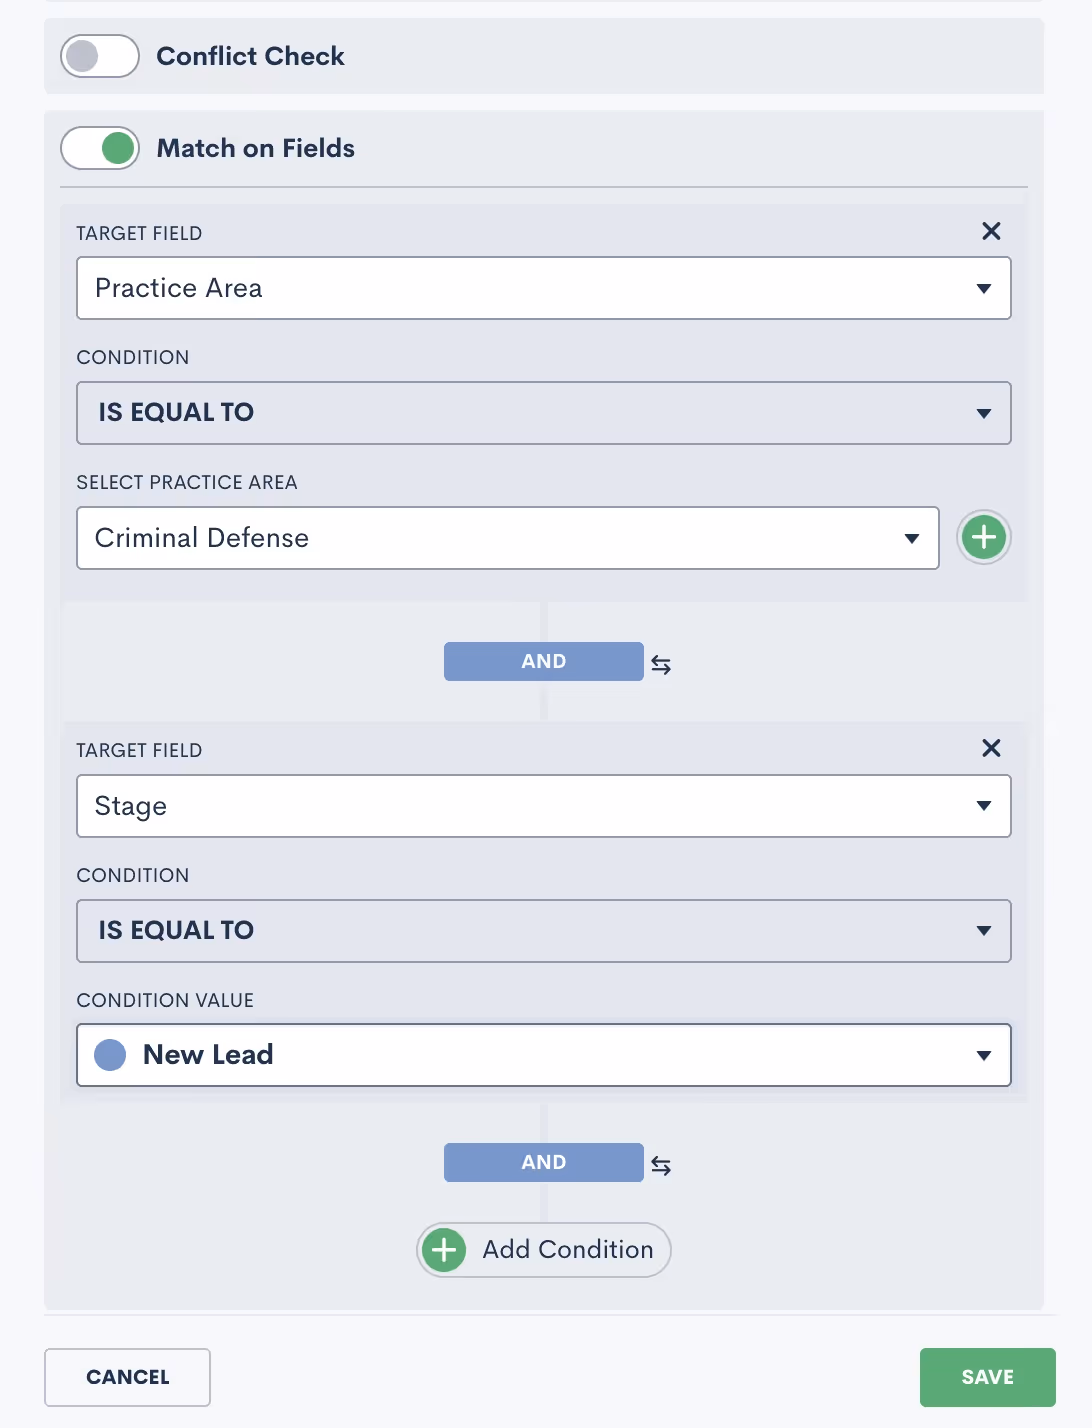
The Add Condition button allows you to add multiple conditions to the matching trigger, as shown in the image above. You can also give these conditions either an AND or OR condition. In the image above, you will see that they have an AND relationship. To change to OR, simply click on the word AND, and it will switch to OR.
Exit conditions
Guess what – the options for exit conditions are exactly the same as those for entry conditions!

While we won’t go through them all again, just remember that any of the conditions described above that can trigger an Automation are essentially used the exact same way to “trigger” a target to exit an Automation.ExampleWhile a filled form could be used to initiate an Automation, that exact same condition may be used in a different scenario to exit a target from the Automation. You might use this to stop an automated sequence of follow-up emails after a client has submitted the information your firm requires.As you set your Automation exit conditions, simply think of them as “triggers” in reverse.Exit conditions are checked at the start of each action in your Automation. If you happen to have an Automation with long time delays, the exit conditions are not taken into consideration while the target is within that delayed period.Instead, the exit condition will be checked once that time delay has run its course and the target starts to enter the next action in the Automation. At this point, that next action will not be run if the exit condition is met and the target will exit before any further actions occur.That being said, you typically want to select exit conditions that are more of a permanent condition rather than something static that may change by the time the next action is reached.
Exit vs. If/Else Conditions
One of the most common mistakes when it comes to exit conditions is to use an If/Else Condition branch instead of exit conditions. Ponder the following example:

The supposed goal of this Automation is to check if a Matter has filled out a form. If they have, we want to change a certain attribute, and if they have not, we want to re-send the form. This is an example of what NOT to do.The way this Automation is built with the If/Else Condition will NOT work. The condition will be checked at the time the target hits this branch in the Automation, not necessarily when the form is filled out.Instead, you need to have an Automation that sends out the form on spaced out intervals, with exit conditions of the form being filled. A separate Automation will trigger when the form is filled to perform the change attributes action. Read more below to see this example of what TO do.
Useful examples
Example: form reminders
When creating an Automation to send out a Basic Intake form (or any other form), your Automation should look similar this:

These actions can be repeated as many times and on any cadence that you would like. As you have the exit condition selected, as shown above, your target will stop getting reminders once they have submitted the form.Remember, if you want something to trigger once the form is filled out, make sure to use the filled form as your trigger for a separate Automation. Don’t try to use an If/Else branch to check for the status of the form.
Example: drip campaign
The same principle applies to creating a drip campaign within an Automation. Your drip campaigns could have any purpose you desire. For example, you may have one prompting a new lead to schedule an appointment, another following up with an old lead that has gone dark, yet another checking in with an ongoing client – or any other scenario you can think of.When it comes to exit conditions for these drip campaigns, you must think about what condition would cause this Automation to no longer be relevant for a given target. In other words, whenever the call to action (AKA the thing you’re trying to get them to do from this drip campaign) is accomplished, they should exit the Automation.The example below shows a hypothetical drip campaign set up to continue sending emails to a matter as long as they are in the New Lead stage of my pipeline.

Since I have set the exit condition to be “Stage is NOT New Lead”, this means that they will exit the Automation once they move to any other stage on the pipeline besides New Lead.
Conclusion
You now have the knowledge and tools to craft highly efficient, precise Automations that will not only save time, but also elevate your firm's productivity. You've gained a deeper understanding of these vital components. You've also learned to harness a diverse array of entry conditions to trigger automated workflows and to utilize exit conditions effectively.With these insights and relevant examples, you're well on your way to becoming an Automation maestro. Create the best possible client experience with Automations, and stay ahead of the curve to transform the way you approach automation in your firm.

Ready to grow your law firm with Lawmatics?
Schedule a demo of legal’s most trusted growth platform.