Deep Dive: How to Automate Every Intake Scenario With a Single Form

An effective legal intake software both accelerates and simplifies the intake process for you and your prospective clients, ultimately leading to a higher close rate. You may be asking yourself how to go about building an approachable yet all-encompassing intake form for all practice areas and matter types in Lawmatics. In this product deep-dive we will examine all the various elements of custom forms that will allow you to accomplish this goal.
As you begin to create your one-stop-shop intake form, it is first important to understand the basics of the Lawmatics Custom Form Builder. You will then be able to progress to more advanced options such as relationships and appointments, as well as using conditional logic within the form for branching pathways. Take your process to the next level by using this form to trigger helpful automations based on intake form responses, and finally weave the data collected from the form into your entire intake process like documents and email templates.
Here we will walk through each of these elements of creating an intake form to handle every possible intake scenario within your firm.
Form Basics
There are several key aspects of forms that you must be familiar with as you begin creating your intake form. Let’s start with fields. Fields are used to capture the written response to each question on your intake form; the data populated into each field is stored within your CRM.
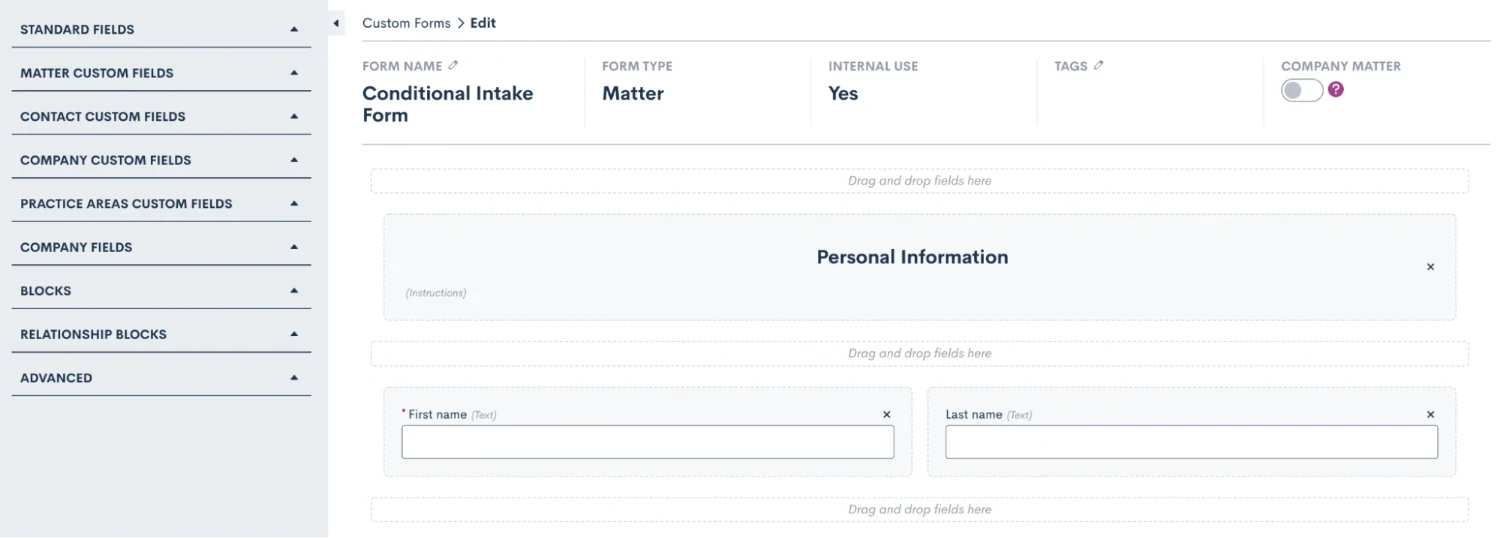
View all available fields and other form elements on the left sidebar of the form.
There are three different types of fields that can be added to a form:
- Standard fields
- Custom fields
- General fields
Standard Fields
When adding a new question to your form, always check the standard fields section first to see if the field already exists as a default; these are the built-in fields that come standard with your Lawmatics account. In the standard fields section you will find common contact information such as first name, last name, phone, email, address, birthdate, etc.
Custom Fields
As you are building your form you will also need to add fields that are more specific to your firm and/or to your practice areas. These fields will be created as custom fields. When creating a custom field, give your field a name, select the type of field, and select the field visibility.
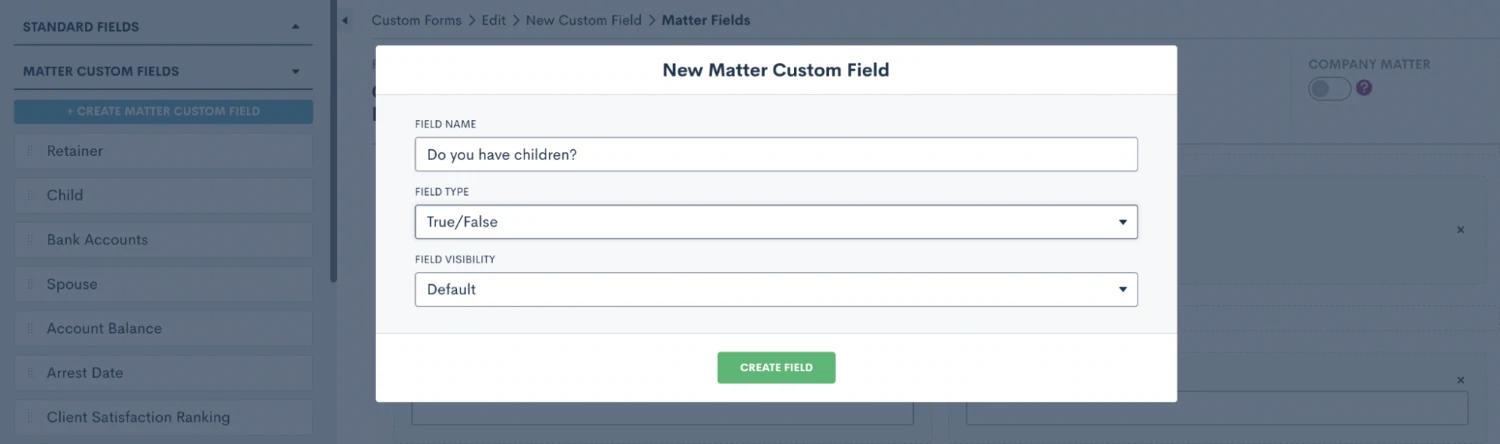
You will see these options when creating a new custom field within your form.
Once you have created your custom field, simply drag and drop it into the form canvas wherever you would like to place that question in the form.
General Fields
General fields are unique in that they do not save data into your CRM, they are only populated within the context of the form itself. Do not use this type of field for any data that you will need to save and use later in the matter, such as merging into a document, triggering an automation, or using in a report. For the purpose of creating your master conditional intake form, you likely will choose not to use any general fields on that form.
When creating a new custom form, you have the option to make it internal or external. If you plan to use this form only internally, meaning that it will never be shared with a PNC directly, only an internal staff member will be filling it out, then feel free to make your form internal.
Relationship Blocks
You may want to utilize relationship blocks in your form, especially if you commonly work with married couples or matters concerning multiple clients. A relationship block allows you to create a separate contact related to the matter. This is a great tool for keeping all contacts in your CRM organized. These blocks can also be made repeatable, which is useful in the instance of more than one contact in a particular relationship, such as children or siblings.
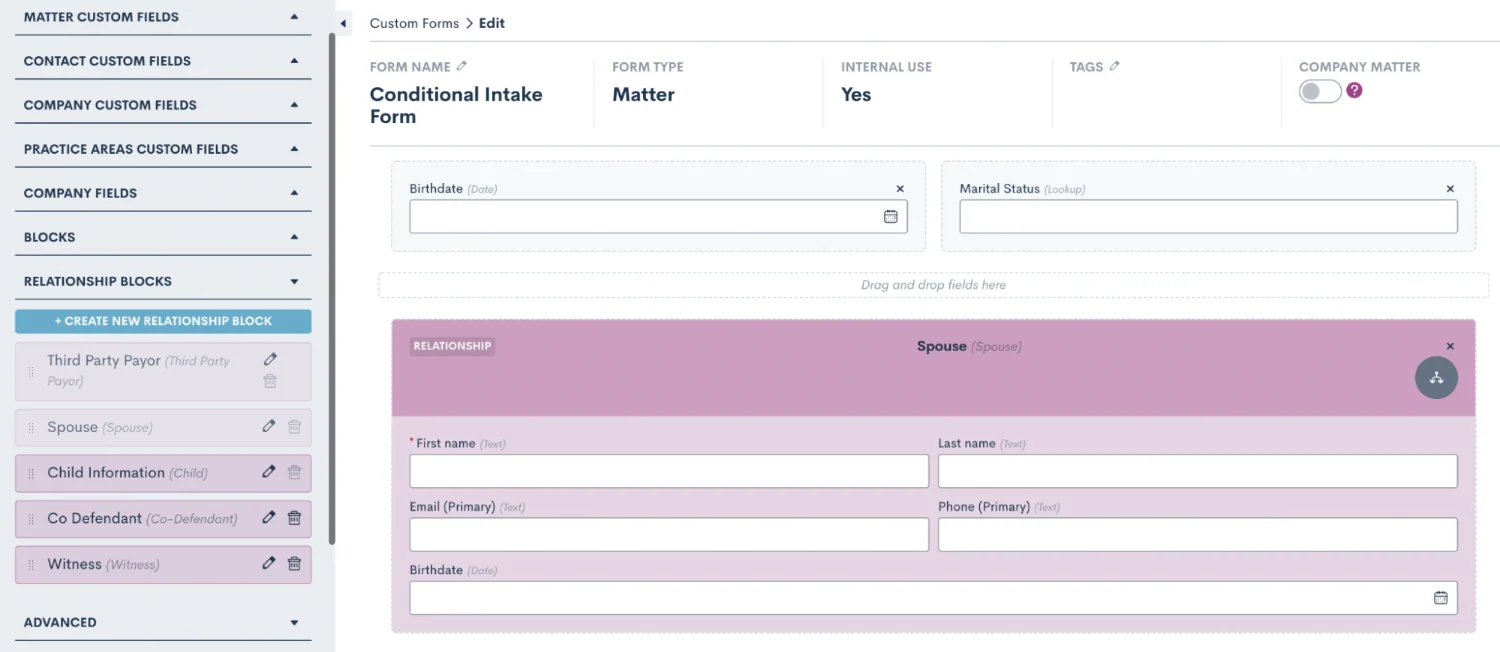
Create custom relationship blocks for your various relationship types, and drag them into the form.
Once you have added fields and blocks to your form, remember that you can click on the field to view additional options in the right side menu. Here you have the option to make fields required or not, as well as add conditional logic (discussed further below). You will also see the option to make a field hidden.

Click on a field to view additional options on the right side, including the option to make a field hidden.
There are several scenarios in which to hide a field:
- You may wish to have a default value populated into a certain field, and you don't want the lead/client to have the opportunity to enter something other than the field default
- You may be triggering something an automation internally with a hidden field, such as assigning a certain practice area or moving the lead to a certain stage on your pipeline
- You may want certain client data to appear in the form submission PDF for your reference, but you don't need the client to re-enter or view that information on multiple forms
Advanced Options
When you expand the Advanced section on the left sidebar of the form builder you will find a number of additional components that can be useful to customize and streamline your intake form. For starters, you can use the Instructions field to add headings, script dialogue, or even insert images into your form. Simply drag over the instructions field and then click on it to add your content.
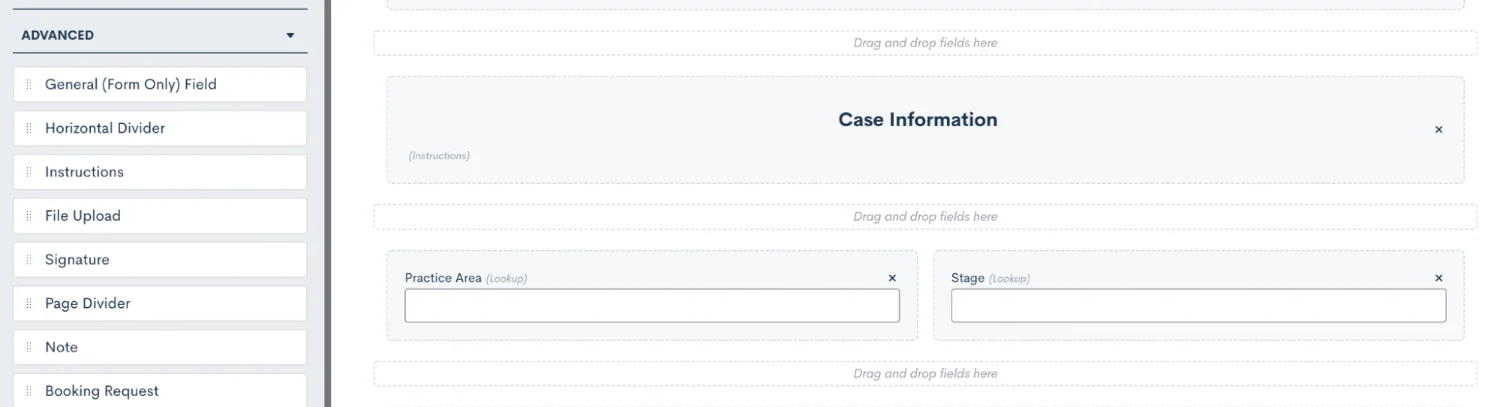
Drag and drop an instructions block, then click in it to add a section header such as “Case Information” or other instructions.
Another advanced element that you will likely find useful in your intake form is the Note field. This note field is different from a custom or standard field, as opposed to populated data in your CRM the note field will save a note item to the matter’s profile.
Consultation Booking
Since this intake form is often used when a new lead initially calls into your firm, you may wish to book a consultation directly from the form. There are two ways to easily accomplish this:
- Method 1: Drag and drop an Appointment field into your form. This will allow you to book an appointment on the calendar of any of your firm’s Lawmatics users, selecting any date and time that you wish. With this option, you will want to reference the host’s calendar before selecting and booking a time on the calendar widget in the form.
- Method 2: Alternatively, you can use the Booking Request advanced option to add a scheduling widget - this will only reveal time slots that correspond with the host’s availability. This is a great tool for high volume firms, where time is of the essence to get leads booked in your system ASAP without taking the time to reference the consulting attorney’s calendar.
After adding a booking request field into the form, click on it to open the options for this request. Make sure to select the booking options, as shown below, to determine what type of event this will be, who will be the host(s), and what the location of the event will be.
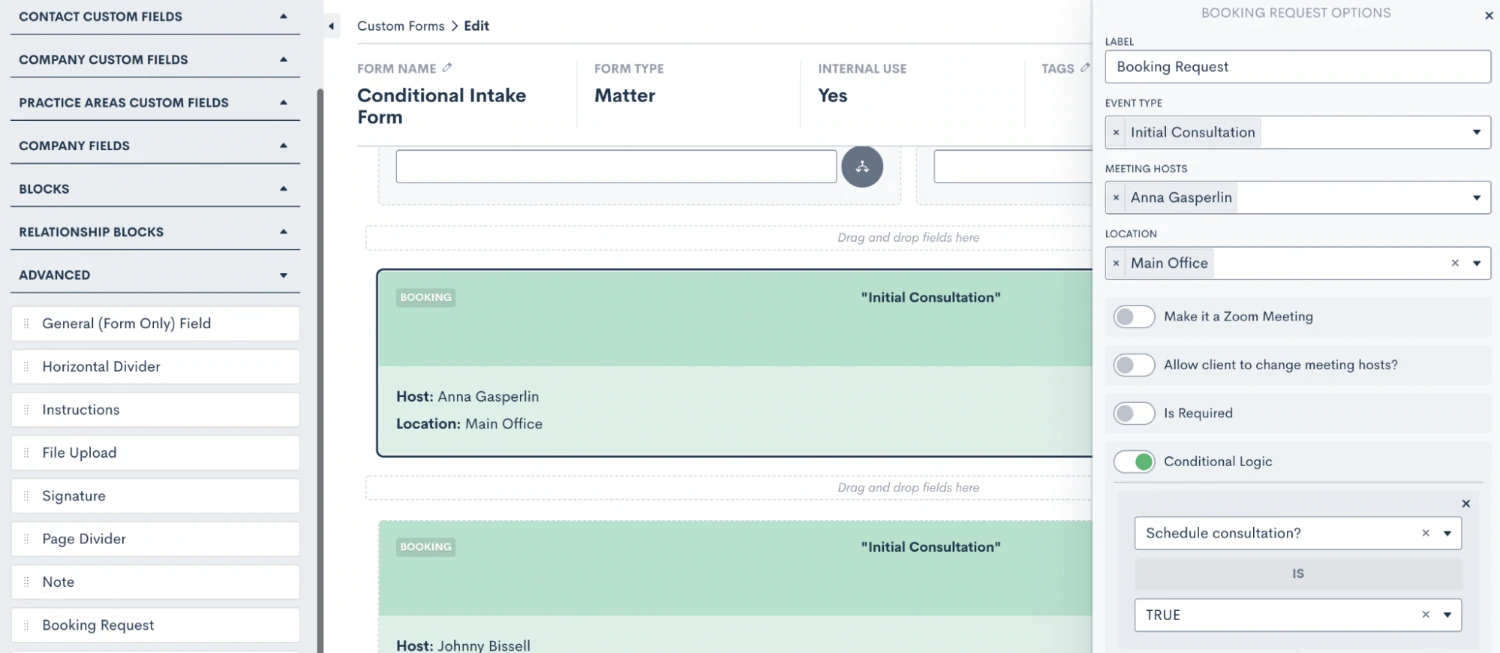
Use a booking request field to allow easy scheduling based on the host’s availability.
It is also important to make sure that all Lawmatics users have synced their calendar in their user settings, so that the system can pull their availability accurately. When an appointment is booked via the scheduling widget, it will automatically appear on that user’s synced calendar.
Conditional Logic
Before you start diving into conditional logic and its many uses, it is first important to understand the mechanics behind it. In its simplest form, conditional logic is simply an “if, then” statement. If a certain condition holds true, then the desired outcome will take place.
While conditional logic looks a little different in each different area where it can be used in Lawmatics, the basic concept is the same. Let’s consider the example shown below from an automation.
Rule #1 - Conditional Fields
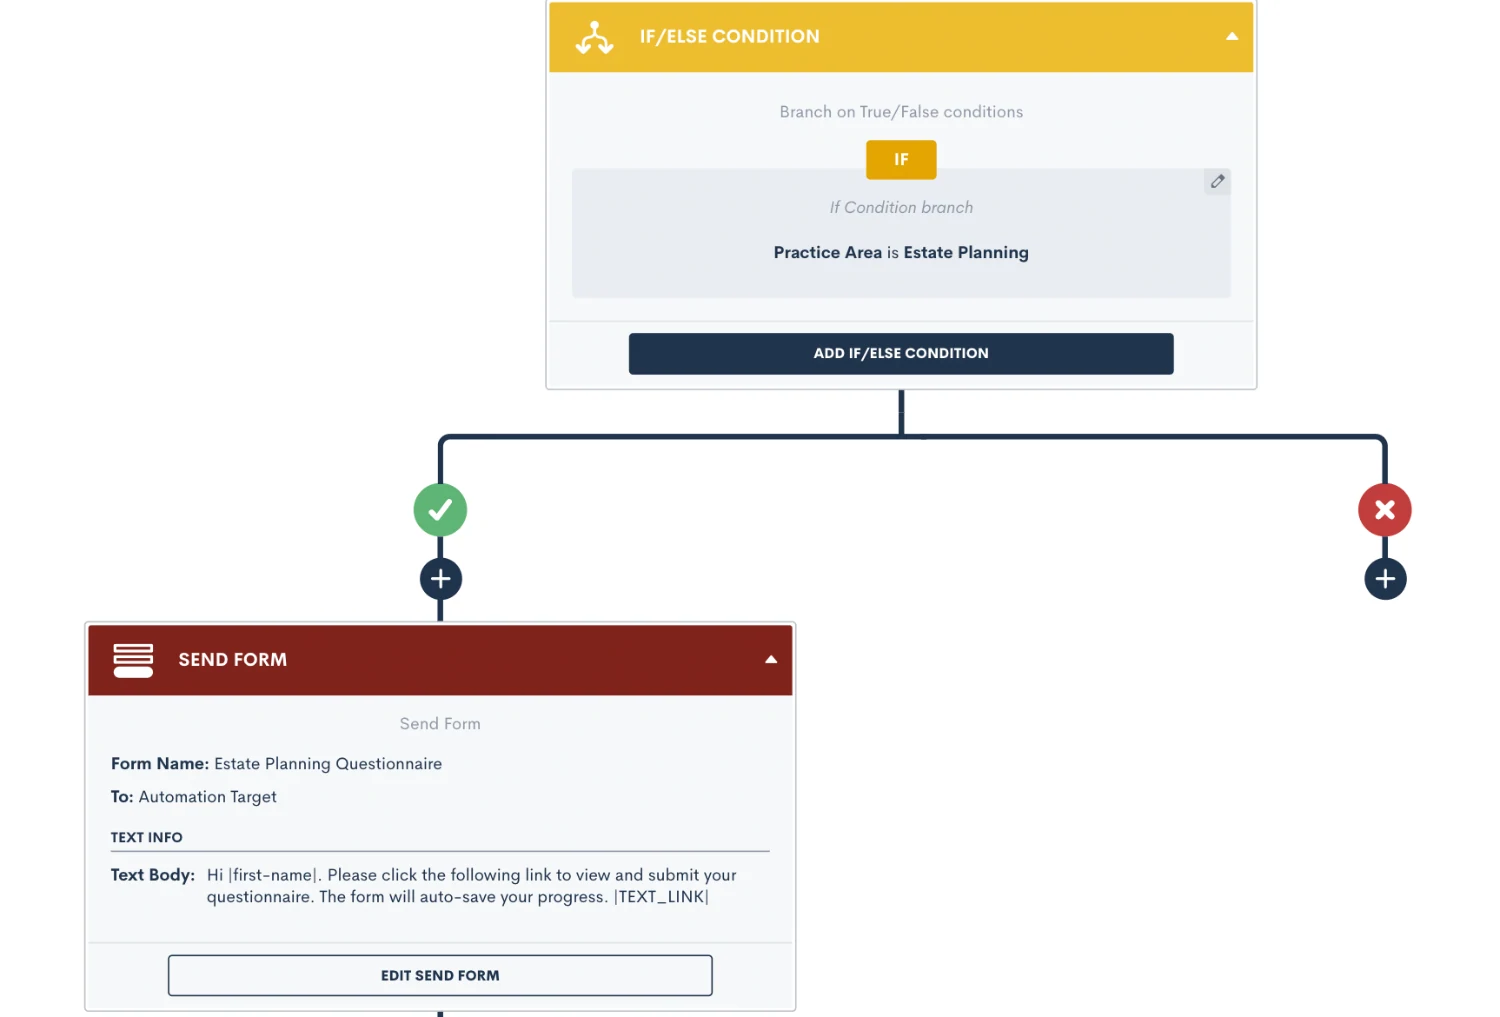
Above you will see that our “if” statement is “if the Practice Area is Estate Planning”. When this condition is found to be true, then the outcome will be that of the affirmative side of the branch. If the if statement is not found to be true, then the outcome will be that of the negative branch.
In this particular example, the affirmative outcome is to deliver the Estate Planning Questionnaire to the target matter whereas on the negative side of the branch, nothing will occur — the automation simply ends there.
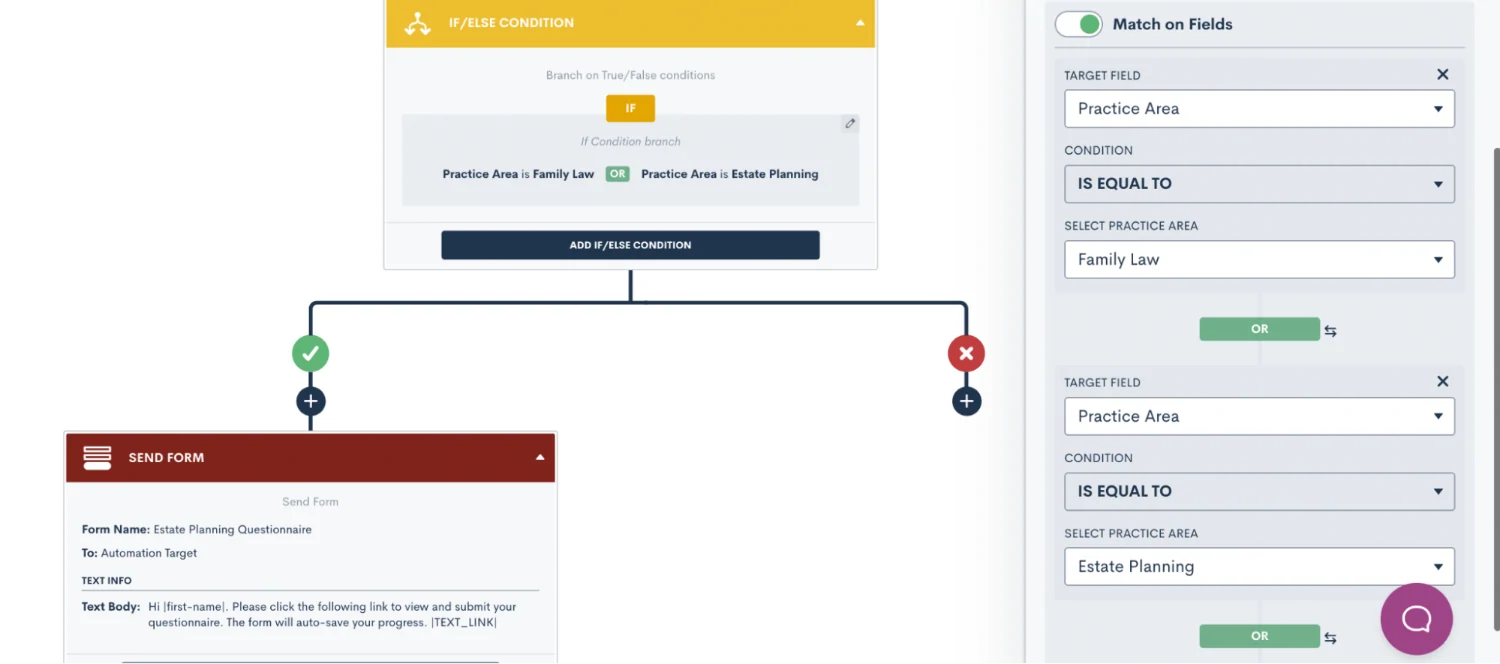
There are also certain instances where multiple conditions can be used as your “if” statement. When this is the case, it is important to give those conditions an “AND” or OR” relationship accordingly.
Notice in the image below how we have not added a second condition to our “if” statement but rather have given it an “OR” relationship to our initial condition.
The same concept applies to using conditional logic in your intake form. When setting conditional logic in custom forms, remember that you will set the logic on the field that is conditional, as opposed to the field that sets the condition.
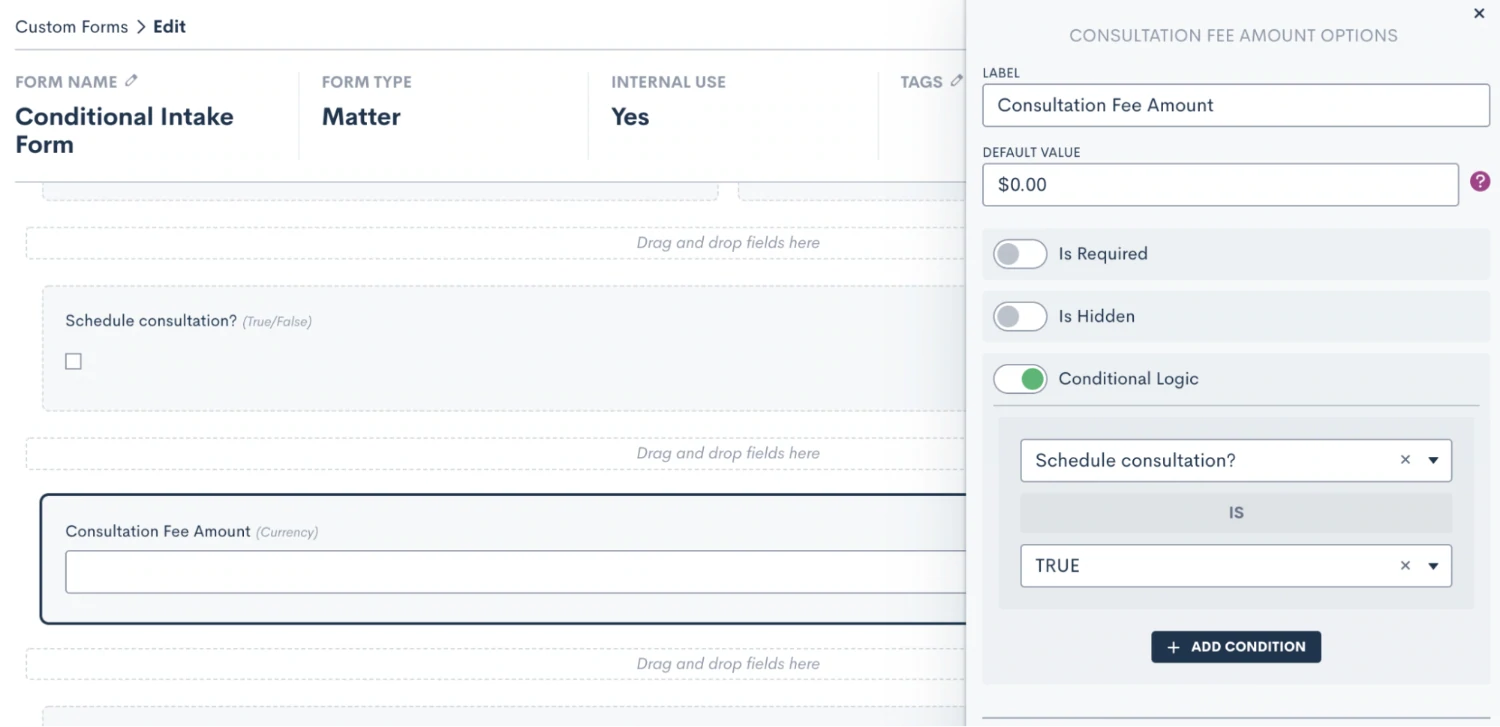
Let’s break down how you can go about using this on your intake form. When discussing next steps with the PNC, you may ask the question “Would you like to schedule a consultation?”. This will likely be a boolean (true/false) field or a picklist field with options of Yes and No. If the answer is Yes, then you may want to have a field appear to enter in the consultation fee for that matter.
To set up conditional logic in this example, click on the second field, the consultation fee, and turn on conditional logic there. You will then select which field sets the logic for this field, which in this case is the field “Schedule consultation?” being TRUE.
In short, rule number one of using conditional logic in custom forms is to set the logic on the field that is conditional.
Rule #2 - Defined Value Fields
That brings us to rule number two. Conditional logic can only be set using fields that have defined values, such as true/false fields, picklist, or multi picklist fields. You cannot set conditional logic using fields that are open text fields, since these are open-ended and do not have defined responses.
To clarify further, this rule pertains to the field that is setting the condition, not the field that is conditional. Returning to our example from earlier, you’ll notice that the conditional field “Consultation Fee Amount” is a currency type field, allowing the user to enter any dollar amount. This is perfectly acceptable, since this is not the field that is setting the condition. The field setting the condition is “Schedule consultation?”, which was created as a true/false field. A picklist field would also suffice in this example.
As long as you keep these two rules in mind for using conditional logic in your custom forms, you are sure to create a better customer experience for clients filling out your forms.
What to Include in Your Form
With the baseline knowledge of the various intake form components you’ve acquired, you are ready to start building. Please note that we are merely suggesting what you may wish to include in your form; some of these items may or may not be needed for your practice, and you may also have other elements not mentioned here that make sense for you to include. Use these suggestions as you see fit.
Standard Fields
Begin by determining what standard fields you need to capture initially during your intake. This is typically the person’s first and last name, email address, and phone number. Depending on the type of law you practice, you may also need to know their marital status, citizenship, etc.
Locate these fields in the standard fields section, and drag and drop them over to your form. You may also want to use an instructions block to make a section heading, as shown below.
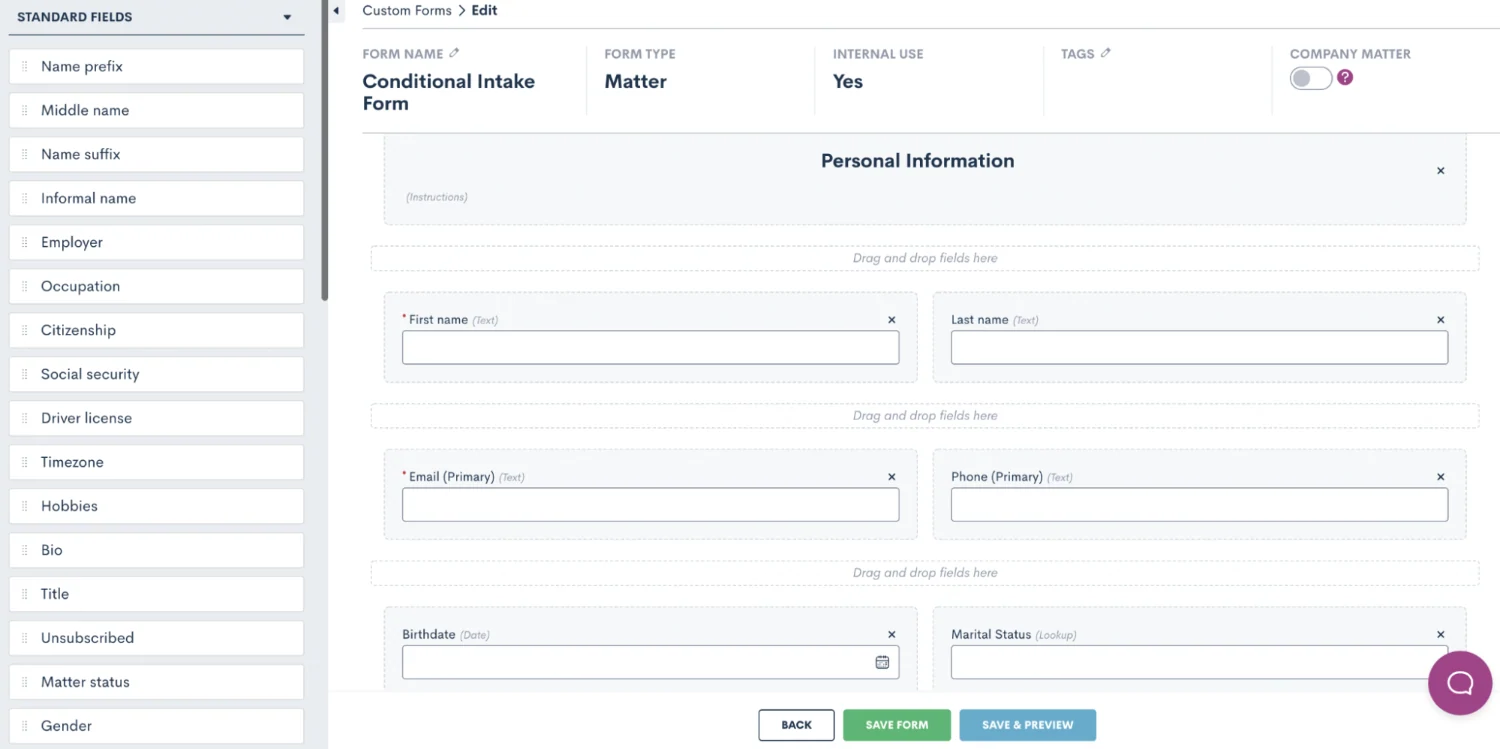
Use an instructions block to make a heading for your basic contact information section.
Relationship Blocks
This is also a good place to include a relationship block in your form. Notice the field Marital Status in the bottom right of the image above. Here we have a great opportunity to implement some conditional logic in your form. Create a relationship block for your Spouse relationship, containing whatever fields you wish to capture for the spouse, and then set that block to only appear if the marital status is married.
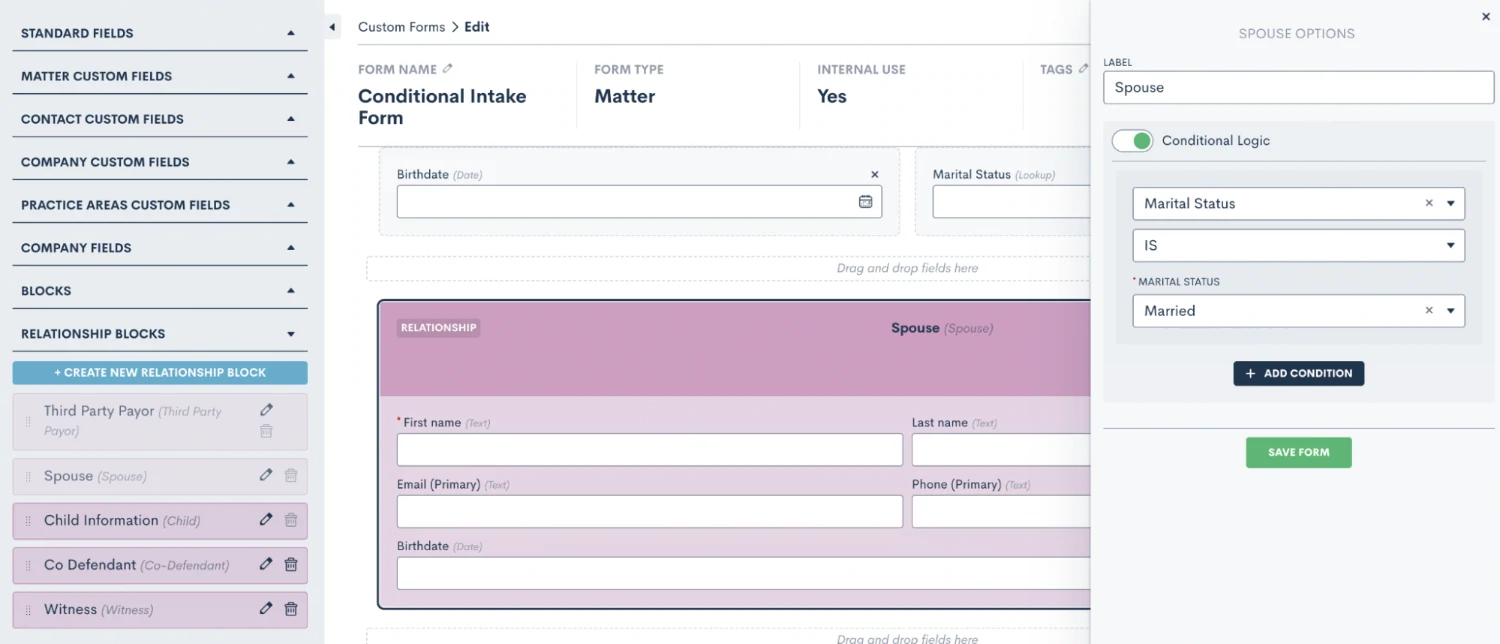
Create and drag over a Spouse relationship block, then add conditional logic so it only appears when marital status is married.
Dividers & More
As you move on to the next section of your form, you may find it helpful to add dividers or another instructions field to help with the organization and structure of your form. Additionally, we suggest including the Source and Campaign fields, both found in the standard fields section. These fields allow you to save data on how each lead found your firm, which is critical for capturing valuable marketing data.
Additionally, a Note field comes in handy here to collect any other information shared by the PNC that should be saved to their matter.
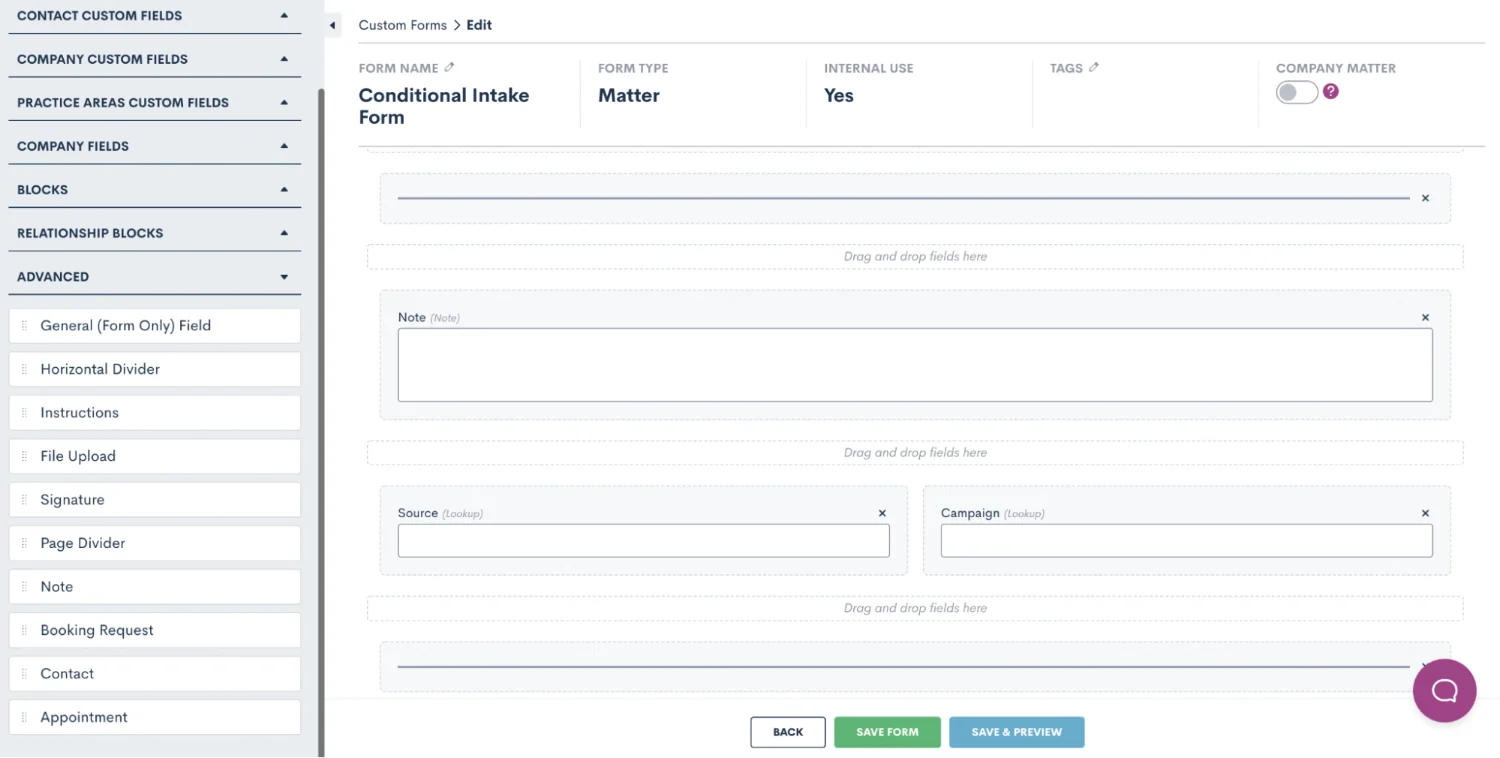
Use dividers or instructions to separate sections of your form.
Case-specific Fields
Next, you’ll want to start getting into some case-specific information for this PNC. Make sure to include the practice area field to label which type of case this is right off the bat. In our form we have also included our pipeline stage field which allows you to select exactly which stage of your intake pipeline this lead should land in.
Conditional Logic
Conditional logic will come in handy here to pose questions that align with the type of practice area that is selected. In our example, we added a follow up question asking about witnesses which will only appear when “criminal defense” is selected as the practice area. We also added a field to ask the lead how many children they have, and this field is conditional on the practice area being family law.

Add practice area specific follow up questions with conditional logic.
The ultimate goal of this form is to automate all possible intake scenarios, the best way to accomplish this is by adding a Next Steps section to your form. This tells the system whether or not this lead is qualified, which automation(s) to trigger, which conditions apply for this particular lead, and anything else that is needed for your process. While there are many different ways to use custom fields to capture this data, you’ll see some suggestions from our team in the image below.
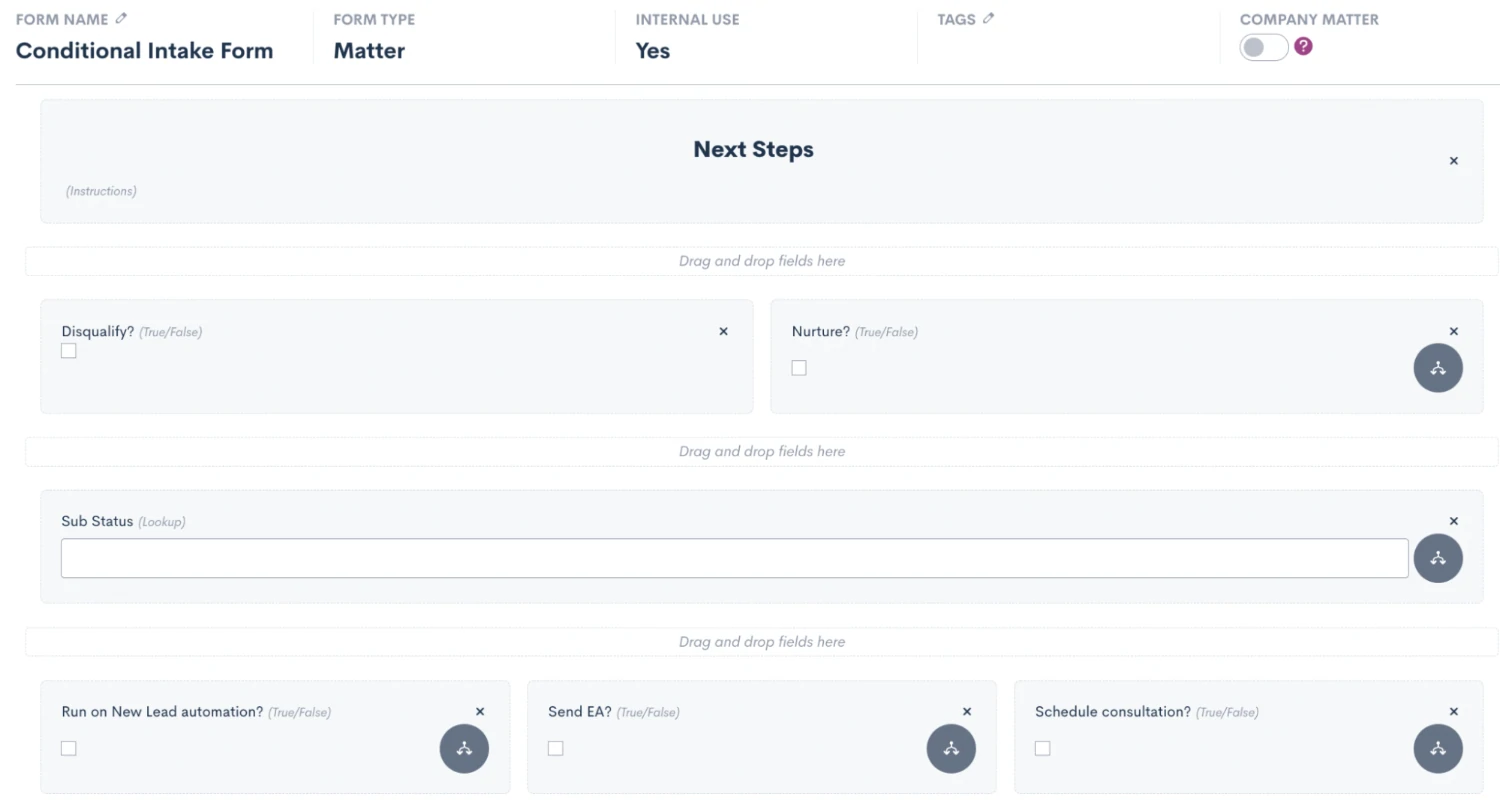
The first question we ask here is whether or not to disqualify the lead. Our additional follow-up questions are conditional on that field being False, meaning that if the lead is disqualified, none of the other questions are relevant so they will not appear in the form.
We have also added a possible option for nurturing this lead. This can be useful to trigger an automated nurture sequence spanning over weeks, months, or even years to keep working that lead. Typically, you would select this option if a lead is interested, but not ready to move forward with next steps right at that moment.
We have also included the standard Sub Status field in our form. In the scenario of a lost/disqualified lead, this field is particularly useful to capture the reason the lead was lost. As opposed to just labeling a lead as Lost, this field allows you to select a custom reason, such as disqualified, which is useful for future reporting.
Last but not least, at the bottom of the image above, you will also see three conditional fields. Depending on your process, these may be slightly different at your firm, but these fields show an example of what some potential next steps for a qualified lead may be. Each of these options will be used to trigger an automation taking the appropriate action, as explained in the following section.
Utilize Data from Your Form in the Rest of Your Process
Now that you have automated your intake form, it’s time to automate the next steps of each possible scenario. Again, these examples may differ from your firm’s actual process, but they are meant to be used as a guideline for creating your own automations.
New Lead Automation
Let’s break down our three possible outcomes for a qualified lead as described in the section above. First, we have the option to Run on New Lead Automation. As you may guess, when this option is selected in the intake form we will use it to trigger our new lead automation. Depending on your clientele and your sales cycle, this automation may vary slightly for you, but for ours we have decided to include an alternating sequence of emails and text messages, with the call to action for the lead being to book their consultation.
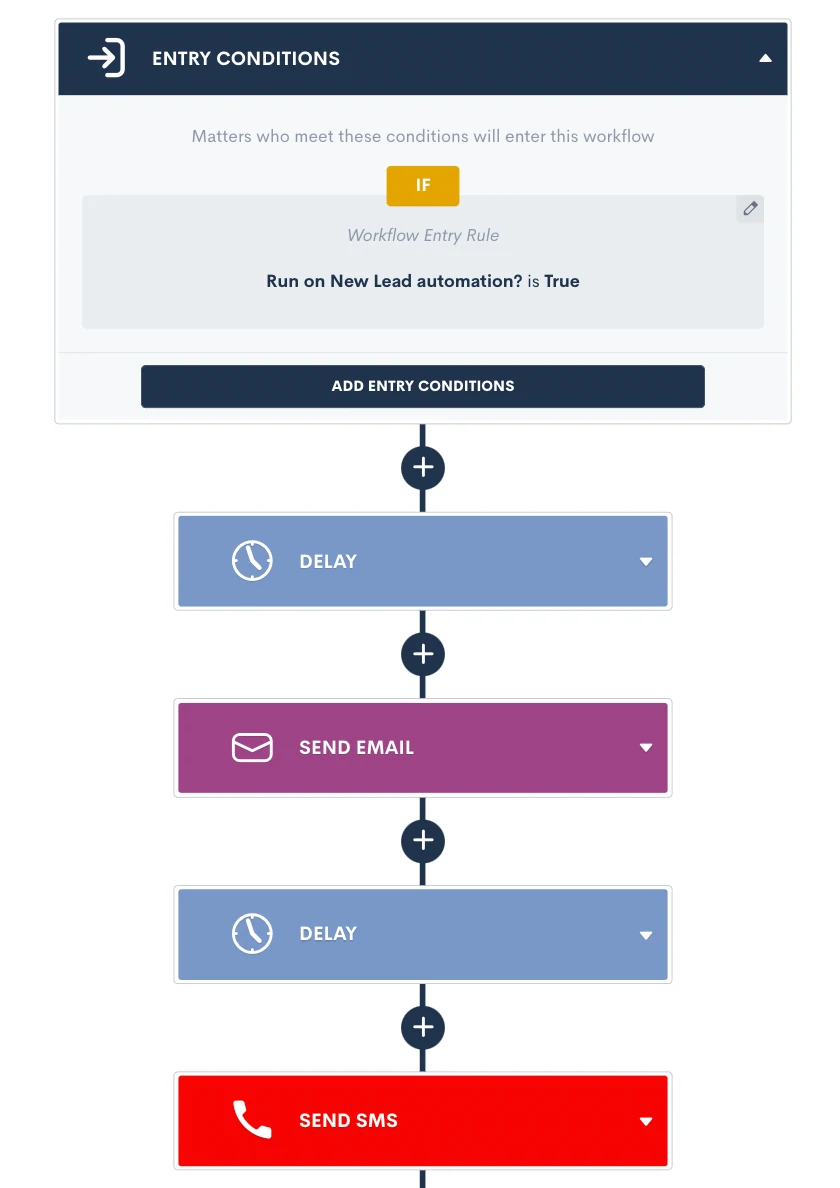
Trigger your new lead automation when the corresponding field is True, and then build out a sequence of automated actions.
Feel free to continue this sequence for as long as you would like, there is no limit to how many action items you can add or how much time this workflow can span. We have also included exit conditions in this automation so that once they book their consultation, they will no longer continue getting outreach from this automation. This is a key step to make sure all communication is relevant to where they are at in the process.
Send Engagement Agreement Automation
When filling out the intake for a new PNC, you may have someone who is ready to sign up on the spot and sign their engagement agreement immediately. When this is the case, you will select the Send EA option in your intake form. We now have an automation that triggers when that field is selected, and we have implemented conditional logic in the automation to check the matter’s practice area, and send the appropriate engagement agreement for e-signature accordingly.
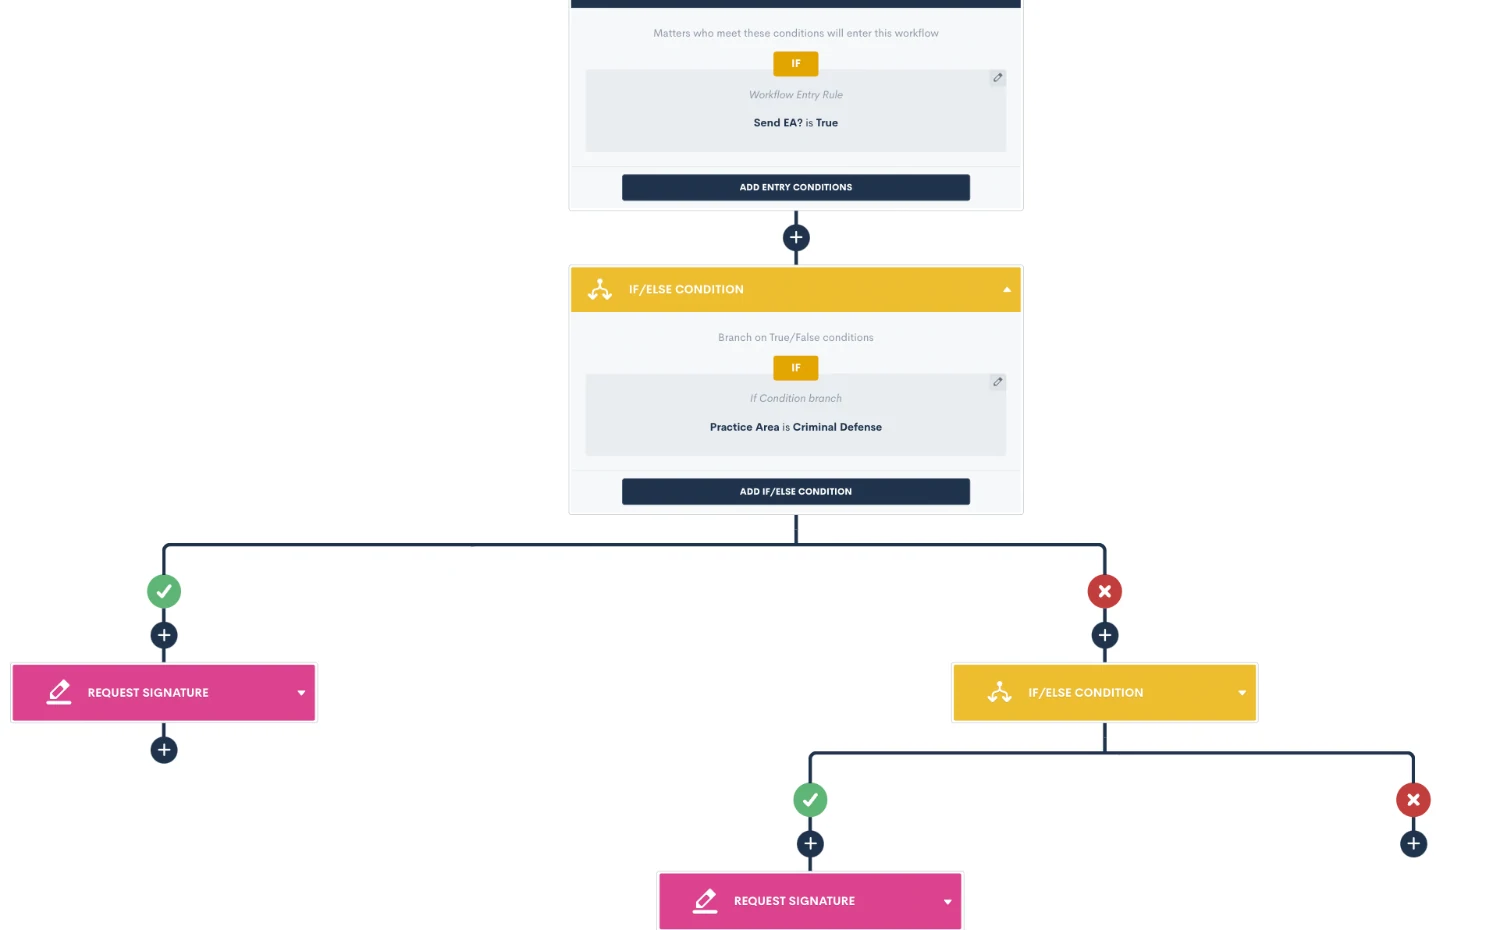
Use if/else condition branches to send the appropriate document for signature depending on the practice area.
In the example above you see just two if branch statements, but feel free to continue adding as many as you need to account for all of your firm’s different practice areas or engagement agreement variations.
Scheduling Consultation Automation
In our intake form we have also built in an option for leads who want to move forward with your intake process, but still need to schedule their consultation. This is a very straightforward scenario to automate using our booking request feature. Simply trigger the automation when the needs to schedule option is selected in your form, and then send out an appointment request action item, making sure to select the appropriate firm user as the host.
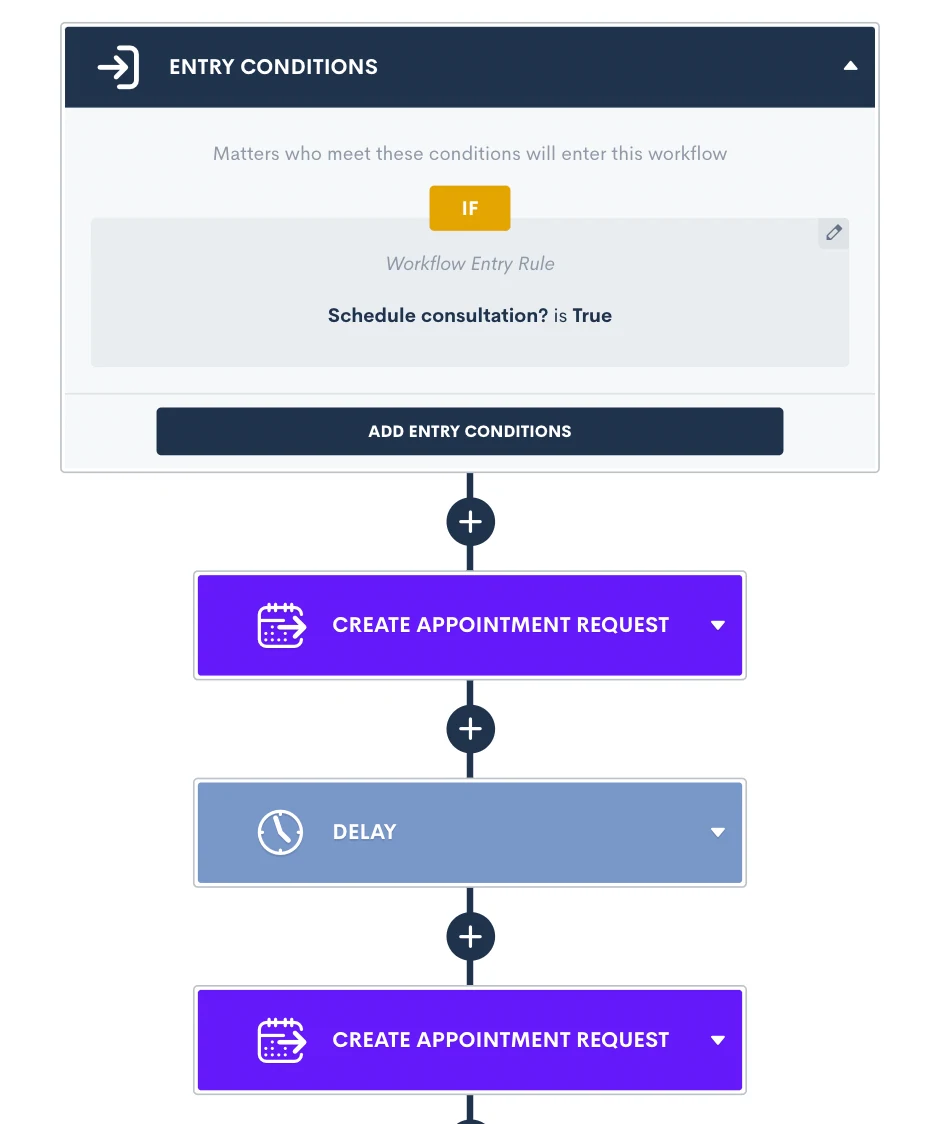
Alternate appointment request action items with time delays to create a cadence of reminders to book their consultation.
Just as mentioned earlier, feel free to include as many reminders to schedule as you would like, sending them at a cadence that makes sense for your clientele. Once again, make sure to include exit conditions so that once the lead books their consultation using the appointment request, they will not continue getting the automated reminders.
While these are just a few examples of scenarios that can be automated in Lawmatics based on the intake possibilities from your form, keep in mind that the possibilities are absolutely endless. With the use of conditional logic and our powerful trigger options, you have the ability to create automations for every possibility.
Reporting
In addition to automating your process, the intake form is also useful to capture data that can be tracked in a custom report. For example, in the intake form we have added the option to mark a lead as disqualified, and apply the appropriate sub status. You may find it useful to create a report of all disqualified leads, along with the marketing source they came from, so that you can hopefully work to eliminate getting an influx of unqualified leads from that source.
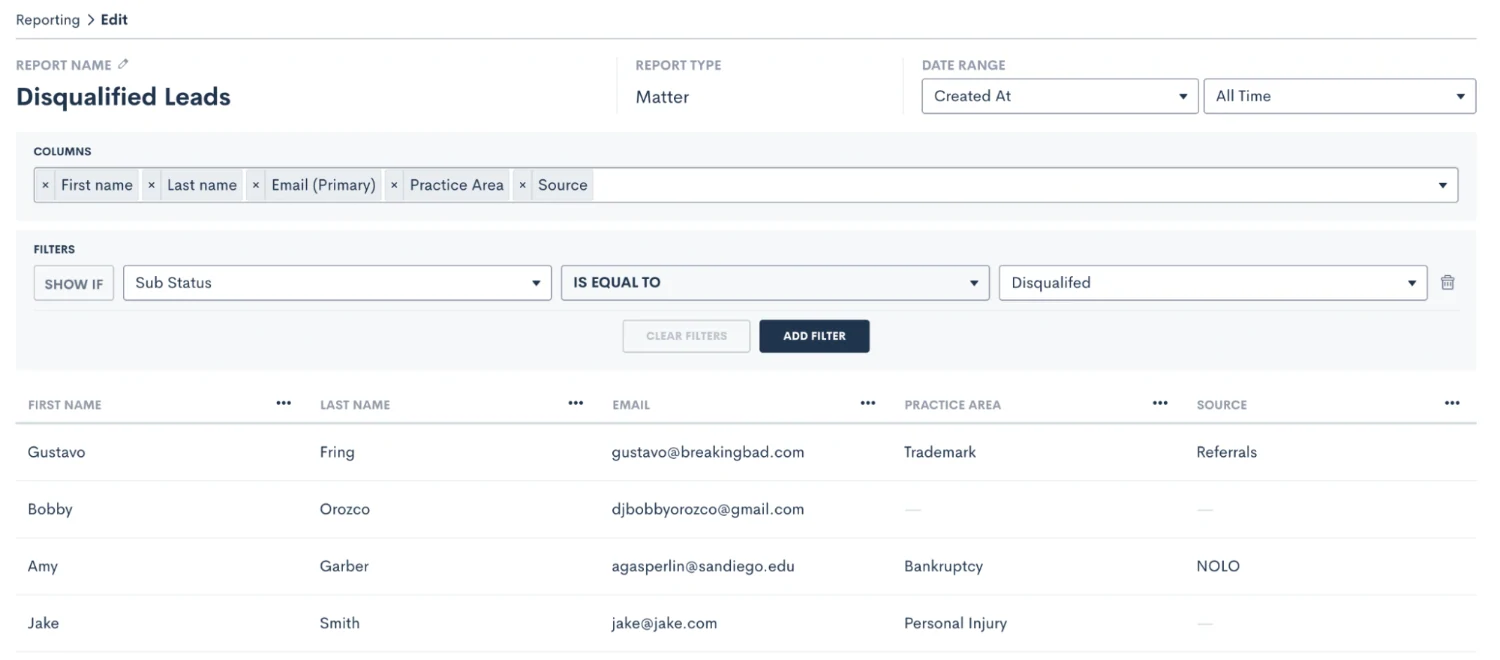
Create a custom report filtered by sub status to easily view disqualified leads from a given time period.
Remember that you will create a report under the Insights tab in Lawmatics. Once you have created it once, by setting your filters and columns as shown above, you can simply save the report and come back to view it any time. You could also set a custom date range so that you can easily check the report weekly or monthly and see only relevant data from that time period.
All of this will lead to better insight into your firm’s performance, and help guide you on which marketing sources to invest more highly in.
Conclusion
In summary, there are many benefits to using a conditional intake form to automate your process. Accounting for all of your firm’s potential intake scenarios in a single form will save valuable time for you and your team. It also creates a much smoother experience for both your staff, as well as for your clients. At the end of the day, improving the client journey will always help improve your firm overall.
Keeping the future of your firm in mind, your conditional intake form will also help set you up for insightful reporting and analytics down the road. Unlock statistics that you never had access to before, such as rate of leads lost before vs. after a consult, conversion rates by practice area, and of course marketing source performance. Once you have access to all of this data you will be able to easily adapt and adjust your processes to maximize profitability as your firm grows and changes over time.
Finally, your all-encompassing intake form, in conjunction with automations, reports, etc. will enable your firm to convert more leads into clients. Use the form to bring in more business while spending less time and effort on your intake process.
Ready to unlock the full potential of your firm's client intake process? Learn how Lawmatics legal intake software can revolutionize your firm's efficiency and client experience today!