Deep Dive: Law Firm Automation Best Practices in Lawmatics
This Lawmatics product deep-dive explores best practices for automating your law firm’s administrative and intake processes.


Table of contents
Automation can transform your intake process from one filled with tedious, manual tasks to a well-oiled machine that requires little to no human intervention. What could be better than creating a templated workflow once, knowing that it will run on autopilot and facilitate the same experience for every new lead?Lawmatics has simplified the automation process by creating an easy to use, plug and play Automation builder. Simply select a trigger, add in an assortment of action items, give it an exit condition when needed, and you’re off to the races. While the Lawmatics Automation builder is intuitive, there are a number of tricks and tips that can help you optimize your Automations for maximum efficiency.Though the benefits of Automation are plentiful, if set up improperly there can be pitfalls. You want to make a good impression with all incoming leads and clients, and an Automation misfire sending out an incorrect message is absolutely not the way to do that. The good news is that these kinds of misfires are one hundred percent avoidable. With the following tips you’ll become an Automation pro in time. Read on to learn the secrets of making your Automations work for you, instead of the other way around!
Entry Conditions
When creating a new Automation in Lawmatics, you will be prompted to make several selections right off the bat.
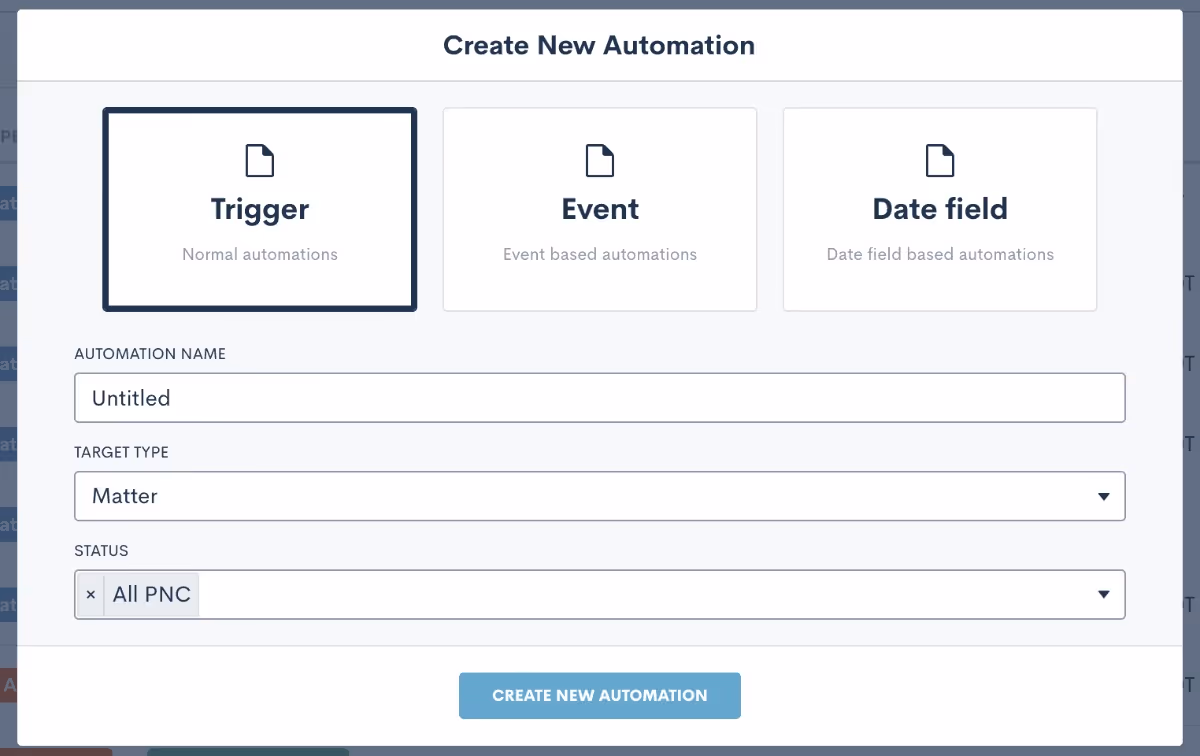
First, select the type of Automation from the options of Trigger, Event, or Date Field. The majority of Automations are trigger-based, meaning that they begin when a specified action occurs. The other two types of Automations are both triggered around the date of either an event on the calendar or populated into a custom date field.Next, you will also need to select the type of your Automation. Most often, the type will be Matter, meaning that the Automation applies to any potential clients or clients. You may sometimes create Automations that are contact type, meaning they could run on plain old contacts like friends, family, colleagues, etc as opposed to only for matters.Last but not least, when the Automation is matter type, you must also select the status that is viable to run in this workflow. If the Automation is purely intake-related, the status will be PNC. Select Hired, Lost, or some combination of the three accordingly.
Pro Tip: Making improper selections at this point can throw your Automation off course, so be sure to pick the proper options or email the Lawmatics support team if you get stuck.
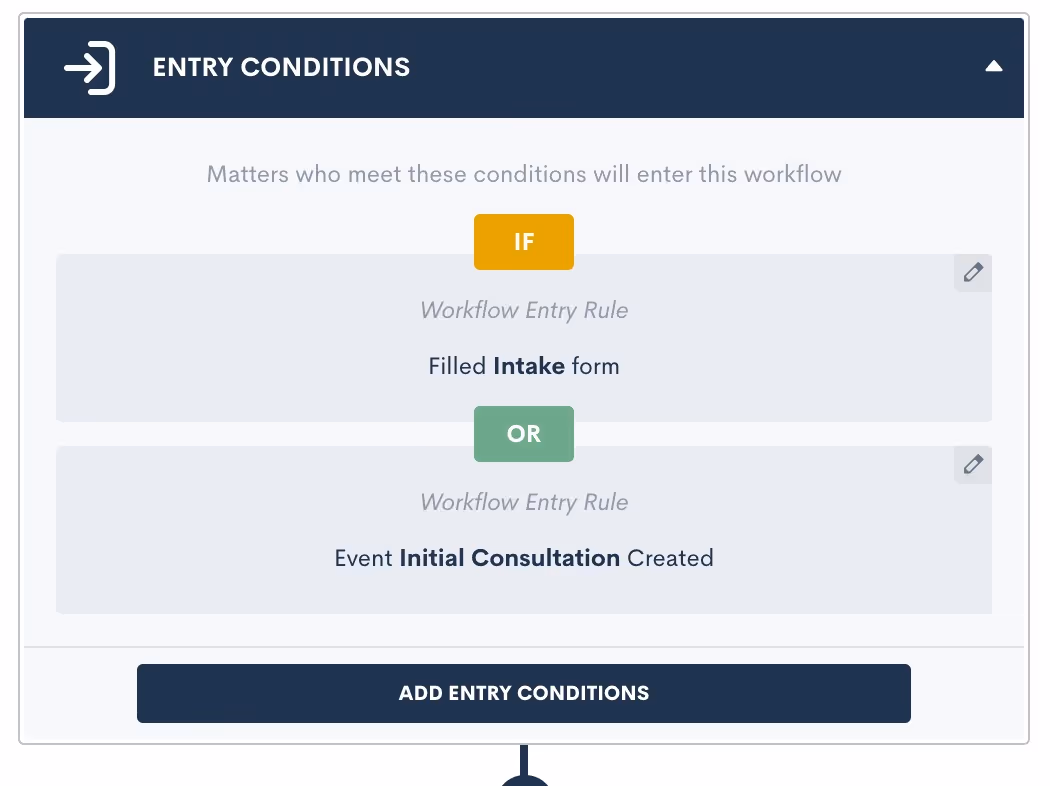
Once you have created your Automation and are in the Automation builder, you will then select your specific entry condition(s). This will be the kickoff or initiator of the workflow. Some of the most common triggers used for intake-related Automations are ‘filled a form’, ‘event created’, ‘match on fields’, and ‘signed a document’.You can also create Automations with more than one entry condition, and choose to give the conditions an “and” or an “or” relationship. In the example below, you see that this Automation will trigger either if the intake form is filled out, or the consultation event is created.
Pro Tip: There are certain entry conditions where it would not make sense to use an “and” relationship, so paying extra attention to the entry condition relationship will help make sure to avoid Automation mishaps. For example, a matter can never be multiple practice areas simultaneously or in different pipeline stages at the same time. For that reason, having an Automation triggered if “practice area = X” AND “practice area = Y” would not be a logical entry condition.
The match on fields entry condition option is a very powerful one, and also one that can cause some confusion and errors when not used properly. This trigger refers to the value of any data field being populated, so the Automation triggers when the specified value is matched.

For example, this Automation (above) will trigger when a matter enters the Missed Consult stage (AKA the stage field is populated as Missed Consult). Remember, Automations that use the match on fields entry condition will trigger as soon as the data is matched.
Pro Tip: Know your triggers! A common cause for Automation misfire is populating a field internally without realizing that this field is in use as an Automation trigger. If you are not familiar with your triggers then you may think you are just populating a field and unbeknownst to you have triggered an Automation. This problem can be easily avoided by keeping tabs on (or documenting) which fields you have selected as triggers throughout your workflow, and by being intentional when populating those fields knowing that they are an Automation trigger.
Action Items
Once you have selected an entry condition for your Automation you are ready to begin adding action items. While this step is overall a straightforward one, with the plug and play colorful interface, there are still several best practices to be aware of that can level up your Automation.One action item that you will undoubtedly use in plenty of your Automations is the time delay. As you may guess, this action creates a pause in your workflow for the duration of your choosing. This is particularly useful for drip campaigns, reminders, etc.
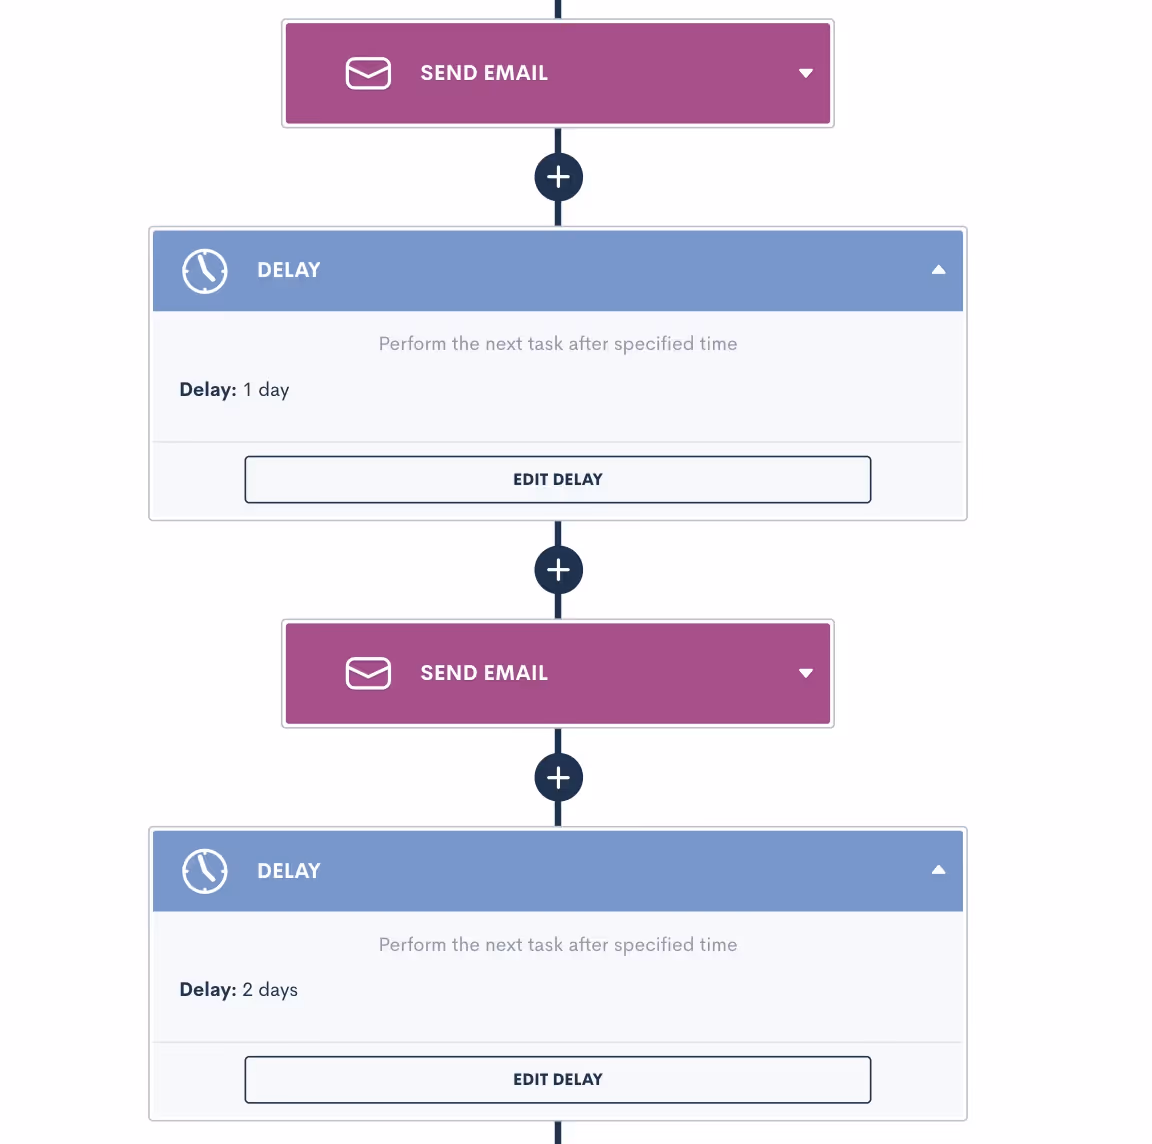
Pro Tip: When using multiple delay action items in an Automation, such as for a drip campaign, the time delays add on from the previous step. In the example below, the second email is sent after a one day time delay, and is then followed by a two day delay. When the next action occurs after that two day delay, it will be three days from the start of the Automation, since it stacks on to that initial one-day delay.
When it comes to the other options for automated actions, most are self explanatory but a few could cause you to slip up. Let’s review some other common mistakes and misconceptions when adding action items.
Create Appointment vs. Request Appointment
These two options may seem the same or similar at a glance, but they are actually very different. The Create Appointment action will book an event on your calendar with the target matter. This action is typically used for webinars or other events, since the event will be scheduled for a static date and time. This action books the appointment for the date that you have selected in the Automation, with no input from the client. Request Appointment on the other hand will send a link to the target and allow them to select their own appointment based on the host’s availability. This is a more commonly used action item in Automations.
Send Documents vs. Request Signature
E-signatures are collected from documents, so the send document action item may seem tempting as the correct one to use, but in actuality it is not the action you would use for e-signature. The Send Document action simply merges the target’s information into the document and sends it as an email attachment, with no e-signature involved. The Request Signature action is what you will use to send a document to someone for collecting an e-signature.
Sending Email to Recipient (Other Than the Automation Target)
By default, an email used in an Automation will be sent to the Automation target (AKA whichever matter is running through the Automation). If you select a recipient other than the target, such as a related contact or internal user, then you must specify whose data fields should be merged into the email, the Automation target or the recipient.
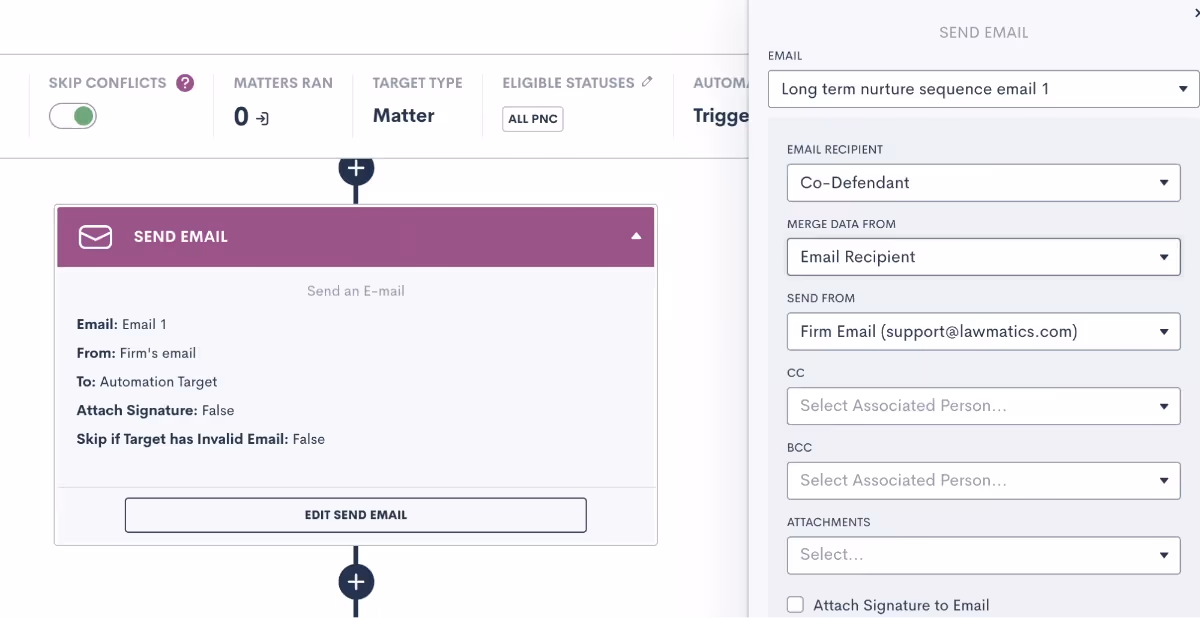
Pro Tip: Make sure you select appropriately so that any fields, such as first name, display the proper values. If you are addressing the email “Dear [first-name]”, then make sure you select the email recipient in the Merge Data From box, so that the recipient’s name will be merged in as opposed to the matter running through the Automation. If you need to reference the matter’s name in the email, for example if you are sending their info to another attorney as a referral, then you would select the Automation Target option for merge data from.
You cannot have some fields in the email template show the target’s info, and others display the recipient’s, so make sure you keep that in mind when building fields into an email template.
Matter Conversion
Use this action item to change a matter’s status from PNC to Hired once they have completed your intake process and hired the firm.
Pro Tip: This action item can only be used at the very end of an Automation, so you will only see it available to select when there are no steps following.
Sharing Items via Portal
The client portal is a useful tool for keeping clients engaged with their forms, documents, and other deliverables. Use an Automation to share any of these items to the client portal.
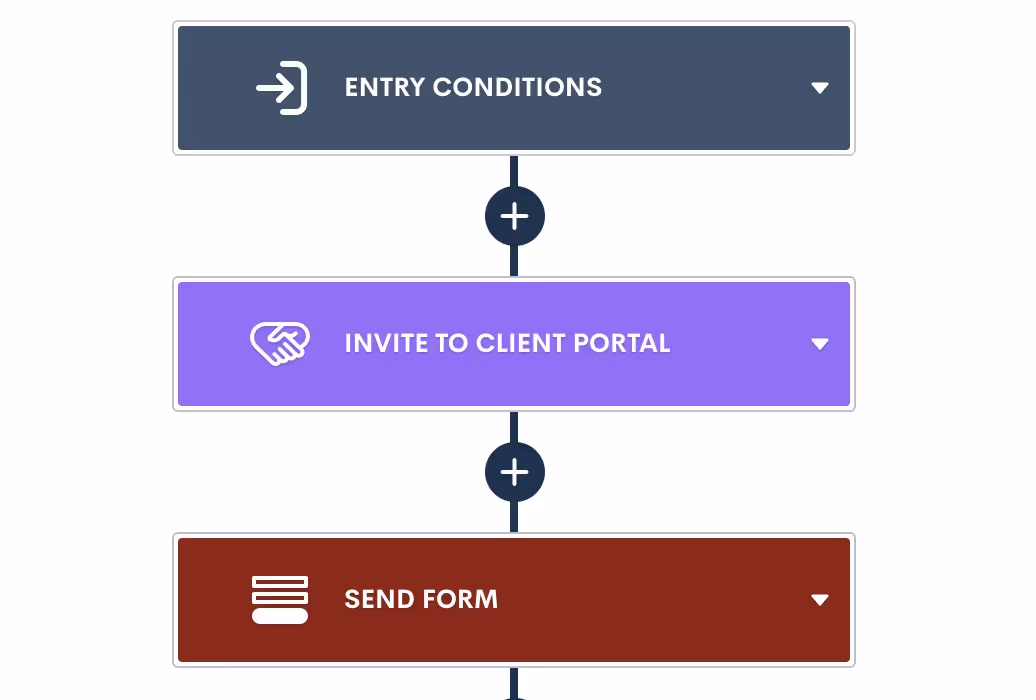
Pro Tip: You must first invite the matter or related contact to have access to the portal before any items, such as forms, can be shared. This can be done via Automation as well, just make sure to use the Invite.
Delivery Windows
As an Automation best practice, we recommend setting delivery windows on most, if not all, of your automated deliverables. Especially if you frequently find yourself burning the midnight oil, delivery windows make sure that your Automations don’t send something out at an off time.It's great to send emails, forms, and documents via Automation, but sending them during business hours can be even more useful to help increase your open rates. This is especially important for documents or other items that require prompt attention from the client or prospect.Delivery windows can be selected for any automated action items that are sent to a target, either via email or SMS. To set up a delivery window, click on the action item, and then select the window as shown below.
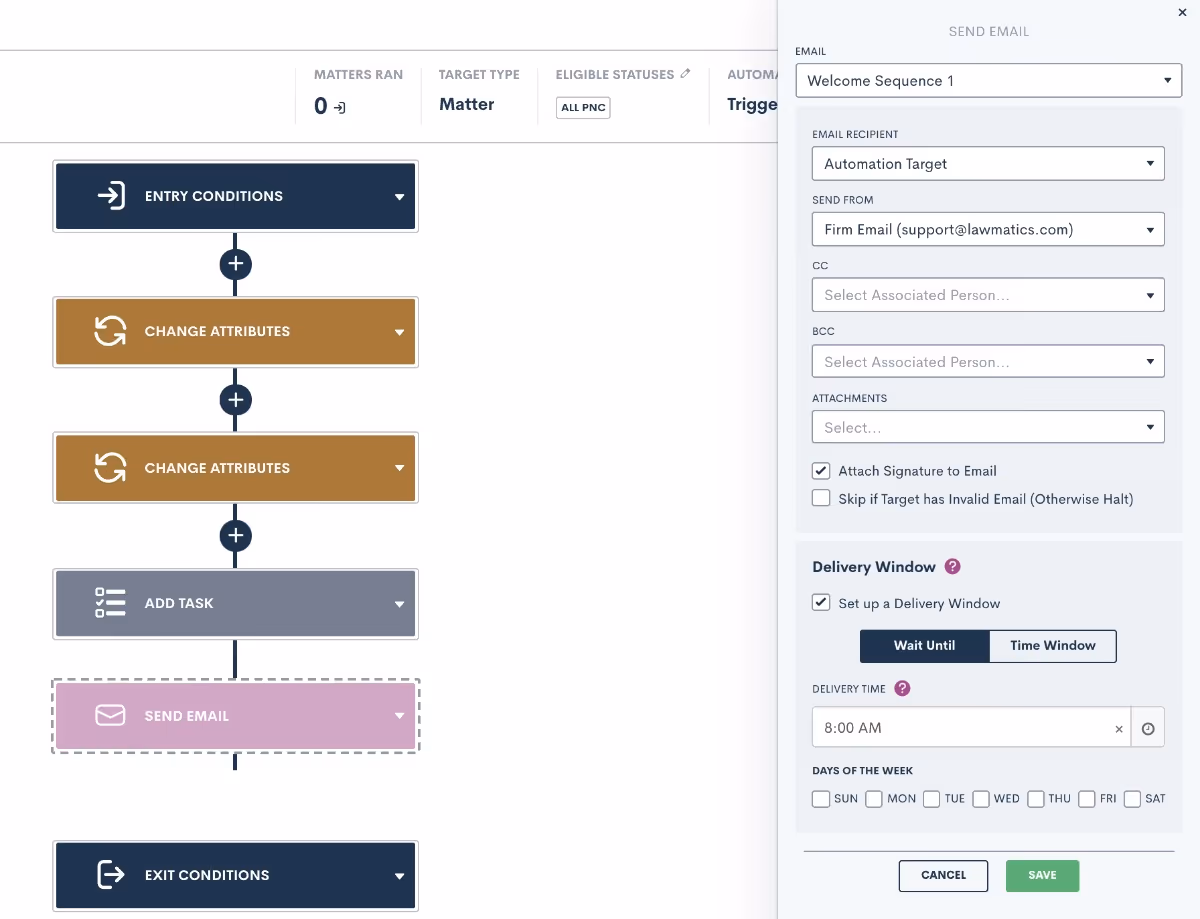
Pro Tip: You may choose the Wait Until option, to make sure the deliverable gets sent at a specific time, or the Time Window, which will allow it to send any time during the window of your choosing.
Conditional Logic
One of the biggest power features within Automations is conditional logic. This feature also has the potential to cause problems when not set up properly. When adding action items to an Automation, you will see the option to Add If Condition.If conditions work similarly to entry conditions in that they check if a particular condition is met, and trigger the appropriate action (side of the branch) when met or not met. When you select the If Condition action, you will see a menu on the right side of the screen to select which conditions should be checked for this branch.
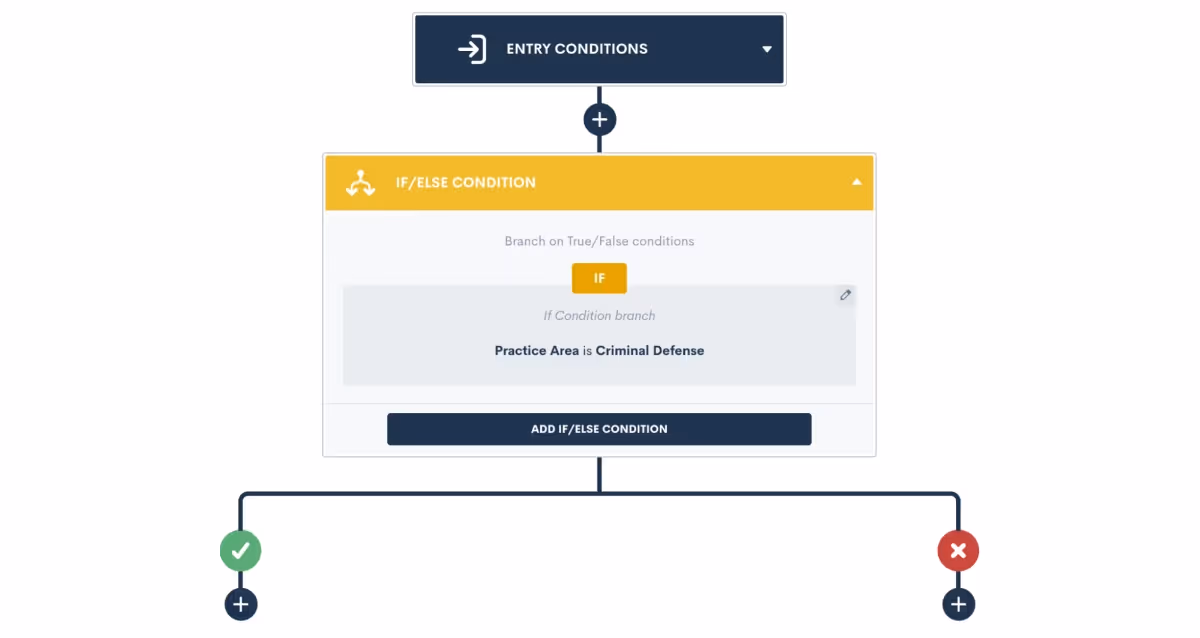
Once you select your condition and click save, you will see a branch created in your Automation. When the condition is met on a target in the Automation, they will flow down the "yes" (green check mark) side of the branch. When the condition is not met, they will head down the "no" side.
Pro Tip: It is very important to note that branches should only be used for conditions that are already determined at the time the Automation triggers, such as practice area, pipeline stage, marital status, etc. You should not use if conditions for sending reminders to fill a form/sign a document/book an appointment etc.
Once the condition is checked at the branch, the matter will flow down one of the two sides. At that point, the condition will never be re-checked (unless you have another if condition further on in the Automation). In other words, once a matter flows down one side of the branch, it will never go back to the other side.
Pro Tip: When editing an Automation, if you delete the if condition then all action items underneath it will also be deleted. For that reason, take caution when deleting a branch!
Exit Conditions
Exit conditions, although sometimes easily overlooked, are a surefire way to level up your Automations. Adding proper exit conditions to a workflow is the best way to ensure that matters only stay in a workflow that is still relevant to them.Let’s say you have an Automation that sends out a series of reminders for a potential client to reschedule their consultation after a no-show. This Automation would likely span over days, weeks, or even months, and would include a cadence of emails and/or text messages prompting them to reschedule. Now at any point if that PNC does in fact reschedule their consultation, you do NOT want them to continue receiving reminders from this workflow. Cue exit conditions.In this example, an exit condition of Event Created would be necessary to make sure that they exit once that appointment is booked. When you add exit conditions into an Automation, these conditions will be checked at each action item, and if the conditions are met, the matter will immediately exit the Automation and no future action items will run on them from that workflow.
Pro Tip: Exit conditions are not continuously checked 24/7, rather they are checked each time a matter hits the next action item. So let’s say you have a 3 day time delay in your Automation, and the matter meets the exit condition on the 2nd day of that time delay, they will not actually exit until the full time delay has run and the next action item is hit.
For that reason, it is crucial to think through your exit conditions carefully. Many users want to use a pipeline stage as an exit condition, but this can sometimes be problematic because the matter may already progress past that stage before the exit conditions are checked.With that in mind, the best exit conditions are ones that are “permanent”, meaning not a temporary status or a pipeline stage. Picklist fields or true/false fields make great exit conditions, since you will typically make a selection for those fields, and it will not change frequently like a pipeline stage would.
Conclusion
When done right, Automations are one of the best tools for saving time while also providing optimum communication with your clients. The best practices laid out here help you avoid any pesky issues that can cause your Automations to become troublesome.While building your Automations, keep in mind all of the various components, from entry conditions to action items to conditional logic to exit conditions, this will allow your Automations to work for you, instead of the other way around.Add these tips to your toolbox for creating your next Automation, and see how Automation can make your life much easier.

Ready to grow your law firm with Lawmatics?
Schedule a demo of legal’s most trusted growth platform.